“We always click ‘Apply Changes’, then we click the button we actually wanted” – a user
Typically an Apex report with an “Open” or “Edit” icon will simply do an immediate navigation to the target page, passing the ID of the record to edit. When the user clicks this link, the page is not submitted and the user is instead redirected.
It’s easy to quickly build large and complex applications in Apex but it’s also very easy to build something that confuses and disorients your users. They only need one instance when something doesn’t work how they expected it to, and they will lose trust in your application.
For example: if most buttons save their changes, but one button doesn’t, they might not notice straight away, and then wonder what happened to their work. If you’re lucky, they will raise a defect notice and you can fix it. More likely (and worse), they’ll decide it’s their fault, and begrudgingly accept slow and unnecessary extra steps as part of the process.
You can improve this situation by taking care to ensure that everything works the way your users expect. For most buttons in an Apex page, this is easy and straightforward: just make sure the buttons submit the page. The only buttons that should do a redirect are those that a user should expect will NOT save the changes – e.g. a “Cancel” button.
For the example of an icon in a report region, it’s not so straightforward. The page might include some editable items (e.g. a page for editing a “header” record) – and if the user doesn’t Save their changes before clicking the report link their changes will be lost on navigation.
To solve this problem you can make the edit links first submit the page before navigating. The way I do this is as follows (in this example, the report query is on the “emp” table:
Add a hidden item P1_EDIT_ID to the page
Set Value Protected to No
Add something like this to the report query (without the newlines):
'javascript:apex.submit(
  {request:''SAVE_EDIT_ROW'',
   set:{''P1_EDIT_ID'':''' || emp.rec_id || '''}
  })' AS edit_link
Set this new column to Hidden Column
Modify the edit link Target:
Type = URL
URL = #EDIT_LINK#
Add a Branch at point “After Processing”
Set the Target to the page to navigate to
Set the item for the record ID to &P1_EDIT_ID.
Set the Condition to the following PL/SQL Expression:
:REQUEST='SAVE_EDIT_ROW' AND :P1_EDIT_ID IS NOT NULL
Make sure the branch is evaluated before any other branches (at least, any others that might respond to this request)
Modify any existing Processing so that the request SAVE_EDIT_ROW will cause any changes on the page to be saved.
You can, of course, choose different item names and request names if needed (just update it in the code you entered earlier). For example, to make it work with the default Apex DML process you might need to use a request like “APPLY_CHANGES_EDIT_ROW”.
Now, when the user makes some changes to the form, then clicks one of the record Edit links, the page will first be submitted before navigating to the child row.
Adding buttons to Apex pages is easy. Making sure every last one of them does exactly what the user expects, nothing more, and nothing less, is the tricky part!
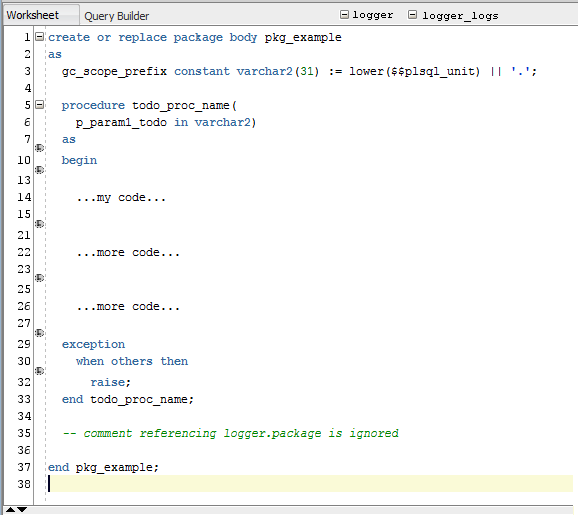
Juergen Schuster, who has been enthusiastically trying OraOpenSource Logger, raised an idea for the debug/instrumentation library requesting the addition of a standard synonym “l” for the package. The motive behind this request was to allow our PL/SQL code to remain easy to read, in spite of all the calls to logger sprinkled throughout that are needed for effective debugging and instrumentation.
In the judgement of some (myself included) the addition of the synonym to the standard package would run the risk of causing clashes on some people’s systems; and ensuring that Logger is installable on all systems “out of the box” should, I think, take precedence.
However, the readability of code is still an issue; so it was with that in mind that I suggested that perhaps an enhancement of our favourite development IDE would go a long way to improving the situation.
Logger: show/hide or dim (highlight) debug/instrumentation code
“The oracle open source Logger instrumentation library is gaining popularity and it would be great to build some specific support for it into SQL Developer, whether as a plugin or builtin. To enhance code readability, it would be helpful for PL/SQL developers to be able to hide/show, or dim (e.g. grey highlight) any code calling their preferred debug/instrumentation library (e.g. Logger).
“One way I expect this might work is that the Code Editor would be given a configurable list of oracle object identifiers (e.g. “logger”, “logger_logs”); any PL/SQL declarations or lines of code containing references to these objects would be greyed out, or be able to be rolled up (with something like the +/- gutter buttons).”
Mockup #2 (identifier slugs in header bar to show/hide, with icons in the gutter showing where lines have been hidden):
“Gold-plated” Option: add an option to the SQL Editor’s right-click context menu – on any identifier, select “Hide all lines with reference to this” and it adds the identifier to the list of things that are hidden!
If you like the idea (or at least agree with the motive behind it) please vote for it.
Unfortunately it doesn’t work as you might expect if you use an INSERT ALL statement; it evaluates the default expression once per statement, instead of once per row.
Test case:
create sequence test_seq;

create table test_tab
( id number default test_seq.nextval primary key
, dummy varchar2(100) not null );

insert into test_tab (dummy) values ('xyz');

1 row inserted.

insert all
into test_tab (dummy) values ('abc')
into test_tab (dummy) values ('def')
select null from dual;

Error report -
SQL Error: ORA-00001: unique constraint
(SCOTT.SYS_C00123456) violated
A minor issue, usually, but something to be aware of – especially if you’re not in the habit of declaring your unique constraints to the database!
create sequence test_seq;

create table test_stupid_tab
( id number default test_seq.nextval
, dummy varchar2(100) not null );

insert into test_tab (dummy) values ('xyz');

1 row inserted.

insert all
into test_tab (dummy) values ('abc')
into test_tab (dummy) values ('def')
select null from dual;

2 rows inserted.

select * from test_tab;

i dummy
= =====
1 xyz
2 abc
2 def
ADDENDUM 28/10/2016
Another similar scenario which might trip you up is where you are inserting from a UNION view:
create sequence test_seq;

create table test_tab
( id number default test_seq.nextval primary key
, dummy varchar2(100) not null
);

insert into test_tab (dummy) select 'x' from dual;
-- success

insert into test_tab (dummy)
select 'y' from dual union all select 'z' from dual;
-- fails with ORA-01400 "cannot insert NULL into id"

insert into test_tab (dummy) select c from (
select 'y' c from dual union all select 'z' from dual
);
-- success
If you can get yourself to Perth in November, you must try to get to AUSOUG Connect. Here is my “Must See” list based on the current program (subject to change):
Lots of APEX goodies, a new (to me, at least) database IDE, plus plenty of solid Oracle database content – there’ll probably be a few conflicts leading to some decisions to make on the day.
I’m looking forward to a long-awaited return of the AUSOUG conference series – I hope to see you all there.
If you need to send almost any message to almost any phone from your Oracle database, and you want to use straight PL/SQL, you may want to consider using my Clicksend API.
SMS (Short Message Service)
MMS (Multimedia Message Service)
Text to Voice
I have released the first beta version of my Oracle PL/SQL API for Clicksend. Read the installation instructions, API reference and download the release from here:
Sending an SMS is as simple as adding this anywhere in your code:
begin
  clicksend_pkg.send_sms
    (p_sender  => 'TheDatabase'
    ,p_mobile  => '+61411111111'
    ,p_message => 'G''day, this is your database!'
    );
  clicksend_pkg.push_queue;
  commit;
end;
All you need to do is signup for a Clicksend account. You’ll only be charged for messages actually sent, but they do require you to pay in advance – e.g. $20 gets you about 300 messages (Australian numbers). You can get test settings so that you can try it out for free.
I’ve been using Clicksend for years now, and have been satisfied with their service and the speed and reliability of getting messages to people’s mobiles. When I encountered any issues, a chat with their support quickly resolved them, and they were quick to offer free credits when things weren’t working out as expected.
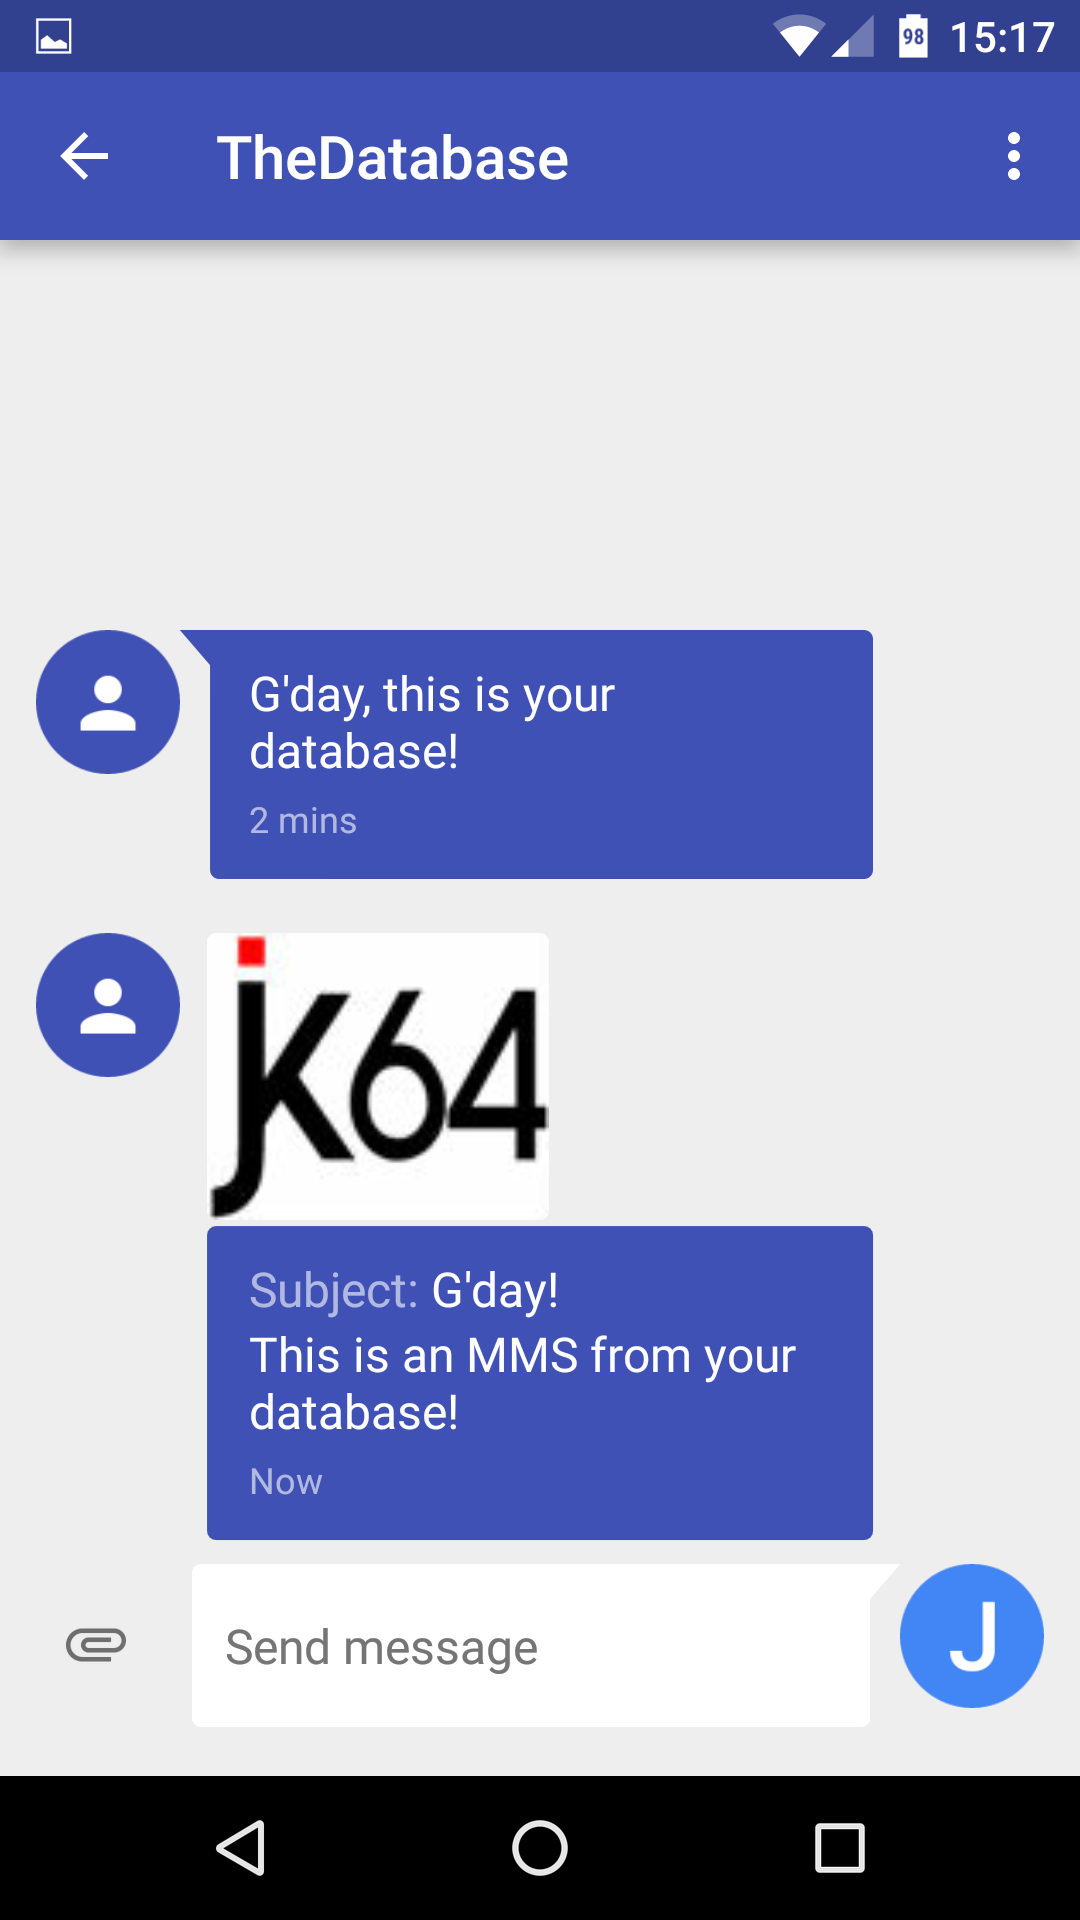
If you want to send a photo to someone’s phone via MMS (although I’m not sure what the use-case for this might be), you need to first upload the image somewhere online, because the API only accepts a URL. In my case, I would use the Amazon S3 API from the Alexandria PL/SQL Library, then pass the generated URL to the clicksend API. There is a file upload feature that ClickSend provides, I plan to add an API call to take advantage of this which will make this seamless – and provide some file conversion capabilities as well.
begin
  clicksend_pkg.send_mms
    (p_sender  => 'TheDatabase'
    ,p_mobile  => '+61411111111'
    ,p_subject => 'G''Day!'
    ,p_message => 'This is an MMS from your database!'
    ,p_media_file_url =>
'http://s3-ap-southeast-2.amazonaws.com/jk64/jk64logo.jpg'
    );
  clicksend_pkg.push_queue;
  commit;
end;
You can send a voice message to someone (e.g. if they don’t have a mobile phone) using the Text to Voice API.
begin
  clicksend_pkg.send_voice
    (p_phone_no     => '+61411111111'
    ,p_message      => 'Hello. This message was sent from your database. '
                    || 'Have a nice day.'
    ,p_voice_lang   => 'en-gb' -- British English
    ,p_voice_gender => 'male'
    ,p_schedule_dt  => sysdate + interval '2' minute
    );
  clicksend_pkg.push_queue;
  commit;
end;
You have to tell the API what language the message is in. For a number of languages, you can specify the accent/dialect (e.g. American English, British English, or Aussie) and gender (male or female). You can see the full list here.
All calls to the send_sms, send_mms and send_voice procedures use Oracle AQ to make the messages transactional. It’s up to you to either COMMIT or ROLLBACK, which determines whether the message is actually sent or not. All messages go into a single queue.
You can have a message be scheduled at a particular point in time by setting the p_schedule_dt parameter.
The default installation creates a job that runs every 5 minutes to push the queue. You can also call push_queue directly in your code after calling a send_xxx procedure. This creates a job to push the queue as well, so it won’t interfere with your transaction.
All messages get logged in a table, clicksend_msg_log. The log includes a column clicksend_cost which allows you to monitor your costs. To check your account balance, call get_credit_balance.
Please try it out if you can and let me know of any issues or suggestions for improvement.
Updated 10/10/2017 now that APEX 5.1 has been out for a while.
Updated 22/8/2020 with some corrections.
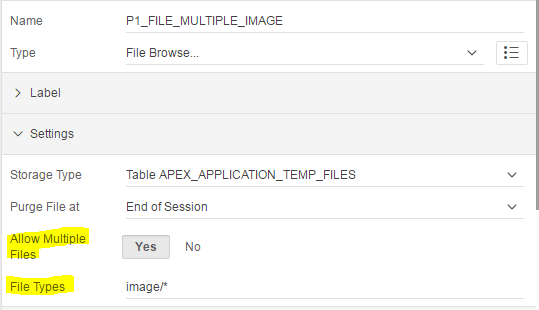
The standard File Upload item type is getting a nice little upgrade in Apex 5.1. By simply changing attributes on the item, you can allow users to select multiple files (from a single directory) at the same time.
In addition, you can now restrict the type of file they may choose, according to the MIME type of the file, e.g. image/jpg. This file type restriction can use a wildcard, e.g. image/*, and can have multiple patterns separated by commas, e.g. image/png,application/pdf.
NOTE (22/8/2020): this doesn’t stop a user from choosing files of other types (they can change the file type selector) and doesn’t validate the file types.
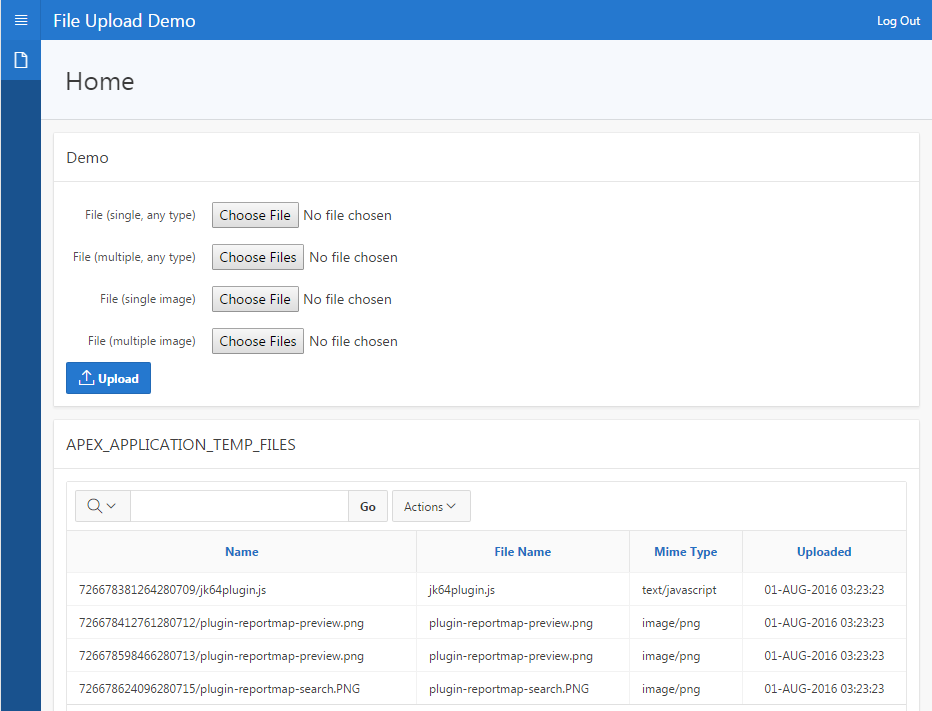
Normally, to access the file that was uploaded you would query APEX_APPLICATION_TEMP_FILES with a predicate like name = :P1_FILE_ITEM. If multiple files are allowed, however, the item will be set to a colon-delimited list of names, so the suggested code to get the files is:
declare
  arr apex_global.vc_arr2;
begin
  arr := apex_util.string_to_table(:P1_MULTIPLE_FILES);
  for i in 1..arr.count loop
    select t.whatever
    into   your_variable
    from   apex_application_temp_files t
    where  t.name = arr(i);
  end loop;
end;
If you want to support drag-and-drop, image copy&paste, load large files asynchronously, restrict the actual file type or maximum file size that may be uploaded, you will probably want to consider a plugin instead, like Daniel Hochleitner’s DropZone.
DISCLAIMER: this article is based on Early Adopter 1.
I’ve finally got back to looking at my reference TAPI APEX application. I’ve greatly simplified it (e.g. removed the dependency on Logger, much as I wanted to keep it) and included one dependency (CSV_UTIL_PKG) to make it much simpler to install and try. The notice about compilation errors still applies: it is provided for information/entertainment purposes only and is not intended to be a fully working system. The online demo for APEX 5.0 has been updated accordingly.
I next turned my attention to APEX 5.1 Early Adopter, in which the most exciting feature is the all-new Interactive Grid which may replace IRs and tabular forms. I have installed my reference TAPI APEX application, everything still works fine without changes.
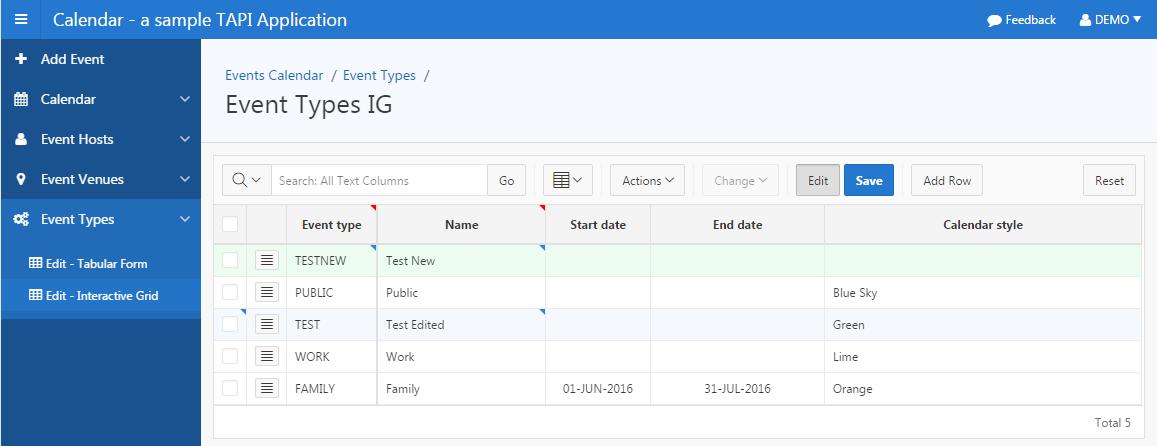
I wanted my sample application to include both the old Tabular Forms as well as the new Interactive Grid, so I started by making copies of some of my old “Grid Edit” (tabular form) pages. You will find these under the “Venues” and “Event Types” menus in the sample application. I then converted the tabular form regions to Interactive Grids, and after some fiddling have found that I need to make a small change to my APEX API to suit them. The code I wrote for the tabular forms doesn’t work for IGs; in fact, the new code is simpler, e.g.:
PROCEDURE apply_ig (rv IN VENUES$TAPI.rvtype) IS
  r VENUES$TAPI.rowtype;
BEGIN
  CASE v('APEX$ROW_STATUS')
  WHEN 'I' THEN
    r := VENUES$TAPI.ins (rv => rv);
    sv('VENUE_ID', r.venue_id);
  WHEN 'U' THEN
    r := VENUES$TAPI.upd (rv => rv);
  WHEN 'D' THEN
    VENUES$TAPI.del (rv => rv);
  END CASE;
END apply_ig;
You may notice a few things here:
(1) APEX$ROW_STATUS for inserted rows is ‘I’ instead of ‘C’; also, it is set to ‘D’ (unlike under tabular forms, where it isn’t set for deleted rows).
(2) After inserting a new record, the session state for the Primary Key column(s) must be set if the insert might have set them – including if the “Primary Key” in the region is ROWID. Otherwise, Apex 5.1 raises No Data Found when it tries to retrieve the new row.
(3) I did not have to make any changes to my TAPI at all 🙂
Here’s the example from my Event Types table, which doesn’t have a surrogate key, so we use ROWID instead:
PROCEDURE apply_ig (rv IN EVENT_TYPES$TAPI.rvtype) IS
  r EVENT_TYPES$TAPI.rowtype;
BEGIN
  CASE v('APEX$ROW_STATUS')
  WHEN 'I' THEN
    r := EVENT_TYPES$TAPI.ins (rv => rv);
    sv('ROWID', r.p_rowid);
  WHEN 'U' THEN
    r := EVENT_TYPES$TAPI.upd (rv => rv);
  WHEN 'D' THEN
    EVENT_TYPES$TAPI.del (rv => rv);
  END CASE;
END apply_ig;
Converting Tabular Form to Interactive Grid
The steps needed to convert a Tabular Form based on my APEX API / TAPI system are relatively straightforward, and only needed a small change to my APEX API.
Select the Tabular Form region
Change Type from “Tabular Form [Legacy]” to “Interactive Grid”
Delete any Region Buttons that were associated with the Tabular form, such as CANCEL, MULTI_ROW_DELETE, SUBMIT, ADD
Set the Page attribute Advanced > Reload on Submit = “Only for Success”
Under region Attributes, set Edit > Enabled to “Yes”
Set Edit > Lost Update Type = “Row Version Column”
Set Edit > Row Version Column = “VERSION_ID”
Set Edit > Add Row If Empty = “No”
If your query already included ROWID, you will need to remove this (as the IG includes the ROWID automatically).
If the table has a Surrogate Key, set the following attributes on the surrogate key column:
Identification > Type = “Hidden”
Source > Primary Key = “Yes”
Also, if the table has a Surrogate Key, delete the generated ROWID column. Otherwise, leave it (it will be treated as the Primary Key by both the Interactive Grid as well as the TAPI).
Set any columns Type = “Hidden” where appropriate (e.g. for Surrogate Key columns and VERSION_ID).
Under Validating, create a Validation:
Editable Region = (your interactive grid region)
Type = “PL/SQL Function (returning Error Text)”
PL/SQL = (copy the suggested code from the generated Apex API package) e.g.
Under Processing, edit the automatically generated “Save Interactive Grid Data” process:
Target Type = PL/SQL Code
PL/SQL = (copy the suggested code from the generated Apex API package) e.g.
I like how the new Interactive Grid provides all the extra knobs and dials needed to interface cleanly with an existing TAPI implementation. For example, you can control whether it will attempt to Lock each Row for editing – and even allows you to supply Custom PL/SQL to implement the locking. Note that the lock is still only taken when the page is submitted (unlike Oracle Forms, which locks the record as soon as the user starts editing it) – which is why we need to prevent lost updates:
Preventing Lost Updates
The Interactive Grid allows the developer to choose the type of Lost Update protection (Row Values or Row Version Column). The help text for this attribute should be required reading for any database developer. In my case, I might choose to turn this off (by setting Prevent Lost Updates = “No” in the Save Interactive Grid Data process) since my TAPI already does this; in my testing, however, it didn’t hurt to include it.
Other little bits and pieces
I found it interesting that the converted Interactive Grid includes some extra columns automatically: APEX$ROW_SELECTOR (Type = Row Selector), APEX$ROW_ACTION (Type = Actions Menu), and ROWID. These give greater control over what gets included, and you can delete these if they are not required.
Another little gem is the new Column attribute Heading > Alternative Label: “Enter the alternative label to use in dialogs and in the Single Row View. Use an alternative label when the heading contains extra formatting, such as HTML tags, which do not display properly.”.
Demo
If you’d like to play with a working version of the reference application, it’s here (at least, until the EA is refreshed) (login as demo / demo):
I’ve been running my APEX sites on Amazon EC2 for many years now, and I’ve gone through a number of infrastructure upgrades and price changes over time. I have some alerts set up, e.g. if a server starts getting very busy or if my estimated charges go over a threshold. Today I got an alert saying my estimated monthly bill will be over $100 which is unusual.
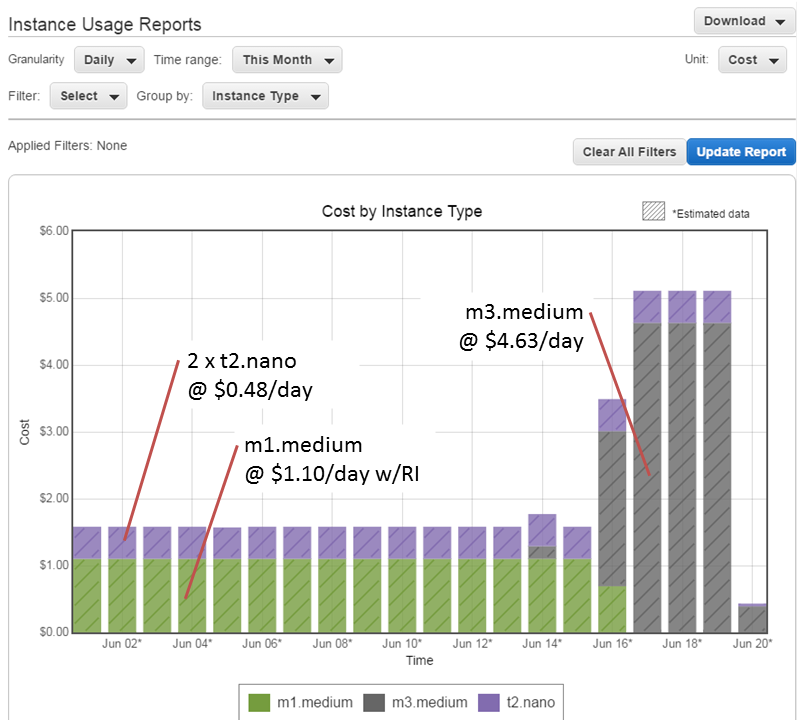
One of the most useful reports in AWS is the Instance Usage Reports (found under Dashboard > Reports > EC2 Instance Usage Report). I tell it to report Cost, grouped by Instance Type, which gives me the following:
As you can see, my daily cost was about $1.58 per day, and this shot up on the 16th (note: these rates are for the Sydney region). I was running Oracle on an m1.medium SUSE Linux instance until June 16, when I upgraded it to an m3.medium instance. I have a Reserved Instance (RI) for m1.medium, but not for m3.medium, which is why the cost has shot up. That RI will expire soon; I will purchase an m3.medium RI which will bring the cost of that instance back down to about $1 per day. Until I do that, I will be charged the “On Demand” rate of $4.63 per day.
I’m also running two t2.nano Amazon Linux instances as my frontend Apache servers. Even though they are the smallest available instance type (nano), they barely register over 1% CPU most of the time. I’ve moved all the DNS entries across to one of those nano instances now, so I will soon decommission one which will save me a few extra dollars per month.
As an APEX developer, outsourcing the hardware-related worries to AWS has been the best decision I’ve made. I’ve only suffered a couple of significant outages to date, and in both instances all my servers were still running without issue when connectivity was restored. I can spin up new instances whenever I want, e.g. to test upgrades (you might notice from the graph that I did a test upgrade on an m3.medium instance on June 14).
In case you’re wondering, the total time I needed to take down my Apex instance, take a snapshot, spin up the new instance, and swap the IP address across to it, was about 30 minutes. And that included about 10 minutes lost because I accidentally picked an incorrect option at one point. Not only that, but my upgrade also included changing from magnetic disk to SSD, which seems a bit faster. Overall I’m pretty happy with all that.
If your APEX application import log shows something like this:
...PAGE 73: Transaction Lines Report
declare
*
ERROR at line 1:
ORA-00001: unique constraint (APEX_040200.WWV_FLOW_WORKSHEET_RPTS_UK)
violated
ORA-06512: at "APEX_040200.WWV_FLOW_API", line 16271
ORA-06512: at line 6
(this is on an Apex 4.2.4 instance)
This is due to a Saved Report on an Interactive Report that was included in the export, which conflicts with a different Saved Report in the target instance. The log will, conveniently, tell you which page the IR is on.
The solution for this problem is simple – either:
(a) Export the application with Export Public Interactive Reports and Export Private Interactive Reports set to No;
OR
(b) Delete the Saved Report(s) from the instance you’re exporting from.
You can find all Saved Reports in an instance by running a query like this:
select workspace
      ,application_id
      ,application_name
      ,page_id
      ,application_user
      ,report_name
      ,report_alias
      ,status
from APEX_APPLICATION_PAGE_IR_RPT
where application_user not in ('APXWS_DEFAULT'
                              ,'APXWS_ALTERNATIVE');
You can delete Saved Reports from the Application Builder by going to the page with the Interactive Report, right-click on the IR and choose Edit Saved Reports, then select the report(s) and click Delete Checked.