Wherein I natter on about gear and how I choose what to buy. Perhaps with a point to make about software development.
Bilung Pool, Murchison
At least once a year we pack the Prado with a tent, gear and food and go camping with a group of friends. For a few days to a week or so we’d unplug, relax and enjoy God’s creation somewhere in our vast state of Western Australia.
I’m a frugal person so at first we only collected the bare essentials, got a tent on special for $100 big enough to fit the whole family. Every time we’d go camping we’d think about what worked well last time, and what could be improved, and perhaps get some extra gear or replace something to make things a bit easier. Got a 4WD vehicle so we could go to more places. Got a fast frame tent to reduce the time to set up (this makes a huge difference when we rock up to the site with 5 minutes of light left and three hungry kids). Bought a collapsible basin and bucket which allowed us to fit more gear in. Got some hardy camping boxes for gear. A waterproof rooftop bag for the car which fits all our clothing, pillows and sleeping bags. Ditched the self-inflating mattress that got all warped and took up heaps of space, for some cheap inflatable ones that would only last a year or so but pack down very tightly.
Improvements to the car have also been made. Instead of spending thousands of dollars getting a custom set up done, while not really knowing exactly how we want it set up, we have gradually added small upgrades a bit at a time. Auxiliary battery installed with an isolator so that our fridge and chargers would run without draining the starter battery. My friend installed some power points in the boot so I could run the fridge there, as well as some USB points for charging phones. This year he upgraded my setup to a DC/DC charger which has improved things a lot, and I got a folding solar panel so that I can keep things running (as long as there’s sunlight). Ran two fridges, one as a freezer and one as a fridge – and learned that my aux battery doesn’t have the capacity to keep them both running well, especially in high temperatures. So now I have an idea of what sort of fridge/freezer combo I’d like, and what sort of power usage efficiency I need to be looking for in such a unit.
Early on we were short on funds and we did everything “on the cheap”. This required being very selective about what things we bought, looking for bargains, and buying some things secondhand. Over time we got better at managing our finances, got our spending under control – and so were able to afford the occasional big upgrade when it seemed worthwhile. Instead of just buying cheap gear that frustrates us for a couple of years before they break, we can invest in higher quality products that last many years. Our spending is reasonable and intentional.
Cattle Pool, East Lyons River
Software development works well when done this way, as well. Sometimes it’s a good idea to quickly throw together a rough solution to get the job done. It only costs a small amount of time and gives us the opportunity to see if it really works, where are the rough edges, what areas need work, what features were never really needed in the first place. Later, we can throw part of it out and replace it with a more expensive component (expensive, as in taking a longer period of time and perhaps more manpower to build).
The “big bang” approach never really works in my opinion. It’s so tempting to want to divert down the “tear it all down and rebuild from scratch” road, especially when in the depths of trying to analyse and understand some complex behaviour arising from code that some developer (probably myself) wrote many months ago. You want to throw it all out and start again because that’s a lot more fun. Don’t believe it!
Any non-trivial project will have complexity that, whether you are on your own or are in a team, will have many issues that are difficult to resolve, many of which would have been resolved early on if a small prototype had been built first. This complexity is a simple consequence of the fact that every non-trivial system will be comprised of multiple smaller systems which need to work together; there are exponentially more ways for these mini-systems to interact and fail than you have consciously considered or tested.
Temple Gorge, Kennedy Ranges
I’m currently several years into a large project that is currently being used in production but still has a long list of features yet to be built. It originally started with a small prototype, that itself was an adaptation of a much older, smaller application. The prototype involved a few changes, improvements and refactorings but it was still recognizable from its progenitor. This prototype became a system that was used worldwide with great success, but not without some issues internally that made it difficult to extend and adapt.
These were architectural design issues that required a major redesign – but instead of building a whole new system “from scratch”, we designed the new system with the prototype as a basis. The new data model was an evolution of the original rather than being completely new. In some ways it might have been nicer to start with a completely new data model, but the approach we took meant that a lot of the code from the original simply needed to be adapted to the changes, and meant that we could get our beta version out for testing and evaluation quicker.
Several years later, we had gone back and rewritten, refactored, or even completely replaced large portions of the code; now, I suspect that there are very few, if any, lines of code that have survived from the original source. We’ve changed approaches, technologies and frameworks gradually, replacing one thing at a time. This has not always been smooth; sometimes edge cases and smaller features are forgotten or lost in a rewrite. On the whole, however, we have maintained continuity and releasing the product in small(ish) releases has been successful and generally been received positively.
Recently we went on a 4WD trip in my home state, Western Australia. The photos in this post were from that trip.
This would be a very rare requirement, as most of the time when you are designing an ORDS REST service you should know what query parameters your service supports. However, in the case where your users are allowed to supply an arbitrary list of additional parameters to your service, you won’t know what the keys will be for these parameters.
Since you can’t define the user-defined query parameters in your ORDS endpoint, they won’t be supplied via bind variables. Instead, in your PL/SQL handler you need to get the original query string using owa_util.get_cgi_env('QUERY_STRING'), then parse it to find the query parameters.
Here’s what I’ve used:
function query_string_map
return apex_application_global.vc_map
is
l_plist apex_t_varchar2;
l_map apex_application_global.vc_map;
begin
-- query string may be like:
-- param1=abc¶m2=def¶m3=ghi
-- or blanks may be included like:
-- param1=abc¶m2=¶m3=ghi
-- or the = symbol may be omitted:
-- param1=abc¶m2¶m3=ghi
l_plist := apex_string.split(owa_util.get_cgi_env('QUERY_STRING'), '&');
for i in 1..l_plist.count loop
declare
l_offset pls_integer;
l_key varchar2(255);
l_value varchar2(32767);
begin
l_offset := instr(l_plist(i), '=');
if l_offset > 0 then
l_key := substr(l_plist(i), 1, l_offset - 1);
l_value := substr(l_plist(i), l_offset + 1);
else
l_key := l_plist(i);
-- the value is null
end if;
-- ORDS may encode %20 as '+', but this is not detected by utl_url
l_key := replace(l_key, '+', ' ');
l_key := sys.utl_url.unescape(l_key, 'UTF-8');
if l_value is not null then
l_value := replace(l_value, '+', ' ')
l_value := sys.utl_url.unescape(l_value, 'UTF-8');
end if;
-- add the key/value to the map
l_map(l_key) := l_value;
end;
end loop;
return l_map;
end query_string_map;
This takes the query string and splits it on each occurrence of the & symbol. Each parsed part is expected to take the form key=value, key= or just key (with no = symbol). It converts any escaped URL characters and builds a map of key/value pairs and returns it.
The calling process can then use the map to process each key/value in turn, e.g.
declare
    l_map apex_application_global.vc_map;
    l_key varchar2(255);
begin

    l_map := query_string_map;

    l_key := l_map.first;
    while l_key is not null loop

        -- do something with the key/value
        dbms_output.put_line(l_key || ' : ' || l_map(l_key));

        l_key := l_map.next(l_key);
    end loop;

end;
The Oracle JSON functions are very useful for generating JSON from a query, and developing using these functions requires understanding the limitations of the string data types they return.
Unless otherwise specified, they return a VARCHAR2 with a maximum of 4000 bytes. If your query might return more than this, you must either specify a larger length, e.g. RETURNING VARCHAR2(32767), or request a CLOB, e.g. RETURNING CLOB.
If the data exceeds the limit, calls to JSON_OBJECT, JSON_OBJECTAGG, JSON_ARRAYAGG, and JSON_TRANSFORM will fail at runtime with the following exception:
select
    json_object(
        'name-is-twenty-chars' : rpad('x',3974,'x')
    )
from dual;

ORA-40478: output value too large (maximum: 4000)
The error occurs here because the representation of the entire JSON object requires more than 4000 bytes. No-one likes to see errors, but it’s better than the alternative because it is more likely to alert you to the problem so you can fix it.
You may have noticed I missed one of the JSON functions from the list above – JSON_MERGEPATCH. By default, this function does not raise an exception if the size limit is exceeded. Instead, it merely returns NULL at runtime. This behaviour can cause confusion when debugging a complex query, so it’s something to be aware of.
Note that even though both the JSON objects specified RETURNING CLOB, this was missed for JSON_MERGEPATCH; which means it is limited to the default 4000 bytes, causing it to return NULL. The fix is to add RETURNING CLOB to the JSON_MERGEPATCH:
If you wish to remove a NOT NULL constraint from a column, normally you would execute this:
alter table t modify module null;
The other day a colleague trying to execute this on one of our tables encountered this error instead:
ORA-01451: column to be modified to NULL cannot be modified to NULL
*Cause:    the column may already allow NULL values, the NOT NULL constraint
           is part of a primary key or check constraint.
*Action:   if a primary key or check constraint is enforcing the NOT NULL
           constraint, then drop that constraint.
Most of the time when you see this error, it will be because of a primary key constraint on the column. This wasn’t the case for my colleague, however.
This particular column had a NOT NULL constraint. This constraint was not added deliberately by us; it had been applied automatically because the column has a default expression using the DEFAULT ON NULL option. For example:
create table t (
    ...
    module varchar2(64) default on null sys_context('userenv','module'),
    ...
);
A column defined with the DEFAULT ON NULL option means that if anything tries to insert a row where the column is null, or not included in the insert statement, the default expression will be used to set the column’s value. This is very convenient in cases where we always want the default value applied, even if some code tries to insert NULL into that column.
One would normally expect that a DEFAULT ON NULL implies that the column will never be NULL, so it makes sense that Oracle would automatically add a NOT NULL constraint on the column.
An edge case where this assumption does not hold true is when the default expression may itself evaluate to NULL; when that occurs, the insert will fail with ORA-01400: cannot insert NULL into ("SAMPLE"."T"."MODULE").
Therefore, my colleague wanted to remove the NOT NULL constraint, but their attempt failed with the ORA-01451 exception noted at the start of this article.
Unfortunately for us, the DEFAULT ON NULL option is not compatible with allowing NULLs for the column; so we had to remove the DEFAULT ON NULL option. If necessary, we could add a trigger on the table to set the column’s value if the inserted value is null.
The way to remove the DEFAULT ON NULL option is to simply re-apply the default, omitting the ON NULL option, e.g.:
alter table t modify module default sys_context('userenv','module');
Here’s a transcript illustrating the problem and its solution:
create table t (
    dummy number,
    module varchar2(64) default on null sys_context('userenv','module')
);

Table T created.

exec dbms_application_info.set_module('SQL Developer',null);

insert into t (dummy) values (1);

1 row inserted.

select * from t;

     DUMMY MODULE
---------- -----------------------------------------------------------
         1 SQL Developer


exec dbms_application_info.set_module(null,null);

insert into t (dummy) values (2);

Error report -
ORA-01400: cannot insert NULL into ("SAMPLE"."T"."MODULE")


alter table t modify module null;

ORA-01451: column to be modified to NULL cannot be modified to NULL


alter table t modify module default sys_context('userenv','module');

Table T altered.

insert into t (dummy) values (3);

1 row inserted.

select * from t;

     DUMMY MODULE
---------- -----------------------------------------------------------
         1 SQL Developer
         3
Quite often I will need to export some data from one system, such as system setup metadata, preferences, etc. that need to be included in a repository and imported when the application is installed elsewhere.
I might export the data in JSON or CSV or some other text format as a CLOB (character large object) variable. I then need to wrap this in suitable commands so that it will execute as a SQL script when installed in the target system. To do this I use a simple script that takes advantage of the APEX_STRING API to split the CLOB into chunks and generate a SQL script that will re-assemble those chunks back into a CLOB on the target database, then call a procedure that will process the data (e.g. it might parse the JSON and insert metadata into the target tables).
This will work even if the incoming CLOB has lines that exceed 32K in length, e.g. a JSON document that includes embedded image data encoded in base 64, or documents with multibyte characters.
This is clob_to_sql_script:
function clob_to_sql_script (
    p_clob           in varchar2,
    p_procedure_name in varchar2,
    p_chunk_size     in integer := 8191
) return clob is

-- Takes a CLOB, returns a SQL script that will call the given procedure
-- with that clob as its parameter.

    l_strings apex_t_varchar2;
    l_chunk   varchar2(32767);
    l_offset  integer;

begin

    apex_string.push(
        l_strings,
        q'[
declare
l_strings apex_t_varchar2;
procedure p (p_string in varchar2) is
begin
    apex_string.push(l_strings, p_string);
end p;
begin
]');

    while apex_string.next_chunk (
        p_str    => p_clob,
        p_chunk  => l_chunk,
        p_offset => l_offset,
        p_amount => p_chunk_size )
    loop
        apex_string.push(
            l_strings,
            q'[p(q'~]'
            || l_chunk
            || q'[~');]');
    end loop;

    apex_string.push(
        l_strings,
        replace(q'[
    #PROC#(apex_string.join_clob(l_strings));
end;
]',
            '#PROC#', p_procedure_name)
        || '/');

    return apex_string.join_clob(l_strings);
end clob_to_sql_script;
Note that the default chunk size is 8,191 characters which is the safe limit for multi-byte characters. You can choose a smaller chunk size if you want, although if the incoming CLOB is very large, the smaller the chunk size the bigger the expanded SQL script will be.
A simple test case will demonstrate what it will do:
declare
    l_input  clob;
    l_output clob;
begin
    l_input := q'[
{
    "data": "Lorem ipsum dolor sit amet, consectetur adipiscing elit, sed do eiusmod tempor incididunt ut labore et dolore magna aliqua. Ut enim ad minim veniam, quis nostrud exercitation ullamco laboris nisi ut aliquip ex ea commodo consequat. Duis aute irure dolor in reprehenderit in voluptate velit esse cillum dolore eu fugiat nulla pariatur. Excepteur sint occaecat cupidatat non proident, sunt in culpa qui officia deserunt mollit anim id est laborum."
}
]';
    l_output := clob_to_sql_script(
        p_clob           => l_input,
        p_procedure_name => 'mypackage.import',
        p_chunk_size     => 60 );
    dbms_output.put_line( l_output );
end;
/
The above script would output this:
declare
l_strings apex_t_varchar2;
procedure p (p_string in varchar2) is
begin
    apex_string.push(l_strings, p_string);
end p;
begin

p(q'~
{
    "data": "Lorem ipsum dolor sit amet, consectetur adip~');
p(q'~iscing elit, sed do eiusmod tempor incididunt ut labore et d~');
p(q'~olore magna aliqua. Ut enim ad minim veniam, quis nostrud ex~');
p(q'~ercitation ullamco laboris nisi ut aliquip ex ea commodo con~');
p(q'~sequat. Duis aute irure dolor in reprehenderit in voluptate ~');
p(q'~velit esse cillum dolore eu fugiat nulla pariatur. Excepteur~');
p(q'~ sint occaecat cupidatat non proident, sunt in culpa qui off~');
p(q'~icia deserunt mollit anim id est laborum."
}
~');

    mypackage.import(apex_string.join_clob(l_strings));
end;
/
Recently I’ve been reviewing and updating my knowledge of APEX security, especially protection from URL tampering. I’ve read the documentation, a number of blogs, and heard from people with experience in the field such as Lino. By default, when you create a new application in APEX you get the following security settings set automatically, which is a good start:
Application Session State Protection is Enabled.
Each page has Page Access Protection set to Arguments Must Have Checksum.
Each Application Item has Protection Level set to Restricted – May not be set from browser.
Each Primary Key Item* created by a wizard has Protection Level set to Checksum Required – Session Level.
(* that is, any item mapped from a table column that is, or forms part of, a Primary Key constraint).
These default settings are considered best practice. If you change these, it becomes your responsibility to ensure that your application is protected against security vulnerabilities from URL tampering.
For page items, however, the Protection Level defaults to Unrestricted. This is ok for Form items because the page fetch process will set their values on page load, rendering any attempt at URL tampering ineffective.
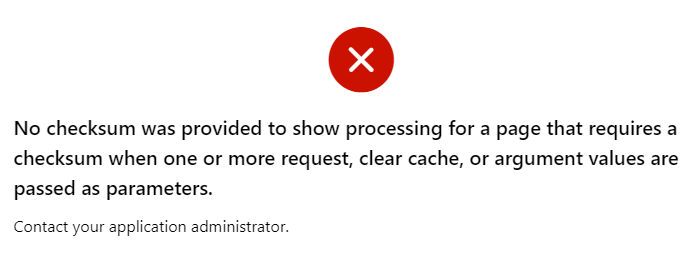
For non-form page items, unless the Page Access Protection is relaxed (Unrestricted), leaving items unrestricted is safe since URL tampering is blocked for the entire page anyway. At runtime, if a malicious visitor tries to modify the item value via the URL, they will get the error “No checksum was provided to show processing for a page that requires a checksum when one or more request, clear cache, or argument values are passed as parameters.“
However, what if a developer later needs to change the page to Unrestricted? They may unwittingly introduce a potential URL tampering issue because one or more items were not protected.
UPDATE: in fact, this applies even if it’s a different page in the same application. As Martin D’Souza pointed out a decade ago, URL tampering for any item in the application is possible from any page in the application that is Unrestricted.
The majority of these items are editable input items, so the fact that someone may input a value via the URL is not a big deal. However, for Hidden and Display Only items, it is common for application logic to depend on their values; this logic may be adversely affected by malicious values supplied via the URL.
In some cases, this default is needed in order for the application to work. Some examples when an item must be left Unrestricted are:
An item is changed by a Dynamic Action (whether via a Set Item Value, via the Items to Return of a Execute Server-side Code action, or in some custom JavaScript), and cannot have Value Protected set because the page may be submitted.
We do actually intend the item to be set via the URL, e.g. when an external web page has a link that sets the item’s value.
In all these cases, the application must be designed to ensure it does not “trust” the value of these items; it should apply suitable checks to ensure the values are valid.
In most cases, it is best practice to set the item Protection Level to Checksum Required – Session Level (or Restricted – May not be set from browser where supported).
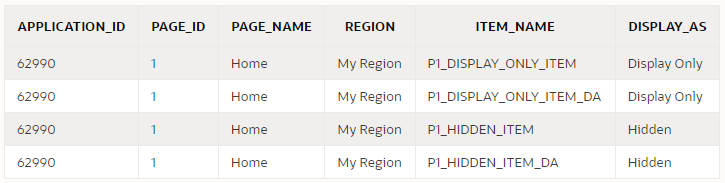
You can use a query like this to discover all items that may need to be reviewed:
select
    i.application_id,
    i.page_id,
    i.page_name,
    i.region,
    i.item_name,
    i.display_as
from apex_application_page_items i
where i.application_id = :app_id
and i.item_protection_level = 'Unrestricted'
and i.display_as_code in ('NATIVE_HIDDEN','NATIVE_DISPLAY_ONLY')
order by i.application_id, i.page_id, i.region, i.item_name;
Other excellent options are using third-party security scanners such as APEXSec and APEX-SERT to alert you to potential issues in your application. We mandate the use of tools like these internally at Oracle for our own applications and they are a great help.
Using the Session State Protection Wizard
One easy step you can take right now is to use the Session State Protection wizard. It gives you a quick overview of what level of protection your application has against URL tampering, and gives an easy way of fixing the relevant attributes in bulk.
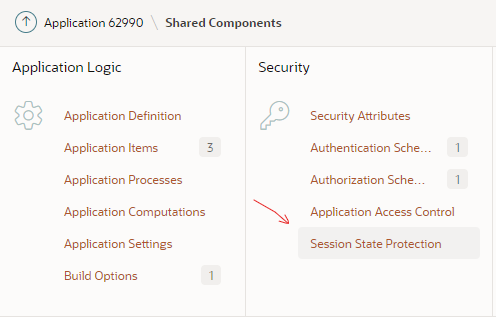
You can access the wizard via Shared Components > Session State Protection
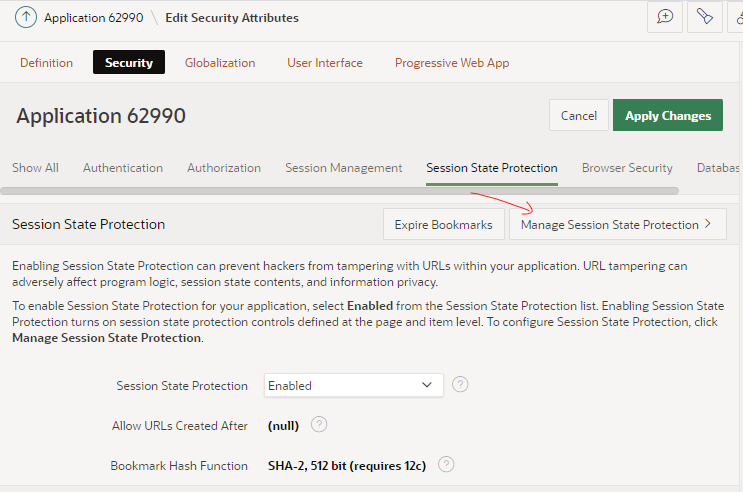
Alternatively, you can access the wizard via Edit Application Definition > Security > Session State Protection > Manage Session State Protection
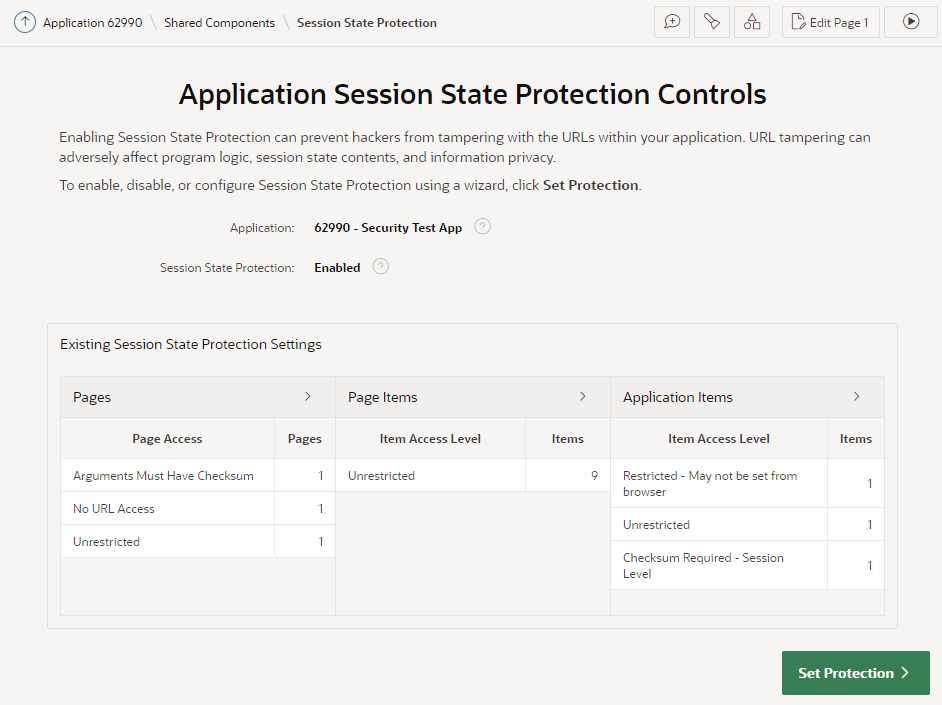
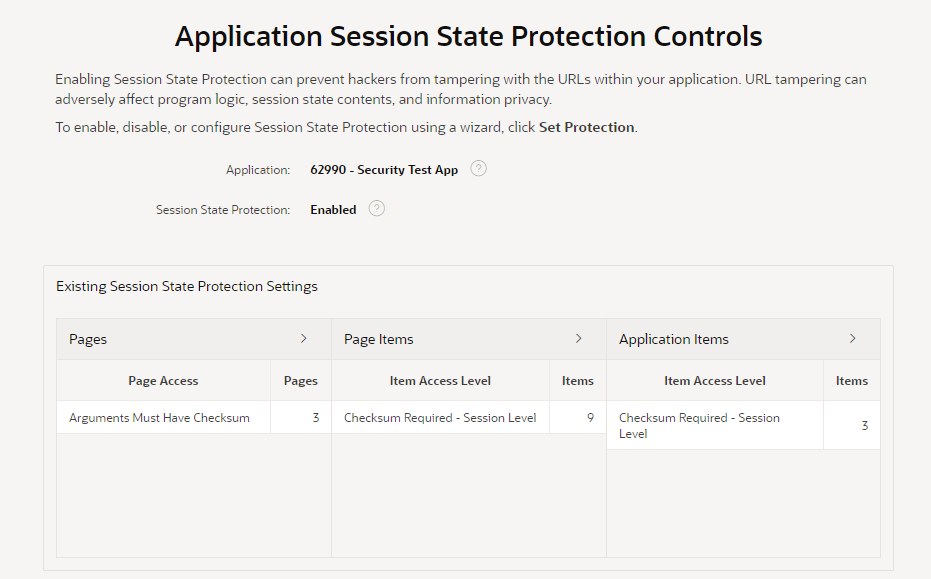
The wizard starts by showing an overview of the current state of your application’s protection against URL tampering.
You can see if your application has Session State Protection enabled (which it should, really), and if any pages, page items, and/or application items are unprotected. In my sample app here, it’s obvious that there are some potential security issues that need to be reviewed.
You can click the > buttons next to each category to list all the pages and items that need to be reviewed.
The main things to watch out for are Pages, Page Items, and Application Items that are set to Unrestricted. Other values are generally fine.
If you see any Items which are set to Checksum Required but not at the Session Level, you may find that a developer has simply set them incorrectly and you should consider changing them to Session Level. However, there are some scenarios where the other levels (Application Level, or User Level) are required.
Now, I might now go through the application page-by-page and set the protection level on each page and item as appropriate. This could be a laborious process for a large application.
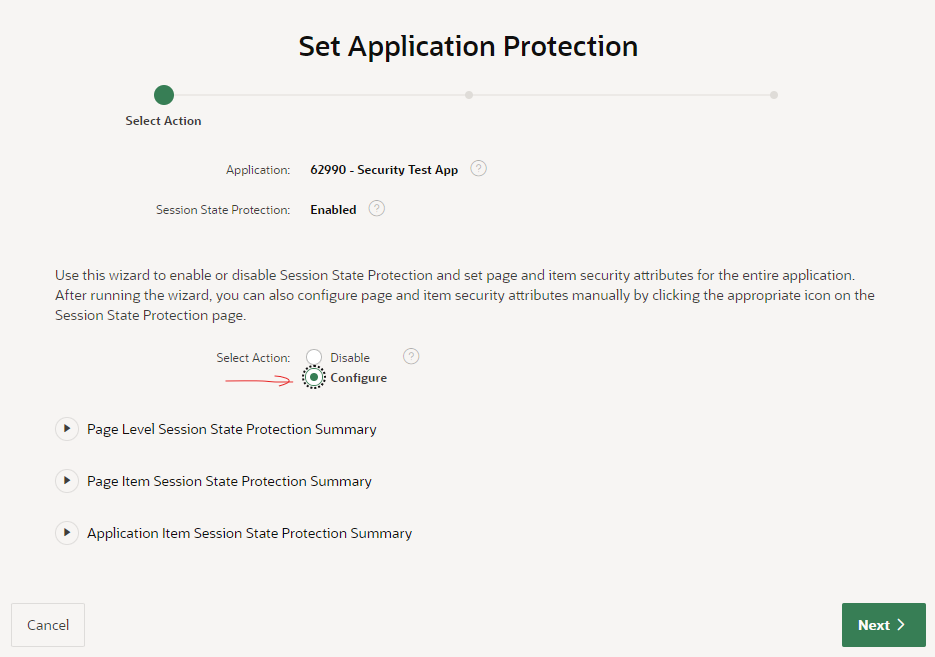
A good alternative is to use this wizard to set the protection level in bulk. In this case, I’m going to click Set Protection.
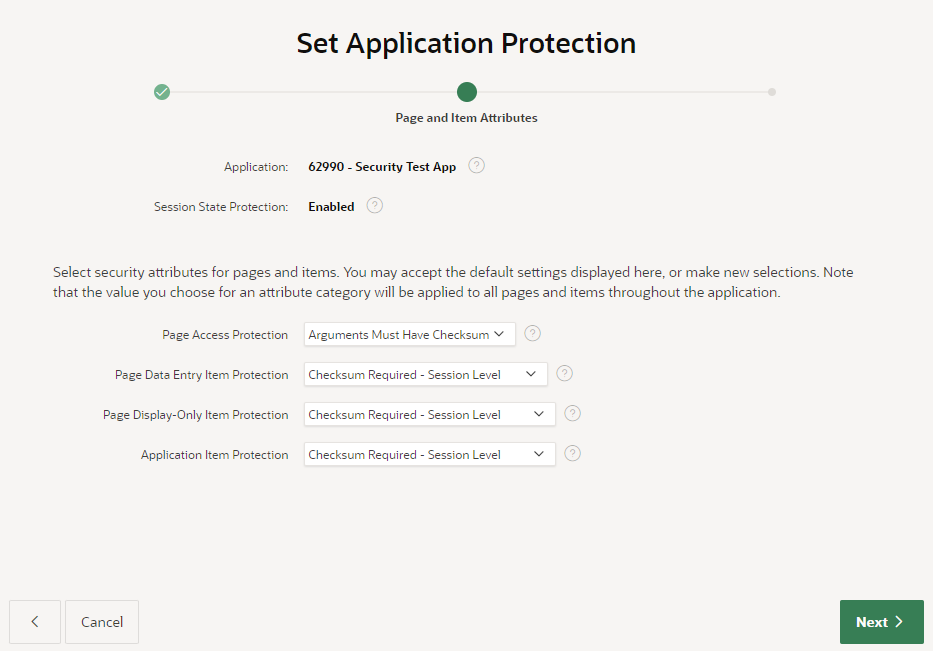
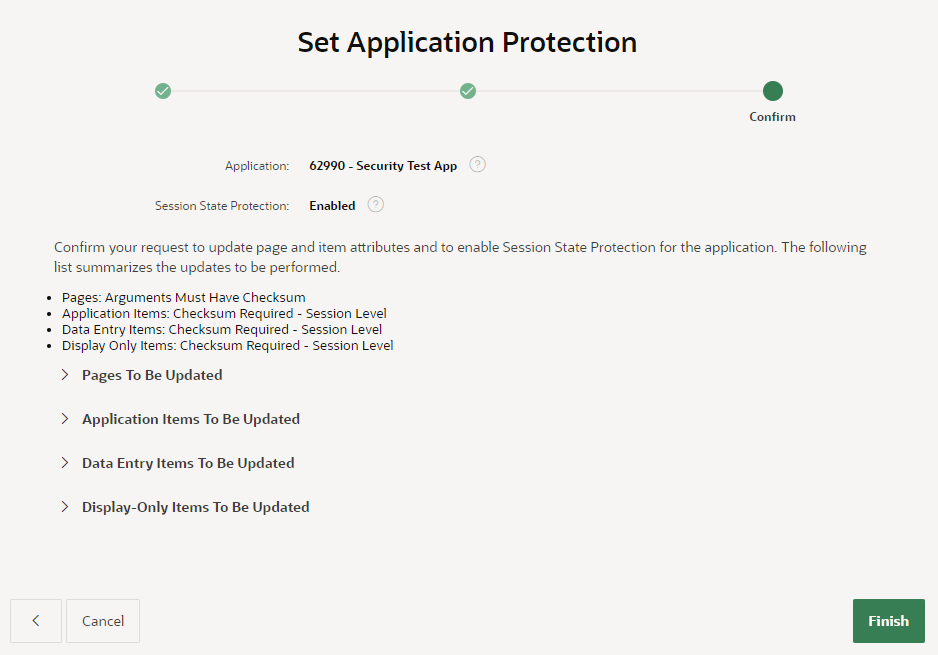
I’ve selected the action Configure, then click Next.The wizard now gives me the opportunity to modify the protection level on my pages and items in bulk. I’m going to accept the defaults (Arguments Must Have Checksum / Checksum Required – Session Level) because they are appropriate for most cases in my application.After reviewing the summaries of the changes that the wizard will make, I click Finish.
Perfect!
Final Steps
Now, I need to check for hidden page items that are now restricted that might need to be returned to Unrestricted. Otherwise, users will see the error “Session state protection violation” when they submit the page, if a dynamic action has changed them.
The following query will alert me to any Hidden items that have Value Protected switched off (e.g. because they need to be submitted):
select
    i.application_id,
    i.page_id,
    i.page_name,
    i.region,
    i.item_name,
    i.display_as
from apex_application_page_items i
where i.application_id = :app_id
and i.item_protection_level != 'Unrestricted'
and i.display_as_code = 'NATIVE_HIDDEN'
and i.attribute_01 = 'N' -- Value Protected
order by i.application_id, i.page_id, i.region, i.item_name;
Now I can review this item to check if Value Protected really needed to be switched off. If the page is never submitted, or the item is never changed by any dynamic actions, this could be switched On. Otherwise, I need to set the item protection to Unrestricted in order for the page to work.
Having made changes to the application, I need to test to ensure I haven’t introduced any issues. My focus will be mainly on the following areas:
Navigation – e.g. do the View or Edit buttons in all reports still work?
Dynamic actions – e.g. do all the dynamic actions and custom javascript still work on all pages that set item values?
For #1, I’m looking for any links that include item values that were not correctly built. If the application generates any links using just string concatenation, it will fail if the target page expects a checksum. The application should build these links using declarative link attributes if possible, or by calling apex_page.get_url (or apex_util.prepare_url at least).
For #2, I would test to ensure that after triggering a dynamic action or javascript code that modifies an item’s value, that the form is still submitted (saved) without error.
You are probably familiar with some of the data types supported by the Oracle Database for storing numeric values, but you might not be aware of the full range of types that it provides.
Some types (such as NUMBER, INTEGER) are provided for general use in SQL and PL/SQL, whereas others are only supported in PL/SQL (such as BINARY_INTEGER).
There are others (such as DECIMAL, REAL) that are provided to adhere to the SQL standard and for greater interoperability with other databases that expect these types.
Most of the numeric data types are designed for storing decimal numbers without loss of precision; whereas the binary data types (e.g. BINARY_FLOAT, BINARY_DOUBLE) are provided to conform to the IEEE754 standard for binary floating-point arithmetic. These binary types cannot store all decimal numbers exactly, but they do support some special values like “infinity” and “NaN”.
In PL/SQL you can define your own subtypes that further constrain the values that may be assigned to them, e.g. by specifying the minimum and maximum range of values, and/or by specifying that variables must be Not Null.
What do I prefer?
In my data models, I will usually use NUMBER to store numeric values, e.g. for quantities and measurements; for counts and IDs (e.g. for surrogate keys) I would use INTEGER (with the exception of IDs generated using sys_guid, these must use NUMBER).
In PL/SQL, if I need an index for an array, I will use BINARY_INTEGER (although if I’m maintaining a codebase that already uses its synonym PLS_INTEGER, I would use that for consistency). In other cases I will use INTEGER or NUMBER depending on whether I need to store integers or non-integers.
I don’t remember any occasion where I’ve needed to use FLOAT, or the binary types; and of the subtypes of BINARY_INTEGER, I’ve only used SIGNTYPE maybe once or twice. Of course, there’s nothing wrong with these types, it’s just that I haven’t encountered the need for them (yet).
What about Performance?
There are some differences in performance between these data types, but most of the time this difference will not be significant compared to other work your code is doing – see, for example, Connor on Choosing the Best Data Type. Choosing a data type that doesn’t use more storage than is required for your purpose can make a difference when the volume of data is large and when large sets of record are being processed and transmitted.
Reference Chart: Numeric Data Types
This diagram shows all the numeric data types supplied by Oracle SQL and PL/SQL, and how they relate to each other:
From smallest to largest – the maximum finite integer that can be stored by these data types is listed here. It’s interesting to see that BINARY_FLOAT can store bigger integers than INTEGER, but NUMBER can beat both of them:
BINARY_INTEGER
2.147483647 x 10⁹
INTEGER
9.9999999999999999999999999999999999999 x 1037
BINARY_FLOAT
3.40282347 x 1038
NUMBER
9.999999999999999999999999999999999999999 x 10125
BINARY_DOUBLE
1.7976931348623157 x 10308
To put that into perspective:
If you need to store integers up to about 1 Billion (109), you can use a BINARY_INTEGER.
If you need to store Googolplex (10googol) or other ridiculously large numbers (that are nevertheless infinitely smaller than infinity), you’re “gonna need a bigger boat” – such as some version of BigDecimal with a scale represented by a BigInteger – which unfortunately has no native support in SQL or PL/SQL. Mind you, there are numbers so large that even such an implementation of BigDecimal cannot even represent the number of digits in them…
Storing SMALL Numbers
The smallest non-zero numeric value (excluding subnormal numbers) that can be stored by these data types is listed here.
BINARY_FLOAT
1.17549435 x 10-38
NUMBER
1.0 x 10-130
BINARY_DOUBLE
2.2250738585072014 x 10-308
These are VERY small quantities. For example:
The size of a Quark, the smallest known particle, is less than 10-19 metres and can easily be represented by any of these types.
You can store numbers as small as the Planck Length (1.616 × 10⁻³⁵ metres) in a BINARY_FLOAT.
But to store a number like the Planck Time (5.4 × 10-44 seconds), you need a NUMBER – unless you change the units to nanoseconds, in which case it can also be stored in a BINARY_FLOAT.
I’m not aware of any specifically named numbers so small that they require a BINARY_DOUBLE; however, there are certainly use cases (e.g. scientific measurements) that need the kind of precision that this type provides.
On a number of pages throughout my application, I needed to build a region containing a fairly complex set of items, along with dynamic actions and other controls to provide a friendly editing experience for the user. This non-trivial set of items with their accompanying dynamic actions and conditions would be needed on several different pages, and in some cases, multiple times on the same page.
Copying all this all over the place would have created a maintenance headache, so I would much prefer to build them only once, and then re-use the same component throughout my application. Unfortunately, APEX does not at this stage support the concept of a reusable region. An idea might be to allow a region to “subscribe” to another region – although this would be tricky because somehow the item names, dynamic action names, etc. would need to be unique but predictable.
Why not use a plugin?
One approach is to build the whole region as a plugin; this would be ideal as the plugin can then be maintained separately and deployed wherever it’s needed; this would have the benefit that it could be reused in multiple applications.
The downside is that I would not be able to use the declarative features of APEX to define the items and dynamic actions within the region; I would have to code most of that in custom HTML, JavaScript and AJAX calls for database interaction. This would then provide a different maintenance challenge for my successors.
Why not put the region on the Global Page?
Another approach would be to build the region on the Global Page; a condition could be used to show it if it’s needed by the current page.
The downsides to this approach include: (a) you can’t reuse it multiple times on a single page; (b) it may be tricky to integrate it on the pages it needs to return data to (although this could be done with some JavaScript); and (c) you have little control over where on each page the region would be shown.
The Global Region idea might work better if is implemented as an Inline Dialog; with some JavaScript it could be made to pop up wherever it’s needed. I haven’t tried this approach, however.
Use a Modal Page
Instead, the approach I took was to use a modal page. This is a page that will pop up as a layer on top of the calling page, making the calling page visible but non-responsive until the user closes the popup. I can then define all the items needed, along with their conditions and dynamic actions, in the one modal page, and then add buttons throughout my application wherever it was needed.
The calling page needs to pass the current value of one or more items to the modal page; these values are not in the database (yet) because the user may be in the middle of editing them, so their current value on screen may be different to the value stored in the table. This means I can’t have the modal page reading the value from the table, and I can’t just pass the value using the link attributes because these are set in stone when the page is rendered.
In order to open the modal page, then, I need to use a dynamic action.
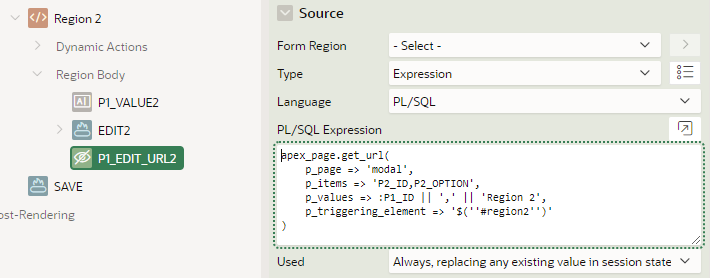
Note that you can’t build the URL for the modal page in JavaScript, because the client-side code cannot calculate the checksum required by the modal page. Instead, I pre-calculate the URL for the modal page using apex_page.get_url which generates the checksum automatically.
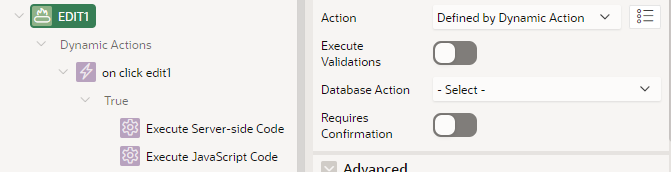
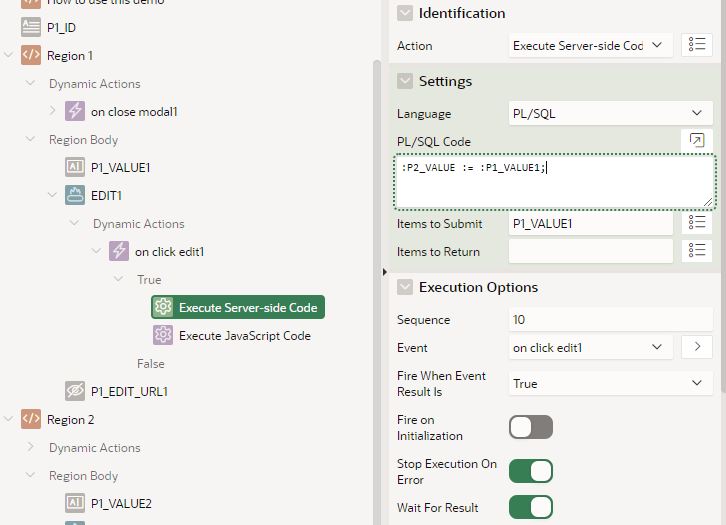
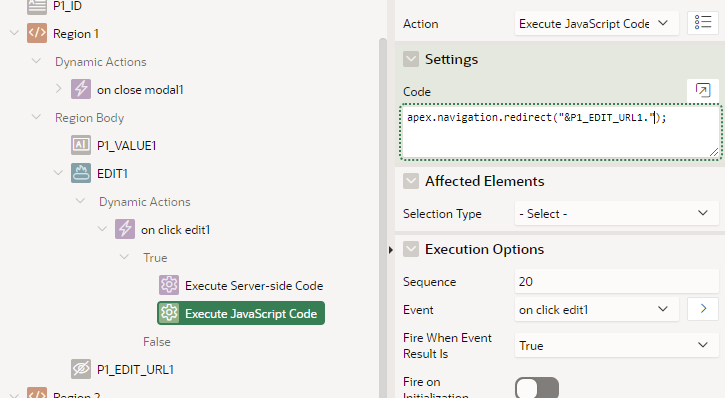
When the user clicks the “Edit” button, it needs to first copy the current value of the item into the session state for the modal page; I do this by making the Edit button Defined by Dynamic Action. On click, it executes two actions: (1) Server-side Code to submit the current value of the text item and set the modal item’s value; then (2) JavaScript Code to redirect to the URL I calculated earlier.
The modal page is then shown, allowing the user to make changes to the value. When they click the “OK” button, the modal page closes and returns the value via Items to Return.
Note that the modal page itself never saves any changes to the database, since on the calling page, the user might decide to cancel.
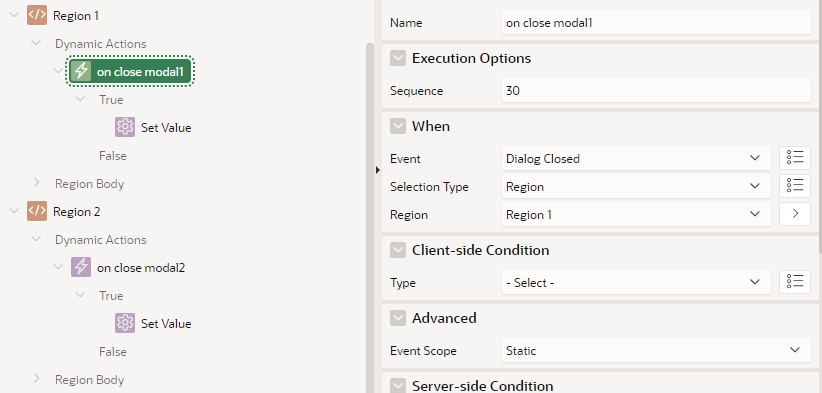
Back on the calling page, the new value is copied back into the page item via a Dialog Closed dynamic action. This sets the value based on the Dialog Return Item.
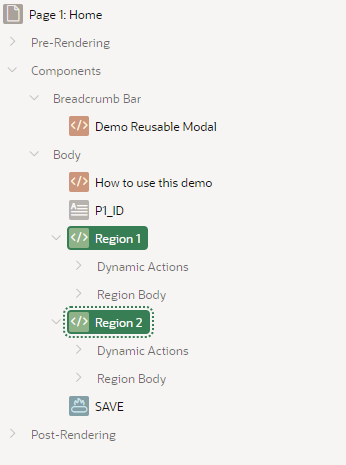
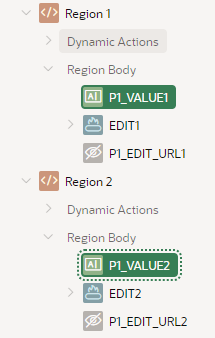
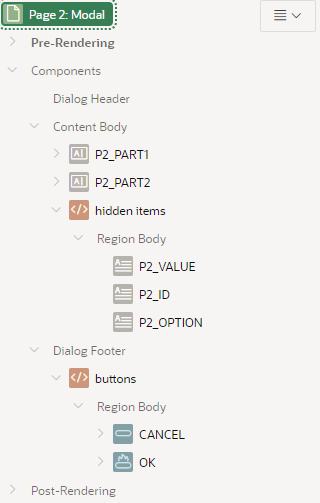
Here is my main page definition, with two regions. Each region has an item that we want to pass to/from our modal page.
Each region needs a unique Static ID.
Each region has a visible Value item, an Edit button, and a hidden item to precalculate the URL for the modal page.
There are no special attributes on the value item(s); they could be a simple text field, a text area, a readonly item, a combination of various item types, or they could be hidden. Typically they would be based on database column(s) and saved in the record being edited.
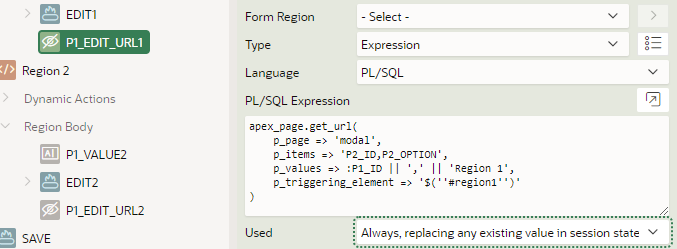
The “EDIT URL” hidden items are precalculated using an expression, and set to Always, replacing any existing value in session state.
The other edit URL is similar.
The call to apex_page.get_url is used to pass some static values (that are not changed by the page at runtime) to the modal page. These values may be used by the modal page to customise it for the context it was called from.
Note that the value of the item is not passed in the URL.
Note that p_triggering_element is a string, constructed to be a jQuery selector referring to the Static ID that was set on the region, so that the right Dialog Closed event will fire (since we may have multiple Edit buttons on the same page).
Tip: if your modal page doesn’t need them, you can omit the p_items and p_values parameters.
The Edit buttons are set to “Defined by Dynamic Action“.
The Server-side Code simply copies the current value of the item into the modal page’s item. This sets the session state on the server, which is then loaded when the modal is opened.
The JavaScript Code redirects to the modal page using the URL we calculated on page load.
apex.navigation.redirect("&P1_EDIT_URL1.");
The JavaScript Code for Region 2 is the same except it refers to P1_EDIT_URL2.
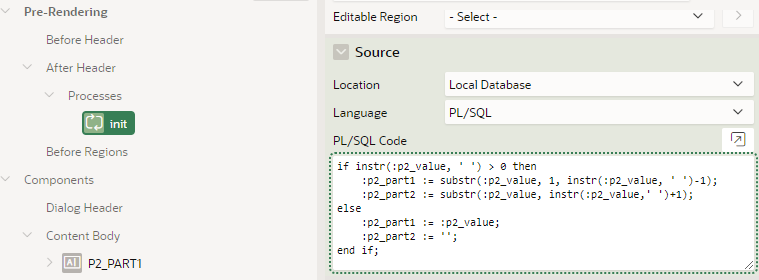
On page 2, the modal page, I have contrived an example “calculator” which simply breaks the string value into two “parts”, and allows the user to edit each “part” separately; when they click OK, the concatenated value gets returned to the calling page.
The two “PART” items are calculated on page load with some PL/SQL:
Note that this code is being executed based on the value of P2_VALUE which was set in session state by the calling page.
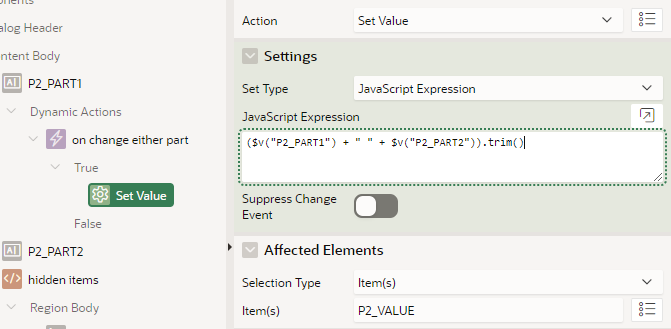
Just for the sake of the demo, my “calculator” merely sets the value of the hidden P2_VALUE item based on concatenating the two “parts”:
Note: you would define whatever items, dynamic actions or other components that you need.
This modal page never saves any changes to the database; that’s the role of the calling page.
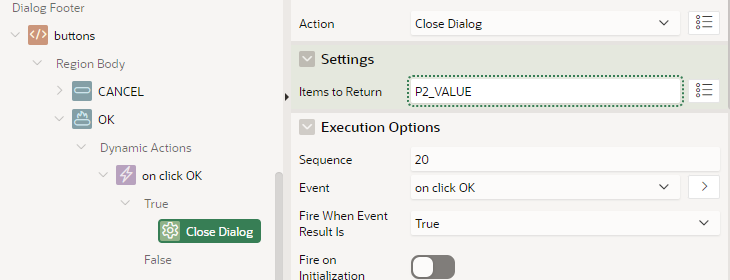
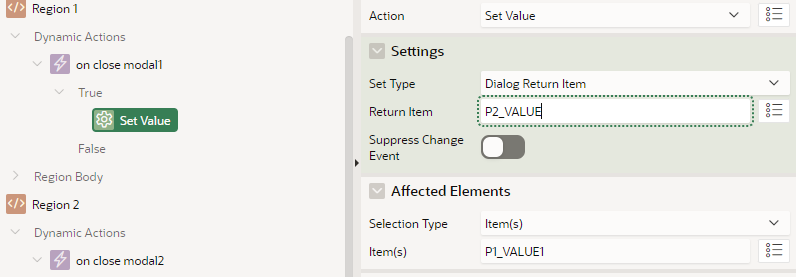
The OK button simply closes the dialog, returning the new value of P2_VALUE to the calling page.
Back on the calling page, each region has a dynamic action defined on Dialog Closed.
The Set Value action copies the Dialog Return Item value into the appropriate item on the page.
Summary
To use my special modal page in my application, I need to:
Set a unique Static ID on the region
Add an Edit button with a dynamic action
Add a hidden URL item based on an expression
Add a dynamic action to the region on Dialog Closed
The outcome is that the modal page provides a user-friendly experience involving any complex items, lists, dynamic actions, conditions, etc. maintained in one place, which can be re-used anywhere needed in the application.
If you would like to examine in detail the demo app, you can download it from here: https://apex.oracle.com/pls/apex/jk64/r/demo-reusable-modal/home (click the “Download this demo app” link). You may then install this in your own workspace and check out how it all works.
Have you had a similar requirement in your apps? Comment below and describe how you implemented it.
I had an APEX page based on a Form region that I’d built by hand (rather than using the wizard). I was wondering why the user always got an unexpected warning “Changes that you have made may not be saved.” – even though they hadn’t changed anything on the page.
I noticed that the item had a List of Values, and it had the Display Null Value setting set to No; however, the value in the underlying column was NULL. What was happening was that the item could not handle a null value, so it was changing to the first value in the LOV; this in turn marked the item as “changed” which caused the “unsaved changes” warning to show when the user tries to navigate away from the page.
When I set Display Null Value to Yes, the problem was resolved. Alternatively, I could have ensured that the underlying column would always have a value (e.g. by putting a NOT NULL constraint on it), which would also have resolved this problem.
Within the APEX development team it has been known for some time that maps are frequently required and this has been on the roadmap to be built in to the core product.
Since 2016 I have built and maintained plugins that make it easy to integrate Google Maps in your APEX applications. The most popular of these is the ReportMap Plugin which has received a wealth of features and enhancements, and is being used widely.
Introducing: Map regions
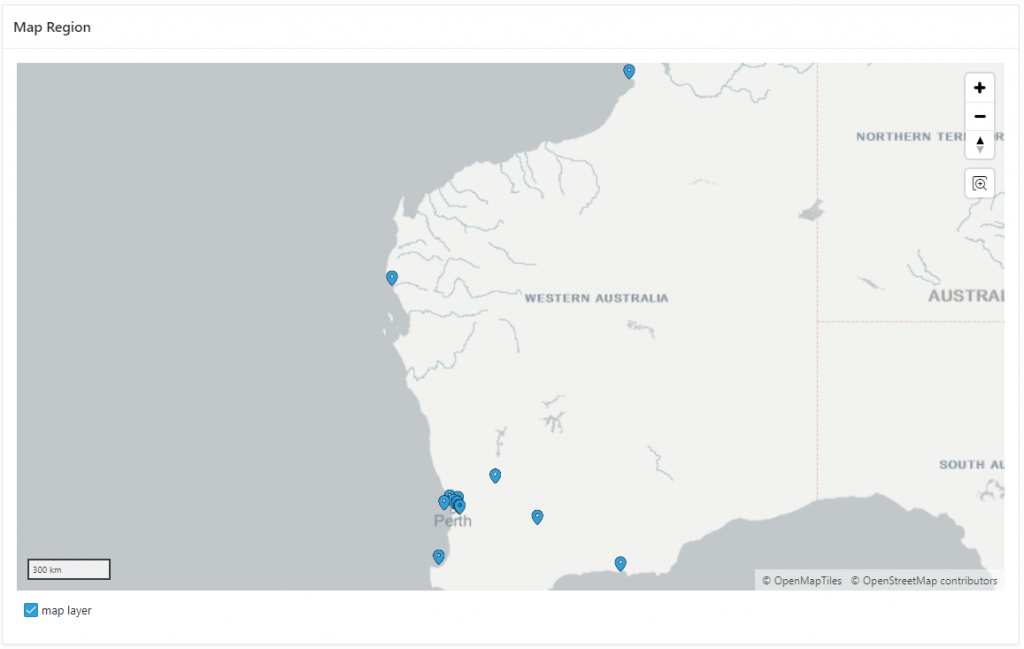
In the latest pre-production release APEX 21.1 which you can try today for yourself at apex.oracle.com, the APEX development team has introduced the new Map region. This component allows the developer to show a world map on the page, and add one or more “Layers”, each based on a table or SQL query, to show features on the map.
This is a welcome move because it means maps will be easy for all APEX developers to use, including those who avoid plugins (e.g. due to the lack of direct support from Oracle). It also means that maps added to applications based on the core feature will be fully supported in future releases of APEX without needing to rely on a 3rd party.
Note: this post is based solely on my first impressions of the new feature and is not intended to answer all questions about it. There will be more official blog posts coming directly from the APEX development team about this and other new features being introduced in APEX 21.1, so keep a look out for those!
The APEX Map region renders the map using the MapBox API, with a number of tile backgrounds included based on OpenStreetMap and HERE map data.
Implementing a Map Region
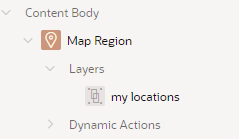
Let’s try the new Map region, and compare it to the jk64 ReportMap plugin. To add a map to a page, I added a region of type “Map” and nominated a data source for the Layer to show on it.
First thing you might notice is what I didn’t need:
no 3rd party plugin to install
no account on a 3rd party cloud service
no API key, and no APIs need to be enabled
no credit card details
The Map region is free to use within your applications, just like any other built-in feature of APEX.
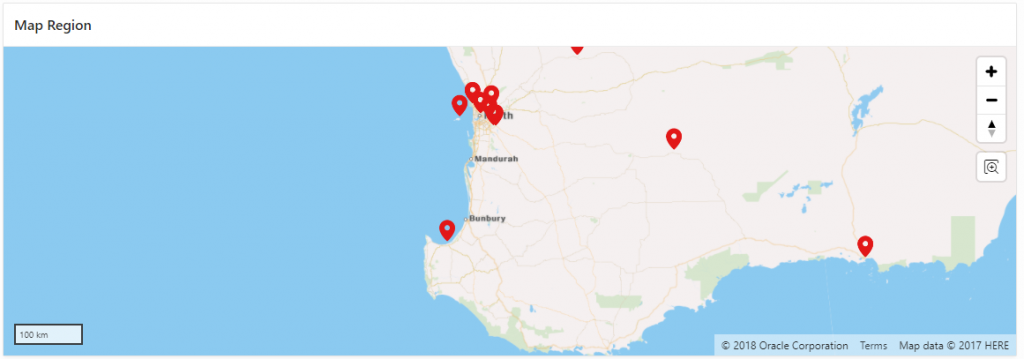
If you already have a map based on the ReportMap plugin, you can if you wish convert it to a map by simply changing the region Type to Map – the SQL data source will be preserved and you can use the same query for the new Map region type. However, the danger with this approach is that you may lose some attributes and customisations that you had on the plugin region. Instead, I recommend using the Duplicate feature to create a copy of your map region, change the attributes on the copy, using the original as a reference as you go. Once you’re happy with the new map you can then delete the original plugin region.
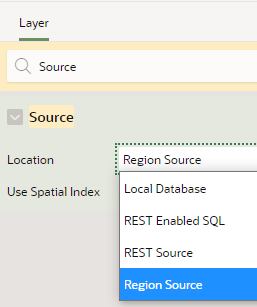
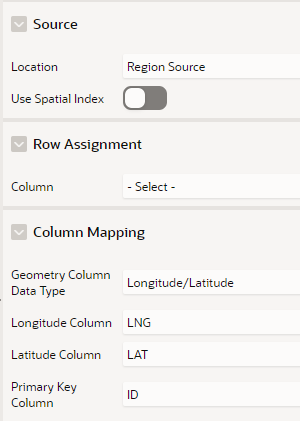
You can choose to set the data source directly on each Layer (e.g. if you want to get data from multiple data sources), or you can set the data source on the map Region. If you set it on the Region, each Layers may refer to the Region data source by setting the layer’s Location attribute to Region Source.
If you have a single data source that you want to split up into multiple Layers, you can set the Row Assignment column which will be used to differentiate the data for each layer. This would be more efficient than adding separate SQL queries for each layer if the queries are based on the same table or view.
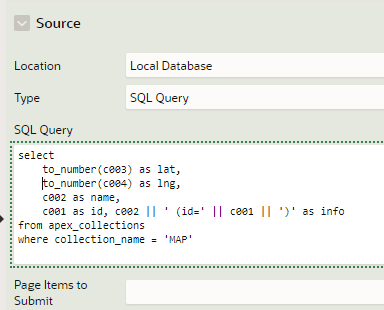
The first thing I noticed when converting my demo application was that since my data source was based on an APEX collection, the Lat and Lng columns are strings, not numbers; to use this as a data source for the Map region I had to convert the strings to numbers first using TO_NUMBER.
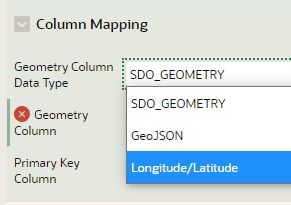
Once that was done, I could map the LAT and LNG columns to the layer by setting the Geometry Column Data Type to Longitude/Latitude:
Notice that the layer may alternatively be based on a SDO_GEOMETRY column, or a GeoJSON geometry object.Layer attributes
This is the result:
I wanted to style it as close as possible to my plugin demo so I tweaked a few attributes on the Region:
Appearance / Template Options / Remove Body Padding = on
Region Attributes:
Background = Custom
Standard (tile background) = Oracle World Map
Height = 350
Controls / Options / Mousewheel Zoom = on
Legend / Show = off
Layer Attributes:
Point Objects / Shape Scale = 1.5
Appearance / Fill Color = #e21818 (reddish)
Tooltip / Column = NAME
Info Window / Title Column = NAME
Info Window / Body Column = INFO
Much nicer colours, in my humble opinion 🙂
Map Dynamic Actions
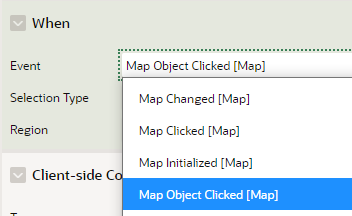
The next thing I need to do is handle click events on the pins. To do this, I added a Dynamic Action to the map region, on the event Map Object Clicked.
Notice that the Map region can trigger the following events:
Map Initialized – the map has loaded, including all the data
Map Changed – the user pans the map or zooms in or out
Map Clicked – the user clicks in the map area (but not on a pin)
Map Object Clicked – the user clicks on a pin
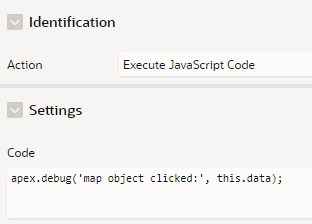
Whenever I’m experimenting with dynamic actions one of the first things I’ll add is a Action to run this JavaScript:
At runtime in debug mode, the console log will then show the content of this.data which shows the structure it takes.
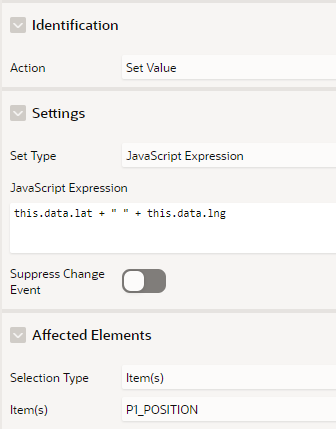
Based on this, I can see that we get the id, infoWindow, lat, lng, and tooltip attributes – similar to the structure provided by the ReportMap plugin events. If I want to display the Latitude and Longitude values on the page, I create a display-only item (e.g. P1_POSITION), and add a “Set Value” action to the dynamic action as follows:
When a pin is clicked, we now see this data on the page:
Of course, we could make this item hidden if we want, and use its value in other ways.
The Map Clicked event returns this.data.lat and this.data.lng to indicate where the user clicked.
The Map Changed event returns:
this.data.changeType – e.g. ‘map-resized’, ‘map-drag’, ‘map-zoom’
this.data.bbox – bounding box, an array of numbers of longitudes and latitudes [west, south, east, north]
this.data.layers – an array with attributes for each layer (id, name, visible)
this.data.bearing
this.data.pitch
this.data.zoom
New Features
The following is a short list of features or enhancements that the new Map region has, which are not (currently) supported by the ReportMap plugin:
Multiple data layers, each with their own distinct data source; you can also use one SQL query for multiple layers if you want
REST data sources
Declarative styles – options for customing how each data layer is rendered, including pin and feature icon, colour and size
Min/Max Zoom – each layer can be shown or hidden automatically depending on the zoom level (e.g. show a more detailed layer as the user zooms in)
Legend – each data layer (optionally) can be shown in a legend, allowing the user to selectively show/hide each layer
Extruded polygons – show a 3D polygon rising from the ground with the height determined by a column from your data source
Initial Position and Zoom is remembered between page requests
Circle tool – allows the user to draw a circle on the map; you can then respond to this by filtering data by points that fall within the circle
Distance tool – allows the user to calculate the distance between two points
Conclusion
That’s page 1 of my side-by-side demo done. Not too shabby!
Only 34 other pages to go over… eventually I plan to release my demo application for you to play with. Some of the demo pages will not be so easy or even possible to replicate, however, until we get the ability to use the Google Maps JavaScript API in the native Map region – so they’ll need to wait for some potential future release.
More posts to come…
Q: Should we switch now, or wait?
If you have a simple map on your page showing some pins, with no custom JavaScript code that provide specific custom behaviour, I think you should consider switching now. Of course, you should make sure to test the new region thoroughly – as with any major new feature, there will be a few bugs here and there. Overall however the Map region looks solid so far and is based on a well-known open source API with a long history.
One of the things to remember if you’re planning to switch from the ReportMap plugin to the new Map region is that not every feature is implemented the same way, and some features are not available at all (at least, not yet, if ever). This is partly because they are based on different JavaScript APIs (Google Maps vs MapBox). In addition, some UI behaviour is different and will likely always be different, although a lot of it will be customisable.
Q: Is this the end for the JK64 ReportMap plugin?
No, the ReportMap plugin is not going away any time soon. I plan to enhance and support it for years to come. My intent is to continue supporting the plugin at least until the APEX Map component supports integration of the Google Maps JavaScript API, and provides declarative support for most (ideally, all) of the declarative features of the ReportMap plugin. I expect that after this, most developers will naturally choose the native Map region over the plugin for new projects, and I’ll only need to provide bug fix support for the plugin while existing users of the plugin migrate gradually to the new component.
I consider this one of the strengths of the plugin system: the APEX development team will never have the capacity to support every last feature needed for every last application built for any customer in the world, so developers and companies should be empowered to create and use plugins to fill those gaps.
These plugins often serve to prove there is demand and need for a particular feature, and this often prompts the APEX development team to consider building these features into the core product, making it better with each release. Exciting times are ahead of us.