For a number of years now I’ve been using LetsEncrypt to provide free SSL certificates for the APEX applications I provide. These certificates last for 90 days and are renewed automatically by a simple script on my server.
By the way – if you’re not already using https for your public-facing APEX applications, you should, okay – even if your site doesn’t have data entry.
Each LetsEncrypt certificate can cover multiple subdomains. They don’t currently support wildcard domains (e.g. *.example.com) but they are planning to add this next year (2018).
To install LetsEncrypt I ran the following on my Amazon Linux instance (note – this is my web server, not my database server):
cd /opt
git clone http://github.com/letsencrypt/letsencrypt
cd letsencrypt
./letsencrypt-auto -v --debug
(when prompted at the last step I typed “c” to cancel the subsequent steps)
It wasn’t easy at first because I got a number of errors which I’d google (or search the community forum) and eventually find reasonable answers. I’ve had to reinstall a number of times, as the OS is patched regularly and certbot is updated from time to time.
I use Apache to provide about a dozen virtual hosts and therefore the automated installation option didn’t work for me. Instead, I’ve got lines like these in each VirtualHost:
<VirtualHost *:443>
 ServerName subdomain.mydomain.com
 ServerAlias subdomain.mydomain.com
 SSLEngine on
 SSLCertificateFile "/etc/letsencrypt/live/mydomain.com/cert.pem"
 SSLCertificateKeyFile "/etc/letsencrypt/live/mydomain.com/privkey.pem"
 SSLCertificateChainFile "/etc/letsencrypt/live/mydomain.com/chain.pem"
 ...
</VirtualHost>
To register a certificate I used the following command as root (all one line):
/opt/letsencrypt/letsencrypt-auto
certonly --webroot -w /var/www/html
-d mydomain.com,www.mydomain.com,sub1.mydomain.com,sub2.mydomain.com
This generates all the keys and certificates and stores them locally. No private keys ever leave the server. This command is using SAN to combine multiple subdomains in one certificate. I run this command again separately for each domain.
To renew all my certificates I run the following command as root:
/opt/letsencrypt/letsencrypt-auto renew -n --no-self-upgrade
service httpd restart
This will automatically skip any certificates that are not yet due to expire. I’ve put the above script in a file which is run by cron on a monthly basis.
0 20 1 * * /path-to-script/renewall.sh
To get usage info on the options:
/opt/letsencrypt/letsencrypt-auto --help
Since it’s free, one cannot expect support from LetsEncrypt directly if there are issues; however, there is an active LetsEncrypt support community which can be helpful at times.
But it’s certainly made a big difference to my bottom line, and provided a bit of peace-of-mind to my users.
Related
I’ve been running my APEX sites on Amazon EC2 for many years now, and I’ve gone through a number of infrastructure upgrades and price changes over time. I have some alerts set up, e.g. if a server starts getting very busy or if my estimated charges go over a threshold. Today I got an alert saying my estimated monthly bill will be over $100 which is unusual.
One of the most useful reports in AWS is the Instance Usage Reports (found under Dashboard > Reports > EC2 Instance Usage Report). I tell it to report Cost, grouped by Instance Type, which gives me the following:
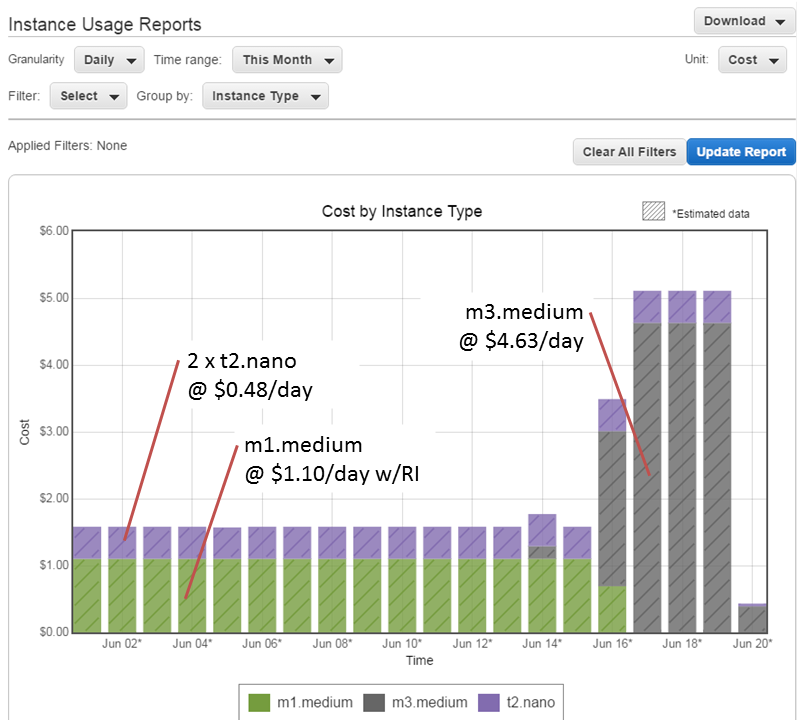
As you can see, my daily cost was about $1.58 per day, and this shot up on the 16th (note: these rates are for the Sydney region). I was running Oracle on an m1.medium SUSE Linux instance until June 16, when I upgraded it to an m3.medium instance. I have a Reserved Instance (RI) for m1.medium, but not for m3.medium, which is why the cost has shot up. That RI will expire soon; I will purchase an m3.medium RI which will bring the cost of that instance back down to about $1 per day. Until I do that, I will be charged the “On Demand” rate of $4.63 per day.
I’m also running two t2.nano Amazon Linux instances as my frontend Apache servers. Even though they are the smallest available instance type (nano), they barely register over 1% CPU most of the time. I’ve moved all the DNS entries across to one of those nano instances now, so I will soon decommission one which will save me a few extra dollars per month.
As an APEX developer, outsourcing the hardware-related worries to AWS has been the best decision I’ve made. I’ve only suffered a couple of significant outages to date, and in both instances all my servers were still running without issue when connectivity was restored. I can spin up new instances whenever I want, e.g. to test upgrades (you might notice from the graph that I did a test upgrade on an m3.medium instance on June 14).
In case you’re wondering, the total time I needed to take down my Apex instance, take a snapshot, spin up the new instance, and swap the IP address across to it, was about 30 minutes. And that included about 10 minutes lost because I accidentally picked an incorrect option at one point. Not only that, but my upgrade also included changing from magnetic disk to SSD, which seems a bit faster. Overall I’m pretty happy with all that.
Just a quick post to point out that the Alexandria PL/SQL Library has been updated to v1.7, including updates to the Amazon S3 package and a new package for generating iCalendar objects – more details on Morten’s blog.
 In Perth this morning, at a breakfast courtesy of the local AUSOUG, I spoke about using the Alexandria PL/SQL Library to automate various tasks with Amazon’s Simple Storage (S3) service. If you haven’t used Amazon Web Services before, or haven’t looked at Alexandria yet, and you enjoy discovering new capabilities with PL/SQL I think you’ll find this interesting.
The powerpoint slides and demo script are now available on my Presentations page.
In late October I’ll be speaking at the 20:20 Foresight Perth Conference – more details later.

Ever since I downloaded the Alexandria PL/SQL library, I haven’t been able to put it down. Just recently I decided I wanted to serve up a whole lot of media files directly from Amazon’s S3 simple storage service, instead of serving them from within my EC2 (elastic compute) instance. They were just wasting my linux server’s time responding to http requests.
So, I quickly wrote the following code to transfer them:
DECLARE
  l_blob BLOB;
BEGIN
  /* initialise my AWS session */
  ALEX.amazon_aws_auth_pkg.init
    ( 'yyy-my-aws-id-yyy'
    , 'xxx-not-telling-xxx'
    , p_gmt_offset => -8);
  FOR rec IN (
    SELECT id, filename, mime_type, location
    FROM myfiles
    WHERE location = 'http://myserver/media/'
  ) LOOP
    /* read the file from its current location */
    l_blob := ALEX.http_util_pkg.get_blob_from_url
      (rec.location || rec.filename);
    IF DBMS_LOB.getLength(l_blob) > 0 THEN
      /* upload the file to Amazon S3 */
      ALEX.amazon_aws_s3_pkg.new_object
        ( 'mybucket'
        , rec.filename
        , l_blob
        , rec.mime_type
        , ALEX.amazon_aws_s3_pkg.g_acl_public_read);
      UPDATE myfiles
      SET location = 'http://mybucket.s3-ap-southeast-1.amazonaws.com/'
      WHERE id = rec.id;
      COMMIT;
    END IF;
  END LOOP;
END;
After a short while, all the files had been copied across to my bucket on S3, and my table updated so that my web site now points people’s browsers to the new location for those files.
Of course, I could have used UTL_FILE to read the files from disk, but then I’d have to first create a directory, and write a loop to read the file in chunks into the BLOB. Why bother with all that when I can just call http_util_pkg.get_blog_from_url and get it all in one go?
That’s the trouble with powerful utilities like Alexandria: they’re too easy to use, make tasks like this trivial, and you start finding all sorts of uses for them. All of a sudden, Alexandria is your hammer, and the world is full of nails.
See also: this quick intro to using Alexandria’s API for Amazon S3.
There is officially now no good excuse for not running your own instance of Oracle 11g and getting into APEX 4 development, or just playing with SQL and PL/SQL.
Note: another easy-to-follow guide to this process was published back in April by Alex Gorbachev here: http://www.pythian.com/news/22045/how-to-get-started-with-amazon-ec2-oracle-11g-xe-example/, which may suit your needs – although it is based on an AMI with a beta release of 11gXE pre-installed. Some of the instructions below are virtually identical to his.
1. Gather your software.
You’ll need:
What, no OS, you ask? Nah – the easiest way to get started is to start with an AMI (Amazon Machine Image) that has linux installed.
Install PuTTY and your SCP/SFTP client on your computer, then:
2. Get your Amazon EC2 account.
Go to
http://aws.amazon.com/ and click “Sign Up Now”. You’ll need an EC2 account and you’ll need to give them some credit card details.
Navigate to the Amazon Elastic Compute Cloud (EC2) in the AWS Management Console.
3. Launch Instance.
Click the “Launch Instance” button. Go to “Community AMIs“. Change the “Viewing” filter to “64-bit“. In the search field type “oracle“. You should see a long list of AMIs to choose from. What you’re looking for is an EBS-backed AMI running Oracle Enterprise Linux 5. The actual name and AMI ID will vary from region to region, but in US-East you could use “493731438004/Oracle Linux 5.6 x86_64 – OVM”, AMI ID ami-42778a2b (you could enter this ID into the search field to go directly to it), or if you’re using the Singapore region you could use AMI ID ami-bc2f56ee.
Next, you get to choose the size of the instance. The bigger the machine, the more grunt you get, but also slightly more expensive to run. You could choose Micro, but you might find it a bit slow at times. Of course, there’s nothing stopping you from trying one, and if you don’t like what it offers, just trade up!
On the “Advanced Instance Options” page, accept all the defaults and Continue.
On the next page, you can put a name on your instance if you like. This is just a label, and comes in handy when you run many instances.
On the “Create Key Pair” page, you need to select a Key Pair. You can create one if you don’t already have one.
Enter a name for your key pair, then click “Create & Download your Key Pair“. Make sure you keep the file (it’ll be a .PEM file) in a safe place – if you lose it, you’ll lose access to your instance (in which case you’d just have to terminate it and start again).
The next page is the “Configure Firewall” step, where you select a Security Group. You could create a new one if you like – open up TCP ports 22, 8080 and 1521 so you can upload files, access the Apex web interface, and connect to the database (e.g. from SQL Developer).
On the final page, click “Launch”. After maybe a minute or two, your instance will have been started and running, ready for you to connect to it and do stuff on it:

Here, you can find the following useful information:
Status: this will say “Pending”, “Running”, or some other status.
Public DNS: this is the URL you can use to connect to your instance: in my case, it is ec2-72-44-48-28.compute-1.amazonaws.com.
4. Set up your key pair.
Before you can connect to your instance with PuTTY or your SCP client, you’ll need a PPK file. You generate this from the PEM file you got before. In the folder where PuTTY is installed is a little tool called PUTTYGEN.EXE. Run this, select Conversions -> Import Key, select your PEM file, then click Save Private Key. It might warn you about a passphrase – if you want to protect the key in case someone manages to steal it then you could put one in, but personally I don’t. Save it somewhere safe as a PPK file.
5. Upload the Oracle installer to the instance.
Open WinSCP. Click New. Copy the Public DNS into Host (e.g. ec2-72-44-48-28.compute-1.amazonaws.com). Set User name to root. Leave the Password blank. Select your Private Key file (PPK). Save the settings then click Login. If you get a warning about the “server’s host key not in the cache”, just click “Yes” to continue.
If you get timeout errors, check that port 22 has been open (and your changes saved) on your AWS Security Group.
Upload the Oracle installer (oracle-xe-11.2.0-1.0.x86_64.rpm.zip).
6. Login to your instance.
Open PuTTY. Copy the Public DNS into Host Name, and select your Private Key file (PPK) (this option is tucked away under Connection/SSH/Auth). You can save the session if you want. When you Open the connection, it will prompt for the login. Login as root.
7. Install Oracle.
If you just want to know what to type, here is basically all you need (type the commands after the “#” – don’t type the “#” itself though):
# unzip /root/oracle-xe-11.2.0-1.0.x86_64.rpm.zip
# rpm -ivh /root/Disk1/oracle-xe-11.2.0-1.0.x86_64.rpm
# /etc/init.d/oracle-xe configure
This script will prompt you for the APEX port and the database port – just press Enter to accept the defaults (8080 and 1521, respectively). It will then ask for the password for SYS and SYSTEM. Finally, it will ask you if you want it to run on startup. Accept the default (yes).
8. Disable the firewall.
# chkconfig iptables off
# service iptables stop
This disables the internal firewall running in your linux instance.
9. Log into APEX.
Open your browser and point it at your instance. Take the Public DNS and add :8080/apex/apex_admin, e.g.:
http://ec2-72-44-48-28.compute-1.amazonaws.com:8080/apex/apex_admin
The login name is admin, and the password is (for now) the same password you entered for the SYS and SYSTEM accounts earlier.

It will prompt you to change the password. It has to be a fairly secure – you’ll need at least a letter, number and symbol, and you can’t include the login name. After changing your password, you’ll need to log in again but using the new password.
You now have a fully-fledged Oracle Application Express environment, version 4.0.
10. Create a Workspace.
The last thing you need to do before you can start creating applications and stuff is to create a workspace. Click “Create Workspace” and answer the prompts to create the workspace along with its own schema and admin user account.

Log out of APEX Administration, and log into the newly created workspace – and you will now be able to start creating applications, tables, and what-have-you. You can also use APEX to write code (such as procedures and packages), but I suggest you use Oracle SQL Developer for this kind of thing because it’s a bit more powerful.
From now on, to get back into your APEX development environment, you can use this url:
http://ec2-72-44-48-28.compute-1.amazonaws.com:8080/apex

Have fun!
Oh, by the way: when you’ve had your fun, and you want to stop your instance (which at about 34c/h may cost around $60 per week if you leave it running 24×7), don’t forget to terminate it from AWS Management Console. Before you do, however, you can take a snapshot of it in its current state so you can restore from it later. (Before this, you might want to shut down the Oracle database within the instance first – although I’ve found it quite easy to recover an instance which was snapshotted while the database was up and running). To do that, right-click on the instance in AWS Management Console, and select “Create Image (EBS AMI)”. It may take some time for the image to be created. When the image creation is complete, you can then Terminate the instance. The AMI will take up a bit of storage that will cost a dollar or two per month; and you can now spin up as many copies of your machine whenever you want.
Update:
Lew posted an excellent introduction to PuTTY and SSH for AWS Newbies that I heartily recommend. It was posted in 2009 but still applies.
For a long time my disaster recovery procedure for my Amazon EC2-based web site was:
- Find an Oracle AMI that has 10g XE with APEX pre-installed, and start up an instance with it.
- Create a volume from a backup snapshot and attach it to the new instance.
- Log into the instance, shut down apache and oracle, then delete all the oracle data files, apache config files, and a few other bits and pieces.
- Create symbolic links for the deleted bits and pieces (including the oracle data files) that point to the attached volume.
- Start up oracle and apache and test.
- Switch the elastic IP over to the new instance.
This procedure has been tested and retested multiple times, and came in useful once when I almost lost the site (actually, it just went unresponsive due to some general problems at Amazon, but at the time I thought it’d had gone down).
Last week I logged in to the AWS Management Console to do a routine backup-and-restore test, but discovered a problem: it couldn’t find the Oracle 10g XE AMI. Searches on the image ID and various keywords, across all the Amazon regions, returned no results. Searches on “oracle” brought back a number of options but none of them close to what I required. I enquired with Amazon and they responded that the AMIs are supplied by Oracle and had been removed. I discovered this meant that not only could I not start up an instance using one of these images, I also couldn’t point to my running instance and “start up another like this” – because this requires access to the original AMI that was used to start it.
The machine image which I was trying to find is (at least, as of today 5 Jul 2011) still referred to here: http://aws.amazon.com/amis/Oracle/1720 “Oracle Database 10g Release 2 Express Edition – 32 Bit” so I raised a question on the oracle forum (http://forums.oracle.com/forums/thread.jspa?messageID=9707298�) and sent an email to Bill Hodak at Oracle who was named in the description of the AMI. He replied he would see if he could find out what had happened to it.
At this point I was hoping that my running instance wouldn’t go down, because I didn’t know if I’d be able to restore from backup. My backup consisted solely of snapshots of just the data – the rest of the OS was supposed to be provided by the AMI.
Meanwhile, asam replied to my oracle forum thread, suggesting I create my own AMI. A bit of googling yielded this result, which proved very helpful: http://webkist.wordpress.com/2010/03/16/creating-an-amazon-ec2-ebs-ami-from-a-running-instance/ “Creating an Amazon EC2 EBS AMI from a running instance”. I followed the instructions, slightly modified as follows:
- Use AWS Management Console to create a new volume
- Attach the volume to my running instance and mount it:
# mkdir /u03
# mount -t ext3 /dev/sdf /u03
- Move everything from the old volume so that it all sits under / again instead of via symbolic links
- Synchronize the filesystem to the new volume:
# rsync -a --delete --progress -x / /u03
- When rsync has completed, fix up the devices:
# MAKEDEV -d /u03/dev -x console
# MAKEDEV -d /u03/dev -x zero
# MAKEDEV -d /u03/dev -x null
- Unmount the volume:
# umount /u03
- Get the EC2 X.509 cert and private key from the “Security Credentials” area under “Account” in AWS Management Console.
- Download the Amazon EC2 API tools:
http://aws.amazon.com/developertools/351
- I needed java to run the API tools, so download the rpm:
jre-6u26-linux-i586.rpm – e.g. from http://www.oracle.com/technetwork/java/javase/downloads/jre-6u26-download-400751.html
- Upload the EC2 X.509 cert and private key, the Amazon EC2 API tools, and the java rpm to the instance. Unzip and install the API tools and the java rpm.
- Set up all the required environment variables (replace xxxwith the appropriate bits from the relevant file names):
# export EC2_CERT=/root/cert-xxx.pem
# export EC2_PRIVATE_KEY=/root/pk-xxx.pem
# export EC2_HOME=(path-to-ec2-stuff)
# export JAVA_HOME=(path-to-java-stuff)
# export PATH=$PATH:$EC2_HOME/bin
- Set up a symbolic link so that the EC2 tools can find java:
# ln -s (path-to-java-stuff) /usr/bin/java
- Back in the AWS Management Console, create a snapshot of the volume.
- In the instance, run this command (this is the only command you can’t do in the management console, which is what all that rigmarole about installing the API tools was all about):
# ec2-register --snapshot snap-xxx   --description "my ami description" --name "my ami name"
  --ramdisk ari-yyy --kernel aki-zzz   --region ap-southeast-1
You can get the snapshot, ramdisk and kernel identifiers from the AWS Management Console. (my instance was running in Singapore, so my region is ap-southeast-1)
- Back in AWS Management Console, I see my new AMI has been created. All I have to do now is select it, click Launch Instance, and a copy of my site is up and running.
I startup the database and see if it’s working. Unfortunately it isn’t – a bit more investigation revealed that the Oracle listener was not responding to requests. lsnrctl status reveals that it is still using the old internal IP address from the original instance – but this is a new instance with a different internal IP address.
To fix this, I edit listener.ora to correct the IP:
# cd /usr/lib/oracle/xe/app/oracle/product/10.2.0/server/network/admin
# chmod +w listener.ora
# vi listener.ora
The IP address is listed as the “Private IP Address” on the instance in AWS Management Console.
# lsnrctl start
After that, it’s all working – and very soon I will have a much simpler (and hopefully somewhat less reliant on the kindness of big corporations) disaster recovery process. I just need to work out the simplest way to restore the data from backup to the new instance. I’ll probably just create a new volume from a backup snapshot, attach it to the instance, and copy all the data across.
UPDATE: With an EBS-backed volume, I can now create a new AMI from the running instance whenever I want – it takes a complete snapshot of the instance, from which I can then create new instances. So my disaster recovery procedure is much simpler than it was before 🙂
Disclaimer: if you’re looking for an Amazon-basher, you’ll have to look elsewhere.
 I had two web sites running on a server at Amazon’s Virginian data center when it suffered the recent issues. The first I heard of it was when one of my primary users called on 20 April to let me know that the web site was down – it was consistently returning 500 Internal Server errors. I wasn’t able to connect to the web site, to Apex, to the database, or even by SSH. Next I checked the AWS Management Console, which reported “Instance connectivity, latency and error rates” for the US-East region – which happens to be the region where our site was running.
Immediately, I calmly went into panic mode. First thing I’d thought I’d try is to reboot the instance. That took a while, but then it wouldn’t come back up again. Uh oh. Next thing I thought I’d do is try to detach the volume from the instance, re-attach it to a new instance, and hope I could bring it back up. AWS, however, seemed unable to detach the volume (probably because it needed to wait for outstanding writes to the disk to be written) – it was stuck in “detaching” mode.
There is an option to “force detach” a volume, but it comes with warnings that it might leave the volume in a corrupted state (since it might not have every change written). I decided to leave it alone for now.
Meanwhile, the web site is down, and my first priority is to get something up and running – so this is a chance to demonstrate that my restore procedure works. Yes, I’ve tested my restore process several times, so I was confident it would work, assuming the Amazon infrastructure is working ok.
The last backup I’d taken was a week ago – the morning of 16 April – stored as a snapshot in the US-East region. Generally, the data center was working reasonably well – it was mainly existing EBS instances that were suffering. Everything was extremely slow, and I got frequent errors. For example, I’d select my snapshot, go “create volume”, and it would report “sorry, an error stopped the volume being created”. So I’d try again, in various availability zones, same error every time. I’d wait for a while, then go back in and find half a dozen volumes in various states of Pending or Available status in various availability zones – it seems it was able to create the volumes after all.
So I delete all but one of them, then start up a new instance. By this time, Amazon have started putting more info on their status page, and it seems the problems are now limited to one availability zone – probably the one our site was in. Now, attach the backup volume to the new instance, and follow my restore procedure to get the site up and running. It took a bit longer than usual (hours instead of minutes), but finally it was all up and running. Switch the Elastic IP over to the backup instance, test the web site – all looks good, except (of course) that all data inserts/changes since 16 April have been lost. So I flip a few switches to stop emails and SMSs being sent (I don’t want people being confused by out-of-date notices), and set the Global Notification string on some of the key applications to let people know what’s going on.
Next step is to see if I can access the stuck volume. It took about two days, but finally the volume was detached, and my instance was terminated. So I start up another instance, get it set up, then attach the volume to it. It immediately was set to “attaching” status, and I couldn’t mount it – and it turned out to be another 24 hours (give or take 12 hours) before it was attached.
In the meantime, since I was just waiting, I thought it would be a good time to finally do what I’d been meaning to for a while – move the site to the Singapore data center, and take a long-overdue offline backup.
The purpose of my first goal was basically to see if being closer physically translates to lower latency to here in Perth. Also, I wanted to work out how best to move data between Amazon regions, so that I’d get even better redundancy. It was good that I had been taking weekly backups, but they were all stored in one data center on the US East coast, and I felt it would be a good idea to move a monthly backup set to a different region in case they irretrievably lost an entire data center.
Amazon don’t provide any option to just move a snapshot, volume, instance or anything between regions. It’s easy to move between availability zones within a region (by taking a snapshot, then creating a new volume from the snapshot targetting a different zone), but you can’t move from one region to another. Therefore, the only option I could find to do this was to bring up a new instance in the Singapore data center, create a volume with matching size (15GB), then transfer the data within the instance using dd and scp. This I did – it took more than 6-7 hours (I’m not sure, because I got tired of waiting and went to bed) – and I had to run fsck on the volume after loading the data, because some of the directories seemed to have lots of inaccessible files showing “? ? ? ?” in the directory listing. After that, however, the site was up and running and my quick smoke test seemed to show up no issues. So I allocated an Elastic IP to the instance, then changed my DNS settings to point to it.
If the entire Amazon EC2 ecosystem were to be blasted off the map in some cataclysmic fireball, I doubt many people would care that my two little sites were gone. More likely, of course, is that I might suffer reduced access to one or more Amazon regions, and if I cannot access them I cannot restore from backup – unless I have one in my care. So I downloaded the dd’ed snapshot. That took about 3 hours to download the 7GB file.
Meanwhile, back on the ranch in Virginia, today (23 April) the old volume was marked as “attached” to my new instance, and I was able to log in to it and mount the volume. I ran fsck on it but it reported no issues. Got the database started up without any issues, and immediately took a complete export. scp’ed the export across to the new instance in Singapore. Imported the data to a new schema. There were only a few tables that would have had critical data created or updated in the past week, so I just compared them – it looked like no-one had made any changes to anything in the replacement instance, so I just truncated them and re-populated them from the data taken from Virginia.
All done – a bit of stress, lots of patience required, but in the end it was relatively simple to get things up and running again. In hindsight, it would have worked out even simpler and easier to just leave the stuck instance alone and wait – I suspect, eventually, it would have come up again no problems. I could have just brought up the backup instance while I waited, maybe set it to read-only. Oh well, lesson learned.
There’s a whole lot of FUD and anger directed at Amazon and cloud services in general, but to my mind, this would have been a darn sight more difficult (or even impossible) if we’d been self-hosting. For example, I didn’t have to leave home to do any of this. I haven’t had to worry about hardware failures or network connectivity at all. If the service goes down once a year like this, it’s not the end of the world. As long as I have a backup to go back to, all is not lost. Amazon never promised 100% uptime or even 100% data retention. So far, for me personally it’s been about 99.6% (over the past two years), and 100% data retention.
And that’s a whole lot better than I could do by myself.