This would be a very rare requirement, as most of the time when you are designing an ORDS REST service you should know what query parameters your service supports. However, in the case where your users are allowed to supply an arbitrary list of additional parameters to your service, you won’t know what the keys will be for these parameters.
Since you can’t define the user-defined query parameters in your ORDS endpoint, they won’t be supplied via bind variables. Instead, in your PL/SQL handler you need to get the original query string using owa_util.get_cgi_env('QUERY_STRING'), then parse it to find the query parameters.
Here’s what I’ve used:
function query_string_map
return apex_application_global.vc_map
is
l_plist apex_t_varchar2;
l_map apex_application_global.vc_map;
begin
-- query string may be like:
-- param1=abc¶m2=def¶m3=ghi
-- or blanks may be included like:
-- param1=abc¶m2=¶m3=ghi
-- or the = symbol may be omitted:
-- param1=abc¶m2¶m3=ghi
l_plist := apex_string.split(owa_util.get_cgi_env('QUERY_STRING'), '&');
for i in 1..l_plist.count loop
declare
l_offset pls_integer;
l_key varchar2(255);
l_value varchar2(32767);
begin
l_offset := instr(l_plist(i), '=');
if l_offset > 0 then
l_key := substr(l_plist(i), 1, l_offset - 1);
l_value := substr(l_plist(i), l_offset + 1);
else
l_key := l_plist(i);
-- the value is null
end if;
-- ORDS may encode %20 as '+', but this is not detected by utl_url
l_key := replace(l_key, '+', ' ');
l_key := sys.utl_url.unescape(l_key, 'UTF-8');
if l_value is not null then
l_value := replace(l_value, '+', ' ')
l_value := sys.utl_url.unescape(l_value, 'UTF-8');
end if;
-- add the key/value to the map
l_map(l_key) := l_value;
end;
end loop;
return l_map;
end query_string_map;
This takes the query string and splits it on each occurrence of the & symbol. Each parsed part is expected to take the form key=value, key= or just key (with no = symbol). It converts any escaped URL characters and builds a map of key/value pairs and returns it.
The calling process can then use the map to process each key/value in turn, e.g.
declare
    l_map apex_application_global.vc_map;
    l_key varchar2(255);
begin

    l_map := query_string_map;

    l_key := l_map.first;
    while l_key is not null loop

        -- do something with the key/value
        dbms_output.put_line(l_key || ' : ' || l_map(l_key));

        l_key := l_map.next(l_key);
    end loop;

end;
You are probably familiar with some of the data types supported by the Oracle Database for storing numeric values, but you might not be aware of the full range of types that it provides.
Some types (such as NUMBER, INTEGER) are provided for general use in SQL and PL/SQL, whereas others are only supported in PL/SQL (such as BINARY_INTEGER).
There are others (such as DECIMAL, REAL) that are provided to adhere to the SQL standard and for greater interoperability with other databases that expect these types.
Most of the numeric data types are designed for storing decimal numbers without loss of precision; whereas the binary data types (e.g. BINARY_FLOAT, BINARY_DOUBLE) are provided to conform to the IEEE754 standard for binary floating-point arithmetic. These binary types cannot store all decimal numbers exactly, but they do support some special values like “infinity” and “NaN”.
In PL/SQL you can define your own subtypes that further constrain the values that may be assigned to them, e.g. by specifying the minimum and maximum range of values, and/or by specifying that variables must be Not Null.
What do I prefer?
In my data models, I will usually use NUMBER to store numeric values, e.g. for quantities and measurements; for counts and IDs (e.g. for surrogate keys) I would use INTEGER (with the exception of IDs generated using sys_guid, these must use NUMBER).
In PL/SQL, if I need an index for an array, I will use BINARY_INTEGER (although if I’m maintaining a codebase that already uses its synonym PLS_INTEGER, I would use that for consistency). In other cases I will use INTEGER or NUMBER depending on whether I need to store integers or non-integers.
I don’t remember any occasion where I’ve needed to use FLOAT, or the binary types; and of the subtypes of BINARY_INTEGER, I’ve only used SIGNTYPE maybe once or twice. Of course, there’s nothing wrong with these types, it’s just that I haven’t encountered the need for them (yet).
What about Performance?
There are some differences in performance between these data types, but most of the time this difference will not be significant compared to other work your code is doing – see, for example, Connor on Choosing the Best Data Type. Choosing a data type that doesn’t use more storage than is required for your purpose can make a difference when the volume of data is large and when large sets of record are being processed and transmitted.
Reference Chart: Numeric Data Types
This diagram shows all the numeric data types supplied by Oracle SQL and PL/SQL, and how they relate to each other:
From smallest to largest – the maximum finite integer that can be stored by these data types is listed here. It’s interesting to see that BINARY_FLOAT can store bigger integers than INTEGER, but NUMBER can beat both of them:
BINARY_INTEGER
2.147483647 x 10⁹
INTEGER
9.9999999999999999999999999999999999999 x 1037
BINARY_FLOAT
3.40282347 x 1038
NUMBER
9.999999999999999999999999999999999999999 x 10125
BINARY_DOUBLE
1.7976931348623157 x 10308
To put that into perspective:
If you need to store integers up to about 1 Billion (109), you can use a BINARY_INTEGER.
If you need to store Googolplex (10googol) or other ridiculously large numbers (that are nevertheless infinitely smaller than infinity), you’re “gonna need a bigger boat” – such as some version of BigDecimal with a scale represented by a BigInteger – which unfortunately has no native support in SQL or PL/SQL. Mind you, there are numbers so large that even such an implementation of BigDecimal cannot even represent the number of digits in them…
Storing SMALL Numbers
The smallest non-zero numeric value (excluding subnormal numbers) that can be stored by these data types is listed here.
BINARY_FLOAT
1.17549435 x 10-38
NUMBER
1.0 x 10-130
BINARY_DOUBLE
2.2250738585072014 x 10-308
These are VERY small quantities. For example:
The size of a Quark, the smallest known particle, is less than 10-19 metres and can easily be represented by any of these types.
You can store numbers as small as the Planck Length (1.616 × 10⁻³⁵ metres) in a BINARY_FLOAT.
But to store a number like the Planck Time (5.4 × 10-44 seconds), you need a NUMBER – unless you change the units to nanoseconds, in which case it can also be stored in a BINARY_FLOAT.
I’m not aware of any specifically named numbers so small that they require a BINARY_DOUBLE; however, there are certainly use cases (e.g. scientific measurements) that need the kind of precision that this type provides.
I have been working with some code that uses JSON, sometimes fairly large documents of the stuff, and it’s often necessary to send this to the debug log (e.g. DBMS_OUTPUT) for debugging; however, the builtin functions that convert a JSON object to a string (or clob) return the JSON document in one big long line, like this:
To show this formatted, I added the following function using JSON_SERIALIZE with the “PRETTY” option, to my utility package:
function format_json (p_clob in clob) return clob is
    l_blob blob;
    l_clob clob;

    function clob_to_blob(p_clob clob) return blob is
        l_blob blob;
        o1 integer := 1;
        o2 integer := 1;
        c integer := 0;
        w integer := 0;
    begin
        sys.dbms_lob.createtemporary(l_blob, true);
        sys.dbms_lob.converttoblob(l_blob, p_clob, length(p_clob), o1, o2, 0, c, w);
        return l_blob;
    end clob_to_blob;

begin
    l_blob := clob_to_blob(p_clob);
    select JSON_SERIALIZE(l_blob returning clob PRETTY) into l_clob from dual;
    return l_clob;
end format_json;
Note that my function takes a CLOB, not a JSON object, because sometimes I receive the data already as a CLOB and I don’t want to require conversion to JSON before passing it to my formatting function.
In building a code generator I found the need to write a number of helper methods for doing basic modifications of arrays that are indexed by integer – such as appending one array onto another, inserting, and shifting. These arrays represent an ordered sequence of strings (e.g. lines of source code).
I think these would be a useful addition to the language if they were made native – e.g. (new commands in UPPERCASE):
declare
    type str_array_type is table of varchar2(32767)
        index by binary_integer;
    l_lines str_array_type;
    l_new str_array_type;
    l_idx binary_integer;
begin
    .. (some code to fill the arrays here) ..

    -- get a subset of lines
    l_new := l_lines.SLICE(50, 59);

    -- extend l_lines with l_new at the end:
    l_lines.APPEND(l_new);

    -- shift l_lines forwards and insert l_new
    -- at the beginning:
    l_lines.PREPEND(l_new);

    -- insert l_new into l_lines at the given index;
    -- shift any existing lines at that location
    -- forward:
    l_lines.INSERT(l_new, at_idx => 21);

    -- remove the given range of indices from
    -- l_lines, replace with whatever is in l_new:
    l_lines.UPDATE(l_new,
        from_idx => 120,
        to_idx   => 149);

    -- apply the given substitution on each line
    l_lines.REPLACE_ALL(
        old_val => 'foo',
        new_val => 'bar');

    -- shift the given range of lines by the given
    -- offset (raise exception if existing data
    -- would get overwritten):
    l_lines.SHIFT(
        from_idx => 20,
        to_idx   => 29,
        offset   => 1000);

    -- shift and renumber all indices in the array
    -- with the given starting index and increment:
    l_lines.RENUMBER(start_idx => 10, increment => 10);

    -- make the array contiguous (i.e. remove gaps):
    l_lines.RENUMBER;

    -- loop over every line in the array that contains
    -- the given string:
    l_idx := l_lines.FIND_NEXT(contains => 'hello');
    loop
        exit when l_idx is null;
        .. do something with l_lines(l_idx) ..
        l_idx := l_lines.FIND_NEXT(contains => 'hello',
            from_idx => l_idx);
    end loop;
end;
I’ve illustrated these with a little sample package that may be viewed here:
Need to run DBMS_MVIEW.explain_mview in APEX SQL Workshop, but don’t have the MV_CAPABILITIES_TABLE? You’ll get this error:
ORA-30377: table ORDS_PUBLIC_USER.MV_CAPABILITIES_TABLE not found
You don’t need to create this table. You could create this table by running admin/utlxmv.sql (if you have it). Instead, you can get the output in an array and do whatever you want with its contents, e.g.:
declare
    a sys.ExplainMVArrayType;
begin
    dbms_mview.explain_mview('MY_MV',a);
    dbms_output.put_line('Explain MV '
        || a(1).mvowner || '.' || a(1).mvname);
    for i in 1..a.count loop
        dbms_output.put_line(
            rpad(a(i).capability_name, 30)
            || ' [' || case a(i).possible
                       when 'T' then 'TRUE'
                       when 'F' then 'FALSE'
                       else a(i).possible
                       end || ']'
            || case when a(i).related_num != 0 then
                   ' ' || a(i).related_text
                   || ' (' || a(i).related_num || ')'
               end
            || case when a(i).msgno != 0 then
                   ' ' || a(i).msgtxt
                   || ' (' || a(i).msgno || ')'
               end
        );
    end loop;
end;
The result will be something like this:
Now, the challenge is merely how to resolve some of those “FALSEs” …
This is an article I wrote quite some time ago and put “on ice” until I completed the client project it was related to. However, for unrelated reasons the project was significantly delayed and later rebooted with an updated set of requirements, which no longer require Oracle Workspace Manager. This means I’m unable to add a triumphant postscript saying “this was a great success and it’s being used to this day”. Instead, I’m adding this preamble to say “this was a very interesting feature of Oracle I learned but didn’t quite get to use, but hopefully someone will find it useful”.
Oracle Workspace Manager (OWM) is a feature of the Oracle database that was built back in the 8i days and installed in Oracle by default since 9i. As described by Tim Hall, it allows multiple transactionally consistent environments to exist within one database.
Confusing Terms… Don’t confuse OWM with Oracle APEX workspaces, or with Analytic Workspace Manager for Oracle OLAP.
OWM allows the developer to take a leap over the complexities involved in a number of use cases, such as:
Savepoints – a snapshot of a point in time
Workspaces – a private area for modifications that are not visible to normal users
Row History – store a history of every change for every record
Valid Time – support date/time range validity for each record
The Row History use case is similar to using Flashback Query which is a more modern feature of the database; however, since it can be enabled or disabled individually for each table, it may require less storage space to support querying back as far as the user would like in time.
The Valid Time use case allows your users to set a date/time range on each record; multiple versions of a unique row can be created with non-overlapping date ranges; updates can be done within the context of a given date/time range, which will cause rows that span the boundary of the range to be split into multiple versions. I haven’t tried this myself but it looks like a powerful feature.
Note: the default workspace for a user session is called “LIVE“, and the default savepoint is “LATEST“.
One example of using savepoints is that a user could create a savepoint, make changes, go back and view the database as of the savepoint, and can rollback all changes to a savepoint. They can also run an API command (dbms_wm.SetDiffVersions) to generate a differences report which shows all the inserts, updates, and deletes that have occurred since a savepoint.
An example of using workspaces is where a user could create one or two workspaces, each representing a different scenario. The user can jump back and forth between the scenarios and the “live” workspace (which is the default). They can edit any of these workspaces. Changes made by other users to the “live” workspace may, optionally, be automatically propagated into a workspace. Similarly to savepoints, the user can get a differences report between any workspace (including the “live” workspace). In addition, the user can create and view savepoints and additional workspaces within a workspace – OWM maintains a hierarchy of workspaces.
If the user is not happy with their scenario, they can simply delete the workspace and the live data is not affected.
If they are happy with their changes in a workspace, they can choose to do a Merge – which attempts to effect all the inserts, updates and deletes that were made in the workspace to its parent workspace (e.g. the “live” workspace if that was the source). If any change to a row would conflict with a change that another user made to the same row in the parent workspace, the merge stops and the user may be prompted to resolve the conflicts (i.e. for each row, the user can decide to refresh their workspace with the updated data in the parent, or they can force their workspace’s change onto the parent).
I suspect OWM was once known (or internally referred to) as “Long Transactions” or something like that, probably because of its user workspace and merging features. You can see the remnants of this old name in the documentation – many of the document URLs start with “long”. Also, note the title of this slide deck by an Oracle product manager: “Long Transactions with Oracle Database Workspace Manager Feature”.
The features of OWM only affect the tables that you explicitly Enable Versioning on via the API (DBMS_WM).
Limitations/Restrictions of Workspace Manager
If you are looking into using OWM, you must read the Intro to Workspace Manager in the docs. Make sure to review the restrictions that apply, such as:
Each version-enabled table must have a primary key.
If a parent table is version-enabled, each child table must also be version-enabled (but the opposite does not apply).
Referential integrity constraints MUST refer to the primary key in the parent table.
Primary key values in a parent table cannot be updated.
Only row-level triggers are supported – no per-statement triggers.
SQL MERGE statements are not allowed (attempts to do so results in “ORA-01400 cannot insert NULL into WM_VERSION”).
RETURNING clause is not supported (for INSERT or UPDATE statements).
Row-level security policies (VPD) are not enforced during workspace operations (such as Merge Workspace, and Rollback to Savepoint).
Materialized Views on a version-enabled table can only use the REFRESH COMPLETE method; e.g. no FAST or ON COMMIT.
Table names cannot be longer than 25 characters.
Column names cannot be longer than 28 characters.
Trigger names cannot be longer than 27 characters.
Some reserved words and characters apply, e.g. column names cannot start with WM$ or WM_.
Most DDL operations cannot be run directly on a version-enabled table (see below).
There are some other restrictions, so make sure to review the intro document carefully and consider the ramifications of each limitation for your particular situation.
I’ve used this simple script to do some basic checks on a table before I enable it for versioning: check_table_for_owm.sql
Database schema changes made by OWM
Internally, when you version-enable a table (e.g. MYTABLE), OWM makes a number of changes to your schema as follows:
Renames MYTABLE to MYTABLE_LT, for internal use only
Adds a number of grants on the object to WMSYS and WM_ADMIN_ROLE
Adds some extra OWM-specific columns (with names prefixed with WM_) and indexes to MYTABLE_LT
Creates the view MYTABLE, for use by your application for querying and DML
Creates an INSTEAD OF trigger (owned by WMSYS) on the view to handle DML
Creates some other triggers on any parent tables for referential integrity
Creates one or two other tables (MYTABLE_AUX, and sometimes MYTABLE_LCK) for internal use only
Creates some other views (MYTABLE_CONF, MYTABLE_DIFF, MYTABLE_HIST, MYTABLE_LOCK, MYTABLE_MW) for application use where needed
Converts any triggers and VPD policies on the table to metadata and then drops them; these are managed by OWM from then on
Based on the grants that OWM gives to WMSYS (such as ON COMMIT REFRESH and QUERY REWRITE) I think the OWM tables are materialized views.
To change the structure of a version-enabled table, e.g. adding/modifying/removing a column, constraint, or trigger, the following steps must be done:
Call dbms_wm.BeginDDL('MYTABLE');
Make the changes to a special table called MYTABLE_LTS
Call dbms_wm.CommitDDL('MYTABLE');
Note that this will fail if the table happens to have any constraints or indexes that are longer than 26 characters – so keep this in mind when naming them.
One of the most pleasing features of OWM is that it is relatively idiot-proof; if you try to perform an operation that is not supported, OWM will simply raise an exception (e.g. “ORA-20061: versioned objects have to be version disabled before being dropped“) instead of leaving you with a mess to clean up. Therefore it’s generally safe to test your scripts by simply running them and seeing what happens. For example, try doing some damage to the underlying tables or views by changing columns or dropping them – OWM will stop you. I would never do this sort of experiment in a production environment, of course!
Column comments on a table that becomes version-enabled are not migrated automatically to the view. They do remain on the renamed table (MYTABLE_LT). You can add comments to the view columns (and you don’t need to execute the BeginDDL/CommitDDL procedures for this); the same applies to the TABLE_LT table as well. Note, however, that if you remove the versioning from the table the view is dropped along with its comments, so if you later re-enable versioning you might want to re-apply the column comments as well.
To copy/synchronize the column comments from the underlying MYTABLE_LT table to the MYTABLE view, I use this script: sync_comments_lt_to_view.sql.
Implementing Workspace Manager
For guidance on how to take advantage of Oracle Workspace Manager in an APEX application, I watched this video by Dan McGhan. He demonstrates it in a javascript application but the real work is all done on the database in PL/SQL, which can be used by any application environment including APEX.
These are some of the API calls that I’ve used to build OWM features into my application:
My APEX application already uses VPD (or Row Level Security) to provide a multi-tenant environment for a wide range of users. Groups of users are assigned to one or more Security Groups; when they login they are assigned to one Security Group at a time which is set in a Global Application Context. A VPD policy has been applied to most tables like this:
function vpd_policy
  (object_schema in varchar2
  ,object_name in varchar2
  ) return varchar2 is
begin
  return q'[security_group_id=sys_context('CTX','SECURITY_GROUP_ID')]';
end vpd_policy;
The Application Context is associated with the APEX session’s Client Identifier (e.g. JBLOGGS:16630445499603) so each page request will be executed within the correct VPD context. A procedure is called from the Post-Authentication Procedure Name on the authentication scheme which sets the SECURITY_GROUP_ID context variable.
According to the docs, OWM can work along with VPD. However, you need to be aware of a few considerations:
Row-level security policies are not enforced during workspace operations, including MergeWorkspace and RollbackToSP.
Row-level security policies must be defined on a number of views, not just the view for the version-enabled table.
Don’t apply policies to the underlying tables created by OWM.
You can add VPD policies to a table prior to version-enabling it and these will be handled correctly by OWM when you version-enable it. However, if I need to add VPD policies after a table has been version-enabled, this is the code I run:
declare
  target_table varchar2(30) := 'MYTABLE';
begin
  for r in (
    select view_name
    from user_views
    where view_name in (target_table
                       ,target_table||'_LOCK'
                       ,target_table||'_CONF'
                       ,target_table||'_DIFF'
                       ,target_table||'_HIST'
                       ,target_table||'_MW')
  ) loop
    begin
      dbms_rls.add_policy
        (object_name     => r.view_name
        ,policy_name     => 'security_policy'
        ,policy_function => 'security_pkg.security_policy'
        ,update_check    => true
        ,static_policy   => true);
    exception
      when others then
        if sqlcode != -28101 /*policy already exists*/ then
          raise;
        end if;
    end;
  end loop;
end;
It adds the policy to the base view, as well as the five specific associated views (mytable_LOCK, mytable_CONF, mytable_DIFF, mytable_HIST and mytable_MW). Similar code may be used to alter or drop policies.
Note: with relation to VPD policies, the documentation doesn’t specifically mention the Multi-Workspace (_MW) view. As far as I can tell, however, this is required – because when you version-enable a table, a VPD policy on a non-version-enabled table will be applied by Workspace Manager to this _MW view as well as the other views.
Since a user’s changes within a workspace will be restricted to data for their Security Group, a MergeWorkspace works just fine – even though technically the merge occurs across the entire table ignoring the VPD policy, the only changes we expect are those for the user’s Security Group.
However, Savepoints are different; like workspaces, they are a snapshot of the entire table; if you issue a RollbackToSP, it will ignore any VPD policies and rollback all data to the selected savepoint. This means that you can’t use RollbackToSP to give users the ability to rollback their data to a snapshot, while isolating their changes to their VPD context. For this reason I don’t use RollbackToSP in my application.
All together – OWM, VPD and APEX
The users of my application need to be able to create scenarios for people in their Security Group to make proposed changes, see how the changes affect the reports, and merge those changes back to the “live” version. To facilitate this, I create a table to list the workspaces, and apply the VPD policy to it so that users can only view and work with workspaces for their Security Group.
create table scenarios (
  scenario_id         number
    default to_number(sys_guid()
                     ,'XXXXXXXXXXXXXXXXXXXXXXXXXXXXXXXX')
    not null
 ,scenario_name       varchar2(200) not null
 ,wm_workspace        varchar2(30) not null
 ,security_group_id   number
    default sys_context('CTX','SECURITY_GROUP_ID')
    not null
 ,constraint scenario_pk primary key (scenario_id)
 ,constraint scenario_uk unique (wm_workspace)
);
Each scenario has an internal ID (in this case, a surrogate key generated from a GUID), a user-specified name, and a name for the workspace. I didn’t use the user-entered name for the workspace name because (a) it must be unique across the database, and (b) it is limited to 30 characters.
After a user clicks the “Create Scenario” button and enters a name, the page process calls the following procedure (within the package security_pkg associated with the context):
procedure create_scenario
  (scenario_name  in varchar2
  ,keep_refreshed in boolean := false) is
  l_wm_workspace varchar2(30);
begin

  -- workspace name must be unique and <=30 chars
  l_wm_workspace := to_basex
   (to_number(sys_guid(),'XXXXXXXXXXXXXXXXXXXXXXXXXXXXXXXX')
   ,36);

  -- record the new scenario
  insert into scenarios (scenario_name, wm_workspace)
  values (create_scenario.scenario_name, l_wm_workspace);

  -- create the workspace
  dbms_wm.CreateWorkspace
    (workspace   => l_wm_workspace
    ,isrefreshed => keep_refreshed
    ,description => scenario_name
                 || ' ('
                 || sys_context('CTX','SECURITY_GROUP')
                 || ')'
    ,auto_commit => false);

  -- reset the savepoint, if required
  dbms_session.clear_context
      (namespace => 'CTX'
      ,attribute => 'WM_SAVEPOINT'
      ,client_id => sys_context('userenv','CLIENT_IDENTIFIER'));

  -- go to the workspace on the next page view
  dbms_session.set_context
      (namespace => 'CTX'
      ,attribute => 'WM_WORKSPACE'
      ,value     => l_wm_workspace
      ,client_id => sys_context('userenv','CLIENT_IDENTIFIER'));

end create_scenario;
In my APEX application Security Attributes, I have the following:
Initialization PL/SQL Code
security_pkg.init_apex_session;
Cleanup PL/SQL Code
security_pkg.cleanup_apex_session;
The procedures called above are as follows:
procedure wm_init is
begin
  dbms_wm.GotoWorkspace(nvl(sys_context('CTX','WM_WORKSPACE')
                           ,'LIVE'));
  dbms_wm.GotoSavepoint(nvl(sys_context('CTX','WM_SAVEPOINT')
                           ,'LATEST'));
end wm_init;

procedure init_apex_session is
begin
  wm_init;
end init_apex_session;

procedure cleanup_apex_session is
begin
  dbms_wm.GotoWorkspace('LIVE');
  dbms_wm.GotoSavepoint('LATEST');
end cleanup_apex_session;
The effect of this is that for each page request, the user’s selected workspace and/or savepoint is activated, or if they have not yet chosen a workspace or savepoint, the “live” workspace and “latest” savepoint is selected (which are the defaults). At the end of each page request, the session is reset to the “live” workspace and “latest” savepoint.
“That makes two of us.”
Create a Snapshot
Here is my code to create a snapshot, using the Workspace Manager SavePoint feature:
procedure create_snapshot
  (snapshot_name in varchar2) is
  l_wm_workspace varchar2(30);
  l_wm_savepoint varchar2(30);
begin

  -- savepoint name must be unique and <=30 chars
  l_wm_savepoint := to_basex
   (to_number(sys_guid(),'XXXXXXXXXXXXXXXXXXXXXXXXXXXXXXXX')
   ,36);

  l_wm_workspace := nvl(sys_context(CTX,'WM_WORKSPACE'), 'LIVE');

  -- record the snapshot
  insert into snapshots
    (snapshot_name
    ,wm_workspace
    ,wm_savepoint)
  values
    (create_snapshot.snapshot_name
    ,l_wm_workspace
    ,l_wm_savepoint);

  -- create the savepoint
  dbms_wm.CreateSavepoint
    (workspace      => l_wm_workspace
    ,savepoint_name => l_wm_savepoint
    ,description    => snapshot_name
                    || ' ('
                    || sys_context(CTX,'SECURITY_GROUP')
                    || ')'
    ,auto_commit    => false);

end create_snapshot;
Go to a Scenario
This sets the context for the user’s session so that subsequent page requests will load the specified Workspace. Any DML the user performs on version-enabled tables will be private to the workspace.
procedure goto_scenario (scenario_name in varchar2) is
  l_wm_workspace varchar2(30);
begin

  -- retrieve the workspace name for the given scenario
  select s.wm_workspace into l_wm_workspace
  from scenarios s
  where s.scenario_name = goto_scenario.scenario_name;

  -- reset the savepoint, if required
  dbms_session.clear_context
      (namespace => 'CTX'
      ,attribute => 'WM_SAVEPOINT'
      ,client_id => sys_context('userenv','CLIENT_IDENTIFIER'));

  -- go to the workspace on the next page view
  dbms_session.set_context
      (namespace => 'CTX'
      ,attribute => 'WM_WORKSPACE'
      ,value     => l_wm_workspace
      ,client_id => sys_context('userenv','CLIENT_IDENTIFIER'));

end goto_scenario;
View a Snapshot
This sets the context for the user’s session so that subsequent page requests will be viewing the specified Savepoint. The version-enabled tables will be read-only; any DML on them will raise an exception.
procedure goto_snapshot (snapshot_name in varchar2) is
  l_wm_workspace varchar2(30);
  l_wm_savepoint varchar2(30);
begin

  -- retrieve the details for the given snapshot
  select s.wm_workspace
        ,s.wm_savepoint
  into   l_wm_workspace
        ,l_wm_savepoint
  from snapshots s
  where s.snapshot_name = goto_snapshot.snapshot_name;

  -- set the workspace and savepoint on the next page request

  dbms_session.set_context
      (namespace => 'CTX'
      ,attribute => 'WM_WORKSPACE'
      ,value     => l_wm_workspace
      ,client_id => sys_context('userenv','CLIENT_IDENTIFIER'));

  dbms_session.set_context
      (namespace => 'CTX'
      ,attribute => 'WM_SAVEPOINT'
      ,value     => l_wm_savepoint
      ,client_id => sys_context('userenv','CLIENT_IDENTIFIER'));

end goto_snapshot;
Go to Live
When the user is in a Scenario, and they wish to go back to “Live”, they can click a button which executes the following procedure. Their next page request will go to the LATEST savepoint in the LIVE workspace.
procedure goto_live is
begin

  dbms_session.clear_context
      (namespace => 'CTX'
      ,attribute => 'WM_WORKSPACE'
      ,client_id => sys_context('userenv','CLIENT_IDENTIFIER'));

  dbms_session.clear_context
      (namespace => 'CTX'
      ,attribute => 'WM_SAVEPOINT'
      ,client_id => sys_context('userenv','CLIENT_IDENTIFIER'));

end goto_live;
Go to Latest
When the user is viewing a Snapshot, and they wish to go back to “Latest” (so they do DML, etc.), they can click a button which executes the following procedure. This works regardless of whether they are in the Live workspace or viewing a scenario. Their next page request will go to the LATEST savepoint.
procedure goto_latest is
begin

  dbms_session.clear_context
      (namespace => 'CTX'
      ,attribute => 'WM_SAVEPOINT'
      ,client_id => sys_context('userenv','CLIENT_IDENTIFIER'));

end goto_latest;
Compare two Scenarios
When the user wishes to analyze the differences between two scenarios, or between a scenario and the Live workspace, there is a two-step process:
The user selects two Scenarios (or the “Live” workspace) from some select lists; the return value of these select lists should be the wm_workspace column from the table, or 'LIVE' for the Live workspace.
The user clicks a button to execute the find_diffs1 procedure (see below).
The page has a report on the view mytable_DIFF.
procedure find_diffs1
  (wm_workspace1 in varchar2
  ,wm_workspace2 in varchar2) is
begin

  dbms_wm.SetDiffVersions
    (workspace1   => wm_workspace1
    ,workspace2   => wm_workspace2
    ,onlyModified => true);

end find_diffs1;
Compare Snapshots
When the user wishes to analyze the differences between two snapshots (in any workspace), or between the latest data and a snapshot, a similar process is used:
The user selects two Snapshots (or the “Latest” snapshot for either the Live workspace or a given Scenario); the return values of these select lists should be the wm_workspace and wm_savepoint, e.g. wm_workspace||':'||wm_savepoint.
The user clicks a button to execute the find_diffs2 procedure (see below).
The page has a report on the view mytable_DIFF.
procedure find_diffs
  (workspace_savepoint1 in varchar2
  ,workspace_savepoint2 in varchar2) is
  l_sep1 number := instr(workspace_savepoint1,':');
  l_sep2 number := instr(workspace_savepoint2,':');
begin

  dbms_wm.SetDiffVersions
    (workspace1   => substr(workspace_savepoint1, 1, l_sep1-1)
    ,savepoint1   => substr(workspace_savepoint1, l_sep1+1)
    ,workspace2   => substr(workspace_savepoint2, 1, l_sep2-1)
    ,savepoint2   => substr(workspace_savepoint2, l_sep2+1)
    ,onlyModified => true);

end find_diffs;
Merge a Scenario
In my system, I don’t allow users to create scenarios within scenarios, although this is possible with Workspace Manager. If the user wishes to merge all changes in a Scenario to Live, they click a button to execute the following procedure:
wm_error_55 exception;
wm_error_56 exception;
pragma exception_init(wm_error_55, -20055);
pragma exception_init(wm_error_56, -20056);

procedure merge_scenario is
  l_wm_workspace varchar2(30);
begin

  l_wm_workspace := sys_context('CTX','WM_WORKSPACE');

  goto_live;
  wm_init;

  -- merge the workspace
  dbms_wm.MergeWorkspace
    (workspace        => l_wm_workspace
    ,remove_workspace => true
    ,auto_commit      => false);

  -- delete the scenario
  delete scenarios s
  where s.wm_workspace = merge_scenario.scenario_id;

exception
  when wm_error_55 or wm_error_56 then
    -- unable to merge due to conflicts

    -- go back into the workspace
    dbms_session.set_context
      (namespace => 'CTX'
      ,attribute => 'WM_WORKSPACE'
      ,value     => l_wm_workspace
      ,client_id => sys_context('userenv','CLIENT_IDENTIFIER'));

    -- caller should redirect user to the "resolve conflicts" page
    raise e_merge_conflict;

end merge_scenario;
This will fail with an exception if there are any conflicting changes in the Live workspace, e.g.:
a record was updated in the scenario, but was deleted in Live
a record was updated or deleted in the scenario, but also updated in Live
a record was inserted in the scenario, but another record with the same PK was inserted in Live
If the workspace had been created with the isrefreshed option, the changes being made in Live will be automatically copied to the workspace so these conflicts should be minimised; however, conflicts cannot always be avoided. To give the user the ability to analyze the conflicts, you would perform the following steps:
Allow the user to select an action for each record in conflict – either “PARENT” (keep the parent, i.e. discard the change in the scenario) or “CHILD” (keep the child, i.e. discard the change made in Live).
For each record, call dbms_wm.ResolveConflicts (see example below).
The ResolveConflicts procedure takes a where clause that identifies the row (or rows) to mark as resolved. In my case, I just call it with the id for each record the user chose:
for r in (
  ...query on something, e.g. an APEX collection...
  ) loop

  dbms_wm.ResolveConflicts
    (workspace    => sys_context('CTX','WM_WORKSPACE')
    ,table_name   => 'MYTABLE'
    ,where_clause => 'id=' || r.id
    ,keep         => r.action /*'PARENT' or 'CHILD'*/);

end loop;
If the conflicts are across multiple tables, the UI will probably be a bit more complicated. You’d have to resolve conflicts on all the affected tables before the Merge can succeed.
“Don’t let a white fence and a promotion end the world for you.”
Delete a Scenario
Deleting a scenario uses RemoveWorkspace:
procedure delete_scenario
  (scenario_name in varchar2) is
  l_wm_workspace varchar2(30);
begin

  -- retrieve the workspace name for the given scenario
  select s.wm_workspace into l_wm_workspace
  from scenarios s
  where s.scenario_name = delete_scenario.scenario_name;

  -- get out of the workspace
  goto_live;
  wm_init;

  -- delete the workspace
  dbms_wm.RemoveWorkspace
    (workspace   => l_wm_workspace
    ,auto_commit => false);

  delete scenarios s
  where s.wm_workspace = l_wm_workspace;

end delete_scenario;
Delete a Snapshot
Deleting a snapshot uses DeleteSavepoint:
procedure delete_snapshot
  (snapshot_name varchar2) is
  l_wm_workspace varchar2(30);
  l_wm_savepoint varchar2(30);
begin

  -- retrieve the details for the given snapshot
  select s.wm_workspace
        ,s.wm_savepoint
  into   l_wm_workspace
        ,l_wm_savepoint
  from snapshots s
  where s.snapshot_name = delete_snapshot.snapshot_name;

  -- get out of the snapshot/scenario:
  goto_latest;
  wm_init;

  -- delete the savepoint
  dbms_wm.DeleteSavepoint
    (workspace      => nvl(l_wm_workspace,'LIVE')
    ,savepoint_name => l_wm_savepoint
    ,auto_commit    => false);

  delete snapshots s
  where s.wm_savepoint = l_wm_savepoint;

end delete_snapshot;
Row History
One of the requirements of my application was to show a report of the entire history of edits to each record in a table. Since I’m already going to version-enable this table, it makes sense to take advantage of the Row History feature of Oracle Workspace Manager.
When you version-enable a table, OWM creates a view called MYTABLE_HIST which includes all the columns of the table, plus the following columns: WM_WORKSPACE, WM_VERSION, WM_USERNAME, WM_OPTYPE, WM_CREATETIME, and WM_RETIRETIME. By default, when you version-enable a table, OWM keeps only a minimal set of history in order to support other features in use, such as snapshots. In order to retain a complete history of changes to the record, enable versioning with the View Without Overwrite history option:
begin
  dbms_wm.EnableVersioning('MYTABLE'
    ,hist => 'VIEW_WO_OVERWRITE');
end;
This stops OWM from overwriting the history of changes to each record, so it can be queried via the _HIST view.
Now, I wanted to expose the contents of this view to my users, and for each history record show Who did it and When. “When” is easily answered by WM_CREATETIME, which is a TIMESTAMP WITH TIME ZONE. “Who” would normally be answered by WM_USERNAME, but since we’re in APEX, this will always be 'APEX_PUBLIC_USER' which is not very useful. Therefore, I have an ordinary column in my table called DB$UPDATED_BY which is set by the following ordinary trigger:
create trigger MYTABLE$TRG
  before update on MYTABLE
  for each row
begin
  :new.db$updated_by :=
     coalesce(sys_context('APEX$SESSION','APP_USER')
             ,sys_context('USERENV','SESSION_USER'));
end MYTABLE$TRG;
This means my report will show the actual APEX username of who created or updated the record.
The WM_OPTYPE column in the _HIST view will be 'I' (inserted), 'U' (updated), or 'D' (deleted). I can translate this code into user-friendly values for reporting purposes, but there is one problem: when a row is deleted, the _HIST table knows the username who deleted the record, but we never recorded the APEX username. Our db$updated_by column wasn’t changed, so it simply shows whoever last updated the records before it was deleted.
To solve this, we have two options: (1) Write the application to do a quick no-change UPDATE on each row immediately before deleting it; then do some fancy footwork in the view to show this as a “Delete” operation. (2) Don’t allow the application to execute actual DELETEs – in other words, use a “soft-delete” design.
I’ve gone with option (2) which is what the users needed anyway – they needed to be able to Delete and Undelete records at will, so I’ve only granted INSERT and UPDATE on the table and the application will translate a request to “DELETE” into an update of a “deleted” flag on the table. A request to Undelete a record is simply another update to set the “deleted” flag to NULL. All reports in the application have a predicate to filter out any deleted records unless the user is viewing the “recycle bin”. In addition, if the user is viewing a deleted record, I put the form into “Readonly” mode – the only thing they can do is Undelete it (thereafter, they can modify the record if they wish).
I’ve created the following view in order to show the history of changes to a record:
create or replace view mytable_hist_vw as
select x.id, x.name, etc.
      ,l.wm_createtime as op_timestamp
      ,case
       when x.wm_optype = 'U'
        and x.deleted_ind = 'Y'
        and lag(x.deleted_ind,1)
            over (partition by x.id
                  order by x.wm_createtime) is null
       then 'Deleted'
       when x.wm_optype = 'U'
        and x.deleted_ind is null
        and lag(x.deleted_ind,1)
            over (partition by x.id
                  order by x.wm_createtime) = 'Y'
       then 'Undeleted'
       when x.wm_optype = 'I' then 'Created'
       when x.wm_optype = 'U' then 'Updated'
       when x.wm_optype = 'D' then 'Deleted permanently'
       end as op_desc
      ,case
       when x.wm_optype = 'D'
       then x.wm_username
       else x.db$updated_by
       end as op_by
from   mytable_hist x
I interpret an WM_OPTYPE of 'D' as “Deleted permanently”. This might occur if we do a delete directly on the table, e.g. via a data fix run directly on the database. In this case I report the username according to the wm_username column since we won’t have the APEX user name.
If you need to send almost any message to almost any phone from your Oracle database, and you want to use straight PL/SQL, you may want to consider using my Clicksend API.
SMS (Short Message Service)
MMS (Multimedia Message Service)
Text to Voice
I have released the first beta version of my Oracle PL/SQL API for Clicksend. Read the installation instructions, API reference and download the release from here:
Sending an SMS is as simple as adding this anywhere in your code:
begin
  clicksend_pkg.send_sms
    (p_sender  => 'TheDatabase'
    ,p_mobile  => '+61411111111'
    ,p_message => 'G''day, this is your database!'
    );
  clicksend_pkg.push_queue;
  commit;
end;
All you need to do is signup for a Clicksend account. You’ll only be charged for messages actually sent, but they do require you to pay in advance – e.g. $20 gets you about 300 messages (Australian numbers). You can get test settings so that you can try it out for free.
I’ve been using Clicksend for years now, and have been satisfied with their service and the speed and reliability of getting messages to people’s mobiles. When I encountered any issues, a chat with their support quickly resolved them, and they were quick to offer free credits when things weren’t working out as expected.
If you want to send a photo to someone’s phone via MMS (although I’m not sure what the use-case for this might be), you need to first upload the image somewhere online, because the API only accepts a URL. In my case, I would use the Amazon S3 API from the Alexandria PL/SQL Library, then pass the generated URL to the clicksend API. There is a file upload feature that ClickSend provides, I plan to add an API call to take advantage of this which will make this seamless – and provide some file conversion capabilities as well.
begin
  clicksend_pkg.send_mms
    (p_sender  => 'TheDatabase'
    ,p_mobile  => '+61411111111'
    ,p_subject => 'G''Day!'
    ,p_message => 'This is an MMS from your database!'
    ,p_media_file_url =>
'http://s3-ap-southeast-2.amazonaws.com/jk64/jk64logo.jpg'
    );
  clicksend_pkg.push_queue;
  commit;
end;
You can send a voice message to someone (e.g. if they don’t have a mobile phone) using the Text to Voice API.
begin
  clicksend_pkg.send_voice
    (p_phone_no     => '+61411111111'
    ,p_message      => 'Hello. This message was sent from your database. '
                    || 'Have a nice day.'
    ,p_voice_lang   => 'en-gb' -- British English
    ,p_voice_gender => 'male'
    ,p_schedule_dt  => sysdate + interval '2' minute
    );
  clicksend_pkg.push_queue;
  commit;
end;
You have to tell the API what language the message is in. For a number of languages, you can specify the accent/dialect (e.g. American English, British English, or Aussie) and gender (male or female). You can see the full list here.
All calls to the send_sms, send_mms and send_voice procedures use Oracle AQ to make the messages transactional. It’s up to you to either COMMIT or ROLLBACK, which determines whether the message is actually sent or not. All messages go into a single queue.
You can have a message be scheduled at a particular point in time by setting the p_schedule_dt parameter.
The default installation creates a job that runs every 5 minutes to push the queue. You can also call push_queue directly in your code after calling a send_xxx procedure. This creates a job to push the queue as well, so it won’t interfere with your transaction.
All messages get logged in a table, clicksend_msg_log. The log includes a column clicksend_cost which allows you to monitor your costs. To check your account balance, call get_credit_balance.
Please try it out if you can and let me know of any issues or suggestions for improvement.
Sending emails from the Oracle database can be both simply deceptively braindead easy, and confoundingly perplexingly awful at the same time. Easy, because all you have to do is call one of the supplied mail packages to send an email:
If you want more control over your emails you can use UTL_SMTP instead; this is what I’ve been using for the past few years because I like feeling in control (doesn’t everyone?). This is the package that APEX_MAIL is built on top of.
If you just don’t trust these high-level abstractions you can use UTL_TCP and interact directly with the mail server. I don’t know, maybe your mail server does some weird stuff that isn’t supported by the standard packages.
If you want to send attachments, you can build this yourself in UTL_SMTP or UTL_TCP, but it’s easier with APEX_MAIL which can send BLOBs. UTL_MAIL can send attachments but only up to 32K in size (half that for binary files which become base64 encoded).
Let’s make up a checklist of features supported out of the box (i.e. without requiring you to write non-trivial code) and see how they stack up:
APEX_MAIL
UTL_MAIL
UTL_SMTP
UTL_TCP
Attachments
Yes
Yes (<32K)
No*
No*
Asynchronous
Yes
No
No
No
Rate limited
Yes
No
No
No
Anti-Spam
No*
No*
No*
No*
SSL/TLS
Yes
No
No*
No*
Authentication
Yes
No
No*
No*
Features marked “No*”: these are not natively supported by the API, but generic API routines for sending arbitrary data (including RAW) can be used to build these features, if you’re really keen or you can google the code to copy-and-paste.
(Note: of course, you can add the Asynchronous and Rate limiting features to any of the UTL_* packages by writing your own code.)
Asynchronous
Calls to the API to send an email do not attempt to connect to the mail server in the same session, but record the email to be sent soon after in a separate session.
This provides two benefits:
It allows emails to be transactional – if the calling transaction is rolled back, the email will not be sent; and
It ensures the client process doesn’t have to wait until the mail server responds, which might be slow in times of peak load.
Anti-Spam
Sending an email within an organisation is easy; internal mail servers don’t usually filter out internal emails as spam. Sending an email across the internet at large is fraught with difficulties, which can rear their ugly heads months or years after going live. One day your server tries to send 100 emails to the same recipient in error, and all of a sudden your IP is blocked as a spammer and NO emails get sent, with no warning.
For the last two years I’ve been battling this problem, because my site allows my clients to broadcast messages to their customers and partners via email and SMS. The SMS side worked fine, but emails frequently went AWOL and occasionally the whole site would get spam blocked. Most emails to hotmail went into a black hole and I was always having to apologise to anyone complaining about not getting their emails – “You’re not using a hotmail address by any chance? ah, that’s the problem then – sorry about that. Do you have any other email address we can use?”
I added some rate-limiting code to ensure that my server trickled the emails out. My server was sending about 2,000 to 3,000 per month, but sometimes these were sent in short spikes rather than spread out over the month. My rate-limiting meant a broadcast to 200 people could take several hours to complete, which didn’t seem to bother anyone; and this stopped the “too many emails sent within the same hour” errors from the mail server (I was using my ISP’s mail server).
I managed to improve the situation a little by implementing SPF (Sender Policy Framework). But still, lots of emails went missing, or at least directly into people’s spam folders.
I looked into DKIM as well, but after a few hours reading I threw that into the “too hard basket”. I decided that I’d much prefer to outsource all this worry and frustration to someone with more expertise and experience.
Searching for an Email Gateway
I’ve been hosting my site on Amazon EC2 for a long time now with great results and low cost, and I’ve also been using Amazon S3 for hosting large files and user-uploaded content. Amazon also provides an Email Gateway solution called SES which seemed like a logical next step. This service gives 62,000 messages per month for free (when sent from an EC2 instance) and you just get charged small amounts for the data transfer (something like 12c per GB).
I started trying to build a PL/SQL API to Amazon SES but got stuck trying to authenticate using Amazon’s complicated scheme. Just to make life interesting they use a different encryption algorithm for SES than they do for S3 (for which I already had code from the Alexandria PL/SQL library). It was difficult because their examples all assumed you’ve installed the Amazon SDK.
It always rejected anything I sent, and gave no clues as to what I might be doing wrong. In the end I decided that what I was doing wrong was trying to work this low-level stuff out myself instead of reusing a solution that someone else has already worked out. A good developer is a lazy developer, so they say. So I decided to see what other email gateways are out there.
I looked at a few, but their costs were prohibitive for my teeny tiny business as they assumed I am a big marketing company sending 100,000s of emails per month and would be happy to pay $100’s in monthly subscriptions. I wanted a low-cost, pay-per-use transactional email service that would take care of the DKIM mail signing for me.
Mailgun
In the end, I stumbled upon Mailgun, a service provided by Rackspace. Their service takes care of the DKIM signing for me, do automated rate limiting (with dynamic ramp up and ramp down), it includes 10,000 free emails per month, and extra emails are charged at very low amounts per email with no monthly subscription requirement.
Other benefits I noticed was that it allows my server to send emails by two methods: (1) RESTful API and (2) SMTP. The SMTP interface meant that I was very quickly able to use the service simply by pointing my existing APEX mail settings and my custom UTL_SMTP solution directly to the Mailgun SMTP endpoint, and it worked out of the box. Immediately virtually all our emails were getting sent, even to hotmail addresses. I was able to remove my rate limiting code. Other bonuses were that I now had much better visibility of failed emails – the Mailgun online interface provides access to a detailed log including bounces, spam blocks and other problems. So far I’ve been using it for a few weeks, and of 2,410 emails attempted, 98.55% were delivered, and 1.45% dropped. The emails that were dropped were mainly due to incorrect email addresses in my system, deliberately “bad” test emails I’ve tried, or problems on the target mail servers. One email was blocked by someone’s server which was running SpamAssassin. So overall I’ve been blown away by how well this is running.
Once I had my immediate problem solved, I decided to have a closer look at the RESTful API. This provides a few intriguing features not supported by the SMTP interface, such as sending an email to multiple recipients with substitution strings in the message, and each recipient only sees their own name in the “To” field. My previous solution for this involved sending many emails; the API means that I can send the request to Mailgun just once, and Mailgun will send out all the individual emails.
Another little bonus is that Mailgun’s API also includes a souped-up email address validator. This validator doesn’t just check email addresses according to basic email address formatting, it also checks the MX records on the target domain to determine whether it’s likely to accept emails. For some domains (such as gmail.com and yahoo.com) I noticed that it even does some level of checking of the user name portion of the email address. It’s still not absolutely perfect, but it’s better than other email validation routines I’ve seen.
Note: Mailgun supports maximum message size of 25MB.
Email Validation Plugin
Mailgun also provide a jQuery plugin for their email address validator which means you can validate user-entered email addresses on the client before they even hit your server. To take advantage of this in Oracle APEX I created the Mailgun Email Validator Dynamic Plugin that you can use and adapt if you want.
PL/SQL API
If you follow me on twitter you are probably already aware that I’ve started building a PL/SQL API to make the Mailgun RESTful API accessible to Oracle developers. You can try it out for yourself by downloading from here if you want. The WIKI on Github has detailed installation instructions (it’s a little involved) and an API reference.
The API supports the following Mailgun features:
Email validation – does the same thing as the jQuery-based plugin, but on the server
My implementation of the Send Email API so far supports the following features:
MAILGUN_PKG
Attachments
Yes
Asynchronous
Yes
Rate limited
Yes*
Anti-Spam
Yes*
SSL/TLS
Yes, required
Authentication
Yes
Features marked “Yes*”: these are provided by the Mailgun service by default, they are not specific to this PL/SQL API.
I’m planning to add more features to the API as-and-when I have a use for them, or if someone asks me very nicely to build them. I’ll be pleased if you fork the project from Github and I welcome your pull requests to merge improvements in. I recommend reading through the Mailgun API Documentation for feature ideas.
If you use either of these in your project, please let me know as I’d love to hear about your experience with it.
Some time back, Connor rightly pointed out that triggers that modify data can get in the way when you need to do out-of-the-ordinary data maintenance, e.g. when you need to fix up a row here or re-insert a row over there. You can’t just disable the trigger or else make your users suffer down-time.
Now, the only purpose for which I use triggers is to do common things like setting audit columns and incrementing a VERSION_ID column, and in certain special cases for carefully implementing cross-row constraints; also, I use them to populate a journal table with all changes to the table. Mind you, in recent times features have been added and improved in the Oracle database (such as Flashback Query and Flashback Data Archive) to the point where I’m almost ready to stop doing this. However, there are still some minor use-cases where having a separate “journal” table can be useful. Any argument about that assertion is ruled “out of scope” for this article! 🙂
So, assuming we’re sticking with triggers that might change data, a solution to this problem is already built-in to the journal triggers and Table APIs (TAPI) that my PL/SQL code generator creates. This allows me to disable the trigger on any table, just for my current session without affecting any other concurrent activity – and no DDL required.
UPDATED 16/2/2016: now uses a context variable (thanks Connor for the idea)
In the trigger I have this code:
create or replace TRIGGER EMPS$TRG
  FOR INSERT OR UPDATE OR DELETE ON EMPS
  COMPOUND TRIGGER

  BEFORE EACH ROW IS
  BEGIN
    IF SYS_CONTEXT('SAMPLE_CTX','EMPS$TRG') IS NULL THEN
      ...etc...
    END IF;
  END BEFORE EACH ROW;

  AFTER EACH ROW IS
  BEGIN
    IF SYS_CONTEXT('SAMPLE_CTX','EMPS$TRG') IS NULL THEN
      ...etc...
    END IF;
  END AFTER EACH ROW;

END EMPS$TRG;
The trigger takes advantage of some extra code that is generated in the Table API:
create or replace PACKAGE EMPS$TAPI AS
/***********************************************
 Table API for emps
 10-FEB-2016 - Generated by SAMPLE
***********************************************/

...

-- Use these procedures to disable and re-enable the
-- journal trigger just for this session (to disable for
-- all sessions, just disable the database trigger
-- instead).
PROCEDURE disable_journal_trigger;
PROCEDURE enable_journal_trigger;

END EMPS$TAPI;
The package body code is quite simple:
create or replace PACKAGE BODY EMPS$TAPI AS
/***********************************************
 Table API for emps
 10-FEB-2016 - Generated by SAMPLE
***********************************************/

...

-- may be used to disable and re-enable the journal trigger for this session
PROCEDURE disable_journal_trigger IS
BEGIN
  log_start('disable_journal_trigger');

  SECURITY.disable_journal_trigger('EMPS$TRG');

  log_end;
EXCEPTION
  WHEN OTHERS THEN
    UTIL.log_sqlerrm;
    RAISE;
END disable_journal_trigger;

PROCEDURE enable_journal_trigger IS
BEGIN
  log_start('enable_journal_trigger');

  SECURITY.enable_journal_trigger('EMPS$TRG');

  log_end;
EXCEPTION
  WHEN OTHERS THEN
    UTIL.log_sqlerrm;
    RAISE;
END enable_journal_trigger;

END EMPS$TAPI;
A context variable is set with the name of the trigger to disable it – the default state for a new session (i.e. the context variable not set) means the trigger is enabled.
create or replace PACKAGE BODY SECURITY AS

...

PROCEDURE disable_journal_trigger
  (trigger_name IN VARCHAR2
  ,client_id    IN VARCHAR2 := NULL) IS
BEGIN
  -- set the context to any non-null value
  DBMS_SESSION.set_context
    (namespace => 'SAMPLE_CTX'
    ,attribute => trigger_name
    ,value     => 'DISABLED'
    ,client_id => NVL(client_id, SYS_CONTEXT('USERENV','CLIENT_IDENTIFIER')));
END disable_journal_trigger;

PROCEDURE enable_journal_trigger
  (trigger_name IN VARCHAR2
  ,client_id    IN VARCHAR2 := NULL) IS
BEGIN
  -- clear the context
  DBMS_SESSION.clear_context
    (namespace => 'SAMPLE_CTX'
    ,attribute => trigger_name
    ,client_id => NVL(client_id, SYS_CONTEXT('USERENV','CLIENT_IDENTIFIER')));
END enable_journal_trigger;

END SECURITY;
So now, to run some data maintenance, I can simply call the TAPI to disable, then re-enable, the trigger:
BEGIN EMPS$TAPI.disable_journal_trigger; END;
/

... do the data maintenance...

BEGIN EMPS$TAPI.enable_journal_trigger; END;
/
Unless the data maintenance is doing something very unusual, this script should be safe to run while the system is still up and running for users.
Also, it would be a trivial exercise to write a routine which disables or enables all the journal triggers at once.
The point of this, of course, is that you should be able to do all this sort of thing without writing a lot of code for each table in your schema – solve it for one table, and then generate the code for all your tables.
The last few weeks I’ve made quite a few improvements to my TAPI generator which I thought I’d share. I’ve also added an Apex API generator which generates code suitable for interfacing between simple Apex applications and my TAPIs. This reduces the volume of PL/SQL required within Apex to a bare minimum.
Templates are now defined in a package spec, so they are easier to edit in a tool with syntax highlighting (more or less)
Most dynamic code generation is defined within the template using a simple syntax
Makes inferences from schema metadata to generate code, including some guesses based on object and column naming conventions.
Ability to insert table-specific code into the template so that it is retained after re-generating the TAPI.
As much as possible, allow generated code to follow my preferred code formatting rules as possible.
The Table API (“TAPI”) package defines two record types; one (rowtype) is based on the table, the other (rvtype) uses mostly VARCHAR2(4000) columns in order to hold a pre-validated record.
Assumptions
My generator makes the following assumptions:
All tables and columns are named non-case-sensitive, i.e. no double-quote delimiters required.
(APEX API) All columns are max 26 chars long (in order to accommodate the Apex “P99_…” naming convention)
(APEX API) Table has no more than 1 CLOB, 1 BLOB and 1 XMLTYPE column (in order to support conversion to/from Apex collections)
If any of the above do not hold true, the TAPI will probably need to be manually adjusted to work. All TAPIs generated should be reviewed prior to use anyway.
Example
For example, given the following schema:
CREATE TABLE emps
(emp_id NUMBER NOT NULL
,name VARCHAR2(100 CHAR) NOT NULL
,emp_type VARCHAR2(20 CHAR) DEFAULT 'SALARIED' NOT NULL
,start_date DATE NOT NULL
,end_date DATE
,dummy_ts TIMESTAMP(6)
,dummy_tsz TIMESTAMP(6) WITH TIME ZONE
,life_history CLOB
,CONSTRAINT emps_pk PRIMARY KEY ( emp_id )
,CONSTRAINT emps_name_uk UNIQUE ( name )
,CONSTRAINT emp_type_ck
CHECK ( emp_type IN ('SALARIED','CONTRACTOR')
);
CREATE SEQUENCE emp_id_seq;
I can run this:
BEGIN GENERATE.tapi('emps'); END;
/
This generates the following package (I’ve removed large portions, the full version is linked below):
create or replace PACKAGE EMPS$TAPI AS
/**********************************************************
Table API for emps
10-FEB-2016 - Generated by SAMPLE
**********************************************************/
SUBTYPE rowtype IS emps%ROWTYPE;
TYPE arraytype IS TABLE OF rowtype INDEX BY BINARY_INTEGER;
TYPE rvtype IS RECORD
(emp_id emps.emp_id%TYPE
,name VARCHAR2(4000)
,emp_type VARCHAR2(4000)
,start_date VARCHAR2(4000)
,end_date VARCHAR2(4000)
,dummy_ts VARCHAR2(4000)
,dummy_tsz VARCHAR2(4000)
,life_history emps.life_history%TYPE
,version_id emps.version_id%TYPE
);
TYPE rvarraytype IS TABLE OF rvtype INDEX BY BINARY_INTEGER;
-- validate the row (returns an error message if invalid)
FUNCTION val (rv IN rvtype) RETURN VARCHAR2;
-- insert a row
FUNCTION ins (rv IN rvtype) RETURN rowtype;
-- insert multiple rows, array may be sparse
-- returns no. records inserted
FUNCTION bulk_ins (arr IN rvarraytype) RETURN NUMBER;
$if false $then/*need to grant DBMS_CRYPTO*/
-- generate a hash for the record
FUNCTION hash (r IN rowtype) RETURN VARCHAR2;
$end
...
END EMPS$TAPI;
create or replace PACKAGE BODY EMPS$TAPI AS
/**********************************************************
Table API for emps
10-FEB-2016 - Generated by SAMPLE
**********************************************************/
FUNCTION val (rv IN rvtype) RETURN VARCHAR2 IS
-- Validates the record but without reference to any other rows or tables
-- (i.e. avoid any queries in here).
-- Unique and referential integrity should be validated via suitable db
-- constraints (violations will be raised when the ins/upd/del is attempted).
-- Complex cross-record validations should usually be performed by a XAPI
-- prior to the call to the TAPI.
BEGIN
log_start('val');
UTIL.val_not_null (val =&amp;amp;amp;amp;gt; rv.name, column_name =&amp;amp;amp;amp;gt; 'NAME');
UTIL.val_not_null (val =&amp;amp;amp;amp;gt; rv.emp_type, column_name =&amp;amp;amp;amp;gt; 'EMP_TYPE');
UTIL.val_not_null (val =&amp;amp;amp;amp;gt; rv.start_date, column_name =&amp;amp;amp;amp;gt; 'START_DATE');
UTIL.val_max_len (val =&amp;amp;amp;amp;gt; rv.name, len =&amp;amp;amp;amp;gt; 100, column_name =&amp;amp;amp;amp;gt; 'NAME');
UTIL.val_max_len (val =&amp;amp;amp;amp;gt; rv.emp_type, len =&amp;amp;amp;amp;gt; 20, column_name =&amp;amp;amp;amp;gt; 'EMP_TYPE');
UTIL.val_date (val =&amp;amp;amp;amp;gt; rv.start_date, column_name =&amp;amp;amp;amp;gt; 'START_DATE');
UTIL.val_date (val =&amp;amp;amp;amp;gt; rv.end_date, column_name =&amp;amp;amp;amp;gt; 'END_DATE');
UTIL.val_timestamp (val =&amp;amp;amp;amp;gt; rv.dummy_ts, column_name =&amp;amp;amp;amp;gt; 'DUMMY_TS');
UTIL.val_timestamp_tz (val =&amp;amp;amp;amp;gt; rv.dummy_tsz, column_name =&amp;amp;amp;amp;gt; 'DUMMY_TSZ');
--TODO: add more validations if necessary
log_end;
RETURN UTIL.first_error;
EXCEPTION
WHEN UTIL.application_error THEN
log_end('application_error');
RAISE;
WHEN OTHERS THEN
UTIL.log_sqlerrm;
RAISE;
END val;
FUNCTION ins (rv IN rvtype) RETURN rowtype IS
r rowtype;
error_msg VARCHAR2(32767);
BEGIN
log_start('ins');
error_msg := val (rv =&amp;amp;amp;amp;gt; rv);
IF error_msg IS NOT NULL THEN
raise_error(error_msg);
END IF;
INSERT INTO emps
(emp_id
,name
,emp_type
,start_date
,end_date
,dummy_ts
,dummy_tsz
,life_history)
VALUES(emp_id_seq.NEXTVAL
,rv.name
,rv.emp_type
,UTIL.date_val(rv.start_date)
,UTIL.date_val(rv.end_date)
,UTIL.timestamp_val(rv.dummy_ts)
,UTIL.timestamp_tz_val(rv.dummy_tsz)
,rv.life_history)
RETURNING
emp_id
,name
,emp_type
,start_date
,end_date
,dummy_ts
,dummy_tsz
,life_history
,created_by
,created_dt
,last_updated_by
,last_updated_dt
,version_id
INTO r.emp_id
,r.name
,r.emp_type
,r.start_date
,r.end_date
,r.dummy_ts
,r.dummy_tsz
,r.life_history
,r.created_by
,r.created_dt
,r.last_updated_by
,r.last_updated_dt
,r.version_id;
msg('INSERT emps: ' || SQL%ROWCOUNT);
log_end;
RETURN r;
EXCEPTION
WHEN DUP_VAL_ON_INDEX THEN
UTIL.raise_dup_val_on_index;
WHEN UTIL.application_error THEN
log_end('application_error');
RAISE;
WHEN OTHERS THEN
UTIL.log_sqlerrm;
RAISE;
END ins;
FUNCTION bulk_ins (arr IN rvarraytype) RETURN NUMBER IS
rowcount NUMBER;
BEGIN
log_start('bulk_ins');
bulk_val(arr);
FORALL i IN INDICES OF arr
INSERT INTO emps
(emp_id
,name
,emp_type
,start_date
,end_date
,dummy_ts
,dummy_tsz
,life_history)
VALUES (emp_id_seq.NEXTVAL
,arr(i).name
,arr(i).emp_type
,UTIL.date_val(arr(i).start_date)
,UTIL.date_val(arr(i).end_date)
,UTIL.timestamp_val(arr(i).dummy_ts)
,UTIL.timestamp_tz_val(arr(i).dummy_tsz)
,arr(i).life_history);
rowcount := SQL%ROWCOUNT;
msg('INSERT emps: ' || rowcount);
log_end('rowcount=' || rowcount);
RETURN rowcount;
EXCEPTION
WHEN DUP_VAL_ON_INDEX THEN
UTIL.raise_dup_val_on_index;
WHEN UTIL.application_error THEN
log_end('application_error');
RAISE;
WHEN OTHERS THEN
UTIL.log_sqlerrm;
RAISE;
END bulk_ins;
$if false $then/*need to grant DBMS_CRYPTO*/
FUNCTION hash (r IN rowtype) RETURN VARCHAR2 IS
sep CONSTANT VARCHAR2(1) := '|';
digest CLOB;
ret RAW(2000);
BEGIN
log_start('hash');
digest := digest || sep || r.emp_id;
digest := digest || sep || r.name;
digest := digest || sep || r.emp_type;
digest := digest || sep || TO_CHAR(r.start_date, UTIL.DATE_FORMAT);
digest := digest || sep || TO_CHAR(r.end_date, UTIL.DATE_FORMAT);
digest := digest || sep || TO_CHAR(r.dummy_ts, UTIL.TIMESTAMP_FORMAT);
digest := digest || sep || TO_CHAR(r.dummy_tsz, UTIL.TIMESTAMP_TZ_FORMAT);
ret := DBMS_CRYPTO.hash(digest, DBMS_CRYPTO.hash_sh1);
log_end(ret);
RETURN ret;
EXCEPTION
WHEN UTIL.application_error THEN
log_end('application_error');
RAISE;
WHEN OTHERS THEN
UTIL.log_sqlerrm;
RAISE;
END hash;
$end
...
END EMPS$TAPI;
Example Template
The following is a template which provides the source used to generate the above TAPI. The syntax may look very strange, but if you read on you can read my explanation of the syntax below. My goal was not to invent an all-singing all-dancing general-purpose syntax for code generation – but to have “just enough” expressive power to generate the kind of code I require.
create or replace PACKAGE TEMPLATES AS
$if false $then
&amp;amp;amp;amp;lt;%TEMPLATE TAPI_PACKAGE_SPEC&amp;amp;amp;amp;gt;
CREATE OR REPLACE PACKAGE #TAPI# AS
/**********************************************************
Table API for #table#
#SYSDATE# - Generated by #USER#
**********************************************************/
&amp;amp;amp;amp;lt;%IF EVENTS&amp;amp;amp;amp;gt;
/*Repeat Types*/
DAILY CONSTANT VARCHAR2(100) := 'DAILY';
WEEKLY CONSTANT VARCHAR2(100) := 'WEEKLY';
MONTHLY CONSTANT VARCHAR2(100) := 'MONTHLY';
ANNUALLY CONSTANT VARCHAR2(100) := 'ANNUALLY';
&amp;amp;amp;amp;lt;%END IF&amp;amp;amp;amp;gt;
SUBTYPE rowtype IS #table#%ROWTYPE;
TYPE arraytype IS TABLE OF rowtype INDEX BY BINARY_INTEGER;
TYPE rvtype IS RECORD
(&amp;amp;amp;amp;lt;%COLUMNS EXCLUDING AUDIT INCLUDING ROWID,EVENTS.REPEAT_IND&amp;amp;amp;amp;gt;
#col#--- VARCHAR2(4000)~
#col#--- #table#.#col#%TYPE{ID}~
#col#--- #table#.#col#%TYPE{LOB}~
#col#--- VARCHAR2(20){ROWID}~
#col#--- VARCHAR2(1){EVENTS.REPEAT_IND}~
,&amp;amp;amp;amp;lt;%END&amp;amp;amp;amp;gt;
);
TYPE rvarraytype IS TABLE OF rvtype INDEX BY BINARY_INTEGER;
-- validate the row (returns an error message if invalid)
FUNCTION val (rv IN rvtype) RETURN VARCHAR2;
-- insert a row
FUNCTION ins (rv IN rvtype) RETURN rowtype;
-- insert multiple rows, array may be sparse; returns no. records inserted
FUNCTION bulk_ins (arr IN rvarraytype) RETURN NUMBER;
...
&amp;amp;amp;amp;lt;%IF DBMS_CRYPTO&amp;amp;amp;amp;gt;&amp;amp;amp;amp;lt;%ELSE&amp;amp;amp;amp;gt;$if false $then/*need to grant DBMS_CRYPTO*/&amp;amp;amp;amp;lt;%END IF&amp;amp;amp;amp;gt;
-- generate a hash for the record
FUNCTION hash (r IN rowtype) RETURN VARCHAR2;
&amp;amp;amp;amp;lt;%IF DBMS_CRYPTO&amp;amp;amp;amp;gt;&amp;amp;amp;amp;lt;%ELSE&amp;amp;amp;amp;gt;$end&amp;amp;amp;amp;lt;%END IF&amp;amp;amp;amp;gt;
END #TAPI#;
&amp;amp;amp;amp;lt;%END TEMPLATE&amp;amp;amp;amp;gt;
&amp;amp;amp;amp;lt;%TEMPLATE TAPI_PACKAGE_BODY&amp;amp;amp;amp;gt;
CREATE OR REPLACE PACKAGE BODY #TAPI# AS
/**********************************************************
Table API for #table#
#SYSDATE# - Generated by #USER#
**********************************************************/
FUNCTION val (rv IN rvtype) RETURN VARCHAR2 IS
-- Validates the record but without reference to any other rows or tables
-- (i.e. avoid any queries in here).
-- Unique and referential integrity should be validated via suitable db
-- constraints (violations will be raised when the ins/upd/del is attempted).
-- Complex cross-record validations should usually be performed by a XAPI
-- prior to the call to the TAPI.
BEGIN
log_start('val');
&amp;amp;amp;amp;lt;%COLUMNS EXCLUDING GENERATED,SURROGATE_KEY,NULLABLE&amp;amp;amp;amp;gt;
UTIL.val_not_null (val =&amp;amp;amp;amp;gt; rv.#col#, column_name =&amp;amp;amp;amp;gt; '#COL#');~
&amp;amp;amp;amp;lt;%END&amp;amp;amp;amp;gt;
&amp;amp;amp;amp;lt;%IF EVENTS&amp;amp;amp;amp;gt;
IF rv.repeat_ind = 'Y' THEN
UTIL.val_not_null (val =&amp;amp;amp;amp;gt; rv.repeat, column_name =&amp;amp;amp;amp;gt; 'REPEAT');
UTIL.val_not_null (val =&amp;amp;amp;amp;gt; rv.repeat_interval, column_name =&amp;amp;amp;amp;gt; 'REPEAT_INTERVAL');
END IF;
&amp;amp;amp;amp;lt;%END IF&amp;amp;amp;amp;gt;
&amp;amp;amp;amp;lt;%COLUMNS EXCLUDING GENERATED,SURROGATE_KEY,LOBS INCLUDING EVENTS.REPEAT_IND&amp;amp;amp;amp;gt;
UTIL.val_ind (val =&amp;amp;amp;amp;gt; rv.#col#, column_name =&amp;amp;amp;amp;gt; '#COL#');{IND}~
UTIL.val_yn (val =&amp;amp;amp;amp;gt; rv.#col#, column_name =&amp;amp;amp;amp;gt; '#COL#');{YN}~
UTIL.val_max_len (val =&amp;amp;amp;amp;gt; rv.#col#, len =&amp;amp;amp;amp;gt; #MAXLEN#, column_name =&amp;amp;amp;amp;gt; '#COL#');{VARCHAR2}~
UTIL.val_numeric (val =&amp;amp;amp;amp;gt; rv.#col#, column_name =&amp;amp;amp;amp;gt; '#COL#');{NUMBER}~
UTIL.val_date (val =&amp;amp;amp;amp;gt; rv.#col#, column_name =&amp;amp;amp;amp;gt; '#COL#');{DATE}~
UTIL.val_datetime (val =&amp;amp;amp;amp;gt; rv.#col#, column_name =&amp;amp;amp;amp;gt; '#COL#');{DATETIME}~
UTIL.val_timestamp (val =&amp;amp;amp;amp;gt; rv.#col#, column_name =&amp;amp;amp;amp;gt; '#COL#');{TIMESTAMP}~
UTIL.val_timestamp_tz (val =&amp;amp;amp;amp;gt; rv.#col#, column_name =&amp;amp;amp;amp;gt; '#COL#');{TIMESTAMP_TZ}~
UTIL.val_integer (val =&amp;amp;amp;amp;gt; rv.#col#, range_low =&amp;amp;amp;amp;gt; 1, column_name =&amp;amp;amp;amp;gt; '#COL#');{EVENTS.REPEAT_INTERVAL}~
UTIL.val_domain
(val =&amp;amp;amp;amp;gt; rv.#col#
,valid_values =&amp;amp;amp;amp;gt; t_str_array(DAILY, WEEKLY, MONTHLY, ANNUALLY)
,column_name =&amp;amp;amp;amp;gt; '#COL#');{EVENTS.REPEAT}~
~
&amp;amp;amp;amp;lt;%END&amp;amp;amp;amp;gt;
&amp;amp;amp;amp;lt;%IF EVENTS&amp;amp;amp;amp;gt;
UTIL.val_datetime_range
(start_dt =&amp;amp;amp;amp;gt; rv.start_dt
,end_dt =&amp;amp;amp;amp;gt; rv.end_dt
,label =&amp;amp;amp;amp;gt; 'Event Date/Time Range');
&amp;amp;amp;amp;lt;%END IF&amp;amp;amp;amp;gt;
&amp;amp;amp;amp;lt;%IF EVENT_TYPES&amp;amp;amp;amp;gt;
UTIL.val_cond
(cond =&amp;amp;amp;amp;gt; rv.event_type = UPPER(rv.event_type)
,msg =&amp;amp;amp;amp;gt; 'Event Type Code must be all uppercase'
,column_name =&amp;amp;amp;amp;gt; 'EVENT_TYPE');
UTIL.val_cond
(cond =&amp;amp;amp;amp;gt; rv.event_type = TRANSLATE(rv.event_type,'X -:','X___')
,msg =&amp;amp;amp;amp;gt; 'Event Type Code cannot include spaces, dashes (-) or colons (:)'
,column_name =&amp;amp;amp;amp;gt; 'EVENT_TYPE');
UTIL.val_date_range
(start_date =&amp;amp;amp;amp;gt; rv.start_date
,end_date =&amp;amp;amp;amp;gt; rv.end_date
,label =&amp;amp;amp;amp;gt; 'Event Types Date Range');
&amp;amp;amp;amp;lt;%END IF&amp;amp;amp;amp;gt;
--TODO: add more validations if necessary
log_end;
RETURN UTIL.first_error;
EXCEPTION
WHEN UTIL.application_error THEN
log_end('application_error');
RAISE;
WHEN OTHERS THEN
UTIL.log_sqlerrm;
RAISE;
END val;
FUNCTION ins (rv IN rvtype) RETURN rowtype IS
r rowtype;
error_msg VARCHAR2(32767);
BEGIN
log_start('ins');
error_msg := val (rv =&amp;amp;amp;amp;gt; rv);
IF error_msg IS NOT NULL THEN
raise_error(error_msg);
END IF;
INSERT INTO #table#
(&amp;amp;amp;amp;lt;%COLUMNS EXCLUDING GENERATED&amp;amp;amp;amp;gt;
#col#~
,&amp;amp;amp;amp;lt;%END&amp;amp;amp;amp;gt;)
VALUES(&amp;amp;amp;amp;lt;%COLUMNS EXCLUDING GENERATED&amp;amp;amp;amp;gt;
#seq#.NEXTVAL{SURROGATE_KEY}~
rv.#col#~
UTIL.num_val(rv.#col#){NUMBER}~
UTIL.date_val(rv.#col#){DATE}~
UTIL.datetime_val(rv.#col#){DATETIME}~
UTIL.timestamp_val(rv.#col#){TIMESTAMP}~
UTIL.timestamp_tz_val(rv.#col#){TIMESTAMP_TZ}~
,&amp;amp;amp;amp;lt;%END&amp;amp;amp;amp;gt;)
RETURNING
&amp;amp;amp;amp;lt;%COLUMNS INCLUDING VIRTUAL&amp;amp;amp;amp;gt;
#col#~
,&amp;amp;amp;amp;lt;%END&amp;amp;amp;amp;gt;
INTO &amp;amp;amp;amp;lt;%COLUMNS INCLUDING VIRTUAL&amp;amp;amp;amp;gt;
r.#col#~
,&amp;amp;amp;amp;lt;%END&amp;amp;amp;amp;gt;;
msg('INSERT #table#: ' || SQL%ROWCOUNT);
log_end;
RETURN r;
EXCEPTION
WHEN DUP_VAL_ON_INDEX THEN
UTIL.raise_dup_val_on_index;
WHEN UTIL.application_error THEN
log_end('application_error');
RAISE;
WHEN OTHERS THEN
UTIL.log_sqlerrm;
RAISE;
END ins;
FUNCTION bulk_ins (arr IN rvarraytype) RETURN NUMBER IS
rowcount NUMBER;
BEGIN
log_start('bulk_ins');
bulk_val(arr);
FORALL i IN INDICES OF arr
INSERT INTO #table#
(&amp;amp;amp;amp;lt;%COLUMNS EXCLUDING GENERATED&amp;amp;amp;amp;gt;
#col#~
,&amp;amp;amp;amp;lt;%END&amp;amp;amp;amp;gt;)
VALUES (&amp;amp;amp;amp;lt;%COLUMNS EXCLUDING GENERATED&amp;amp;amp;amp;gt;
#seq#.NEXTVAL{SURROGATE_KEY}~
arr(i).#col#~
UTIL.num_val(arr(i).#col#){NUMBER}~
UTIL.date_val(arr(i).#col#){DATE}~
UTIL.datetime_val(arr(i).#col#){DATETIME}~
UTIL.timestamp_val(arr(i).#col#){TIMESTAMP}~
UTIL.timestamp_tz_val(arr(i).#col#){TIMESTAMP_TZ}~
,&amp;amp;amp;amp;lt;%END&amp;amp;amp;amp;gt;);
rowcount := SQL%ROWCOUNT;
msg('INSERT #table#: ' || rowcount);
log_end('rowcount=' || rowcount);
RETURN rowcount;
EXCEPTION
WHEN DUP_VAL_ON_INDEX THEN
UTIL.raise_dup_val_on_index;
WHEN UTIL.application_error THEN
log_end('application_error');
RAISE;
WHEN OTHERS THEN
UTIL.log_sqlerrm;
RAISE;
END bulk_ins;
&amp;amp;amp;amp;lt;%IF DBMS_CRYPTO&amp;amp;amp;amp;gt;&amp;amp;amp;amp;lt;%ELSE&amp;amp;amp;amp;gt;$if false $then/*need to grant DBMS_CRYPTO*/&amp;amp;amp;amp;lt;%END IF&amp;amp;amp;amp;gt;
FUNCTION hash (r IN rowtype) RETURN VARCHAR2 IS
sep CONSTANT VARCHAR2(1) := '|';
digest CLOB;
ret RAW(2000);
BEGIN
log_start('hash');
&amp;amp;amp;amp;lt;%COLUMNS EXCLUDING GENERATED,LOBS&amp;amp;amp;amp;gt;
digest := digest || sep || r.#col#;~
digest := digest || sep || TO_CHAR(r.#col#, UTIL.DATE_FORMAT);{DATE}~
digest := digest || sep || TO_CHAR(r.#col#, UTIL.DATETIME_FORMAT);{DATETIME}~
digest := digest || sep || TO_CHAR(r.#col#, UTIL.TIMESTAMP_FORMAT);{TIMESTAMP}~
digest := digest || sep || TO_CHAR(r.#col#, UTIL.TIMESTAMP_TZ_FORMAT);{TIMESTAMP_TZ}~
&amp;amp;amp;amp;lt;%END&amp;amp;amp;amp;gt;
ret := DBMS_CRYPTO.hash(digest, DBMS_CRYPTO.hash_sh1);
log_end(ret);
RETURN ret;
EXCEPTION
WHEN UTIL.application_error THEN
log_end('application_error');
RAISE;
WHEN OTHERS THEN
UTIL.log_sqlerrm;
RAISE;
END hash;
&amp;amp;amp;amp;lt;%IF DBMS_CRYPTO&amp;amp;amp;amp;gt;&amp;amp;amp;amp;lt;%ELSE&amp;amp;amp;amp;gt;$end&amp;amp;amp;amp;lt;%END IF&amp;amp;amp;amp;gt;
END #TAPI#;
&amp;amp;amp;amp;lt;%END TEMPLATE&amp;amp;amp;amp;gt;
$end
END TEMPLATES;
Template Syntax
You may be wondering what all the <%bla> and #bla# tags mean. These are the controlling elements for my code generator.
All template code is embedded within $if false $then ... $end so that the template package spec can be compiled without error in the schema, while still allowing most syntax highlighters to make the template easy to read and edit. This source is then read by the generator from the TEMPLATES database package.
Each template within the TEMPLATES package is delineated by the following structural codes, each of which must appear at the start of a line:
Currently the list of conditions are limited to LOBS (true if the table has any LOB-type columns), ROWID (true if the table does NOT have a surrogate key (i.e. a primary key matched by name to a sequence), or the name of a table (useful to have some code that is only generated for a specific table), or the name of a DBMS_xxx package (useful to have code that is only generated if the owner has been granted EXECUTE on the named DBMS_xxx package).
To negate a condition, simply leave the first part of the IF/ELSE part empty, e.g.:
&amp;amp;amp;amp;lt;%IF LOBS&amp;amp;amp;amp;gt;&amp;amp;amp;amp;lt;%ELSE&amp;amp;amp;amp;gt; /*this table has no LOBS*/ &amp;amp;amp;amp;lt;%END IF&amp;amp;amp;amp;gt;
Code portions that need to be repeated for each column (or a subset of columns) in the table use the COLUMNS structure:
The COLUMNS structure looks very weird and might take a while to get used to, but basically it contains a list of sub-templates, delimited by tildes (~). The first sub-template (e.g. #col#--- => :#COL#) is used for each column, and the second sub-template (e.g. ,) is inserted between each column (if there is more than one column). In the above example, our emps table would result in the following generated:
Notice that #col# is replaced with the column name in lowercase, and #COL# is replaced with the column name in uppercase. In addition, the --- is a special code that causes the generator to insert additional spaces so that the code is aligned vertically. Notice also that the second sub-template (the separator bit with the comma) also includes a carriage return (after ~ and before ,). If we had instead used the following template:
The generator gives you a great deal of control over which columns are included. The COLUMNS structure supports three optional clauses: INCLUDING, EXCLUDING and ONLY.
&amp;amp;amp;amp;lt;%COLUMNS&amp;amp;amp;amp;gt;
(all columns in the table, EXCEPT for virtual columns)
&amp;amp;amp;amp;lt;%END&amp;amp;amp;amp;gt;
&amp;amp;amp;amp;lt;%COLUMNS INCLUDING VIRTUAL&amp;amp;amp;amp;gt;
(all columns in the table, including virtual columns)
&amp;amp;amp;amp;lt;%END&amp;amp;amp;amp;gt;
&amp;amp;amp;amp;lt;%COLUMNS EXCLUDING PK&amp;amp;amp;amp;gt;
(all columns except for Primary Key columns)
&amp;amp;amp;amp;lt;%END&amp;amp;amp;amp;gt;
&amp;amp;amp;amp;lt;%COLUMNS EXCLUDING LOBS&amp;amp;amp;amp;gt;
(all columns except for LOB-type columns)
&amp;amp;amp;amp;lt;%END&amp;amp;amp;amp;gt;
&amp;amp;amp;amp;lt;%COLUMNS EXCLUDING EMPS.NAME&amp;amp;amp;amp;gt;
(all columns - except for the specified column)
&amp;amp;amp;amp;lt;%END&amp;amp;amp;amp;gt;
&amp;amp;amp;amp;lt;%COLUMNS EXCLUDING AUDIT&amp;amp;amp;amp;gt;
(all columns except for the audit columns such as CREATED_BY, etc.)
&amp;amp;amp;amp;lt;%END&amp;amp;amp;amp;gt;
&amp;amp;amp;amp;lt;%COLUMNS ONLY PK&amp;amp;amp;amp;gt;
(only Primary Key columns)
&amp;amp;amp;amp;lt;%END&amp;amp;amp;amp;gt;
&amp;amp;amp;amp;lt;%COLUMNS ONLY PK,NAME&amp;amp;amp;amp;gt;
(only Primary Key columns and columns named NAME)
&amp;amp;amp;amp;lt;%END&amp;amp;amp;amp;gt;
&amp;amp;amp;amp;lt;%COLUMNS INCLUDING ROWID&amp;amp;amp;amp;gt;
(all columns in the table, plus the pseudocolumn ROWID)
&amp;amp;amp;amp;lt;%END&amp;amp;amp;amp;gt;
&amp;amp;amp;amp;lt;%COLUMNS INCLUDING MADEUPNAME&amp;amp;amp;amp;gt;
(all columns in the table, plus a fake column)
&amp;amp;amp;amp;lt;%END&amp;amp;amp;amp;gt;
&amp;amp;amp;amp;lt;%COLUMNS INCLUDING EMPS.MADEUPNAME&amp;amp;amp;amp;gt;
(all columns in the table, plus a fake column for the specified table)
&amp;amp;amp;amp;lt;%END&amp;amp;amp;amp;gt;
&amp;amp;amp;amp;lt;%COLUMNS ONLY SURROGATE_KEY,VERSION_ID INCLUDING ROWID&amp;amp;amp;amp;gt;
(multiple criteria may be combined)
&amp;amp;amp;amp;lt;%END&amp;amp;amp;amp;gt;
Within a sub-template the following placeholders are recognised:
#COL# – column name in uppercase
#col# – column name in lowercase
#Label# – generated user-friendly label based on column name
#MAXLEN# – max length for a CHAR-type column
#DATA_DEFAULT# – column default value
#SEQ# – surrogate key sequence name
#00i# – 001, 002, 003 etc. in order of column id
--- – padding (inserts just enough extra spaces depending on length of column name so that code is aligned vertically)
For example, the following generates a comma-delimited list of user-friendly labels for each column in the table:
Emp, Name, Emp Type, Start, End, Dummy, Dummy, Life History
Side Note: it’s noteworthy that I have no need for a “#datatype#” placeholder; in most cases my templates will anchor to the column’s datatype anyway, so a template just needs to use #col#%TYPE.
Multiple additional sub-templates may be provided within a <%COLUMNS> structure, to be used for certain columns. These must end with a {X} indicator, where X can be a data type or column name. Other indicators are supported for special cases as well.
&amp;amp;amp;amp;lt;%COLUMNS&amp;amp;amp;amp;gt;
Default subtemplate ~
ID column {ID}~
NUMBER column {NUMBER}~
Date/time column {DATETIME}~
Date column {DATE}~
Timestamp column {TIMESTAMP}~
Timestamp with time zone {TIMESTAMP_TZ}~
Indicator (Y or null) column {IND}~
Yes/No (Y or N) column {YN}~
Any other VARCHAR2 column {VARCHAR2}~
Any LOB-type column (e.g. BLOB, CLOB) {LOB}~
Any specific datatype {CLOB}~
Primary key matched to a sequence {SURROGATE_KEY}~
Special case for a specific column {TABLE.COLUMN}~
Extra code to be used if NO columns match {NONE}~
,&amp;amp;amp;amp;lt;%END&amp;amp;amp;amp;gt;
The “data type” for a column is usually just the data type from the schema data dictionary; however, there are some special cases where a special data type is derived from the column name:
ID: a NUMBER column with a name ending with _ID
DATETIME: a DATE column with name ending with _DT
IND: a VARCHAR2 column with a name ending with _IND
YN: a VARCHAR2 column with a name ending with _YN
Within a template it is possible to import the code from another template (e.g. to share code between multiple templates, or to facilitate a nested-IF structure) using this structure:
This will cause the generator to find a template named OTHERTEMPLATE, evaluate it, then insert it at the given position.
This method has allowed my code generator to be quite flexible and powerful, makes it easy to add additional code to all my API packages and other generated code, and makes it easy to find and fix errors.
You can download all the source for the template and generator below. Note that a new Sample Apex application is included (f560.sql) which works in Apex 5 and uses the new Apex API. Disclaimer:This is a work in progress!
If you find it useful or you have suggestions for improvement please comment.


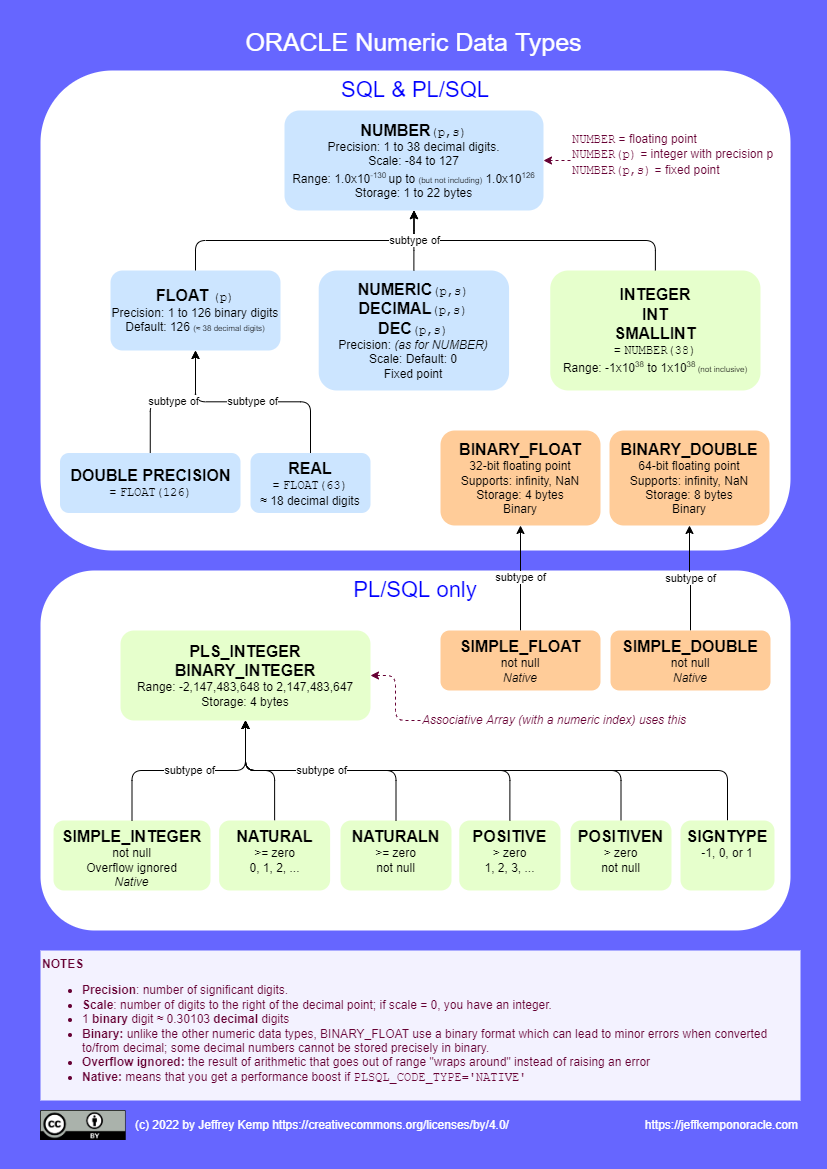
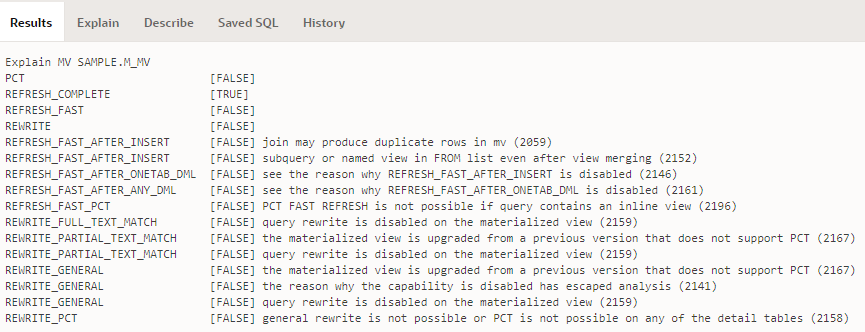




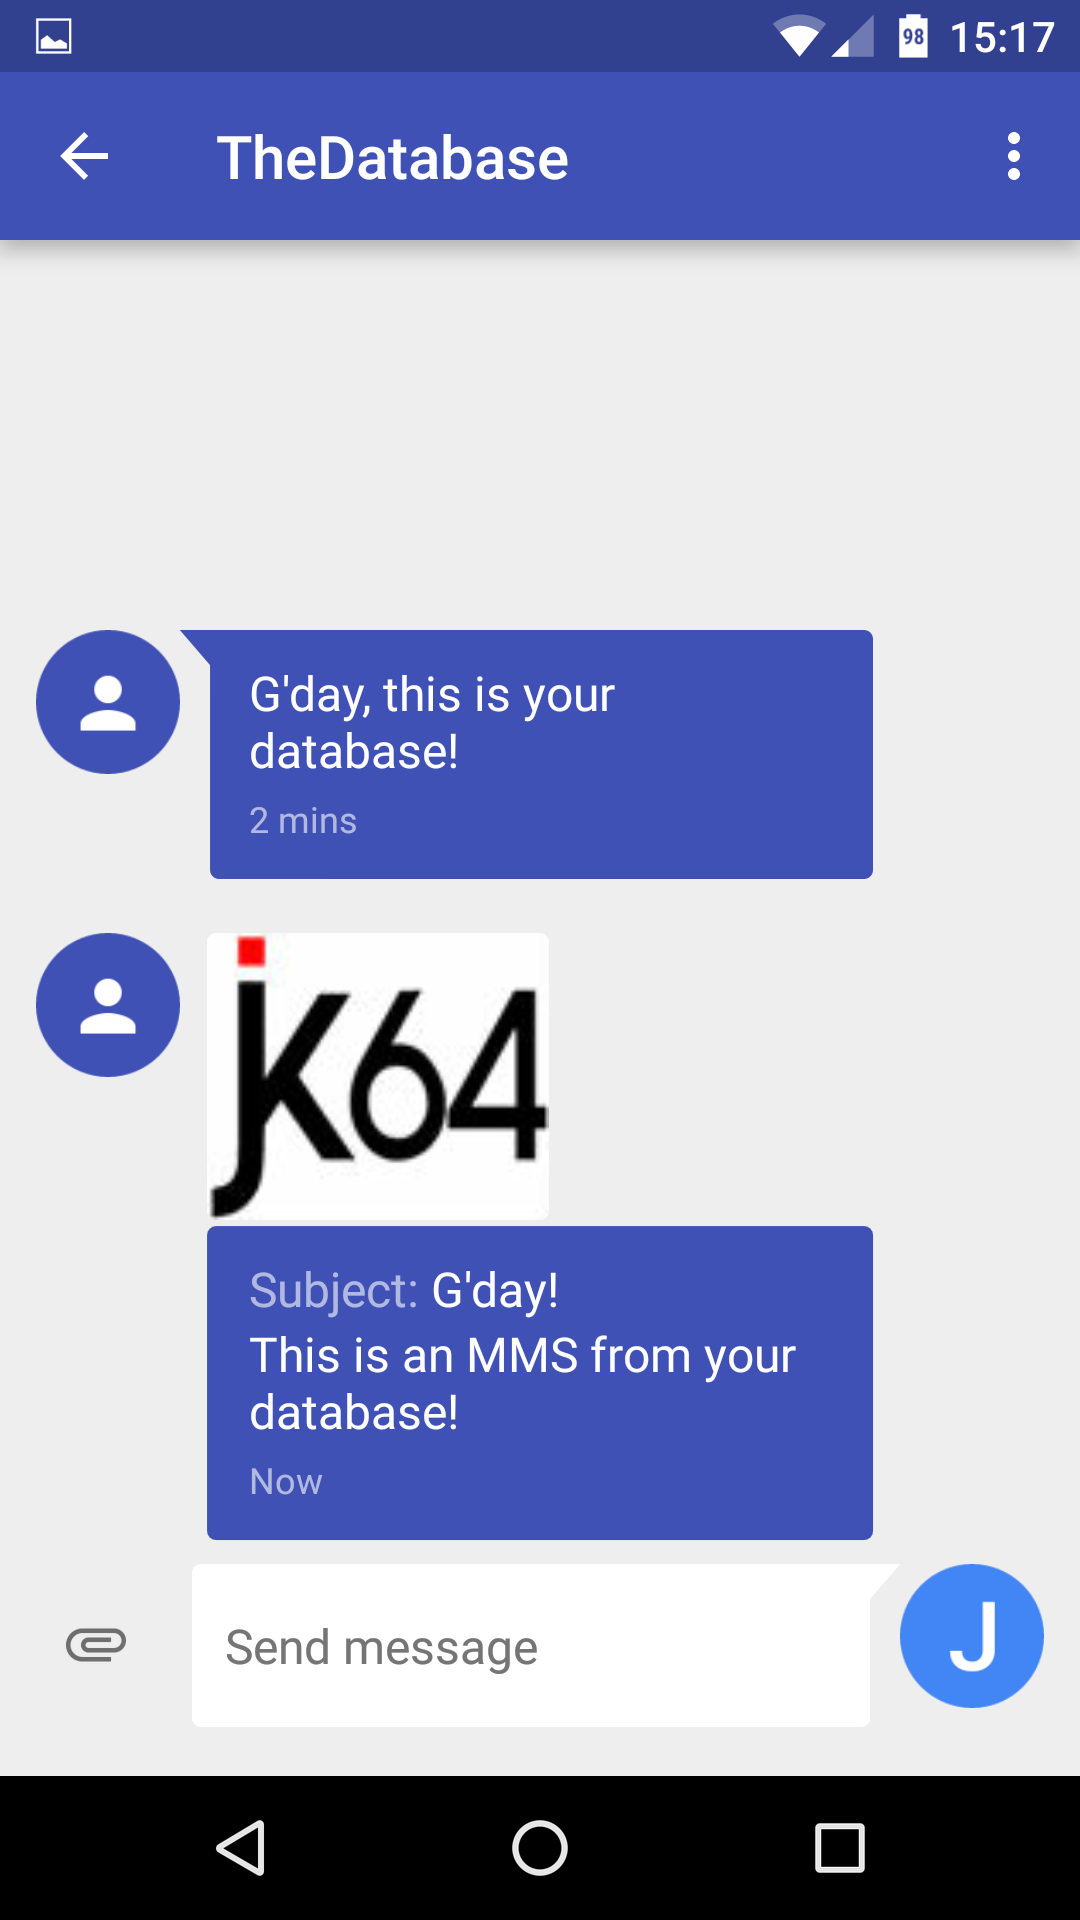
 Sending emails from the Oracle database can be both simply deceptively braindead easy, and confoundingly perplexingly awful at the same time. Easy, because all you have to do is call one of the supplied mail packages to send an email:
 Some time back, Connor
  The last few weeks I’ve made quite a few improvements to my