A user sent me a CSV they had downloaded from my APEX application and then subsequently updated. I needed to know which database column was the source for each column in the spreadsheet; this was not as simple as you might think because the labels from this report (that has a bewilderingly large number of columns) were quite often very different from the database column name.
To map their spreadsheet columns to database columns I used this simple query:
select x.interactive_report_id, x.report_label, x.column_alias
from apex_application_page_ir_col x
where x.application_id = <my app id>
and x.page_id = <my page id>
order by x.interactive_report_id, x.report_label;
Face it: your users are in love with Microsoft Excel, and you can’t do anything about it.
You can show them the excellent Interactive Report and Interactive Grid features of APEX, and train some of your users to use some of their capabilities, but at the end of the day, your users will still download the data into their spreadsheet software to do their own stuff with it.
Once they’ve finished with the data, odds are they’ll come back to you and ask “how do I upload this data back into APEX?” and expect that the answer is merely a flip of a switch to enable a built-in APEX feature. Of course, you know and I know that this is not necessarily a simple thing; it is certainly not just an option to be enabled. Depending on what exactly they mean by “upload this data” it may be reasonably easy to build or it could get quite complex.
File Formats
Typically the data will be provided in some kind of text format (CSV, tab delimited, fixed width) or binary file (XLS or XLSX). If they have copied the data from a table in Excel, it will be in tab-delimited format in the clipboard. Perhaps in some odd instances the user will have received the data from some system in fixed width, XML or JSON format – but this is rare as this is typically part of the build of a system integration solution and users expect these to be “harder”.
Actual Requirements
When your user wants you to provide a facility for uploading data, there are some basic questions you’ll need to ask. Knowing these will help you choose the right approach and solution.
Where are the files – i.e. are they stored on the database server, or is the user going to upload them via an online APEX application
How much automation is required, how often – i.e. is this a ad-hoc, rare situation; something they need to do a few times per month; or something that is frequent and needs to be painless and automatic?
What are the files named – i.e. if they are stored on the database server, do we know what the files will be called?
How consistent is the data structure?
Data Structure
That last one is important. Will the columns in the file remain the same, or might they change all the time? If the structure is not amenable to automated data matching, can the file structure be changed to accommodate our program? Is the structure even in tabular form (e.g. is it a simple “header line, data line, data line” structure or are there bits and pieces dotted around the spreadsheet)? If it’s an Excel file, is all the data in one sheet, or is it spread across multiple sheets? Should all the sheets be processed, or should some of them be ignored? Can the columns vary depending on requirement – might there be some columns in one file that don’t exist in other files, and vice versa?
Finally, is all the data to be loaded actually encoded in text form? This is an issue where a spreadsheet is provided where the user has, trying to be helpful, highlighted rows with different colours to indicate different statuses or other categorising information. I’ve received spreadsheets where some data rows were not “real” data rows, but merely explanatory text or notes entered by the users – since they coloured the background on those rows in grey, they expected my program to automatically filter those rows out.
Solution Components
Any solution for processing uploaded files must incorporate each of the following components:
Load – read the raw file data
Parse – extract the text data from the file
Map – identify how the text data relates to your schema
Validate – check that the data satisfies all schema and business rule constraints
Process – make the relevant changes in the database based on the data
Each of these components have multiple solution options, some are listed here:
Map – Fixed (we already know which columns appear where) (e.g. SQL*Loader Express Mode); Manual (allow the user to choose which column maps to which target); or A.I. (use some sort of heuristic algorithm to guess which column maps to what, e.g. based on the header labels)
Validate – Database constraints; and/or PL/SQL API
Process – INSERT; MERGE; or call a PL/SQL API
The rest of this post is focussed primarily on Parsing and Mapping Text and Excel files.
Solutions for Text files
These are some solutions for parsing text files (CSV, tab-delimited, fixed-width, etc.) that I’ve used or heard of. I’m not including the more standardised data interchange text formats in this list (e.g. XML, JSON) as these are rarely used by end users to supply spreadsheet data. “Your Mileage May Vary” – so test and evaluate them to determine if they will suit your needs.
LOB2Table PL/SQL (CSV, delimited and fixed width files) – Michael Schmid, 2015
Excel2Collection APEX process plugin (CSV, delimited, XLS and XLSX files) – Anton Scheffer, 2013
csv2db – load CSV files from the command line (Linux). Gerald Venzl, 2019
KiBeHa’s CSV parser – a simple CSV parser in PL/SQL written by Kim Berg Hansen, 2014 (this is a simplistic parser that will not handle all CSV files, e.g. ones that have embedded delimiters with double-quoted text)
It could be noted here that the Interactive Grid in APEX 5.1 and later does support Paste; if the user selects some data from Excel, then selects the corresponding columns and rows in the grid, they can Paste the tab-delimited data right in. Of course, this requires that the columns be in exactly the right order.
External Table
This uses the SQL*Loader access driver and you can look up the syntax in the Oracle docs by searching for “ORACLE_LOADER”. Since Oracle 12.1 you can use the simple “FIELDS CSV” syntax to parse CSV files, e.g.:
create table emp_staging
  ( emp_no number(4)
  , name   varchar2(10)
  , ...
  )
organization external
  ( default directory ext_dir
    access parameters
      ( records delimited by newline
        FIELDS CSV
        reject rows with all null fields
      )
    location ( 'emp.dat' )
  )
reject limit unlimited
Since Oracle 12.1 the sqlldr command-line utility supports “Express Mode” which by default reads a CSV file, and loads the data into a given table. Read this quick intro here. This can come in handy for scripting the load of a number of CSV files on an ad-hoc basis into tables that already have exactly the same structure as those CSV files.
> sqlldr userid=scott/tiger table=emp
This expects to find a file named “emp.dat” which contains CSV data to be loaded into the nominated table. Internally, it creates a temporary external table to load the data. Additional parameters can be added to change the filename, delimiters, field names, and other options.
APEX Data Workshop
The APEX Data Workshop is found under SQL Workshop > Utilities > Data Workshop and allows the developer to quickly load data from a CSV, tab-delimited, XML, or copy-and-paste from Excel into an existing or new table. This can be very handy when your client sends you some spreadsheets and you need to quickly load the data as one or more tables.
A related utility is the Create Application from Spreadsheet which does the same thing, plus creates a basic application to report and maintain the data in the new table.
APEX Data Loader Wizard
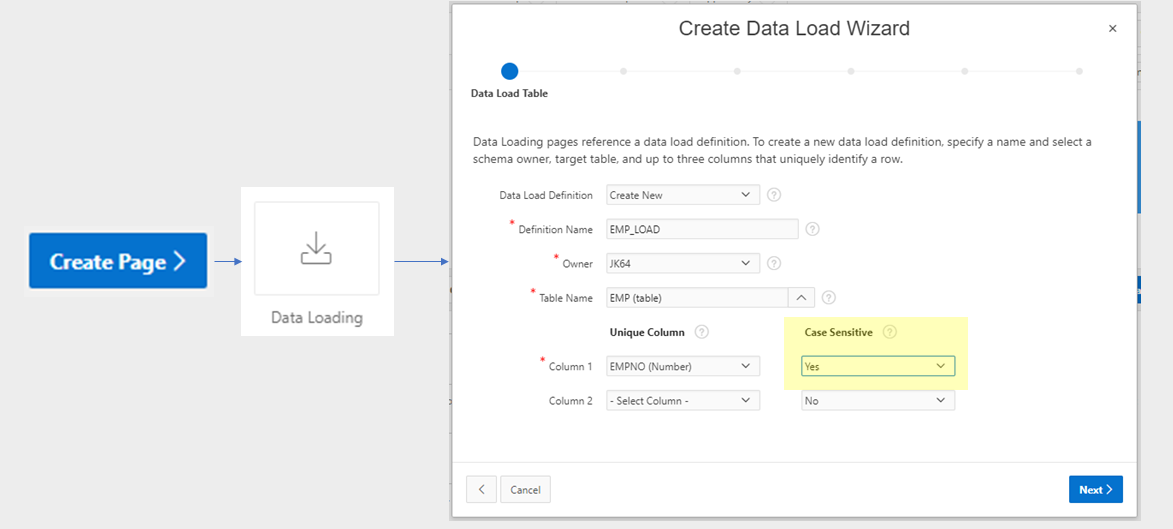
If your users need to load data on an ad-hoc, on-demand basis, and you don’t know necessarily what the structure of the files will be (e.g. the headings might change, or the order of the columns might change), you can use the APEX Data Loader Wizard to build an APEX application that guides your users in loading, mapping, and validating the data for themselves. If required you can customise the generated pages to add your own processing.
To create the wizard, click Create Page, choose Data Loading, and follow the steps to define the Data Load Definition and its associated pages. The definition determines the target table, the unique column(s) for data matching, transformation rules, and lookups (e.g. to get foreign keys for reference tables). Once this is done, the following four pages will be created for you:
You can customise these pages to modify the look and feel (e.g. moving some of the more complicated options in a collapsible region), or to add your own custom processing for the data.
For example, I will often add an additional process on either the 3rd page (to be run after the “Prepare Uploaded Data” process) that will do further processing of the loaded data. The process would be set up to only run When Button Pressed = “NEXT” and would have a Condition “Item is NULL or Zero” = “P111_ERROR_COUNT”. The result is that on the Data Validation (3rd) page, after reviewing the validation summary, the user clicks “Next” and the data is loaded and processed.
Alternatively, I sometimes want the user to view additional validation or summary information on the 4th page before doing further processing. In this case, I would add the process to the Data Load Results (4th) page, When Button Pressed = “FINISH”. For this to work, you need to modify the FINISH button to Submit the page (instead of redirecting). I also would add a CANCEL button to the page so the user can choose to not run the final processing if they wish.
Updating a Data Load Definition
The Data Load Definitions (one for each target table) may be found under Shared Components > Data Load Definitions. Here, you can modify the transformations and lookup tables for the definition. However, if the table structure has changed (e.g. a new column has been added), it will not automatically pick up the change. To reflect the change in the definition, you need to follow the following steps:
Edit the Data Load Definition
Click Re-create Data Load Pages
Delete the new generated pages
This refreshes the Data Load Definition and creates 4 new pages for the wizard. Since you already had the pages you need (possibly with some customisations you’ve made) you don’t need the new pages so you can just delete them.
CSV_UTIL_PKG
The Alexandria PL/SQL Library includes CSV_UTIL_PKG which I’ve used in a number of projects. It’s simple to use and effective – it requires no APEX session, nothing but PL/SQL, and can be called from SQL for any CLOB data. It’s handy when you know ahead of time what the columns will be. You could read and interpret the headings in the first line from the file if you want to write some code to automatically determine which column is which – but personally in this case I’d lean towards using the APEX Data Loader Wizard instead and make the user do the mapping.
If you don’t already have the full Alexandria library installed, to use this package you must first create the schema types t_str_array and t_csv_tab. You will find the definition for these types in setup/types.sql. After that, simply install ora/csv_util_pkg.pks and ora/csv_util_pkg.pkb and you’re good to go.
In the example below I get a CSV file that a user has uploaded via my APEX application, convert it to a CLOB, then parse it using CSV_UTIL_PKG.clob_to_csv:
procedure parse_csv (filename in varchar2) is
    bl blob; cl clob;
begin

    select x.blob_content into bl
    from apex_application_temp_files x
    where x.name = parse_csv.filename;

    cl := blob_to_clob(bl);

    insert into csv_staging_lines
          (session_id, line_no, school_code, school_name
          ,line_type, amount, line_description)
    select sys_context('APEX$SESSION','APP_SESSION')
          ,line_number - 1
          ,c001 as school_code
          ,c002 as school_name
          ,c003 as line_type
          ,replace(replace(c004,'$',''),',','') as amount
          ,c005 as line_description
    from   table(csv_util_pkg.clob_to_csv(cl, p_skip_rows => 1))
    where  trim(line_raw) is not null;

end parse_csv;
This PL/SQL package written and maintained by Michael Schmid parses CSV, delimited or Fixed-width data embedded in any LOB or VARCHAR2, including in a table with many records. The data can be read from any CLOB, BLOB, BFILE, or VARCHAR2. This makes it quite versatile, it reportedly provides excellent performance, and it includes a pipelined option. It will read up to 200 columns, with a maximum of 32K per record.
It requires execute privileges on SYS.DBMS_LOB and SYS.UTL_I18N and creates some object types and a database package. You can download the source from sourceforge. It appears to be well supported and was most recently updated in June 2018. I recommend checking it out.
select d.deptno, d.dname,
t.row_no,
t.column1, t.column2,
t.column3, t.column4 from dept d
cross join table(
lob2table.separatedcolumns(
d.myclob, /* the data LOB */
chr(10), /* row separator */
',', /* column separator */
'"' /* delimiter (optional) */
) ) t;
Excel2Collection
This is a process type APEX plugin written by Anton Scheffer (AMIS) in 2013, and has been actively maintained since then. You can download it from here or find it on apex.world.
The plugin detects and parses CSV, XLS, XML 2003 and XLSX files which makes it very versatile. It will load 50 columns from the spreadsheet into an APEX collection (max 10K rows). If you need to load larger spreadsheets you can send Anton a donation and your email address and he’ll send you a database package that can handle larger files.
Solutions for Excel files
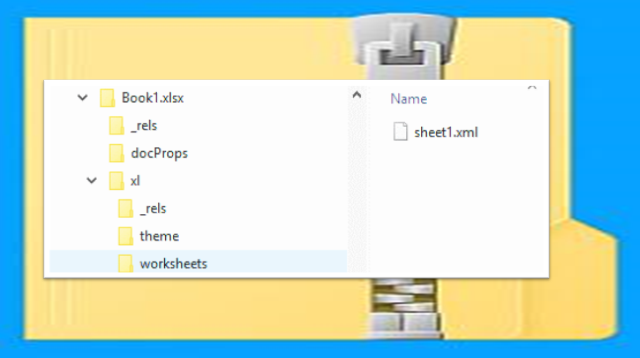
The first thing to know about XLSX files is that they are basically a ZIP file containing a folder structure filled with a number of XML documents. Parsing an XLSX file, therefore, involves first unzipping the file, reading the relevant XML documents and parsing their contents. As usual with any Microsoft file format, the internal structure of these XML documents can be quite complex so I’d much rather leave the work to someone who has already worked out the details. Thankfully, this has largely been done.
These are some solutions for loading data from Microsoft Excel files (XLS, XLSX) that I’ve come across. Again, “YMMV” – so test and evaluate them to determine if they will suit your needs.
The Alexandria PL/SQL Library includes OOXML_UTIL_PKG which provides a number of utilities for parsing (and creating) XLSX, DOCX and PPTX files. It provides functions to get file attributes (including title, creator, last modified) and a list of worksheets in an XLSX. It provides functions to get the text data from any cell in any sheet, although for reasonable performance if you need more than one cell you should use the functions that returns a range of cells in one go.
Installation requires zip_util_pkg, sql_util_pkg, string_util_pkg, xml_util_pkg, xml_stylesheet_pkg, and ooxml_util_pkg, all of which are in the Alexandria library. Given this list of dependencies (and probably others I didn’t notice) I recommend installing the whole library – after all, there’s a lot of useful stuff in there so it’s worth it.
declare
  l_blob   blob;
  l_names  t_str_array := t_str_array('B3','C3','B4','C4','B5','C5');
  l_values t_str_array;
begin
  l_blob := file_util_pkg.get_blob_from_file('EXT_DIR','sample.xlsx');
  l_values := ooxml_util_pkg.get_xlsx_cell_values(l_blob, 'Sheet1', l_names);
  for i in 1..l_values.count loop
    dbms_output.put_line(l_names(i) || ' = ' || l_values(i));
  end loop;
end;
As noted above, the Excel2Collection APEX plugin can detect and parse XLS, XML 2003 and XLSX files (as well as CSV files). The fact that it detects the file type automatically is a big plus for usability.
Apache POI
This solution involves installing Apache POI (“Poor Obfuscation Implementation”), a Java API for Microsoft products, into the database. The solution described by Christian Neumueller here parses XLS and XLSX files although it is admittedly not very efficient.
XLSX_PARSER
In 2018 Carsten Czarski posted a blog article “Easy XLSX Parser just with SQL and PL/SQL” listing a simple database package that parses XLSX files. This uses APEX_ZIP which comes with APEX, although using it does not require an APEX session or collections. It can load the file from a BLOB, or from APEX_APPLICATION_TEMP_FILES. It uses XMLTable to parse the XML content and return the text content of up to 50 columns for any worksheet in the file. It may be modified to support up to 1,000 columns.
To get a list of worksheets from a file:
select * from table(
  xlsx_parser.get_worksheets(
    p_xlsx_name => :P1_XLSX_FILE
  ));
I used this solution in a recent APEX application but the client was still on APEX 4.2 which did not include APEX_ZIP; so I adapted it to use ZIP_UTIL_PKG from the Alexandria PL/SQL Library. If you’re interested in this implementation you can download the source code from here.
ExcelTable
ExcelTable is a powerful API for reading XLSX, XLSM, XLSB, XLS and ODF (.ods) spreadsheets. It is based on PL/SQL + Java and reportedly performs very well. It requires a grant on DBMS_CRYPTO which allows it to read encrypted files. It includes an API for extracting cell comments as well. It can return the results as a pipelined table or as a refcursor. It knows how to interpret special cell values and error codes such as booleans, #N/A, #DIV/0!, #VALUE!, #REF! etc.
It includes API calls that allow you to map the input from a spreadsheet to insert or merge into a table, defining how to map columns in the spreadsheet to your table columns, which may improve throughput and may mean it uses less memory to process large files.
The API was written by Marc Bleron in 2016 and has been in active maintenance since then (latest update 22/10/2018 as of the writing of this article). You can read more details and download it from here: https://github.com/mbleron/ExcelTable
EDIT 17/12/2018: thanks to Nicholas Ochoa who alerted me to this one.
APEX 19.1 Statement of Direction
DISCLAIMER: all comments and code samples regarding APEX 19.1 in this article are based primarily on the Statement of Direction and are subject to Oracle’s “Safe Harbour” provision and must therefore not be relied on when making business decisions.
The SOD for the next release of APEX includes the following note, which is exciting:
“New Data Loading: The data upload functionality in SQL Workshop will be modernized with a new drag & drop user interface and support for native Excel, CSV, XML and JSON documents. The same capabilities will be added to the Create App from Spreadsheet wizard and a new, public data loading PL/SQL API will be made available.”
Whether this release will include corresponding enhancements to the APEX Data Loader Wizard remains to be seen; I hope the wizard is enhanced to accept XLSX files because this is something a lot of my users would be happy about.
EDIT 6/2/2019: Early Adopter of APEX 19.1 reveals that the Data Workshop supports loading CSV, XLSX, XML and JSON data. If you load an XLSX file, it will allow you to choose which worksheet to load the data from (only one worksheet at a time, though). Also, the Data Loader Wizard has not been updated to use the new API, it still only supports loading from CSV files. This is on the radar for a future version of APEX, however.
APEX_DATA_PARSER
The most promising part of the APEX 19.1 SOD is the PL/SQL API bit, which will mean no plugins or 3rd-party code will be needed to parse XLSX files. It appears the package will be called APEX_DATA_PARSER, providing routines to automatically detect and parse file formats including XLSX, XML, JSON and CSV/tab-delimited files, e.g.:
Sometimes my customers need to be able to get a direct link to a record in their APEX application which they can share with others (e.g. to publish it on a website, or send by email to a colleague).
They don’t want people to be able to easily “guess” the link (so it needs to have some degree of randomness and complexity), but it’s not so sensitive that if someone somehow gets the link by mistake it won’t be cause for alarm. They would like to be able to invalidate the link at any time, so if they send the link and then decide they don’t want people viewing the record anymore, they can mark it as “expired”.
Task 1. Generate the link
We have a table to which we want to create links for each record. It already has a surrogate key called id based on a simple sequence, so on its own this is not suitable for our link (we don’t want users just adding 1 to the id and iterating through all values to look up other records). Add a column to the table with a unique constraint:
Update existing rows (if any) and make the column not null:
update mytable
set link_code = id || '-' || dbms_random.string('x',10)
where link_code is null;

alter mytable modify link_code not null;
Set its value using the following expression (e.g. this could be done in a page process, in your table API, or a table trigger):
create trigger bi_mytable before insert on mytable for each row
begin
  :new.link_code := :new.id || '-' || dbms_random.string('x',10);
end;
Note that the random string is more than likely to be unique for each record; but we prepend the unique ID as well which guarantees it to be unique. In addition, if a user sends us a link saying “this didn’t work”, we can visually parse it to see what the record ID was they were trying to access. This is needed because our design allows users to overwrite link_code (e.g. to expire the link).
Task 2. Build an APEX link page
Create a page (in my example, this will be page 100) to be the link resolver. It won’t have any complex regions or show any information, but will merely redirect the user to the page with the actual data (page 10, in my example).
Set it up as follows:
Alias: GO
Page Access Protection: Unrestricted
Region with title “Record not found”
Hidden item: P100_REF
Session State Protection: Unrestricted
Note: if the target page that shows the record is Public (i.e. the people getting the link cannot login to the application), this link resolver page will also need to be public – i.e. set Authentication to Page Is Public. On the other hand, if the target record is only available to authenticated users, the link resolver page should be restricted to authenticated users as well.
Add a PL/SQL Process that runs Before Header, with the following code:
declare
  l_id number;
begin

  select x.id into l_id
  from mytable x
  where x.link_code = :P100_REF;

  -- requires APEX 5.1 or later
  apex_util.redirect_url(
    apex_page.get_url
      (p_page        => 10
      ,p_clear_cache => 10
      ,p_items       => 'P10_ID'
      ,p_values      => l_id));

/*
  -- use this on APEX 5.0 or earlier
  apex_util.redirect_url(
    apex_util.prepare_url(
      p_url => 'f?p='
            || :APP_ID
            || ':10:'
            || :APP_SESSION
            || ':::10:P10_ID:'
            || l_id));
*/

exception
  when no_data_found then
    null;
end;
If the page gets a valid value for P100_REF, it will find the ID for the corresponding record and redirect the user to the page showing that record. If the link is invalid or expired, the page will not redirect but will show a “record not found” message.
Task 3. Show the link
We show the generated link on a page with an ordinary Text item.
Create an item on the page with the following properties:
Name: P10_LINK
Custom Attributes (or HTML Form Element Attributes): readonly
Session State Protection: Unrestricted
We need to generate the link using the page’s domain name, which (at least in some cases) we don’t know ahead of time. To do this, we need to get the page’s URL including host, port and path.
Create a dynamic action on page load. Set its condition so it only fires if P10_LINK_CODE is not null (if it doesn’t already exist, create P10_LINK_CODE as a hidden item based on the database column LINK_CODE).
The dynamic action needs two True Actions – firstly, Execute Javascript:
This dynamic action constructs the link using the current window’s URL including path (which includes the trailing “/apex/f” or “/ords/f“) and query string (“?p=...“).
When the user clicks the item, we want it to automatically select the entire link and copy it to their clipboard. To show this has happened, we show the word “Copied” on the screen.
Create a Dynamic Action on the item – Event: Click
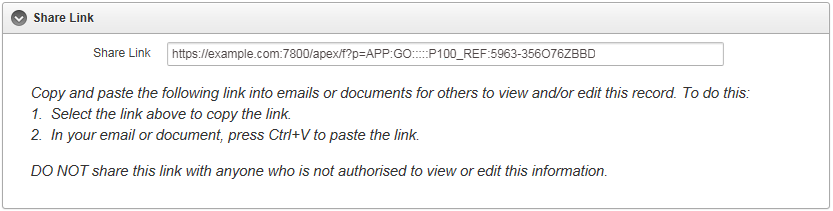
Users who are looking at the record get a “Share Link” in a convenient item that they can copy-and-paste into emails or web pages. If you need to expire a link, simple update the record with a new link_code and the old links will no longer work.
If you have an ordinary Oracle APEX form with the standard Automatic Row Fetch process, and the page has an optional item with a default value, APEX will set the default on new records automatically. However, if the user queries an existing record, Oracle APEX will also fill in a missing value with the default value. This might not be what is desired – if the user clears the value they would expect it will stay cleared.
If you only want the default to be applied for new records, change the attribute on the item so that the default is only applied to new records:
Set Default Value Type to PL/SQL Expression
Set Default value to something like: case when :P1_ID is null then 'xyzzy' end
If your APEX application import log shows something like this:
...PAGE 73: Transaction Lines Report
declare
*
ERROR at line 1:
ORA-00001: unique constraint (APEX_040200.WWV_FLOW_WORKSHEET_RPTS_UK)
violated
ORA-06512: at "APEX_040200.WWV_FLOW_API", line 16271
ORA-06512: at line 6
(this is on an Apex 4.2.4 instance)
This is due to a Saved Report on an Interactive Report that was included in the export, which conflicts with a different Saved Report in the target instance. The log will, conveniently, tell you which page the IR is on.
The solution for this problem is simple – either:
(a) Export the application with Export Public Interactive Reports and Export Private Interactive Reports set to No;
OR
(b) Delete the Saved Report(s) from the instance you’re exporting from.
You can find all Saved Reports in an instance by running a query like this:
select workspace
      ,application_id
      ,application_name
      ,page_id
      ,application_user
      ,report_name
      ,report_alias
      ,status
from APEX_APPLICATION_PAGE_IR_RPT
where application_user not in ('APXWS_DEFAULT'
                              ,'APXWS_ALTERNATIVE');
You can delete Saved Reports from the Application Builder by going to the page with the Interactive Report, right-click on the IR and choose Edit Saved Reports, then select the report(s) and click Delete Checked.
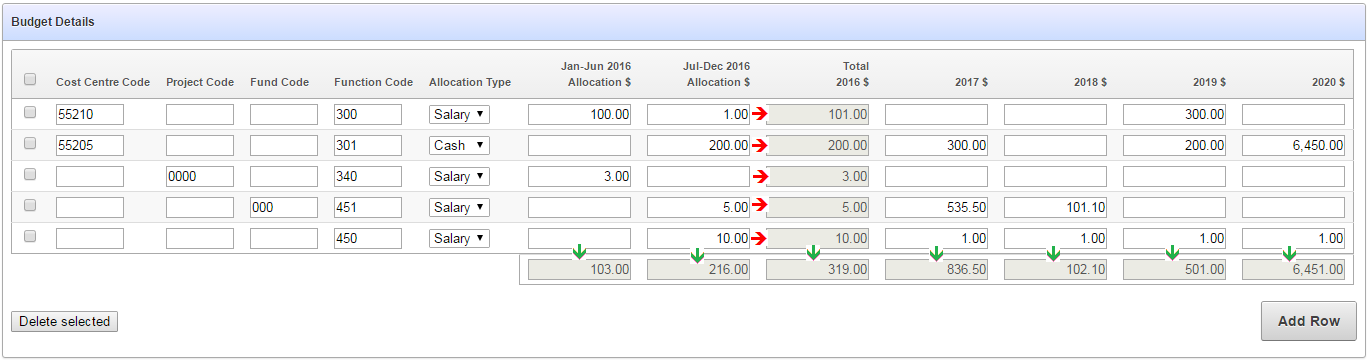
A common APEX project is to take a customer’s existing spreadsheet-based solution and convert it more-or-less as is into APEX. I’ve got one going at the moment, a budgeting solution where users need to enter their budget requests. They currently enter their requests into an XLS template file which generates subtotals and totals for them.
To do this in APEX I’m going to use a tabular form, and to do the subtotals I’ll use jQuery in a way not too dissimilar to that I described earlier.
Here is a mockup of the screen so far:
There are column totals that need to be added up and updated dynamically (indicated by the green arrows) as well as subtotals within each row (indicated by the red arrows).
I started by looking at the generated items, getting their ids (e.g. “f09_0001” etc) and writing the jQuery code to detect changes, add them up, and put the totals in the relevant items. I then started repeating this code for each column, and thought “hmmm”.
There were two problems with this approach that I could foresee:
The generated ids in a tabular form can change if the structure of the query changes – e.g. what was f08 + f09 => f10 might change to f09 + f10 => f11
I was aware of another form that I would need to build, with a similar structure except that there will be two sets of “Jan-Jun” + “Jul-Dec” columns, each with their own subtotal.
I wanted a more declarative solution, so that the heavy lifting will be done in one set of generic javascript functions, and I simply need to put attributes in the relevant columns to activate them. This is how I’ve approached this:
Create the tabular form as usual (mine is based on an APEX Collection) and remove the standard DML processes, replaced with my own that calls APEX_COLLECTION instead.
Create a standard report that generates the total items by calling APEX_ITEM.text, with p_attributes=>'data-total="x"' (with a different “x” for each column, e.g. year1).
Set the Static ID on the tabular form region (e.g. tabularform).
Set Element Attributes on the Jan-Jun column to data-cell="year1" data-col="year1_jan_jun", similarly for the Jul_Dec column.
Set Element Attributes on all the Year columns in the tabular form to data-col="yearx", where x is 1..5.
Set Element Attributes on the total for the first year to data-subtotal="year1".
The following is the query for the totals report region:
select APEX_ITEM.text(1, TO_CHAR(SUM(year1_jan_jun),'FM999G999G999G999G990D00'), p_size=>10, p_maxlength=>2000,
       p_attributes=>'disabled=true class="edit_money" data-total="year1_jan_jun"') as year1_jan_jun
      ,APEX_ITEM.text(2, TO_CHAR(SUM(year1_jul_dec),'FM999G999G999G999G990D00'), p_size=>10, p_maxlength=>2000,
       p_attributes=>'disabled=true class="edit_money" data-total="year1_jul_dec"') as year1_jul_dec
      ,APEX_ITEM.text(3, TO_CHAR(SUM(year1_total),'FM999G999G999G999G990D00'), p_size=>10, p_maxlength=>2000,
       p_attributes=>'disabled=true class="edit_money" data-total="year1"') as year1_total
      ,APEX_ITEM.text(4, TO_CHAR(SUM(year2_total),'FM999G999G999G999G990D00'), p_size=>10, p_maxlength=>2000,
       p_attributes=>'disabled=true class="edit_money" data-total="year2"') as year2_total
      ,APEX_ITEM.text(5, TO_CHAR(SUM(year3_total),'FM999G999G999G999G990D00'), p_size=>10, p_maxlength=>2000,
       p_attributes=>'disabled=true class="edit_money" data-total="year3"') as year3_total
      ,APEX_ITEM.text(6, TO_CHAR(SUM(year4_total),'FM999G999G999G999G990D00'), p_size=>10, p_maxlength=>2000,
       p_attributes=>'disabled=true class="edit_money" data-total="year4"') as year4_total
      ,APEX_ITEM.text(7, TO_CHAR(SUM(year5_total),'FM999G999G999G999G990D00'), p_size=>10, p_maxlength=>2000,
       p_attributes=>'disabled=true class="edit_money" data-total="year5"') as year5_total
from budget_collection_vw
So, to summarise: all the data-cell items get totalled to the data-subtotal item in the same row; and all the data-col items get totalled to the data-total item below the tabular form.
To do all the hard work, I’ve added the following code to my page’s Function and Global Variable Declaration:
function getSum (qry) {
  //get the sum over all items matching the given jQuery search criterion
  var t = 0;
  $(qry).each(function() {
    t += parseFloat($(this).val().replace(/,/g,''))||0;
  });
  return t;
}

function updateSubTotal (item) {
  // update a row-level subtotal
  // the items to add up are identified by data-cell="x"
  // the item to show the total is identified by data-subtotal="x"
  var cell = $(item).data("cell") //get the data-cell attribute
     ,rn = $(item).prop("id").split("_")[1]
     ,t = getSum("input[data-cell='"+cell+"'][id$='_"+rn+"']");

  // we need to temporarily enable then disable the subtotal
  // item in order for the change event to fire
  $("input[data-subtotal="+cell+"][id$='_"+rn+"']")
    .val(t.formatMoney())
    .prop("disabled",false)
    .trigger("change")
    .prop("disabled",true);
}

function updateTotal (item) {
  // update a column total
  var col = $(item).data("col") //get the data-col attribute
     ,t = getSum("input[data-col='"+col+"']");

  $("input[data-total="+col+"]")
    .val(t.formatMoney())
    .trigger("change");
}
In case you’re wondering, I’m re-using the formatMoney function here.
There’s a number of things happening here. On page load, we add a listener for changes to any input item that has a data-cell attribute; this calls updateSubTotal, which detects the row number for the triggering item, adds up all the values for any input item that has the same data-cell value; and puts the total in the input item with a matching data-subtotal attribute.
We also have a listener for changes to any item with a data-col class; when these are changed, updateTotal adds up any item with the same attribute, and puts the total in an item with attribute data-total.
The jQuery selector [id$='_"+rn+"'] makes sure that the row-level code only finds items ending with the given row number (i.e. '*_0001').
The benefit of this declarative approach is that it is much easier to re-use and adapt.
EDIT: fixed the change trigger so that I don’t need to call updateTotal from updateSubTotal.
Ever since I started exploring the idea of using a TAPI approach with APEX, something I was never quite satisfied with was Tabular Forms.
They can be a bit finicky to work with, and if you’re not careful you can break them to the point where it’s easier to recreate them from scratch rather than try to fix them (although if you understand the underlying mechanics you can fix them [there was an article about this I read recently but I can’t find it now]).
I wanted to use the stock-standard APEX tabular form, rather than something like Martin D’Souza’s approach – although I have used that a number of times with good results.
In the last week or so while making numerous improvements to my TAPI generator, and creating the new APEX API generator, I tackled again the issue of tabular forms. I had a form that was still using the built-in APEX ApplyMRU and ApplyMRD processes (which, of course, bypass my TAPI). I found that if I deleted both of these processes, and replaced them with a single process that loops over the APEX_APPLICATION.g_f0x arrays, I lose a number of Tabular Form features such as detecting which records were changed.
Instead, what ended up working (while retaining all the benefits of a standard APEX tabular form) was to create a row-level process instead. Here’s some example code that I put in this APEX process that interfaces with my APEX API:
The process has Execution Scope set to For Created and Modified Rows. It first calls my TAPI.rv function to convert the individual columns from the row into an rvtype record, which it then passes to the APEX API apply_mr procedure. The downside to this approach is that each record is processed separately – no bulk updates; however, tabular forms are rarely used to insert or update significant volumes of data anyway so I doubt this would be of practical concern. The advantage of using the rv function is that it means I don’t need to repeat all the column parameters for all my API procedures, making maintenance easier.
The other change that I had to make was ensure that any Hidden columns referred to in my Apply process must be set to Hidden Column (saves state) – in this case, the VERSION_ID column.
Here’s the generated APEX API apply_mr procedure:
PROCEDURE apply_mr (rv IN VENUES$TAPI.rvtype) IS
  r VENUES$TAPI.rowtype;
BEGIN
  log_start('apply_mr');

  UTIL.check_authorization('Operator');

  IF APEX_APPLICATION.g_request = 'MULTI_ROW_DELETE' THEN

    IF v('APEX$ROW_SELECTOR') = 'X' THEN
      VENUES$TAPI.del (rv => rv);
    END IF;

  ELSE

    CASE v('APEX$ROW_STATUS')
    WHEN 'C' THEN

      r := VENUES$TAPI.ins (rv => rv);

    WHEN 'U' THEN

      r := VENUES$TAPI.upd (rv => rv);

    ELSE
      NULL;
    END CASE;

  END IF;

  log_end;
EXCEPTION
  WHEN UTIL.application_error THEN
    log_end('application_error');
    RAISE;
  WHEN OTHERS THEN
    UTIL.log_sqlerrm;
    RAISE;
END apply_mr;
The code uses APEX$ROW_STATUS to determine whether to insert or update each record. If the Delete button was pressed, it checks APEX$ROW_SELECTOR to check that the record had been selected for delete – although it could skip that check since APEX seems to call the procedure for only the selected records anyway. The debug logs show APEX skipping the records that weren’t selected.
Now, before we run off gleefully inserting and updating records we should really think about validating them and reporting any errors to the user in a nice way. The TAPI ins and upd functions do run the validation routine, but they don’t set up UTIL with the mappings so that the APEX errors are registered as we need them to. So, we add a per-record validation in the APEX page that runs this:
As for the single-record page, this validation step is of type PL/SQL Function (returning Error Text). Its Execution Scope is the same as for the apply_mr process – For Created and Modified Rows.
Note that we need to set a static ID on the tabular form region (the generator assumes it is the table name in lowercase – e.g. venues – but this can be changed if desired).
The val_row procedure is as follows:
PROCEDURE val_row
  (rv               IN VENUES$TAPI.rvtype
  ,region_static_id IN VARCHAR2
  ) IS
  dummy            VARCHAR2(32767);
  column_alias_map UTIL.str_map;
BEGIN
  log_start('val_row');

  UTIL.pre_val_row
    (label_map        => VENUES$TAPI.label_map
    ,region_static_id => region_static_id
    ,column_alias_map => column_alias_map);

  dummy := VENUES$TAPI.val (rv => rv);

  UTIL.post_val;

  log_end;
EXCEPTION
  WHEN UTIL.application_error THEN
    log_end('application_error');
    RAISE;
  WHEN OTHERS THEN
    UTIL.log_sqlerrm;
    RAISE;
END val_row;
The pre_val_row procedure tells all the validation handlers how to register any error message with APEX_ERROR. In this case, column_alias_map is empty, which causes them to assume that each column name in the tabular form is named the same as the column name on the database. If this default mapping is not correct for a particular column, we can declare the mapping, e.g. column_alias_map('DB_COLUMN_NAME') := 'TABULAR_FORM_COLUMN_NAME';. This way, when the errors are registered with APEX_ERROR they will be shown correctly on the APEX page.
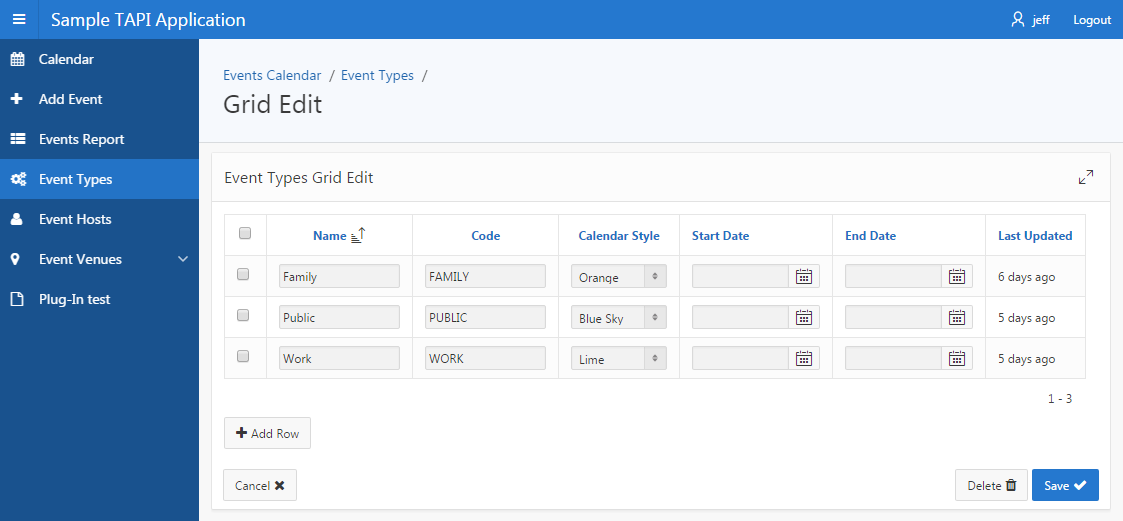
Things got a little complicated when I tried using this approach for a table that didn’t have any surrogate key, where my TAPI uses ROWID instead to uniquely identify a row for update. In this case, I had to change the generated query to include the ROWID, e.g.:
SELECT t.event_type
      ,t.name
      ,t.calendar_css
      ,t.start_date
      ,t.end_date
      ,t.last_updated_dt
      ,t.version_id
      ,t.ROWID AS p_rowid
FROM   event_types t
I found if I didn’t give a different alias for ROWID, the tabular form would not be rendered at runtime as it conflicted with APEX trying to get its own version of ROWID from the query. Note that the P_ROWID must also be set to Hidden Column (saves state). I found it strange that APEX would worry about it because when I removed* the ApplyMRU and ApplyMRD processes, it stopped emitting the ROWID in the frowid_000n hidden items. Anyway, giving it the alias meant that it all worked fine in the end.
* CORRECTION (7/11/2016): Don’t remove the ApplyMRU process, instead mark it with a Condition of “Never” – otherwise APEX will be unable to map errors to the right rows in the tabular form.
The Add Rows button works; also, the Save button correctly calls my TAPI only for inserted and updated records, and shows error messages correctly. I can use APEX’s builtin Tabular Form feature, integrated neatly with my TAPI instead of manipulating the table directly. Mission accomplished.
If you create an APEX form based on a table, APEX automatically creates processes of type Automatic Row Fetch and Automatic Row Processing (DML) as well as one item for each column in the table, each bound to the database column via its Source Type. This design is excellent as it’s fully declarative and is very quick and easy to build a data entry page for all your tables.
The downside to this approach is that if you want to use a Table API (TAPI) to encapsulate all DML activity on your tables, you need to write a whole lot of code to replace the processes that Apex created for you. In order to mitigate this as much as possible, I’ve augmented my code generator with an “APEX API” generator. This generates a second package for each table which can be called from APEX, which in turn calls the TAPI to run the actual DML. In addition, the validations that are performed by the TAPI are translated back into APEX Errors so that they are rendered in much the same way as built-in APEX validations.
Probably the best way to explain this is to show an example. Here’s my EMPS table (same as from my last article):
CREATE TABLE emps
(emp_id NUMBER NOT NULL
,name VARCHAR2(100 CHAR) NOT NULL
,emp_type VARCHAR2(20 CHAR) DEFAULT 'SALARIED' NOT NULL
,start_date DATE NOT NULL
,end_date DATE
,dummy_ts TIMESTAMP(6)
,dummy_tsz TIMESTAMP(6) WITH TIME ZONE
,life_history CLOB
,CONSTRAINT emps_pk PRIMARY KEY ( emp_id )
,CONSTRAINT emps_name_uk UNIQUE ( name )
,CONSTRAINT emp_type_ck
CHECK ( emp_type IN ('SALARIED','CONTRACTOR')
);
CREATE SEQUENCE emp_id_seq;
By the way, my table creation script calls DEPLOY.create_table to do this, which automatically adds my standard audit columns to the table – CREATED_BY, CREATED_DT, LAST_UPDATED_BY, LAST_UPDATED_DT, and VERSION_ID. My script also calls GENERATE.journal for the table which creates a journal table (EMPS$JN) and a trigger (EMPS$TRG) to log all DML activity against the table.
I then call GENERATE.tapi which creates the Table API (EMPS$TAPI) which has routines for validating, inserting, updating and deleting rows (or arrays of rows using bulk binds) of the EMPS table.
Finally, I call GENERATE.apexapi which creates the APEX API (EMPS$APEX) which looks like this:
Package Spec: EMPS$APEX
create or replace PACKAGE EMPS$APEX AS
/**************************************************
Apex API for emps
10-FEB-2016 - Generated by SAMPLE
**************************************************/
-- page load process
PROCEDURE load;
-- single-record page validation
PROCEDURE val;
-- page submit process
PROCEDURE process;
END EMPS$APEX;
Notice that these routines require no parameters; the API gets all the data it needs directly from APEX.
Package Body: EMPS$APEX
create or replace PACKAGE BODY EMPS$APEX AS
/*******************************************************************************
Table API for emps
10-FEB-2016 - Generated by SAMPLE
*******************************************************************************/
PROCEDURE apex_set (r IN EMPS$TAPI.rowtype) IS
p VARCHAR2(10) := 'P' || UTIL.apex_page_id || '_';
BEGIN
log_start('apex_set');
sv(p||'EMP_ID', r.emp_id);
sv(p||'NAME', r.name);
sv(p||'EMP_TYPE', r.emp_type);
sd(p||'START_DATE', r.start_date);
sd(p||'END_DATE', r.end_date);
st(p||'BLA_TSZ', r.bla_tsz);
st(p||'DUMMY_TS', r.dummy_ts);
sv(p||'CREATED_BY', r.created_by);
sd(p||'CREATED_DT', r.created_dt);
sv(p||'LAST_UPDATED_BY', r.last_updated_by);
sd(p||'LAST_UPDATED_DT', r.last_updated_dt);
sv(p||'VERSION_ID', r.version_id);
log_end;
EXCEPTION
WHEN UTIL.application_error THEN
log_end('application_error');
RAISE;
WHEN OTHERS THEN
UTIL.log_sqlerrm;
RAISE;
END apex_set;
FUNCTION apex_get RETURN EMPS$TAPI.rvtype IS
p VARCHAR2(10) := 'P' || UTIL.apex_page_id || '_';
rv EMPS$TAPI.rvtype;
BEGIN
log_start('apex_get');
rv.emp_id := nv(p||'EMP_ID');
rv.name := v(p||'NAME');
rv.emp_type := v(p||'EMP_TYPE');
rv.start_date := v(p||'START_DATE');
rv.end_date := v(p||'END_DATE');
rv.bla_tsz := v(p||'BLA_TSZ');
rv.dummy_ts := v(p||'DUMMY_TS');
rv.version_id := nv(p||'VERSION_ID');
log_end;
RETURN rv;
EXCEPTION
WHEN UTIL.application_error THEN
log_end('application_error');
RAISE;
WHEN OTHERS THEN
UTIL.log_sqlerrm;
RAISE;
END apex_get;
FUNCTION apex_get_pk RETURN EMPS$TAPI.rvtype IS
p VARCHAR2(10) := 'P' || UTIL.apex_page_id || '_';
rv EMPS$TAPI.rvtype;
BEGIN
log_start('apex_get_pk');
IF APEX_APPLICATION.g_request = 'COPY' THEN
rv.emp_id := v(p||'COPY_EMP_ID');
ELSE
rv.emp_id := nv(p||'EMP_ID');
rv.version_id := nv(p||'VERSION_ID');
END IF;
log_end;
RETURN rv;
EXCEPTION
WHEN UTIL.application_error THEN
log_end('application_error');
RAISE;
WHEN OTHERS THEN
UTIL.log_sqlerrm;
RAISE;
END apex_get_pk;
/*******************************************************************************
PUBLIC INTERFACE
*******************************************************************************/
PROCEDURE load IS
p VARCHAR2(10) := 'P' || UTIL.apex_page_id || '_';
rv EMPS$TAPI.rvtype;
r EMPS$TAPI.rowtype;
BEGIN
log_start('load');
UTIL.check_authorization('Reporting');
rv := apex_get_pk;
r := EMPS$TAPI.get (emp_id =&amp;gt; rv.emp_id);
IF APEX_APPLICATION.g_request = 'COPY' THEN
r := EMPS$TAPI.copy(r);
END IF;
apex_set (r =&amp;gt; r);
log_end;
EXCEPTION
WHEN UTIL.application_error THEN
log_end('application_error');
RAISE;
WHEN OTHERS THEN
UTIL.log_sqlerrm;
RAISE;
END load;
PROCEDURE val IS
p VARCHAR2(10) := 'P' || UTIL.apex_page_id || '_';
rv EMPS$TAPI.rvtype;
dummy VARCHAR2(32767);
item_name_map UTIL.str_map;
BEGIN
log_start('val');
IF APEX_APPLICATION.g_request = 'CREATE'
OR APEX_APPLICATION.g_request LIKE 'SAVE%' THEN
rv := apex_get;
UTIL.pre_val
(label_map =&amp;gt; EMPS$TAPI.label_map
,item_name_map =&amp;gt; item_name_map);
dummy := EMPS$TAPI.val (rv =&amp;gt; rv);
UTIL.post_val;
END IF;
log_end;
EXCEPTION
WHEN UTIL.application_error THEN
log_end('application_error');
RAISE;
WHEN OTHERS THEN
UTIL.log_sqlerrm;
RAISE;
END val;
PROCEDURE process IS
p VARCHAR2(10) := 'P' || UTIL.apex_page_id || '_';
rv EMPS$TAPI.rvtype;
r EMPS$TAPI.rowtype;
BEGIN
log_start('process');
UTIL.check_authorization('Operator');
CASE
WHEN APEX_APPLICATION.g_request = 'CREATE' THEN
rv := apex_get;
r := EMPS$TAPI.ins (rv =&amp;gt; rv);
apex_set (r =&amp;gt; r);
UTIL.success('Emp created.');
WHEN APEX_APPLICATION.g_request LIKE 'SAVE%' THEN
rv := apex_get;
r := EMPS$TAPI.upd (rv =&amp;gt; rv);
apex_set (r =&amp;gt; r);
UTIL.success('Emp updated.'
|| CASE WHEN APEX_APPLICATION.g_request = 'SAVE_COPY'
THEN ' Ready to create new emp.'
END);
WHEN APEX_APPLICATION.g_request = 'DELETE' THEN
rv := apex_get_pk;
EMPS$TAPI.del (rv =&amp;gt; rv);
UTIL.clear_page_cache;
UTIL.success('Emp deleted.');
END CASE;
log_end;
EXCEPTION
WHEN UTIL.application_error THEN
log_end('application_error');
RAISE;
WHEN OTHERS THEN
UTIL.log_sqlerrm;
RAISE;
END process;
END EMPS$APEX;
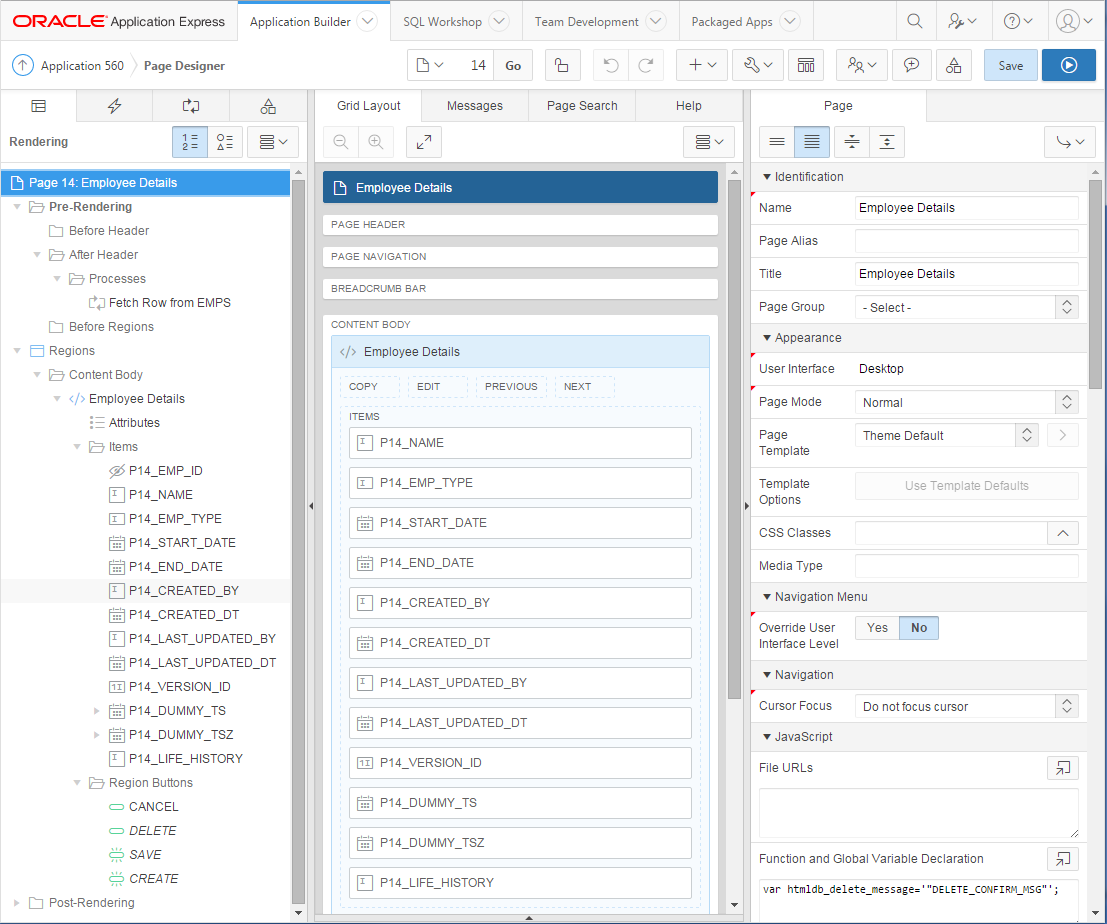
Now, given the above package, we can create an APEX page that allows users to view, create, update, copy and delete a record from the EMPS table, using all the features provided by our TAPI.
Create Page, select Form, select Form on a Table or view, select the table EMPS.
Accept the defaults, or change them to taste, and click Next, Next.
On the Primary Key wizard step, change type to Select Primary Key Column(s) and it should pick up the EMP_ID column automatically. Click Next.*
For Source Type, leave the default (Existing trigger).** Click Next, Next, Next.
For Branching, enter page numbers as required. Click Next, then Create.
* the APEX API and Table API generator also handles tables with no surrogate key by using ROWID instead; in this case, you would leave the default option selected (Managed by Database (ROWID)) here. ** note however that our TAPI will handle the sequence generation, not a trigger.
The page should look something like this:
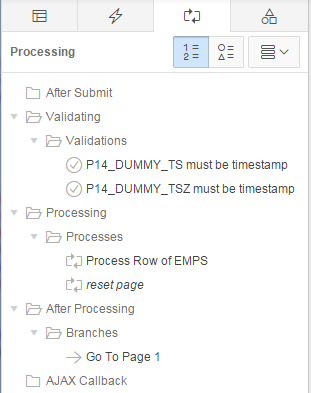
Notice that it has created a Fetch Row from EMPS process for when the page is loaded, as well as the Process Row of EMPS and reset page processes for when the page is submitted. It has also created a few validations.
Notice also that all the items are named consistently with the column names; this is important as my APEX API package generator relies on this one-to-one mapping. You can, of course, add additional non-database items to the page – they won’t be affected by the generator unless the table is altered with columns that match.
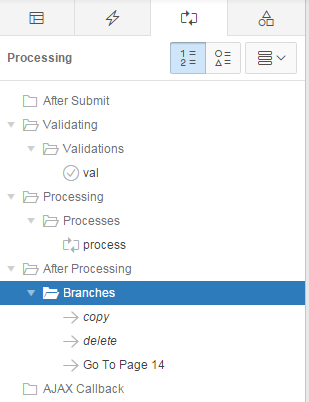
Now, this page will work fine, except that it bypasses our TAPI. To change the page so that it uses our TAPI instead, edit the page as follows:
Delete all the Fetch Row from EMPS, Process Row of EMPS and reset page processes.
Delete all the validations.
For all the page items, set Source Type to Null. In Apex 5 this is easy – just Ctrl+Click each item, then make the change to all of them in one step!
Make the audit column items (CREATED_BY, CREATED_DT, LAST_UPDATED_BY, LAST_UPDATED_DT) Display Only.
Make the VERSION_ID item Hidden.
Under Pre-Rendering, add an After Header process that calls EMPS$APEX.load;.
In the Page Processing tab, under Validating, add a validation with Type = PL/SQL Function (returning Error Text).
Set the PL/SQL Function Body Returning Error Text to EMPS$APEX.val; RETURN null;.
Set Error Message to “bla” (this is a mandatory field but is never used – I think this is a small bug in Apex 5).
Under Processing, add a process that calls EMPS$APEX.process;.
Set Error Message to #SQLERRM_TEXT#.
Run the page – you should find that it works just as well as before, with all the TAPI goodness working behind the scenes. Even the validations work, and they will point at the right items on the page.
But that’s not all! You can easily add a useful “Copy” function that your users will thank you for because (depending on the use case) it can reduce the amount of typing they have to do.
Add a button to the region, named SAVE_COPY (this name is important) with the label Copy. Tip: if you want an icon set the Icon CSS Classes to fa-copy.
Add a hidden item named after the PK item prefixed with “COPY_”, e.g. P14_COPY_EMP_ID.
Under After Processing, add a Branch that goes to this same page (e.g. 14, in this example).
On the branch, set Request (under Advanced) to COPY and assign &P14_EMP_ID. to the item P14_COPY_EMP_ID.
Set When Button Pressed to SAVE_COPY.
Change the order of the branches so that the Copy branch is evaluated before the other branches (see below)
Now, when they click Copy, the page will first save any changes they had made to the record, then go back to the same page with a copy of all the details from the original record. The user can then edit the new record and Create it if they so desire, or Cancel.
An advantage of this design is that, if you want to add a validation that applies whether someone is updating the table from APEX or from some other UI or interface, you can add it in one place – the TAPI (specifically, you would add it to the TAPI template). If you add a column, just add an item to the APEX page and regenerate the TAPI and Apex API. It’s a nice DRY-compliant solution.
Addendum: you may be wondering why we need a P14_COPY_EMP_ID item, instead of simply reusing the P14_EMP_ID item that’s already there. The reason for this is that after saving a copied record, in some cases we may want to copy some or all the child records from the original record to the copy, or do some other operation that needs both the old and the new ID.
You have a Select List item on your page driven from a dynamic query, e.g. one that only shows valid values. One day, users notice that the list appears empty and raise a defect note.
You check the query behind the list and verify that indeed, the list should be empty because there are no valid values to show. It’s an optional item so the user is free to save the record if they wish.
There are a number of ways we could make this more user-friendly: depending on the specifics of the situation, we might just hide the item, or we might want to show an alternative item or a warning message. We can do any of these things quite easily using either a computation on page load (if the list doesn’t change while the page is open) or a dynamic action.
In the case of my client, they wanted the item to remain on screen, but to show an orange warning message to let them know that there are no gateways currently available; this is only a warning because there are subsequent processes that can handle the missing gateway (e.g. a higher-privileged user can assign a “hidden” gateway to the record if they deem it suitable).
To do this we create a display item (e.g. “P1_NO_GATEWAY_WARNING” which shows the warning message) and a dynamic action with the following attributes:
Event = Page Load
Condition = JavaScript expression
Value = listIsEmpty("P1_GATEWAY_ID")
True Action = Set Value
Set Type = Static Assignment
Value = Warning: no gateways currently available
Selection Type = Item(s)
Item(s) = P1_NO_GATEWAY_WARNING
In the page’s Function and Global Variable Declaration, or (even better) in the application’s global javascript file, we add the following:
This was adapted from some solutions here. It looks for all <option>s under the item, filters the list for options which are not disabled and have a label, and returns true if the remaining set is empty. I added the this.text bit because the empty lists generated by Apex include a single empty option for the “NULL” value. This is because I have set the list item’s Null Display Value to blank (null).


 Sometimes my customers need to be able to get a direct link to a record in their APEX application which they can share with others (e.g. to publish it on a website, or send by email to a colleague).