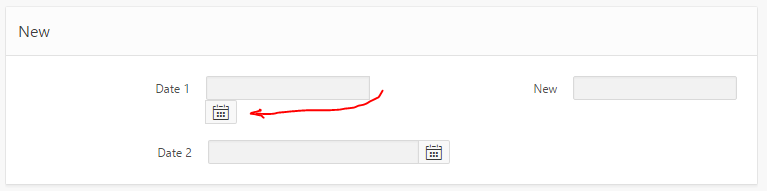
I was playing around with the layout of my APEX form, while at the same time upgrading the date items from the Classic date items to the new Date Picker items, and was rewarded with this:

The simplest way to fix this is to edit the Item, specifically the HTML Table Cell Attributes – set to NOWRAP:

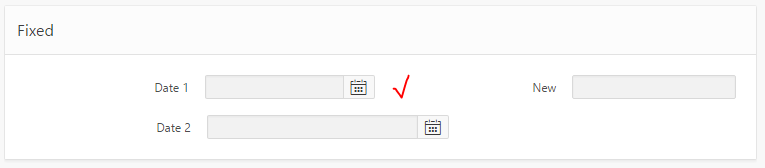
Viola, problem solved:

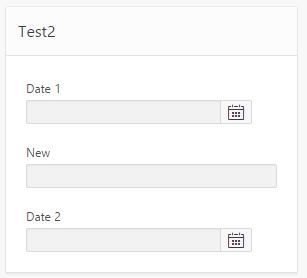
June 2016: Update for APEX 5 Universal Theme
I was alerted by Evandro Giachetto that the above solution does not work with the Universal Theme in APEX 5.
I had a go at trying to workaround it. I tried adding “white-space:nowrap” to various levels of divs around the item, which stopped it from wrapping the icon, but it kept hiding the icon behind the label div for the next item.
So through the magic of twitter we got a CSS solution proposed by Markus Hohloch:
.t-Form-inputContainer { white-space: nowrap; }
.ui-datepicker-trigger { right: 25px; }
This takes care of the wrapping, and fixes the problem with the icon being hidden. The only downside is that when the screen is very slim, this css causes a gap to be shown on the right-hand side of the icon; this is not too big a deal but I suspect with the right media query syntax that could be fixed as well.
I like the “Vertical Images List” in APEX, which allows me to create a navigation bar of icons to give users quick access to various pages in my site. It’s easy to customise each item – you can select any image, add attributes for the image if necessary, and each item in the list has a URL which can point to another page in the application, or to an arbitrary URL.
My problem, however, was that some of the URLs in my list took the user to another site, or opened a PDF, and these would open in the same window. I wanted these particular items to open a new window, but the navigation item properties don’t allow this.
To solve this, I modified the Vertical Images List template, and used one of the User Defined Attributes to add “target=_blank” to the items that I wanted. While I was in there, I made a few tweaks to customise the template further to my liking.
A. Modify the Vertical Images List template.
- Go to Shared Components and open the Templates (under User Interface).
- Scroll down to Vertical Images List (in the Lists category) and open it for editing.
- Modify the Template Definition (WARNING: the code for different Apex templates may differ slightly; you’ll have to use a bit of nouse to customise it to your requirements) – you can add bits like #A01#, #A02#, etc – in my case I’ve used the following convention:
#A01# = extra text to appear below the icon & link;
#A02# = tooltip text for the hyperlink;
#A03# = extra attributes for the link (HTML <A> tag).
I’ve done this in both the “List Template Current” and “List Template Noncurrent” sections.

For example, for “List Template Noncurrent, I’ve modified the template code as follows:
<tr><td><a href=”#LINK#” TITLE=”#A02#” #A03#>
<img src=”#IMAGE_PREFIX##IMAGE#” #IMAGE_ATTR# />#TEXT#</a>
<BR>#A01#</td></tr>
B. Set User Defined Attributes.
- Open the Navigation List for editing (Shared Components -> Navigation -> Lists).
- Open the list item for editing that you wish to customise (or create a new one).
- In User Defined Attributes, attribute 1, add any text you wish to show beneath the link (but not highlighted as part of the ink)
- For attribute 2, add the title you wish to show up as a tooltip.
- For attribute 3, add the html attribute “target=_blank” if you wish this navigation entry to open a new window when invoked.


This is how it looks in a sample application:

If the user clicks on “Address Book”, the “target=_blank” attribute instructs the browser to open in a new window (or tab, in some cases).
My web site accepts applications for a sports team, and the last step is the applicant needs to print out a form to be signed. To make things as simple as possible, I want this form to send itself to their printer as soon as they open it. Now, I’m not a javascript expert; but instead of googling for the code, I stole it by doing a View Source on Google Mail’s print feature.
To get any APEX page to print when it is opened, all you need to do is add two bits to the page definition:
HTML Header
function Print(){document.body.offsetHeight;window.print()}
Page HTML Body Attribute
onload="Print()"
Isn’t javascript easy? I’m not sure what the “document.body.offsetHeight” is all about but I suspect it’s something to do with waiting for the whole page to load and render before the print starts.
Every day it seems, Googlebot scans my site. You wouldn’t think that would affect the performance of the site, or if at all, would make it worse, right?
A few days ago I used APEX’s Page View Analysis, Weighted Page Performance (under Home > Administration > Monitor Activity) to see which pages I should focus on to improve performance. The top page was my home page, which was taking 0.9 seconds to load on average. There were other pages that were taking longer to load, but the home page was the most common entry point so it had a higher “weighting”.
So I loaded up the page while logged in as a developer and clicked the “Debug” button at the bottom of the page. It showed that all the regions on the page were rendering in about 0.01 seconds each (sometimes a bit more), except for one region – a region that pulled a small bit of XML from another website (“Verse of the Day” via BibleGateway.com) and displayed it – it was consistently taking 0.5 – 0.8 seconds to load.
The “Verse of the Day”, obviously, only changes once a day, but for some reason, in spite of the Cache settings on the region, it was still going back to the source every page view (side question: have you noticed that in Debug mode, it seems no regions are found in the cache? – perhaps this is by design?).
Oh well – I was thinking that I’d like to store the text that is being shown in that region anyway, so I created a simple table to store the text, then rewrote the PL/SQL to get the text from the table instead; and if not found, only then does it go to BibleGateway.com to get the VotD.
After the first pageview loads the verse into the cache, subsequent pageviews are taking less than 0.1 seconds total, so that’s solved – except for the very first visitor to the site of the day, who will have to wait a whole 0.9 seconds.
However, as I discovered this morning, looking at the logs, it appears Googlebot is the one who is suffering – sometime after midnight most nights it scans the site, seeds the cache for me, then everyone who visits that day gets the benefit of the cache 🙂 🙂 🙂
