This would be a very rare requirement, as most of the time when you are designing an ORDS REST service you should know what query parameters your service supports. However, in the case where your users are allowed to supply an arbitrary list of additional parameters to your service, you won’t know what the keys will be for these parameters.
Since you can’t define the user-defined query parameters in your ORDS endpoint, they won’t be supplied via bind variables. Instead, in your PL/SQL handler you need to get the original query string using owa_util.get_cgi_env('QUERY_STRING'), then parse it to find the query parameters.
Here’s what I’ve used:
function query_string_map
return apex_application_global.vc_map
is
l_plist apex_t_varchar2;
l_map apex_application_global.vc_map;
begin
-- query string may be like:
-- param1=abc¶m2=def¶m3=ghi
-- or blanks may be included like:
-- param1=abc¶m2=¶m3=ghi
-- or the = symbol may be omitted:
-- param1=abc¶m2¶m3=ghi
l_plist := apex_string.split(owa_util.get_cgi_env('QUERY_STRING'), '&');
for i in 1..l_plist.count loop
declare
l_offset pls_integer;
l_key varchar2(255);
l_value varchar2(32767);
begin
l_offset := instr(l_plist(i), '=');
if l_offset > 0 then
l_key := substr(l_plist(i), 1, l_offset - 1);
l_value := substr(l_plist(i), l_offset + 1);
else
l_key := l_plist(i);
-- the value is null
end if;
-- ORDS may encode %20 as '+', but this is not detected by utl_url
l_key := replace(l_key, '+', ' ');
l_key := sys.utl_url.unescape(l_key, 'UTF-8');
if l_value is not null then
l_value := replace(l_value, '+', ' ')
l_value := sys.utl_url.unescape(l_value, 'UTF-8');
end if;
-- add the key/value to the map
l_map(l_key) := l_value;
end;
end loop;
return l_map;
end query_string_map;
This takes the query string and splits it on each occurrence of the & symbol. Each parsed part is expected to take the form key=value, key= or just key (with no = symbol). It converts any escaped URL characters and builds a map of key/value pairs and returns it.
The calling process can then use the map to process each key/value in turn, e.g.
declare
    l_map apex_application_global.vc_map;
    l_key varchar2(255);
begin

    l_map := query_string_map;

    l_key := l_map.first;
    while l_key is not null loop

        -- do something with the key/value
        dbms_output.put_line(l_key || ' : ' || l_map(l_key));

        l_key := l_map.next(l_key);
    end loop;

end;
If you wish to remove a NOT NULL constraint from a column, normally you would execute this:
alter table t modify module null;
The other day a colleague trying to execute this on one of our tables encountered this error instead:
ORA-01451: column to be modified to NULL cannot be modified to NULL
*Cause:    the column may already allow NULL values, the NOT NULL constraint
           is part of a primary key or check constraint.
*Action:   if a primary key or check constraint is enforcing the NOT NULL
           constraint, then drop that constraint.
Most of the time when you see this error, it will be because of a primary key constraint on the column. This wasn’t the case for my colleague, however.
This particular column had a NOT NULL constraint. This constraint was not added deliberately by us; it had been applied automatically because the column has a default expression using the DEFAULT ON NULL option. For example:
create table t (
    ...
    module varchar2(64) default on null sys_context('userenv','module'),
    ...
);
A column defined with the DEFAULT ON NULL option means that if anything tries to insert a row where the column is null, or not included in the insert statement, the default expression will be used to set the column’s value. This is very convenient in cases where we always want the default value applied, even if some code tries to insert NULL into that column.
One would normally expect that a DEFAULT ON NULL implies that the column will never be NULL, so it makes sense that Oracle would automatically add a NOT NULL constraint on the column.
An edge case where this assumption does not hold true is when the default expression may itself evaluate to NULL; when that occurs, the insert will fail with ORA-01400: cannot insert NULL into ("SAMPLE"."T"."MODULE").
Therefore, my colleague wanted to remove the NOT NULL constraint, but their attempt failed with the ORA-01451 exception noted at the start of this article.
Unfortunately for us, the DEFAULT ON NULL option is not compatible with allowing NULLs for the column; so we had to remove the DEFAULT ON NULL option. If necessary, we could add a trigger on the table to set the column’s value if the inserted value is null.
The way to remove the DEFAULT ON NULL option is to simply re-apply the default, omitting the ON NULL option, e.g.:
alter table t modify module default sys_context('userenv','module');
Here’s a transcript illustrating the problem and its solution:
create table t (
    dummy number,
    module varchar2(64) default on null sys_context('userenv','module')
);

Table T created.

exec dbms_application_info.set_module('SQL Developer',null);

insert into t (dummy) values (1);

1 row inserted.

select * from t;

     DUMMY MODULE
---------- -----------------------------------------------------------
         1 SQL Developer


exec dbms_application_info.set_module(null,null);

insert into t (dummy) values (2);

Error report -
ORA-01400: cannot insert NULL into ("SAMPLE"."T"."MODULE")


alter table t modify module null;

ORA-01451: column to be modified to NULL cannot be modified to NULL


alter table t modify module default sys_context('userenv','module');

Table T altered.

insert into t (dummy) values (3);

1 row inserted.

select * from t;

     DUMMY MODULE
---------- -----------------------------------------------------------
         1 SQL Developer
         3
Quite often I will need to export some data from one system, such as system setup metadata, preferences, etc. that need to be included in a repository and imported when the application is installed elsewhere.
I might export the data in JSON or CSV or some other text format as a CLOB (character large object) variable. I then need to wrap this in suitable commands so that it will execute as a SQL script when installed in the target system. To do this I use a simple script that takes advantage of the APEX_STRING API to split the CLOB into chunks and generate a SQL script that will re-assemble those chunks back into a CLOB on the target database, then call a procedure that will process the data (e.g. it might parse the JSON and insert metadata into the target tables).
This will work even if the incoming CLOB has lines that exceed 32K in length, e.g. a JSON document that includes embedded image data encoded in base 64, or documents with multibyte characters.
This is clob_to_sql_script:
function clob_to_sql_script (
    p_clob           in varchar2,
    p_procedure_name in varchar2,
    p_chunk_size     in integer := 8191
) return clob is

-- Takes a CLOB, returns a SQL script that will call the given procedure
-- with that clob as its parameter.

    l_strings apex_t_varchar2;
    l_chunk   varchar2(32767);
    l_offset  integer;

begin

    apex_string.push(
        l_strings,
        q'[
declare
l_strings apex_t_varchar2;
procedure p (p_string in varchar2) is
begin
    apex_string.push(l_strings, p_string);
end p;
begin
]');

    while apex_string.next_chunk (
        p_str    => p_clob,
        p_chunk  => l_chunk,
        p_offset => l_offset,
        p_amount => p_chunk_size )
    loop
        apex_string.push(
            l_strings,
            q'[p(q'~]'
            || l_chunk
            || q'[~');]');
    end loop;

    apex_string.push(
        l_strings,
        replace(q'[
    #PROC#(apex_string.join_clob(l_strings));
end;
]',
            '#PROC#', p_procedure_name)
        || '/');

    return apex_string.join_clob(l_strings);
end clob_to_sql_script;
Note that the default chunk size is 8,191 characters which is the safe limit for multi-byte characters. You can choose a smaller chunk size if you want, although if the incoming CLOB is very large, the smaller the chunk size the bigger the expanded SQL script will be.
A simple test case will demonstrate what it will do:
declare
    l_input  clob;
    l_output clob;
begin
    l_input := q'[
{
    "data": "Lorem ipsum dolor sit amet, consectetur adipiscing elit, sed do eiusmod tempor incididunt ut labore et dolore magna aliqua. Ut enim ad minim veniam, quis nostrud exercitation ullamco laboris nisi ut aliquip ex ea commodo consequat. Duis aute irure dolor in reprehenderit in voluptate velit esse cillum dolore eu fugiat nulla pariatur. Excepteur sint occaecat cupidatat non proident, sunt in culpa qui officia deserunt mollit anim id est laborum."
}
]';
    l_output := clob_to_sql_script(
        p_clob           => l_input,
        p_procedure_name => 'mypackage.import',
        p_chunk_size     => 60 );
    dbms_output.put_line( l_output );
end;
/
The above script would output this:
declare
l_strings apex_t_varchar2;
procedure p (p_string in varchar2) is
begin
    apex_string.push(l_strings, p_string);
end p;
begin

p(q'~
{
    "data": "Lorem ipsum dolor sit amet, consectetur adip~');
p(q'~iscing elit, sed do eiusmod tempor incididunt ut labore et d~');
p(q'~olore magna aliqua. Ut enim ad minim veniam, quis nostrud ex~');
p(q'~ercitation ullamco laboris nisi ut aliquip ex ea commodo con~');
p(q'~sequat. Duis aute irure dolor in reprehenderit in voluptate ~');
p(q'~velit esse cillum dolore eu fugiat nulla pariatur. Excepteur~');
p(q'~ sint occaecat cupidatat non proident, sunt in culpa qui off~');
p(q'~icia deserunt mollit anim id est laborum."
}
~');

    mypackage.import(apex_string.join_clob(l_strings));
end;
/
Recently I’ve been reviewing and updating my knowledge of APEX security, especially protection from URL tampering. I’ve read the documentation, a number of blogs, and heard from people with experience in the field such as Lino. By default, when you create a new application in APEX you get the following security settings set automatically, which is a good start:
Application Session State Protection is Enabled.
Each page has Page Access Protection set to Arguments Must Have Checksum.
Each Application Item has Protection Level set to Restricted – May not be set from browser.
Each Primary Key Item* created by a wizard has Protection Level set to Checksum Required – Session Level.
(* that is, any item mapped from a table column that is, or forms part of, a Primary Key constraint).
These default settings are considered best practice. If you change these, it becomes your responsibility to ensure that your application is protected against security vulnerabilities from URL tampering.
For page items, however, the Protection Level defaults to Unrestricted. This is ok for Form items because the page fetch process will set their values on page load, rendering any attempt at URL tampering ineffective.
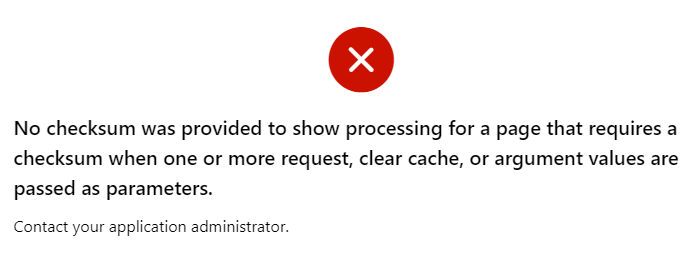
For non-form page items, unless the Page Access Protection is relaxed (Unrestricted), leaving items unrestricted is safe since URL tampering is blocked for the entire page anyway. At runtime, if a malicious visitor tries to modify the item value via the URL, they will get the error “No checksum was provided to show processing for a page that requires a checksum when one or more request, clear cache, or argument values are passed as parameters.“
However, what if a developer later needs to change the page to Unrestricted? They may unwittingly introduce a potential URL tampering issue because one or more items were not protected.
UPDATE: in fact, this applies even if it’s a different page in the same application. As Martin D’Souza pointed out a decade ago, URL tampering for any item in the application is possible from any page in the application that is Unrestricted.
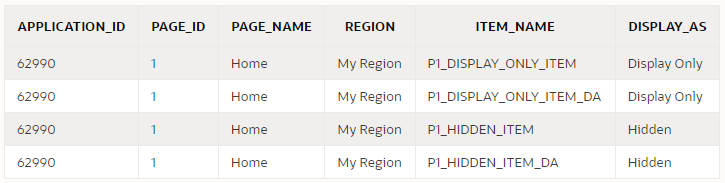
The majority of these items are editable input items, so the fact that someone may input a value via the URL is not a big deal. However, for Hidden and Display Only items, it is common for application logic to depend on their values; this logic may be adversely affected by malicious values supplied via the URL.
In some cases, this default is needed in order for the application to work. Some examples when an item must be left Unrestricted are:
An item is changed by a Dynamic Action (whether via a Set Item Value, via the Items to Return of a Execute Server-side Code action, or in some custom JavaScript), and cannot have Value Protected set because the page may be submitted.
We do actually intend the item to be set via the URL, e.g. when an external web page has a link that sets the item’s value.
In all these cases, the application must be designed to ensure it does not “trust” the value of these items; it should apply suitable checks to ensure the values are valid.
In most cases, it is best practice to set the item Protection Level to Checksum Required – Session Level (or Restricted – May not be set from browser where supported).
You can use a query like this to discover all items that may need to be reviewed:
select
    i.application_id,
    i.page_id,
    i.page_name,
    i.region,
    i.item_name,
    i.display_as
from apex_application_page_items i
where i.application_id = :app_id
and i.item_protection_level = 'Unrestricted'
and i.display_as_code in ('NATIVE_HIDDEN','NATIVE_DISPLAY_ONLY')
order by i.application_id, i.page_id, i.region, i.item_name;
Other excellent options are using third-party security scanners such as APEXSec and APEX-SERT to alert you to potential issues in your application. We mandate the use of tools like these internally at Oracle for our own applications and they are a great help.
Using the Session State Protection Wizard
One easy step you can take right now is to use the Session State Protection wizard. It gives you a quick overview of what level of protection your application has against URL tampering, and gives an easy way of fixing the relevant attributes in bulk.
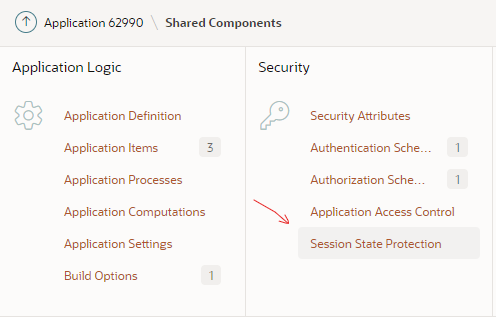
You can access the wizard via Shared Components > Session State Protection
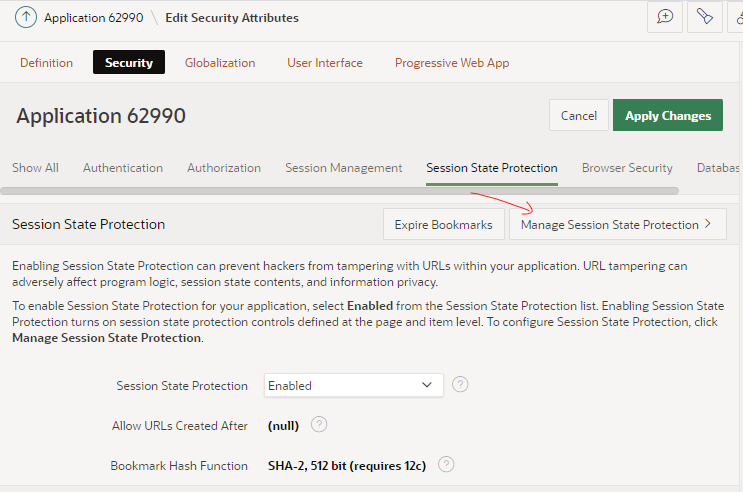
Alternatively, you can access the wizard via Edit Application Definition > Security > Session State Protection > Manage Session State Protection
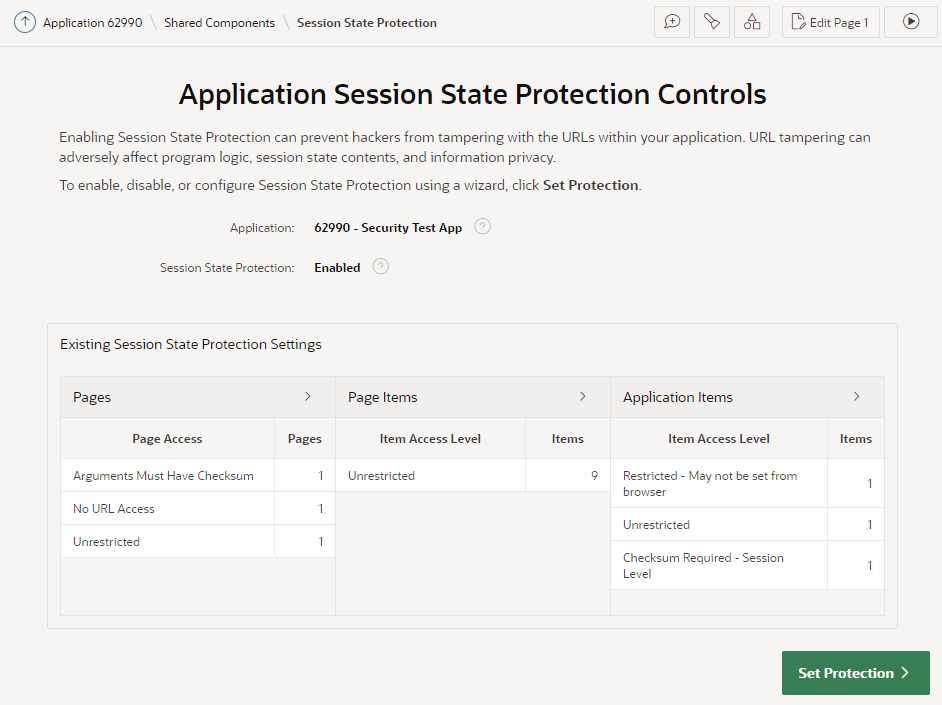
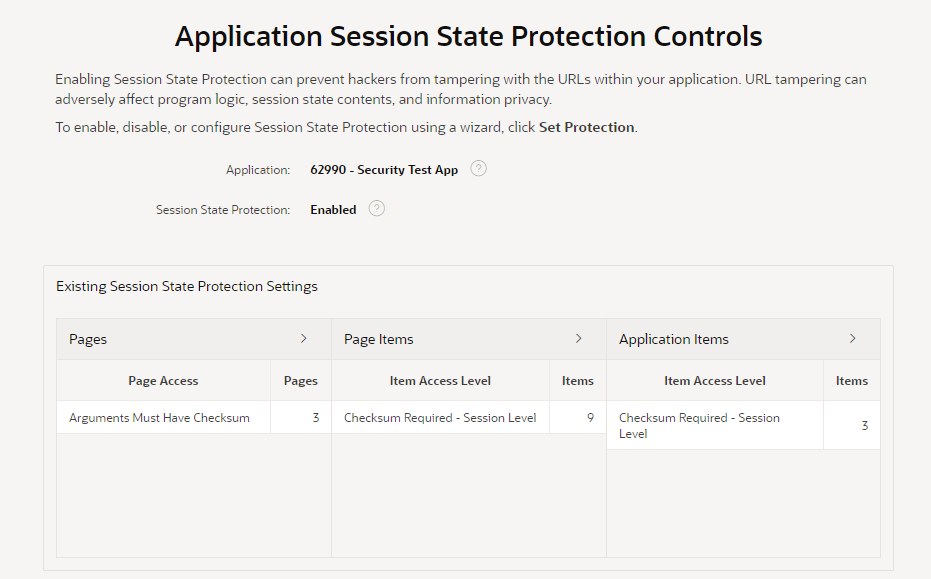
The wizard starts by showing an overview of the current state of your application’s protection against URL tampering.
You can see if your application has Session State Protection enabled (which it should, really), and if any pages, page items, and/or application items are unprotected. In my sample app here, it’s obvious that there are some potential security issues that need to be reviewed.
You can click the > buttons next to each category to list all the pages and items that need to be reviewed.
The main things to watch out for are Pages, Page Items, and Application Items that are set to Unrestricted. Other values are generally fine.
If you see any Items which are set to Checksum Required but not at the Session Level, you may find that a developer has simply set them incorrectly and you should consider changing them to Session Level. However, there are some scenarios where the other levels (Application Level, or User Level) are required.
Now, I might now go through the application page-by-page and set the protection level on each page and item as appropriate. This could be a laborious process for a large application.
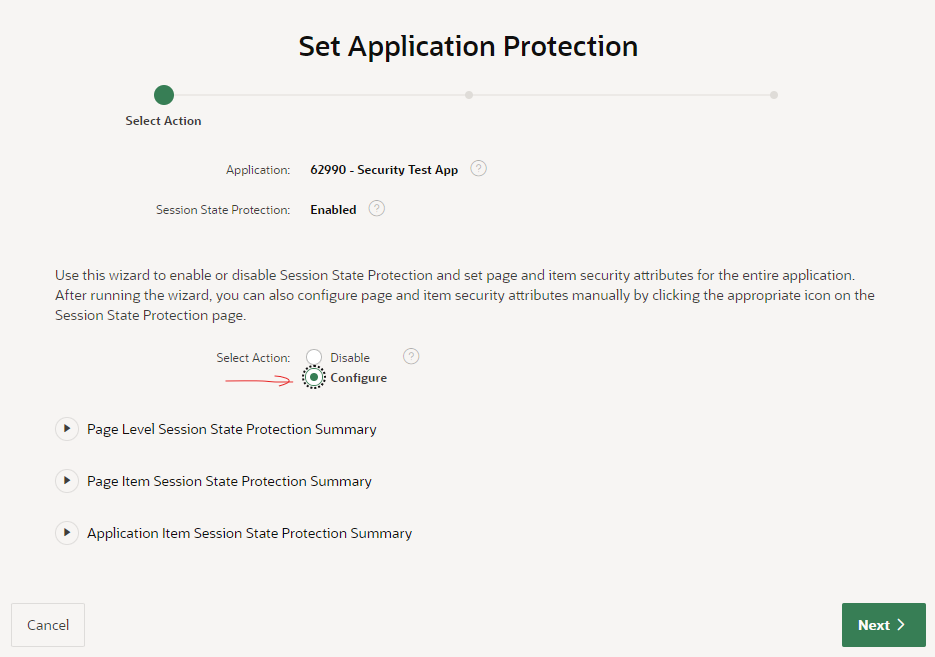
A good alternative is to use this wizard to set the protection level in bulk. In this case, I’m going to click Set Protection.
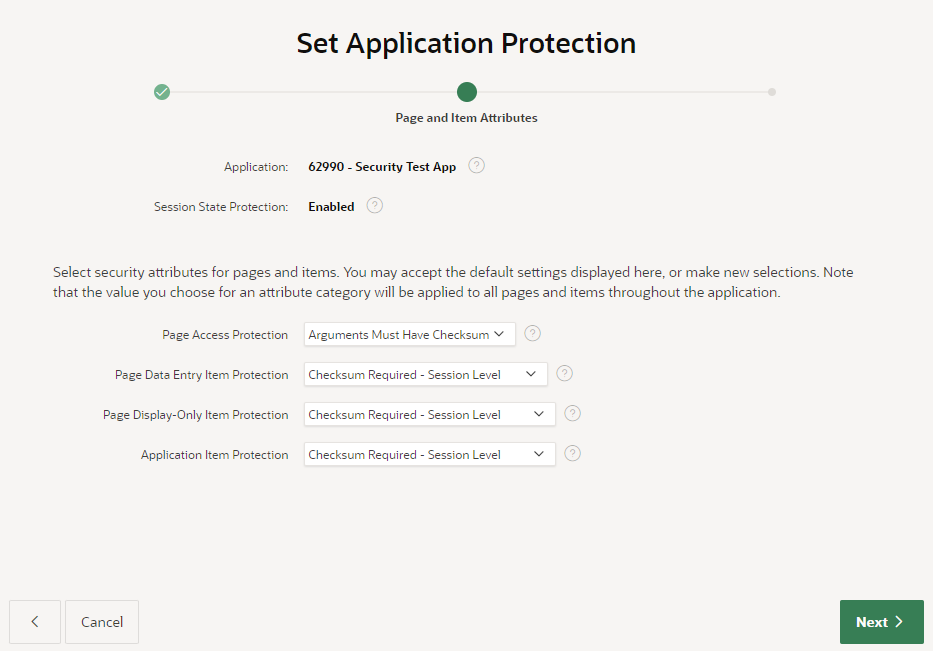
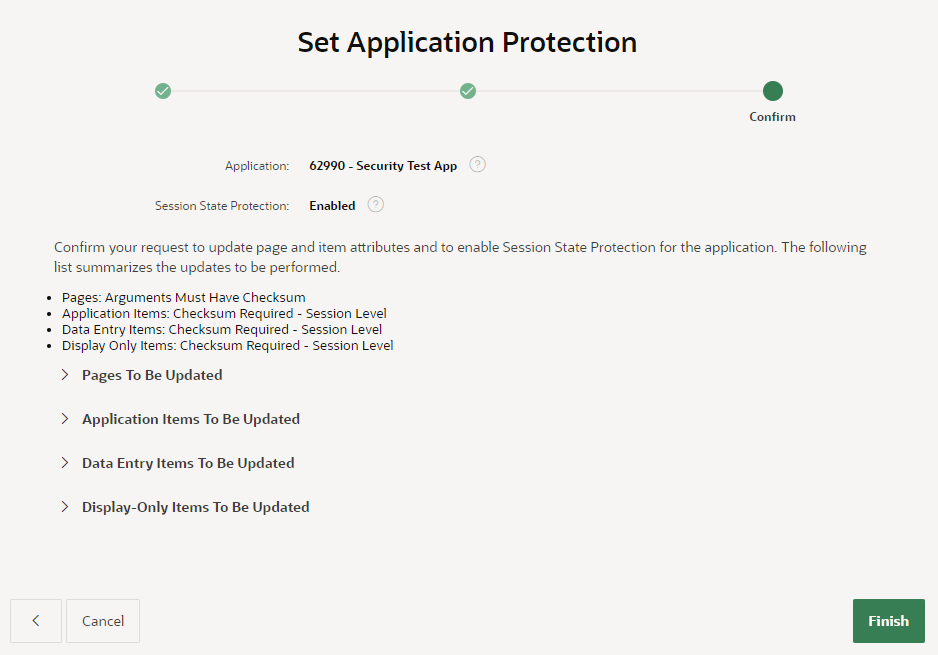
I’ve selected the action Configure, then click Next.The wizard now gives me the opportunity to modify the protection level on my pages and items in bulk. I’m going to accept the defaults (Arguments Must Have Checksum / Checksum Required – Session Level) because they are appropriate for most cases in my application.After reviewing the summaries of the changes that the wizard will make, I click Finish.
Perfect!
Final Steps
Now, I need to check for hidden page items that are now restricted that might need to be returned to Unrestricted. Otherwise, users will see the error “Session state protection violation” when they submit the page, if a dynamic action has changed them.
The following query will alert me to any Hidden items that have Value Protected switched off (e.g. because they need to be submitted):
select
    i.application_id,
    i.page_id,
    i.page_name,
    i.region,
    i.item_name,
    i.display_as
from apex_application_page_items i
where i.application_id = :app_id
and i.item_protection_level != 'Unrestricted'
and i.display_as_code = 'NATIVE_HIDDEN'
and i.attribute_01 = 'N' -- Value Protected
order by i.application_id, i.page_id, i.region, i.item_name;
Now I can review this item to check if Value Protected really needed to be switched off. If the page is never submitted, or the item is never changed by any dynamic actions, this could be switched On. Otherwise, I need to set the item protection to Unrestricted in order for the page to work.
Having made changes to the application, I need to test to ensure I haven’t introduced any issues. My focus will be mainly on the following areas:
Navigation – e.g. do the View or Edit buttons in all reports still work?
Dynamic actions – e.g. do all the dynamic actions and custom javascript still work on all pages that set item values?
For #1, I’m looking for any links that include item values that were not correctly built. If the application generates any links using just string concatenation, it will fail if the target page expects a checksum. The application should build these links using declarative link attributes if possible, or by calling apex_page.get_url (or apex_util.prepare_url at least).
For #2, I would test to ensure that after triggering a dynamic action or javascript code that modifies an item’s value, that the form is still submitted (saved) without error.
On a number of pages throughout my application, I needed to build a region containing a fairly complex set of items, along with dynamic actions and other controls to provide a friendly editing experience for the user. This non-trivial set of items with their accompanying dynamic actions and conditions would be needed on several different pages, and in some cases, multiple times on the same page.
Copying all this all over the place would have created a maintenance headache, so I would much prefer to build them only once, and then re-use the same component throughout my application. Unfortunately, APEX does not at this stage support the concept of a reusable region. An idea might be to allow a region to “subscribe” to another region – although this would be tricky because somehow the item names, dynamic action names, etc. would need to be unique but predictable.
Why not use a plugin?
One approach is to build the whole region as a plugin; this would be ideal as the plugin can then be maintained separately and deployed wherever it’s needed; this would have the benefit that it could be reused in multiple applications.
The downside is that I would not be able to use the declarative features of APEX to define the items and dynamic actions within the region; I would have to code most of that in custom HTML, JavaScript and AJAX calls for database interaction. This would then provide a different maintenance challenge for my successors.
Why not put the region on the Global Page?
Another approach would be to build the region on the Global Page; a condition could be used to show it if it’s needed by the current page.
The downsides to this approach include: (a) you can’t reuse it multiple times on a single page; (b) it may be tricky to integrate it on the pages it needs to return data to (although this could be done with some JavaScript); and (c) you have little control over where on each page the region would be shown.
The Global Region idea might work better if is implemented as an Inline Dialog; with some JavaScript it could be made to pop up wherever it’s needed. I haven’t tried this approach, however.
Use a Modal Page
Instead, the approach I took was to use a modal page. This is a page that will pop up as a layer on top of the calling page, making the calling page visible but non-responsive until the user closes the popup. I can then define all the items needed, along with their conditions and dynamic actions, in the one modal page, and then add buttons throughout my application wherever it was needed.
The calling page needs to pass the current value of one or more items to the modal page; these values are not in the database (yet) because the user may be in the middle of editing them, so their current value on screen may be different to the value stored in the table. This means I can’t have the modal page reading the value from the table, and I can’t just pass the value using the link attributes because these are set in stone when the page is rendered.
In order to open the modal page, then, I need to use a dynamic action.
Note that you can’t build the URL for the modal page in JavaScript, because the client-side code cannot calculate the checksum required by the modal page. Instead, I pre-calculate the URL for the modal page using apex_page.get_url which generates the checksum automatically.
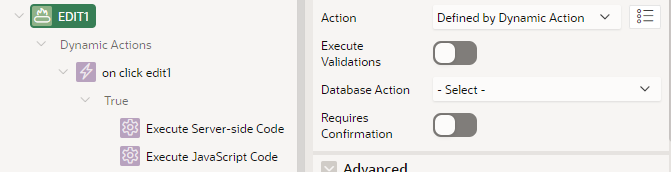
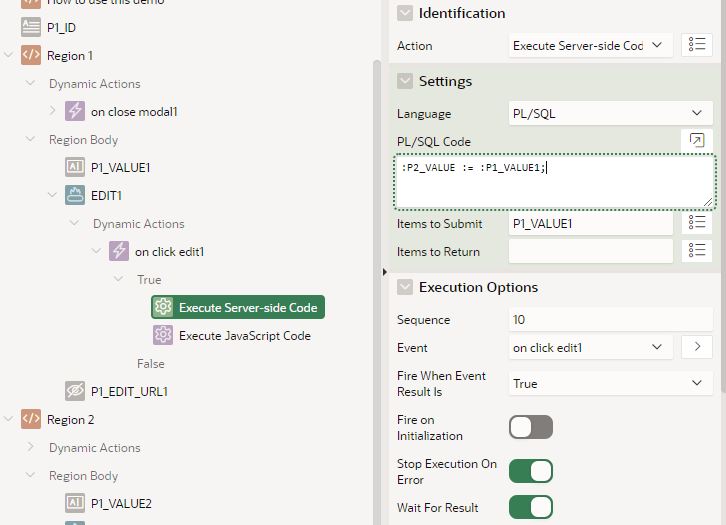
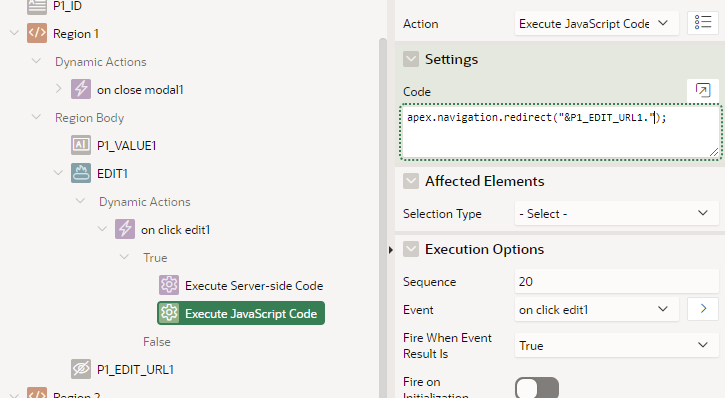
When the user clicks the “Edit” button, it needs to first copy the current value of the item into the session state for the modal page; I do this by making the Edit button Defined by Dynamic Action. On click, it executes two actions: (1) Server-side Code to submit the current value of the text item and set the modal item’s value; then (2) JavaScript Code to redirect to the URL I calculated earlier.
The modal page is then shown, allowing the user to make changes to the value. When they click the “OK” button, the modal page closes and returns the value via Items to Return.
Note that the modal page itself never saves any changes to the database, since on the calling page, the user might decide to cancel.
Back on the calling page, the new value is copied back into the page item via a Dialog Closed dynamic action. This sets the value based on the Dialog Return Item.
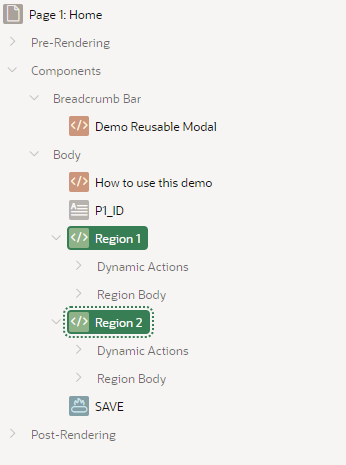
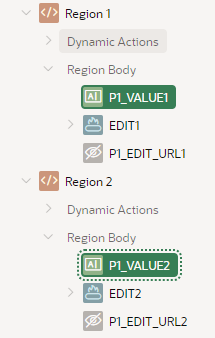
Here is my main page definition, with two regions. Each region has an item that we want to pass to/from our modal page.
Each region needs a unique Static ID.
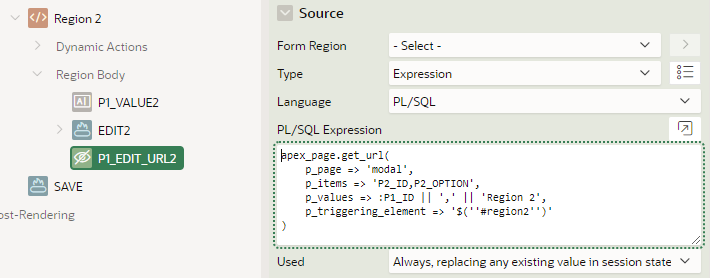
Each region has a visible Value item, an Edit button, and a hidden item to precalculate the URL for the modal page.
There are no special attributes on the value item(s); they could be a simple text field, a text area, a readonly item, a combination of various item types, or they could be hidden. Typically they would be based on database column(s) and saved in the record being edited.
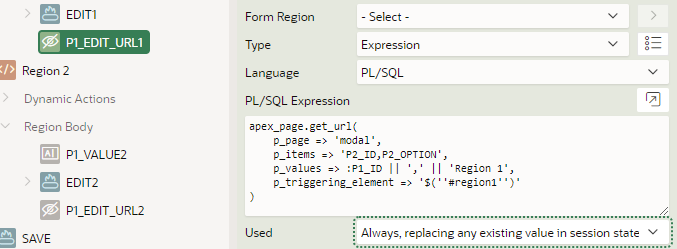
The “EDIT URL” hidden items are precalculated using an expression, and set to Always, replacing any existing value in session state.
The other edit URL is similar.
The call to apex_page.get_url is used to pass some static values (that are not changed by the page at runtime) to the modal page. These values may be used by the modal page to customise it for the context it was called from.
Note that the value of the item is not passed in the URL.
Note that p_triggering_element is a string, constructed to be a jQuery selector referring to the Static ID that was set on the region, so that the right Dialog Closed event will fire (since we may have multiple Edit buttons on the same page).
Tip: if your modal page doesn’t need them, you can omit the p_items and p_values parameters.
The Edit buttons are set to “Defined by Dynamic Action“.
The Server-side Code simply copies the current value of the item into the modal page’s item. This sets the session state on the server, which is then loaded when the modal is opened.
The JavaScript Code redirects to the modal page using the URL we calculated on page load.
apex.navigation.redirect("&P1_EDIT_URL1.");
The JavaScript Code for Region 2 is the same except it refers to P1_EDIT_URL2.
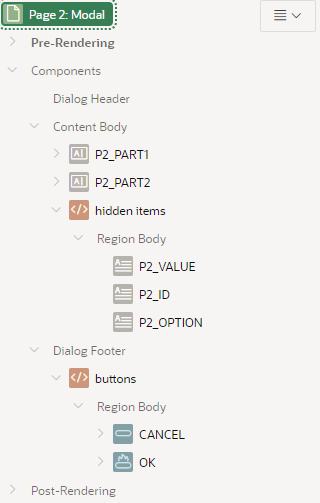
On page 2, the modal page, I have contrived an example “calculator” which simply breaks the string value into two “parts”, and allows the user to edit each “part” separately; when they click OK, the concatenated value gets returned to the calling page.
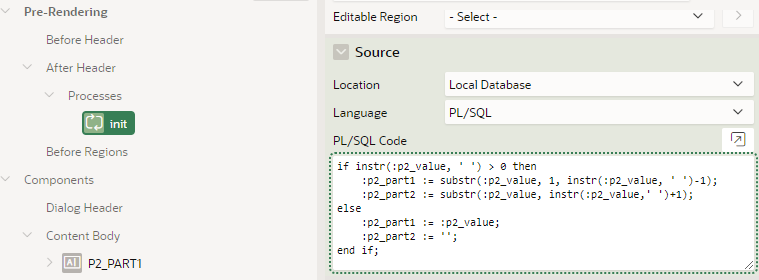
The two “PART” items are calculated on page load with some PL/SQL:
Note that this code is being executed based on the value of P2_VALUE which was set in session state by the calling page.
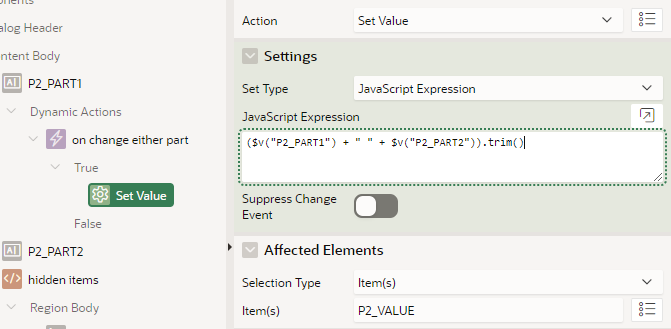
Just for the sake of the demo, my “calculator” merely sets the value of the hidden P2_VALUE item based on concatenating the two “parts”:
Note: you would define whatever items, dynamic actions or other components that you need.
This modal page never saves any changes to the database; that’s the role of the calling page.
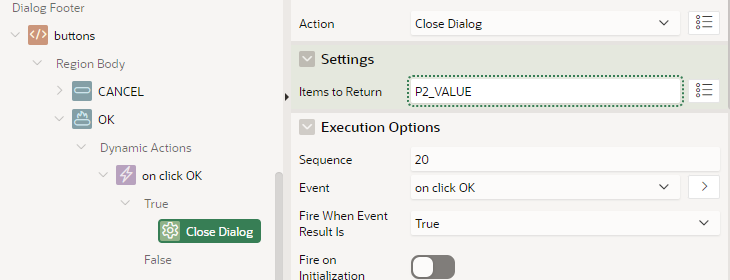
The OK button simply closes the dialog, returning the new value of P2_VALUE to the calling page.
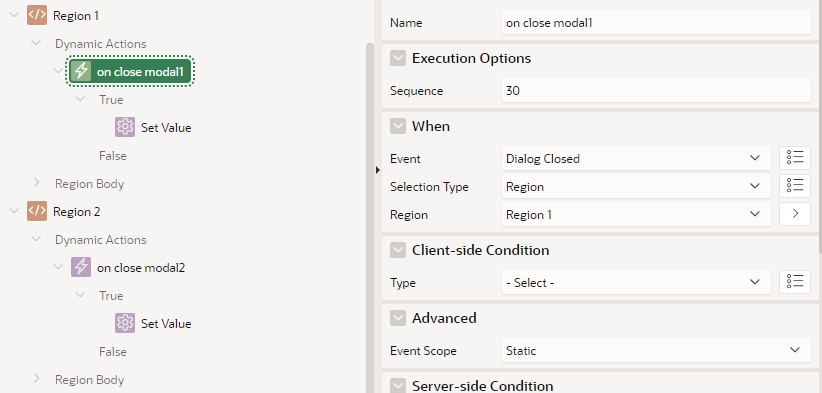
Back on the calling page, each region has a dynamic action defined on Dialog Closed.
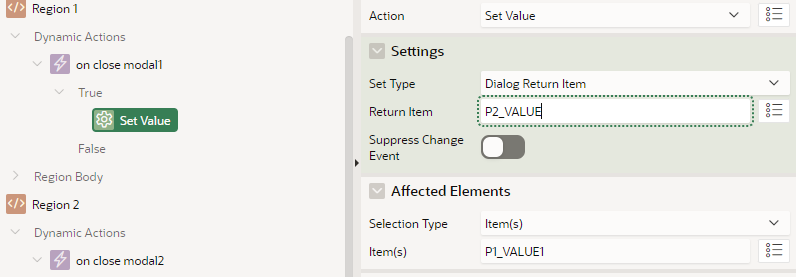
The Set Value action copies the Dialog Return Item value into the appropriate item on the page.
Summary
To use my special modal page in my application, I need to:
Set a unique Static ID on the region
Add an Edit button with a dynamic action
Add a hidden URL item based on an expression
Add a dynamic action to the region on Dialog Closed
The outcome is that the modal page provides a user-friendly experience involving any complex items, lists, dynamic actions, conditions, etc. maintained in one place, which can be re-used anywhere needed in the application.
If you would like to examine in detail the demo app, you can download it from here: https://apex.oracle.com/pls/apex/jk64/r/demo-reusable-modal/home (click the “Download this demo app” link). You may then install this in your own workspace and check out how it all works.
Have you had a similar requirement in your apps? Comment below and describe how you implemented it.
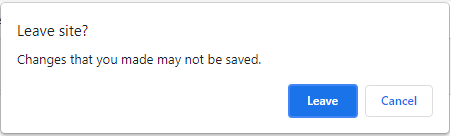
I had an APEX page based on a Form region that I’d built by hand (rather than using the wizard). I was wondering why the user always got an unexpected warning “Changes that you have made may not be saved.” – even though they hadn’t changed anything on the page.
I noticed that the item had a List of Values, and it had the Display Null Value setting set to No; however, the value in the underlying column was NULL. What was happening was that the item could not handle a null value, so it was changing to the first value in the LOV; this in turn marked the item as “changed” which caused the “unsaved changes” warning to show when the user tries to navigate away from the page.
When I set Display Null Value to Yes, the problem was resolved. Alternatively, I could have ensured that the underlying column would always have a value (e.g. by putting a NOT NULL constraint on it), which would also have resolved this problem.
Font APEX is preferred most of the time but sometimes there are icons I really want to use which are not (yet) included. For these cases I want to load the latest Font Awesome library.
It is possible to load Font Awesome instead of Font APEX by opening Shared Components -> Themes -> Universal Theme, and setting Custom Library File URLs to the location of the library (wherever you have loaded it). However, this replaces the Font APEX font completely so you can’t use both at the same time using this method.
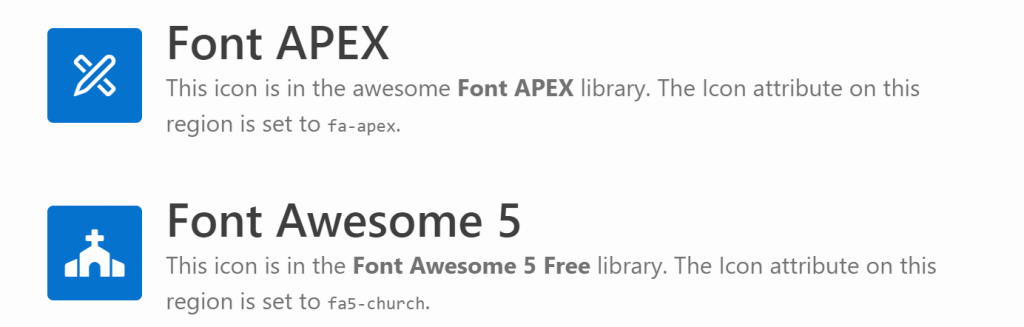
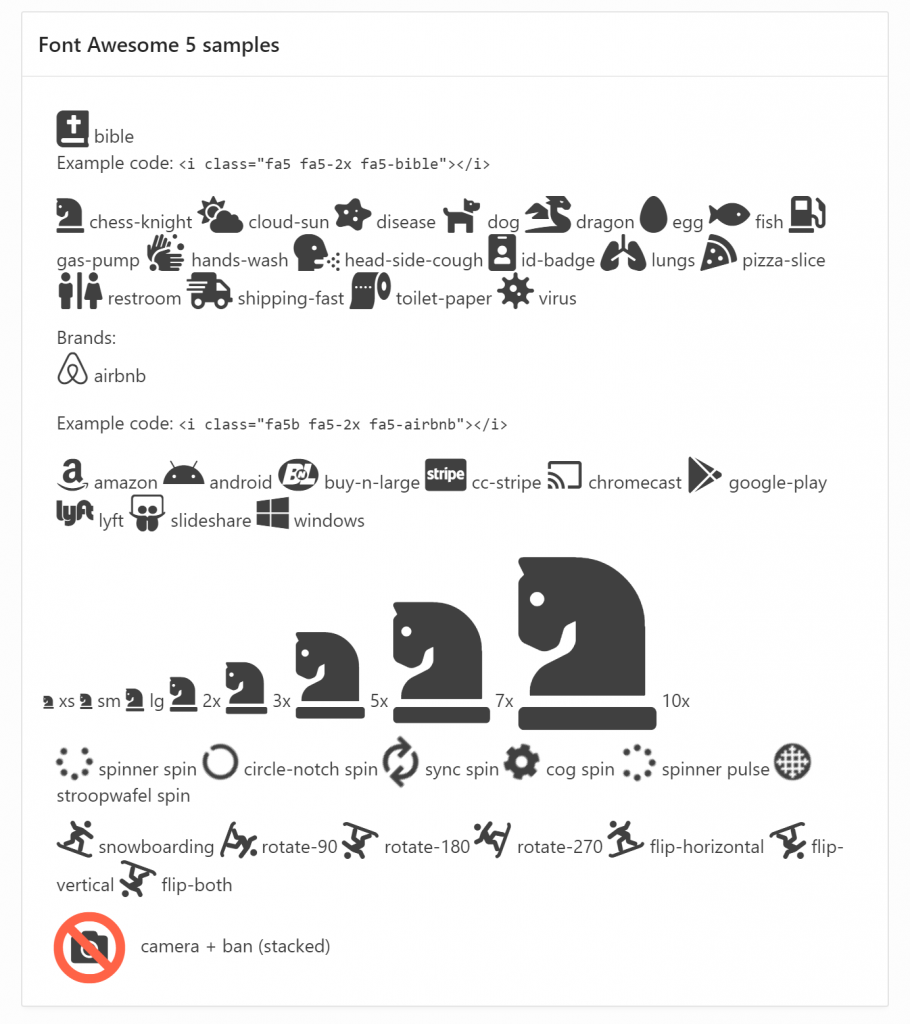
These regions are shown in the same page; the first region uses a Font APEX icon, the second uses a Font Awesome 5 Free icon.
In order to use both at the same time, I’ve downloaded the latest free version of Font Awesome 5 from here (fontawesome.com), taken a copy of the file css/all.css and edited it to replace all occurrences of “.fa” with “.fa5” (if you use CSS precompiler you can do this by editing the appropriate variables file, e.g. _variables.less). This is necessary because the “fa” class prefix would conflict with Font APEX. I named my custom file “fa5.css” and created a minified version as well.
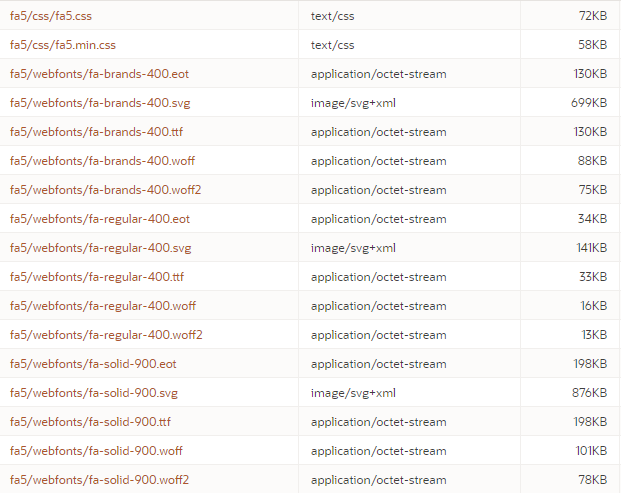
On my web server I created the folder /fa5 under my public html folder, and copied the following files / folders into it:
/fa5/css/fa5.css
/fa5/css/fa5.min.css
/fa5/webfonts/* (all contents)
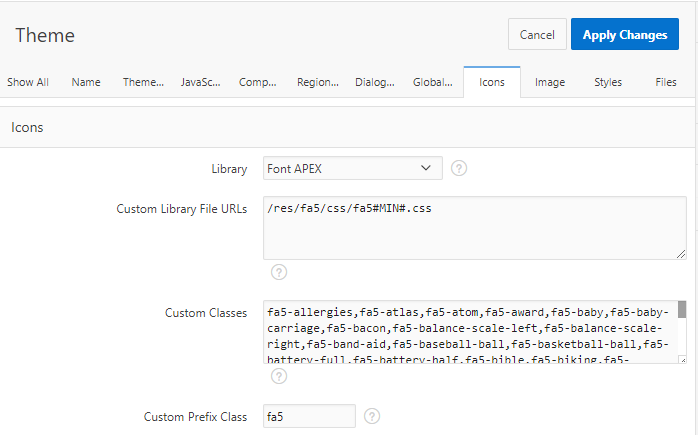
In my APEX application, in the Universal Theme properties I set:
Custom Library File URLs = /fa5/css/fa5#MIN#.css
Custom Prefix Class = fa5
(optional)Custom Classes = (comma-delimited list of your favourite icons)
Theme attributes to load a custom library.
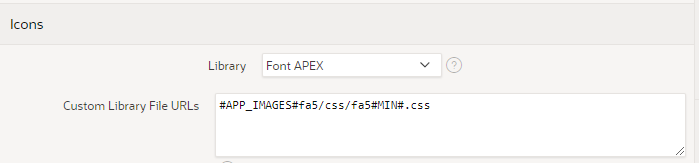
Alternatively, you could upload the library into your Static Application Files and load them from there.
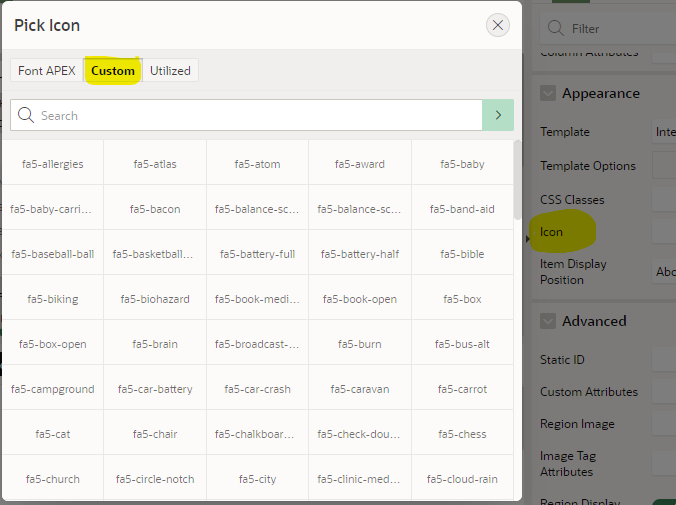
Files loaded into Static Application Files.Theme settings to load the custom library from Static Application Files. If you set the Custom Classes attribute on the theme, you get them listed for convenience in the Pick Icon / Custom list. It doesn’t show previews of the icons, however, since I don’t know how to load a custom library into the APEX builder environment itself.
If I want my page to use an icon from Font APEX, I use the fa- icons as usual, e.g. fa-apex. Where I need an icon from Font Awesome, I have to include both the fa5 class as well as the icon class, e.g. fa5-restroom. For brand icons, of which Font Awesome has a large selection, the class is fa5b, e.g. fa5b fa5-amazon-pay. Font Awesome also includes a range of modifiers including sizes, spin, pulse, rotating, mirroring, and stacking.
The spin and pulse effects are not visible in the screenshot above. A live demo can be viewed and examined here: https://jk64.com/apex/f?p=TEST:FA5:0.
You are, of course, asking, can I stack two icons AND spin just one of them? The answer, of course, is yes:
Issue #1: Featured Hero Region Icon
When I tried to use a Font Awesome icon in a Hero region with the “Featured” style, the font failed to load. This is because the “Featured” style overrides the font-family causing it to fail to use the Font Awesome font. To fix this, on the page I added the following CSS:
In a navigation menu, APEX includes the “fa” class which controls the positioning of the icons in the menu, but it also overrides the font library and fails to load the icon from Font Awesome. To fix this, I further edited my fa5.css file (as well as the minified version) to add the following:
The Icon attribute on a region can only be used to provide a class (or list of classes) to serve as the icon for the region. To use a Stacked icon in this case is impossible as the stack must be specified using a span with nested nodes for each icon in the stack. A workaround for this is to use some jQuery to modify the html at runtime, as follows:
Set the region’s Static ID, e.g. stacked
Set the region’s Icon attribute to one of the icons in the stack (just so that there is something shown if the javascript is delayed), eg. fa5-camera
Add this to the page’s Execute When Page Loads (this example is for a Hero region:
It’s a messy kludge, and you’ll have to adapt it if you want to use it in other region templates (check what the span class is), but if this provides significant business benefit then it might be worthwhile.
Comparing Font Awesome 5 Free with Font APEX
I’ve loaded lists of all the icons in the Font Awesome 5 Free and the Font APEX libraries into a table and created a little application that allows me to compare them.
Note: these stats are not perfect because some of the icon names are slightly different between the libraries – for example, all of the “hand” icons have slightly different names between the two libraries.
An application I maintain needed a checklist feature added. I wanted to show a “Yes / No” switch for a list of checklist items. Initially, when the record is created, the checklist is populated with the questions along with a NULL for the response.
I generated the switches in an ordinary Classic report using code like this:
select r.name as risk_category
      ,apex_item.switch
         (p_idx        => 10
         ,p_value      => i.response
         ,p_on_value   => 'Yes'
         ,p_on_label   => 'Yes'
         ,p_off_value  => 'No'
         ,p_off_label  => 'No'
         ,p_item_id    => 'RESPONSE_' || rownum
         ,p_item_label => i.risk_category_code || '-' || i.rci_fk
         ,p_attributes => 'data-risk="' || i.risk_category_code || '"'
         )
       ||apex_item.hidden(p_idx => 11, p_value => i.rci_fk)
       as response
      ,i.question_text
from supplier_risk_checklist_items i
join risk_categories r on r.code = i.risk_category_code
where i.sri_fk = :P10_ID
order by r.sort_order nulls last, i.sort_order nulls last, i.rci_fk
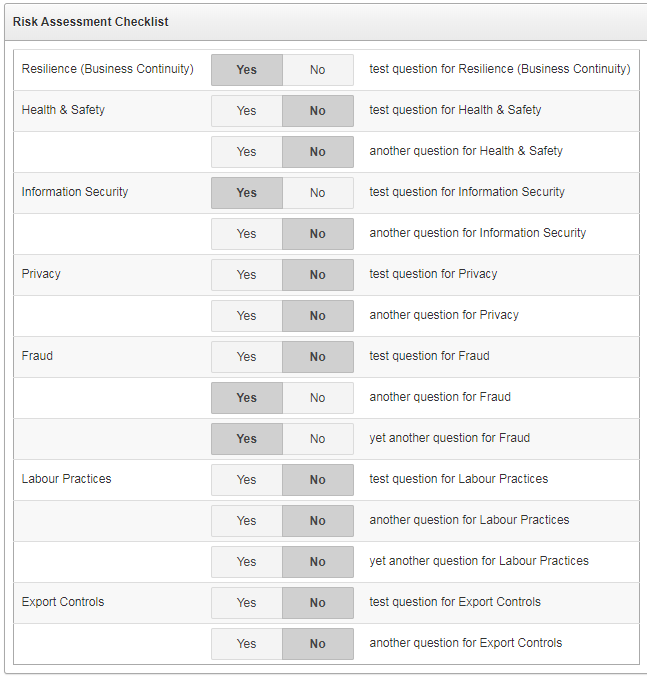
I’ve used p_idx values of 10 and 11 in order to avoid conflicting with another tabular report on this particular page. The “response” column in the report has CSS Classes set to responseSwitch (this becomes useful later when we want to write javascript targeting just these items and nothing else on the page) and its Escape special characters attribute is set to No. The report when run looks like this:
Some of the responses are “Yes”, some “No”, and some are NULL (unanswered).
The problem is that all the NULL responses are indistinguishable from the “No” responses. If the user clicks “Yes” or “No”, the response is saved correctly – but the user cannot tell which ones haven’t explicitly been answered yet.
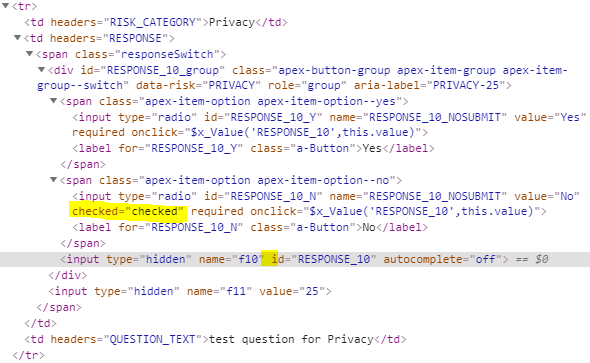
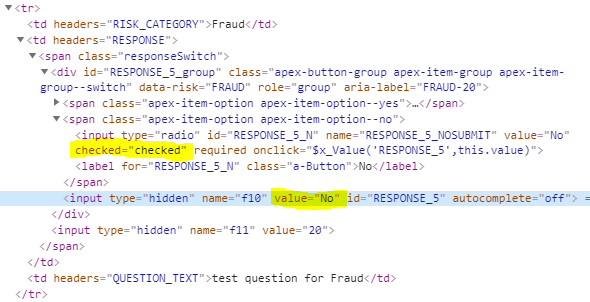
To find a solution for this issue I started by examining the HTML being generated for each question. I noticed that the input option for the “No” value was marked as “checked”, while the hidden input item had no “value” on it. These were the ones that needed fixing.
Example 1. Notice that the displayed radio button RESPONSE_10_N is “checked”, but the associated hidden input RESPONSE_10 has no value attribute.Example 2. In this example, the displayed radio button RESPONSE_5_N is “checked”, but that’s ok because the hidden input RESPONSE_5 has the value “No” – so we don’t want to change this one.
In the page’s Execute When Page Loads, I search for all instances of responseSwitch where the hidden input item does not have a value attribute; in each case, I find the associated input item that shows “No” and unset the “checked” property:
// workaround for generated switch items showing "No" when value is null
// search for the hidden input items without a value (i.e. null on the database)
$(".responseSwitch input[name='f10']:not([value])").each(function(i){
    var id = $(this).attr("id");
    // these will have "checked" on the "No" option; remove it
    $(".responseSwitch input#"+id+"_N").prop("checked",null);
});
This makes it clear to the user which checklist items have been answered so far, and which ones haven’t.
Note: the user is given no way to unset an answer once it has been saved; if this were a problem I would change this to use an ordinary Select list item instead of a Switch item.
In the past when I’ve needed to add half a dozen or more buttons to a page, I’ve sometimes encased them in a Collapsible region so that the user can slide them out of the way instead of clogging up the screen. Recently however I’ve started (sparingly) using a Menu Popup, as per this tutorial. The issue I have with this method, however, is that the menu items are defined in a shared component (a List) which means it’s not defined on a per-page basis.
Some of the actions simply need to do a Submit on the page, which is simple enough: set the URL Target to something like:
In other cases, the action needs to do something more specific to the page, e.g. show a region:
apex.theme.openRegion("popupQuestion")
Or the action might need to navigate to another page, passing parameters based on specific items on the page. This means the list, defined in Shared Components, now has hardcoded elements that are only useful for that one page; more to the point, they are defined outside of the page – I’d rather that everything specific to a page is defined within that page’s definition.
The approach I’m using now is to use a custom trigger. Each list item has its URL Target set to something like:
The third parameter is set to a unique code that the page can use to identify which menu option was chosen. This parameter will be passed to this.data in the custom trigger’s event handler.
On the page, I have a Dynamic Action with the following attributes:
Event: Custom
Custom Event: menuAction
Selection Type: JavaScript Expression
JavaScript Expression: document
True Action: Execute JavaScript Code, e.g.:
switch(this.data) {
  case 'OPEN_POPUP':
    apex.theme.openRegion("popupQuestion");
    break;

  default:
    apex.submit({request:this.data,showWait:true});
}
Note that to do a simple Submit on the page, all I need to do is set the request on the third parameter of the menu item’s URL. If I want to do something slightly different for a particular request, I can put an extra “case” in the JavaScript code to handle it.
The benefit of this approach is that this trigger becomes the jumping-off point for all such menu actions for this page. In theory I could re-use the same List on multiple pages (if the items in the list are generic enough) but have different behaviour occur for each menu item specific to each page. The only challenge with this approach might be if you needed some conditions on each menu item, e.g. so they are shown or hidden in specific circumstances. If the condition for a menu item references a particular page item the List will no longer be generic and re-usable. For this reason, I usually still use a separate List for each menu for each page.
Perhaps in a future release of APEX we will gain the ability to define a List on a Page instead of in Shared Components. In the meantime, if you are interested in all the details on this method (including a solution for implementing a redirect to another page, or to open a modal page), refer to this tip.
EDIT 22/8/2019:Thanks to Robert Gerstein who noticed an issue with this solution when using Internet Explorer. A workaround for this is to not call apex.event.trigger directly in the URL on the list item, but to call a function instead (refer to comments below).
An item in the Universal Theme using the Optional – Floating template looks like this:
An item using the Required – Floating template looks like this:
In addition, if the item is required we would most probably set the Value Required attribute to Yes. What if the item is sometimes required but not always? How do we create a Conditionally Required field?
Firstly, we would make sure there is a Validation on the field that checks that the value is provided if required. This way, regardless of what the form may or may not send to the database, it is validated appropriately.
Secondly, to indicate to the user that the item is required or optional, based on the value of another item, we can use a Dynamic Action that sets the required item property (this triggers the client-side validation) and adds or removes the is-required class from the item’s container (this shows the little red “required” indicator on the page).
For example, let’s say that whether item P1_COST_CENTRE is required or not is dependent on whether a hidden item, P1_COST_CENTRE_REQUIRED, has the value 'Y'.
Create a Dynamic Action
Event: Change
Selection Type: Item(s)
Item(s): P1_COST_CENTRE_REQUIRED
Client-side Condition Type: Item = Value
Item: P1_COST_CENTRE_REQUIRED
Value: Y
Create a True Action: Execute JavaScript Code
var item = $("#P1_COST_CENTRE");
item.prop("required",true);
item.closest(".t-Form-fieldContainer").addClass("is-required");
Create a False Action: Execute JavaScript Code
var item = $("#P1_COST_CENTRE");
item.prop("required",false);
item.closest(".t-Form-fieldContainer").removeClass("is-required");
The above code works for all item templates (“Optional”, “Optional – Above”, “Optional – Floating”, etc.) in the Universal Theme; I’ve tested this on APEX 18.2 and 19.1.
Note: this is custom code for the Universal Theme, so it may or may not work for other themes; and might stop working in a future revision of the theme.
UPDATE 29/7/2019: I’ve created some simple Dynamic Action plugins (for APEX 18.2 and later) to implement this, if you’re interested you can download them from here:
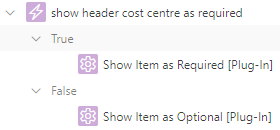
To use these plugins, select them as an Action to take on a Dynamic Action:
EDIT 29/7/2019: modified to use a better method to find the container div.
Older Themes
In other themes, the way that a required field is rendered is different. For example, in Theme 26 (Productivity Applications) the label for a required item is rendered in bold, along with a red asterisk; if the item is optional, no red asterisk is rendered. The way to make an item conditionally mandatory in this theme is:
Set the item to use the Required template (so that the red asterisk is rendered).
In the Dynamic Action JavaScript, execute the following if the item should be optional:
var itemLabel = $("label[for='P1_COST_CENTRE']");
itemLabel.removeClass("uRequired");
itemLabel.addClass("uOptional");
To make the item required again:
var itemLabel = $("label[for='P1_COST_CENTRE']");
itemLabel.removeClass("uOptional");
itemLabel.addClass("uRequired");