Sometimes we can too quickly say “No” when we should take a moment to think about whether we can actually say “Yes”. This was one of those times for me.
We had just gone live with a fairly big system move + upgrade – a suite of APEX applications shifted from one database instance running APEX 5 to another instance running version 19.1. The migration went smoothly. After the new instance was released to the business to do some final shakedown testing, they noticed one problem:
“All our saved reports are gone.”
Oops. We had built the new instance by simply importing each application from source control; since these scripts don’t include the Saved Report formats that users had customised in many of the Interactive Reports in prod, they didn’t get migrated to the new database.
When they asked if we can transfer the saved reports across, I initially replied, “Sorry, we can’t” – thinking that redoing the migration from scratch with a full export from the old database, followed by re-doing all the app changes, was going to take too much time and effort.
A minute later, I sent another email. “Hold that thought – there is a way.” I’d forgotten that my script for exporting the applications uses an APEX API with some parameters that until now I’d rarely used, but which would solve our problem. My script included this:
I call this the “Yes” script. Using this “Yes” script, we performed the following steps:
Log into the schema on the old database (we hadn’t shut it down yet, thankfully – we’d just locked the schemas and set all the applications to “Unavailable”)
Run the “Yes” script. Rename the resulting export files, e.g. f100_ir.sql, f110_ir.sql, etc.
Log into the new database.
Run the IR scripts (f100_ir.sql, etc.). This reverted all the applications to their old versions, but they included all the user’s saved reports.
Re-import the new versions of the applications from source control. This upgraded all the applications, leaving the user’s saved reports intact.
There is a great deal you can build in APEX without even thinking about using a plugin. The development platform has an excellent range of built-in functionality and components so that almost all user requirements can be covered using standard APEX features. Restricting yourself to only the built-in, declarative features (i.e. “low code”) of the tool will result in applications that are easy to maintain and resistant to regression issues when upgrading. However, there will come a time when some custom code is required, whether some special data processing (using PL/SQL), some special user interface styling (using CSS), or some special user interface behaviour (using JavaScript or jQuery).
After you have built an application with (a minimum of) custom code like this, it sometimes happens that the same user requirement crops up again elsewhere; whether on another page, another application, or another workspace. The first time you encounter this you will probably just do a “copy and paste” to replicate the custom code. When you encounter the requirement a third time, you should be asking yourself, “how can I make this code more re-usable” – because chances are one day you’ll need to fix a bug or make an enhancement to that code, and you’ll want it to be easy to deploy the change wherever it has been used. This is where an APEX plugin could be a suitable solution.
This post is mostly based on a talk given in October 2019 at the Australian Oracle User Group conference in Perth, Western Australia.
What is an APEX Plugin?
An APEX Plugin is a Shared Component that can be used in any number of pages in the application. When used, it generates a Region, an Item, a Process, or a Dynamic Action; or, it may implement an Authentication or Authorization Scheme. It is a self-contained set of attributes, code, and (optionally) file attachments. It may be copied to another application, or exported as a SQL script for importing into an application in another workspace or another APEX instance.
Where can I get started?
In my opinion, a great way to get started learning about plugins is to examine a lot of plugins that others have created. The two sources I would recommend you look at are:
Install the Sample Database Application – go into its Shared Components -> Plugins, and look at each of the plugins therein. Look through each attribute and examine the code; read the help for each attribute as well. Look at how the plugins are used in the application.
Browse the plugins at apex.world, and install a few that seem interesting to you.
When looking at these plugins, be aware that many of them have been created by people just like you and me – at differing levels of experience and skill; so they may or may not perfectly reflect “best practice”. This especially goes for the plugins published by yours truly :). In addition, depending on how long ago a plugin was written, it might be more complex than it needs to be, as it might not take advantage of recent enhancements to the APEX plugin API.
Plugin Concepts
Plugin Types
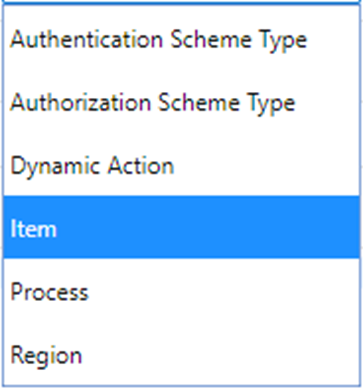
Plugin Type – a plugin may be for a page Region, a page Item, a page Process or a Dynamic Action; or it may implement an Authentication Scheme or an Authorization Scheme. For example, if you create or install an Item Plugin, it will appear in the list of item types available for adding to a page.
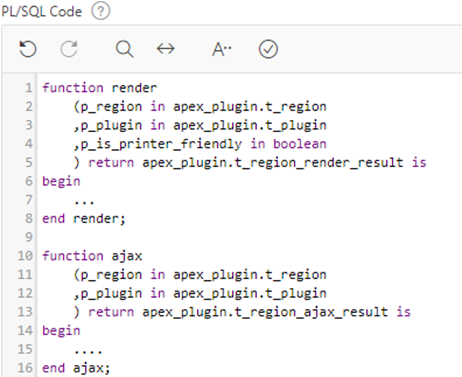
PL/SQL and Callbacks – if needed, you can embed PL/SQL code that APEX will call when rendering the plugin component or for other events such as handling an AJAX callback or validating an item.
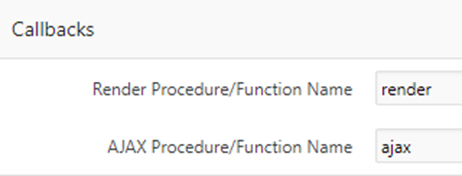
The Callbacks attributes allow you to specify the name of the function for APEX to call; these might be functions that you define within the PL/SQL Code section, or they can call functions in a database package you have defined.
The functions you define must have the exact parameters and return types as documented in the help for each Callback attribute.
Standard & Custom Attributes – some plugin types have Standard Attributes (defined by APEX), and can have additional Custom Attributes (defined by you). For example, a Region plugin has standard attributes that define whether it supports a Data Source or supports the CSS Classes attribute.
If needed you can define up to 15 custom Application attributes. These would be set by the developer when they first install the plugin into their application, and their values apply to all usages of the plugin across their application.
You can also define up to 25 custom Component attributes, which are set on each usage of the plugin separately. The developer will find these in the Attributes node.
Each Custom attribute can be any of a long list of different types, including Text, TextArea, Yes/No, Number, Checkboxes, Select list, Item name, Icon, PL/SQL Code, JavaScript Code, and many others. You can provide a default value for each attribute if needed.
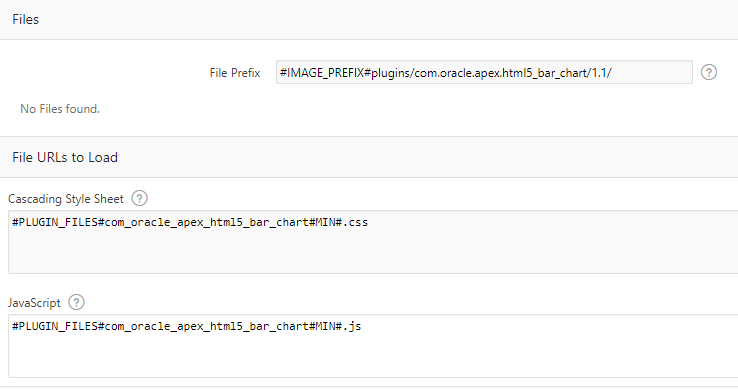
Files, JS and CSS – you can attach any number of resources including JavaScript, CSS scripts, images, or anything else that are required by your plugin. To load JavaScript or CSS files on pages where your plugin is used, you can simply enter them in the File URLs to Load, or call the APEX API routines in your render PL/SQL code (e.g. APEX_JAVASCRIPT.add_library or APEX_CSS.add_file).
When you export the plugin, all the attached resources will be included in the SQL script.
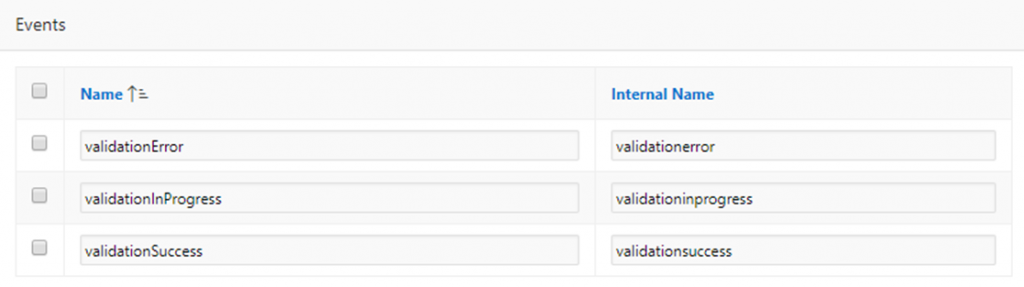
Plugin Events – if your plugin needs to allow your developers to add Dynamic Actions that respond to events raised by your plugin (e.g. to respond to user actions) you can define any number of custom Events here.
Walkthroughs
I’ve written these instructions to get you started creating plugins. They assume you are already reasonably familiar with building simple applications in APEX, and are comfortable editing PL/SQL.
An application I maintain needed a checklist feature added. I wanted to show a “Yes / No” switch for a list of checklist items. Initially, when the record is created, the checklist is populated with the questions along with a NULL for the response.
I generated the switches in an ordinary Classic report using code like this:
select r.name as risk_category
      ,apex_item.switch
         (p_idx        => 10
         ,p_value      => i.response
         ,p_on_value   => 'Yes'
         ,p_on_label   => 'Yes'
         ,p_off_value  => 'No'
         ,p_off_label  => 'No'
         ,p_item_id    => 'RESPONSE_' || rownum
         ,p_item_label => i.risk_category_code || '-' || i.rci_fk
         ,p_attributes => 'data-risk="' || i.risk_category_code || '"'
         )
       ||apex_item.hidden(p_idx => 11, p_value => i.rci_fk)
       as response
      ,i.question_text
from supplier_risk_checklist_items i
join risk_categories r on r.code = i.risk_category_code
where i.sri_fk = :P10_ID
order by r.sort_order nulls last, i.sort_order nulls last, i.rci_fk
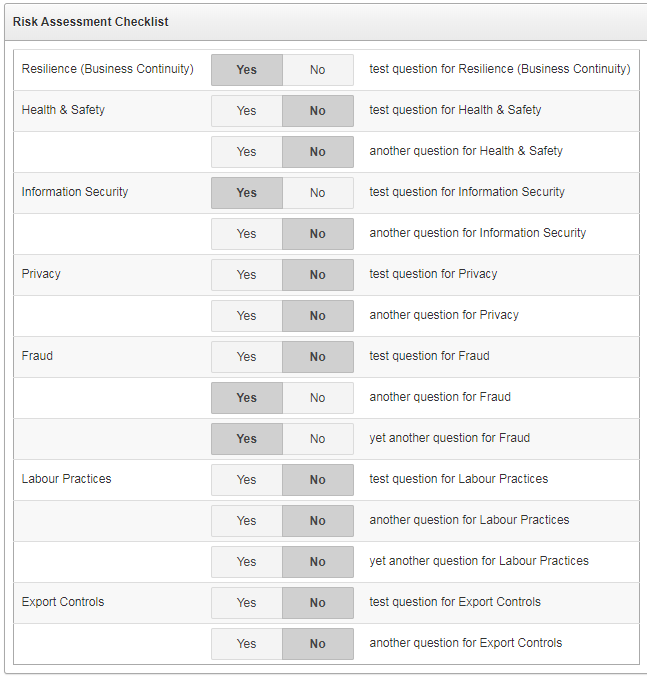
I’ve used p_idx values of 10 and 11 in order to avoid conflicting with another tabular report on this particular page. The “response” column in the report has CSS Classes set to responseSwitch (this becomes useful later when we want to write javascript targeting just these items and nothing else on the page) and its Escape special characters attribute is set to No. The report when run looks like this:
Some of the responses are “Yes”, some “No”, and some are NULL (unanswered).
The problem is that all the NULL responses are indistinguishable from the “No” responses. If the user clicks “Yes” or “No”, the response is saved correctly – but the user cannot tell which ones haven’t explicitly been answered yet.
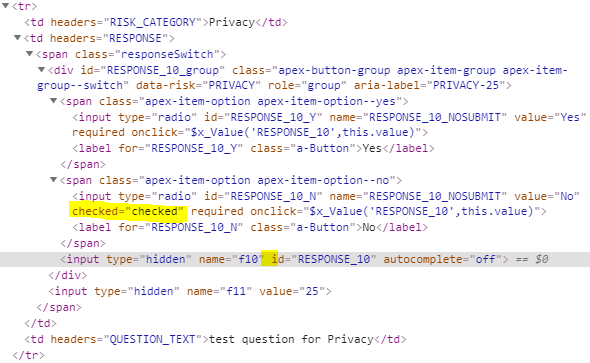
To find a solution for this issue I started by examining the HTML being generated for each question. I noticed that the input option for the “No” value was marked as “checked”, while the hidden input item had no “value” on it. These were the ones that needed fixing.
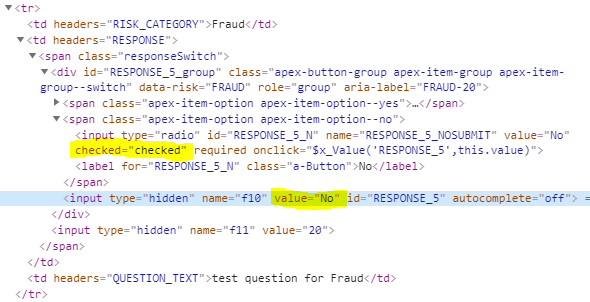
Example 1. Notice that the displayed radio button RESPONSE_10_N is “checked”, but the associated hidden input RESPONSE_10 has no value attribute.Example 2. In this example, the displayed radio button RESPONSE_5_N is “checked”, but that’s ok because the hidden input RESPONSE_5 has the value “No” – so we don’t want to change this one.
In the page’s Execute When Page Loads, I search for all instances of responseSwitch where the hidden input item does not have a value attribute; in each case, I find the associated input item that shows “No” and unset the “checked” property:
// workaround for generated switch items showing "No" when value is null
// search for the hidden input items without a value (i.e. null on the database)
$(".responseSwitch input[name='f10']:not([value])").each(function(i){
    var id = $(this).attr("id");
    // these will have "checked" on the "No" option; remove it
    $(".responseSwitch input#"+id+"_N").prop("checked",null);
});
This makes it clear to the user which checklist items have been answered so far, and which ones haven’t.
Note: the user is given no way to unset an answer once it has been saved; if this were a problem I would change this to use an ordinary Select list item instead of a Switch item.
Otherwise reported as “WWV_FLOW_FORM_REGION.NO_PRIMARY_KEY_ITEM” or merely “Internal error”, this bug caused me to waste hours of investigation, twice, because a simple Google search was not returning any results. This post is merely to remedy that situation.
On an APEX 19.1 page with a new Form region combined with an Interactive Grid region, when the user makes a change to a record and Submits the page, they get this error.
In the past when I’ve needed to add half a dozen or more buttons to a page, I’ve sometimes encased them in a Collapsible region so that the user can slide them out of the way instead of clogging up the screen. Recently however I’ve started (sparingly) using a Menu Popup, as per this tutorial. The issue I have with this method, however, is that the menu items are defined in a shared component (a List) which means it’s not defined on a per-page basis.
Some of the actions simply need to do a Submit on the page, which is simple enough: set the URL Target to something like:
In other cases, the action needs to do something more specific to the page, e.g. show a region:
apex.theme.openRegion("popupQuestion")
Or the action might need to navigate to another page, passing parameters based on specific items on the page. This means the list, defined in Shared Components, now has hardcoded elements that are only useful for that one page; more to the point, they are defined outside of the page – I’d rather that everything specific to a page is defined within that page’s definition.
The approach I’m using now is to use a custom trigger. Each list item has its URL Target set to something like:
The third parameter is set to a unique code that the page can use to identify which menu option was chosen. This parameter will be passed to this.data in the custom trigger’s event handler.
On the page, I have a Dynamic Action with the following attributes:
Event: Custom
Custom Event: menuAction
Selection Type: JavaScript Expression
JavaScript Expression: document
True Action: Execute JavaScript Code, e.g.:
switch(this.data) {
  case 'OPEN_POPUP':
    apex.theme.openRegion("popupQuestion");
    break;

  default:
    apex.submit({request:this.data,showWait:true});
}
Note that to do a simple Submit on the page, all I need to do is set the request on the third parameter of the menu item’s URL. If I want to do something slightly different for a particular request, I can put an extra “case” in the JavaScript code to handle it.
The benefit of this approach is that this trigger becomes the jumping-off point for all such menu actions for this page. In theory I could re-use the same List on multiple pages (if the items in the list are generic enough) but have different behaviour occur for each menu item specific to each page. The only challenge with this approach might be if you needed some conditions on each menu item, e.g. so they are shown or hidden in specific circumstances. If the condition for a menu item references a particular page item the List will no longer be generic and re-usable. For this reason, I usually still use a separate List for each menu for each page.
Perhaps in a future release of APEX we will gain the ability to define a List on a Page instead of in Shared Components. In the meantime, if you are interested in all the details on this method (including a solution for implementing a redirect to another page, or to open a modal page), refer to this tip.
EDIT 22/8/2019:Thanks to Robert Gerstein who noticed an issue with this solution when using Internet Explorer. A workaround for this is to not call apex.event.trigger directly in the URL on the list item, but to call a function instead (refer to comments below).
An item in the Universal Theme using the Optional – Floating template looks like this:
An item using the Required – Floating template looks like this:
In addition, if the item is required we would most probably set the Value Required attribute to Yes. What if the item is sometimes required but not always? How do we create a Conditionally Required field?
Firstly, we would make sure there is a Validation on the field that checks that the value is provided if required. This way, regardless of what the form may or may not send to the database, it is validated appropriately.
Secondly, to indicate to the user that the item is required or optional, based on the value of another item, we can use a Dynamic Action that sets the required item property (this triggers the client-side validation) and adds or removes the is-required class from the item’s container (this shows the little red “required” indicator on the page).
For example, let’s say that whether item P1_COST_CENTRE is required or not is dependent on whether a hidden item, P1_COST_CENTRE_REQUIRED, has the value 'Y'.
Create a Dynamic Action
Event: Change
Selection Type: Item(s)
Item(s): P1_COST_CENTRE_REQUIRED
Client-side Condition Type: Item = Value
Item: P1_COST_CENTRE_REQUIRED
Value: Y
Create a True Action: Execute JavaScript Code
var item = $("#P1_COST_CENTRE");
item.prop("required",true);
item.closest(".t-Form-fieldContainer").addClass("is-required");
Create a False Action: Execute JavaScript Code
var item = $("#P1_COST_CENTRE");
item.prop("required",false);
item.closest(".t-Form-fieldContainer").removeClass("is-required");
The above code works for all item templates (“Optional”, “Optional – Above”, “Optional – Floating”, etc.) in the Universal Theme; I’ve tested this on APEX 18.2 and 19.1.
Note: this is custom code for the Universal Theme, so it may or may not work for other themes; and might stop working in a future revision of the theme.
UPDATE 29/7/2019: I’ve created some simple Dynamic Action plugins (for APEX 18.2 and later) to implement this, if you’re interested you can download them from here:
To use these plugins, select them as an Action to take on a Dynamic Action:
EDIT 29/7/2019: modified to use a better method to find the container div.
Older Themes
In other themes, the way that a required field is rendered is different. For example, in Theme 26 (Productivity Applications) the label for a required item is rendered in bold, along with a red asterisk; if the item is optional, no red asterisk is rendered. The way to make an item conditionally mandatory in this theme is:
Set the item to use the Required template (so that the red asterisk is rendered).
In the Dynamic Action JavaScript, execute the following if the item should be optional:
var itemLabel = $("label[for='P1_COST_CENTRE']");
itemLabel.removeClass("uRequired");
itemLabel.addClass("uOptional");
To make the item required again:
var itemLabel = $("label[for='P1_COST_CENTRE']");
itemLabel.removeClass("uOptional");
itemLabel.addClass("uRequired");
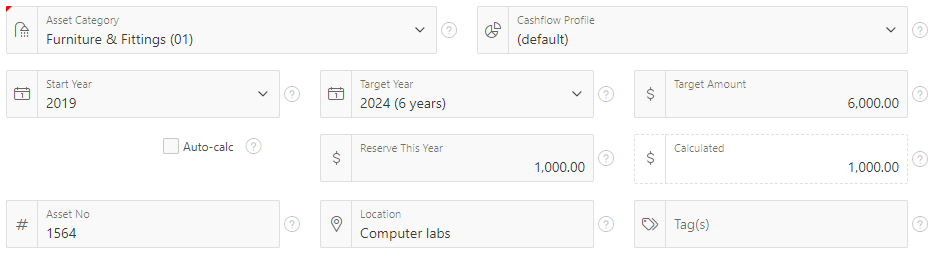
The floating item type has an optional “Icon” property that allows you to render an icon next to the item, which can help users quickly identify what the item is for. This is especially helpful when the form has a lot of items.
The icon attribute can be static, e.g. fa-hashtag, or it can be chosen based on the value of another item, e.g. &P1_FA_ICON..
If you want the icon to change dynamically as the user enters or modifies data, it’s a little bit more complicated. I have a list item based on a table of asset categories, and each asset category has an icon assigned to it. When the user selects an asset category from the list I want it to get the icon from the table and show it in the item straight away.
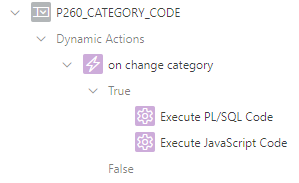
To do this, I use two Dynamic Actions: (1) a PL/SQL action which updates the hidden Pn_FA_ICON item, and (2) a Javascript action which manipulates the displayed icon next to the list item.
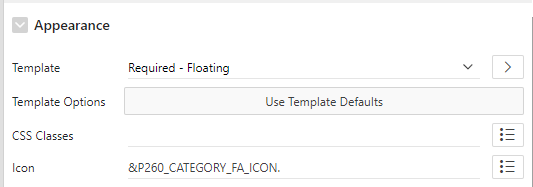
This is my item and its two dynamic actions.The Icon attribute causes the icon to be shown when the page is loaded.
The Execute PL/SQL Code action is a simple PL/SQL block which gets the icon from the reference table for the selected category code. Make sure the “Wait for Result” is “Yes”, and make sure the Items to Submit and Items to Return are set to P260_CATEGORY_CODE and P260_CATEGORY_FA_ICON, respectively.
select x.fa_icon
into   :P260_CATEGORY_FA_ICON
from   asset_categories x
where  x.code = :P260_CATEGORY_CODE;
On examining the source of the page, we see that the select item is immediately followed by a span which shows the icon:
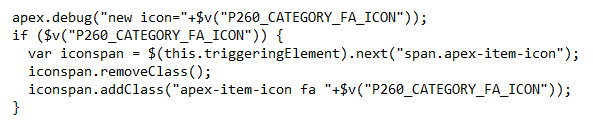
The Execute JavaScript Code action finds the item (in this case, the triggering element), then searches the DOM for the following span with the apex-item-icon class. Once found, it resets the classes on the span with a new set of classes, including the new icon.
It’s a little gimmicky but it’s an easy way to delight users, and it might help them to quickly identify data entry mistakes.
Warning: due to the way the javascript manipulates the DOM, this method is not guaranteed to work correctly in future releases of APEX., so it will need to be retested after upgrades.
Refreshing any of our non-prod environments (e.g. dev, test, etc.) with a clone from production is a fairly regular process at my client. A recurring issue with this is emails: we’ve had occasion where users have received a second copy of an email immediately after the clone has completed. This was confusing because they thought the event that had triggered the email actually occurred twice.
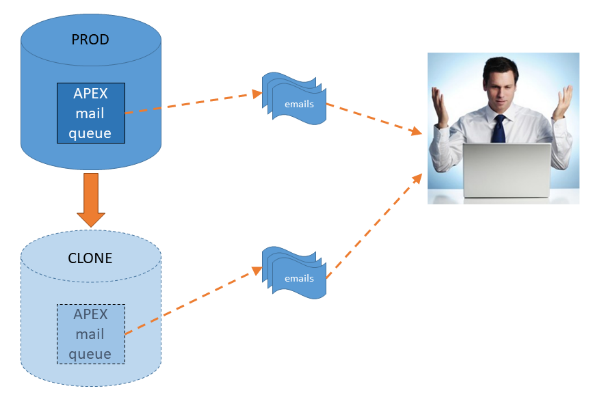
As it turns out, the duplicate emails were caused by the fact that the emails happened to be waiting in the APEX mail queue in production at the time of the export. After the export, the APEX mail queue was processed normally in production and the users received their emails as expected; after the clone was completed, the database jobs were restarted in the cloned environment which duly processed the emails sitting in the cloned queue and the users effectively got the same emails a second time.
What’s worse, if the same export were to be used for multiple clones, the users might get the same emails again and again!
A good way to solve this sort of issue would be to isolate the non-prod environments behind a specially configured mail server with a whitelist of people who want (and expect) to get emails from the non-prod systems. We don’t have this luxury at this client, however.
Instead, we have a post_clone.sql script which is run by the DBAs immediately after creating the clone. They already stop all the jobs by setting job_queue_processes=0.
In case the mail queue happens to have any emails waiting to be sent, the post clone script now includes the following step:
begin
*** WARNING: DO NOT RUN THIS IN PRODUCTION! ***
  for r in (
    select workspace_id
          ,workspace
    from apex_workspaces
    ) loop
    apex_application_install.set_workspace_id (r.workspace_id);
    apex_util.set_security_group_id
      (p_security_group_id => apex_application_install.get_workspace_id);
    delete apex_mail_queue;
  end loop;
  commit;
end;
/
This script is run as SYS but it could also be run as SYSTEM or as APEX_nnnnnn, depending on your preference.
ADDENDUM: Overriding the From Email Address
Christian Neumüller commented that an additional technique that might be useful is to override the From (sender) email address to indicate which environment each email was sent from. To do this, run something like the following:
begin
  apex_instance_admin.set_parameter('EMAIL_FROM_OVERRIDE',
    'apex-' || sys_context('userenv','db_name') || '@mydomain');
end;
I’ve tested this in APEX 19.1 and it seems to work fine. Regardless of the p_from parameter that the code passes to apex_mail.send, the EMAIL_FROM_OVERRIDE email address is used instead. Note that this is currently undocumented, so this may stop working or change in a future release.
The updated Universal Theme has added new “Floating” item templates which look great, e.g.:
I had a list item which I wanted to leave optional; if the user leaves it null, I wanted it to show a “default” display value (derived at runtime). To implement this, I added a hidden item (P10_DEPTNO_DEFAULT) and on the list item set Null Display Value to &P10_DEPTNO_DEFAULT..
If the page is shown in read-only mode, however, the list item is rendered as a Display Item, and the Null Display Value attribute is ignored:
To solve this, I added a Dynamic Action which injects the default value into the HTML for display (without affecting the value of the underlying item):
Event: Page Load
Server-side Condition: <page is readonly> AND :P10_DEPTNO IS NULL
Action: Execute JavaScript Code
Fire on Initialization: No
Code:
This finds the span for the display-only item and injects the default display value for display:
It’s well known that after processing a page one often needs to add a Branch so the user is taken to another page, e.g. to start the next step in a process. It’s less common to need a Branch that is evaluated before the page is shown. This is a “Before Header” Branch and I use it when the user might open a page but need to be redirected to a different one.
A good example is a page that is designed to direct the user to two or more different pages depending on what data they requested.
Another way that a branch like this can be useful is where a user might navigate to a page that should show a record, but if the record ID is not set, I might want the page to automatically redirect the user back to a report page instead.
Of course, you have to take some care with these sorts of branches; if the target page also has its own “Before Header” branch, that will also be evaluated; if the user ends up in a loop of branches the page will fail to load (with a “ERR_TOO_MANY_REDIRECTS” error).
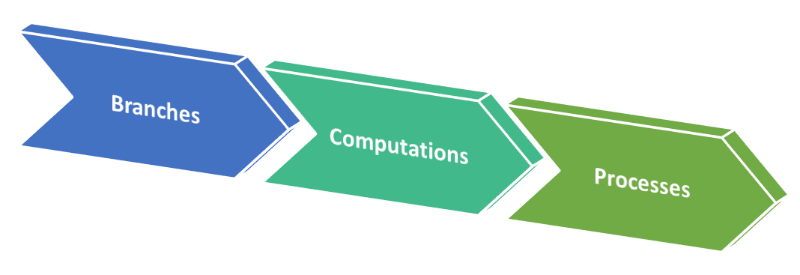
This is the order in which various steps are done before APEX shows a page:
Authentication check
Verify session
“Before Header” Branches
Authorization check
Computations
“Before Header” Processes
Regions, etc.
One of the implications of the above order is that any computations or processes that set or change application state (e.g. an application item) are not run before it evaluates conditions or attributes for any “Before Header” Branches. This applies regardless of whether the computations or processes are defined on the page, or defined globally in Shared Components. This little detail tripped me up today, because I had a branch that I needed to run based on a condition that relied on state that should have been set by a “Before Header” process defined globally.
If you need to redirect a user to a different page on the basis of any application state that is set by a computation or process, you can use a PL/SQL Process instead that does the redirect. The PL/SQL code to use is something like:
Warning: redirect_url raises the exception ORA-20876: Stop APEX Engine, so it’s probably preferable to avoid combining this with other PL/SQL code that might need to be committed first.