[Previous]
I’ve got my Linux server running now, and I can access it from anywhere on the Internet. I can even do application development remotely in Apex, which is fun to show off.
Now, I have a number of small APEX applications (mainly personal use) which are running on my Windows PC, and I want to transfer them all to Linux. The steps I take are as follows:
- Backup
- Export the applications
- Export the data
- Export the workspaces
- Set up tablespaces
- Import the workspaces
- Import the data
- Import the applications
- Test
- Backup
Instead of trying to just copy everything across in one big bang, I wanted to selectively move certain applications and data across, with a few changes along the way. For example, one application was storing a lot of images in BLOBs in a table, but in the new database these are going to be stored on the filesystem to save space in the database. So I’ll only export the data for the other tables, not including the BLOBs (if needed I could export the data to files on the filesystem, but as it happens I have already been keeping copies of all these images on the filesystem anyway, so it’ll be a simple matter to transfer them across). Another change is that one workspace uses a schema name which I’d like to change in the new database.
In detail:
1. Backup
The docs always say “take a backup” before you do anything. On this occasion I decide to actually do this for once. So I do a complete export of the database on the Linux PC.
While that’s running, I switch over to the Windows box and:
2. Export the applications
I’ve only got half a dozen applications I want to transfer across, so it’s not too big a deal to log into each workspace, select an application, click Export/Import, choose Export, and click Export Application.
3. Export the data
I’ve only got a small amount of data and with one exception I just want to get exports of all objects for the various schemas used by the workspaces, so I use the exp utility, one at a time for each schema. The one exception is the schema with the BLOBs – in that case, I choose the mode that allows me to select individual objects to export. Not too hard, as long as I don’t have to do it every day!
The docs all say to use the new Data Pump feature. So “do as I say, not as I do”…
4. Export the workspaces
This is a very useful feature of Apex – it takes care of creating workspaces, schemas and users along with their privileges. To do this, I log into the APEX Administration function (e.g. via the INTERNAL workspace), select Manage Workspaces, and click Export Workspace. Select each workspace in turn and click Export Workspace. Choose UNIX for the file format and click Save File.
Ok, I’ve got all the files I need. I put them on a transfer disk (I’ve got a share on the Windows PC) and switch back to Linux. The backup I started earlier has finished, so now I can start importing it all.
5. Set up tablespaces
I decided to set up my tablespaces manually, so I can specify the file sizes and everything to my exact requirements. E.G.:
CREATE TABLESPACE FLOW_1DATAFILE '/usr/lib/oracle/xe/oradata/XE/FLOW_1.dbf'SIZE 5M NEXT 1M MAXSIZE 100M;
6. Import the workspaces
What could be simpler? APEX Admin, Manage Workspaces, Import Workspace, pick the workspace export file created in step 4, and click Install. I choose the option to create new schemas. In one case I change the schema name (mentioned above).
7. Import the data
Simple matter of running the imp command in a Linux command window. I got quite a few compilation errors due to dependencies between schemas (including some schemas that I’d decided not to import), but once they’re resolved it’s all good.
8. Import the applications
Log into each workspace and click Application Builder, Import. Choose the application exported in step 2 above. Click Next and I’m done!
9. Test
I use all my test cases that I’ve prepared thoroughly beforehand (not!)… ha. Well, in fact I just opened each application and checked a few pages here and there. A few bits and bobs not working but soon sorted out.
10. Backup
I take another backup to lock down everything in a known working state, and it’s all done!
I’m sure there’s two dozen other ways I could have done all this, some of which perhaps easier, more efficient or just more exciting. Certainly I wouldn’t advocate all these steps for a large installation. It’ll depend on your requirements. Another approach would have been to do a complete export of Oracle and import the whole thing.
Please add any comments to any of the posts in this series about your experiences in these areas, as others have done already. We can all learn from each other, and that’s what I love about blogging. Thanks!
Thanks for reading – I hope you’ve enjoyed this little series on “Dirt Cheap Oracle”. I hope I’ve demonstrated that it is possible, and relatively easy, to obtain and set up a cheap Linux box, and add to your APEX/Oracle experience skills in web server configuration and home networking, all for free.
I can see this kind of setup being really useful for small non-profit organisations like community groups, charities, and religious organisations. Get out there and give it a go!
[Previous]
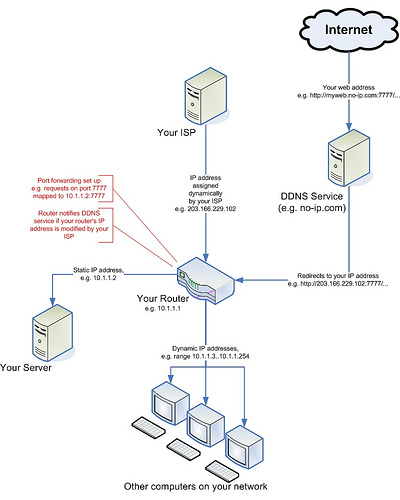
The link here is to a diagram that illustrates what I talked about in recent posts, how to set up a Dynamic DNS service and how the various IP addresses and ports relate to your router and devices connected to it.
[Next]
[Previous]
I want people to get to both my Apache web server (port 8000) as well as Apex (port 8080) via the default HTTP port (80) through the router, but you can’t map one port to two ports – otherwise, how is the router to know which port to pass requests on to? There’s a good reason why I’ve chosen the web server to get all the traffic, and that’s because I have an idea how to get Apache to pass traffic to APEX, but not how the other way around could be done (EPG pass traffic to Apache).
This was a bit of a conundrum, and I was forced to do some spelunking in the documentation for Apache web server configuration. Reading these docs is highly recommended, it’s a lot of fun although at first it’s hard to know where to start. I’d recommend starting with the sections on Configuration Files and Configuration Sections, with a bit of browsing through the various commands, and then maybe the URL Rewriting Guide.
It wasn’t pretty; in the end it came down to one of two options:
(a) Redirect
(b) Rewrite
I can’t use redirection because whenever someone goes to my web page, redirection means Apache will send back a message saying “wrong address, please try this new address” which would include port 8080, which for at least one friend of mine would be blocked.
So I tried URL rewriting, adding the following lines into my /etc/httpd/conf/httpd.conf:
<Location /apex>
    RewriteEngine On
    RewriteRule (.*) http://%{SERVER_NAME}:8080%{REQUEST_URI} [last]
    Order deny,allow
    Deny from none
    Allow from all
</Location>
(BTW if you’re wondering, the third line starting with “RewriteRule” is one long line, “{REQUEST_URI}…” should appear directly after “…8080%” without any line break)
This means: for any URL requesting /apex or anything under that folder, rewrite the request to go to the same server and address, but on port 8080.
This would have worked, except that according to the documentation, if the rewrite engine changes the host or port of the url, it will actually do a Redirect! So rewriting is no better than redirection for this case.
In the end, I found a third option:
(c) ProxyPass
I added the following lines into httpd.conf:
ProxyRequests Off
ProxyPass /apex http://localhost:8080/apex
ProxyPassReverse / http://localhost:8080
ProxyReceiveBufferSize 49152
(the above assumes that localhost is mapped in my hosts file)
This solved the problem for me. What the lines above mean is, any request for /apex or anything underneath it is internally passed on to http://localhost:8080/apex which will act like a proxy server for the request. This operation is transparent to the client, which doesn’t know that anything’s changed. I believe ProxyPassReverse is also needed so that requests going back from port 8080 is routed in the reverse direction; not entirely sure how that works but at least it works.
Now, that works, but when I access APEX pages via port 8000 (80 from the outside), I get all the text but no images. That’s because APEX was serving images via /i/ on port 8080 (via EPG), but now we have this proxy thing only passing requests for /apex/* to it, and Apache web server can’t find /i/.
At first I tried adding another ProxyPass line for /i to port 8080, and this did work; however, all the pages loaded very slowly, all the images were visibly taking time to load each time a page was refreshed, so no images were being cached. I figured this lack of caching was because Apache can’t tell that an image hasn’t been changed since the last time it was requested.
This performance problem was solved by getting all the Apex images and putting them on another folder on the Linux box (e.g. /usr/lib/oracle/apex/images) and adding the following line to httpd.conf:
Alias /i/ "/usr/lib/oracle/apex/images/"
This means that all the APEX images are now served by Apache web server instead of by Apex. It also means that application images I’ve loaded have to be copied out to the file system, but in my case there weren’t many and it didn’t take long.
It’s all very simple, isn’t it? Not. But at least it works, and reasonably well. My friends and family are suitably impressed, although they have no inkling of the trouble I went to to get it all working. Ah, the thankless life of an Oracle programmer – but it’s all worth it in the end when I can do full-on development remotely, wherever in the world I happen to be (e.g. down the road at a friend’s place).
Next problem: world peace. Or, migrating my existing APEX applications from the XP box to Linux. Depending on how much time I have.
[Next]
[Previous]
Disclaimer: don’t blame me if you follow any of the instructions here and get yourself into a right mess – think of me as a helpful but aloof guide who occasionally gets his words mixed up 🙂
I can access Apex from the Linux box, but not from my WinXP machine across the network. This is because the firewall in Linux by default blocks most ports. I’ve got APEX (using EPG) listening on port 8080, and Apache web server (for the static web pages and images) listening on port 8000, so I open up those two ports (System menu -> Administration -> Security Level & Firewall).
The router, by default, assigns IP addresses dynamically via DHCP to each device that connects to it; in order that I don’t have to keep logging into the router to see what today’s IP address is, I need to tell the router to reserve an IP address for the Linux box. To do that I log into the router’s administration page (for mine it’s http://10.1.1.1), and examine the DHCP settings page. There I find that two devices are connected, each with a unique MAC address, and with the IP address currently assigned to them. One is the WinXP machine, the other is the Linux box. I happen to know which one is which, but I suppose if I didn’t know I could have just disconnected one of them and seen which one disappeared from the router. Anyway, I copy the MAC address and tell the router to assign it a static IP address (in my case, 10.1.1.3) (a word of advice: on some routers you have to also change the settings that specify the range of dynamic IP addresses that can be assigned by DHCP, so that they don’t conflict with the static IP addresses; in my case, my router does not work that way).
By the way, if my explanation of this doesn’t help you, just google “static IP address” – you’ll find heaps of guides around – keep reading, and it’ll all make sense…
Now I can access it from WinXP via http://10.1.1.3. For convenience I add a line like the following to C:\windows\system32\drivers\etc\hosts:
10.1.1.3 linuxpc linuxpc
This means I can access it via http://linuxpc, at least from WinXP. The equivalent file on linux, used in exactly the same way, is /etc/hosts [Wikipedia: Hosts file].
What I want now is for friends and family to get to it from the outside. For security reasons there’s a number of things blocking that access which I need to take care of. Also, I want the URL that I give out to be relatively simple; a longish URL with strange numbers and characters can be intimidating and easy to get wrong. Also, at least one of my friends works at a place that seems to block different ports (e.g. 8000). So I want them to get in on port 80, which is the default for HTTP and doesn’t need to be specified in their browser.
At the moment the router ignores mosts requests from the outside world; it only exists to serve the little network connected locally to it and couldn’t care less about my friends and family. I need to make it just a little more friendly. First thing, I need to get a port mapped. In my router admin I navigate to the Port Forwarding (called “Virtual Server” on my router; on your router it might appear in “Network Address Translation (NAT/NAPT/PAT)” or “DMZ host”) section, and select the LAN IP I wish to map the port to (in my case, 10.1.1.3). This router gives me a whole lot of preset ports for various games and applications, but I want to do something different, so I select “User” and click “Add”. Here is where I can create a Rule for mapping ports. I want the router to accept TCP traffic on port 80 (the default for web stuff) but send it to port 8000 on the Linux box. So I give it a name (e.g. something imaginative like “Port80to8000”), select TCP for the Protocol, put in 80 for both Port Start and Port End, and pop in 8000 for the Port Map. I don’t need a range so Port Map End stays blank, and click Apply. Now, I just Add my new rule (Port80to8000) to the list of rules for 10.1.1.3, click Apply, and reboot the router. Now, traffic coming in from the outside on port 80 should be sent to port 8000 on the Linux box.
We’re not out of the woods yet, though, there’s a few more things blocking external access. Firstly, iiNet by default block any incoming traffic on port 80, as well as a few other ports, which is good from a security point of view, but doesn’t help me much, so I go into my account management page and switch this option off.
(Once that’s all done, I can test that external access to the port is working, by logging into the machine I want to test, and plugging 80 into this online tool: CanYouSeeMe.org – Open Port Check Tool.)
Finally, and this is the biggy, to get to my site from the outside, people need a URL; or at least, an IP address they can use (that won’t change from day to day). Now, I don’t have a domain name, nor do I have a static IP address – all I get is a dynamic (i.e. can change without notice) IP address assigned by iiNet. I could upgrade to a business broadband account with a static IP address along with a nice domain name, but I want to do this on the cheap, so I don’t.
Instead, I use DDNS (Dynamic DNS). I learned about this from an excellent article by Nathan Taylor in PC User magazine (May 2007). There’s a few sites out there that do this, the one I use is www.no-ip.com which provides a basic service for free. I sign up, get a domain name of my own (I won’t tell you what it is but it looks like mycomputer.no-ip.info), and plug in the settings into the DDNS page on my router.
The way this works is: whenever someone types in my domain name (e.g. http://mycomputer.no-ip.info) into their web browser, the request goes to no-ip.com. Their computer looks up their database for the current IP address for “mycomputer.no-ip.info”, and then forwards the request on to it. This process is pretty much seamless and without any overhead that I’ve noticed. Whenever iiNet change my IP address, my router sends a message back to no-ip.com with the new IP address and their database is updated so that future requests are passed on correctly.
If your router doesn’t support DDNS, don’t worry – you can get software that will run on a computer on your network, and it will do the same job – whenever the IP address changes, it will notify no-ip.com of the change.
After all that fun, I tried to test it from my WinXP box, but I just couldn’t get it to work. As it turns out, you just can’t access the local network using the external address from within that network – apart from using www.canyouseeme.org to check the port, you have to test your web site from outside your network. So I used my “phone a friend” lifeline and got him to try it out.
You guessed it, it worked first time. Ha! Well,… if I said that I’d be lying. It didn’t work first time, the actual process of working all of the above out was a little bit more bumpy than I’ve made out; but in the end it was all working, and I learned a great deal in the process.
There’s one more thing (oh no, I hear you moan…). You’ll notice I’ve only mapped port 80 to port 8000, which is the Apache web server, and not port 8080, which is APEX. That’s the subject of tomorrow’s post, so stay tuned!
[Next]
[Previous]
Ok kids, play time is over, it’s time to install Oracle, upgrade Apex and then turn out the lights for a good night’s sleep. After double-checking that they haven’t released 11g XE yet :(, I download Oracle XE 10gR2, as well as Apex 3.0 for good measure (no Apex 4.0 yet either…).
Download Oracle XE 10g Release 2 (10.2.0.1) for Linux x86. I chose the RPM version.
Download Oracle Application Express. I chose 3.0.1.
Did some reading, and learned a lot about configuring Linux, but in the end it was a frightfully simple matter to install the RPM using the RPM [Wikipedia:RPM] command (who would have guessed), it installed without a hitch and told me to run the configure command, which I did, and that went fine as well. So now I’ve got Oracle running.
Apex as installed along with Oracle XE works a bit differently to what I’m used to (I’m running 3.0 on Oracle 10GR2 Enterprise Edition on my WinXP box for experimental purposes), it serves as the administration GUI to the database (no Enterprise Manager, unfortunately) as well as the application development environment. The database (Oracle XE), being free, is limited to 4GB of user data, and will only use 1GB of RAM (which is fine, that’s all I’m giving it anyway). To help ensure I don’t go over 4GB I’ll keep my large media files on the file system instead of in the database, and I’ll design my applications with automated cleanup routines for tables that grow a lot. So far my applications on my experimental 10G database only use 1GB, and that’s including a whole lot of BLOBs, so I don’t think I’ll have a problem with this limit if I’m careful.
It uses the Embedded PL/SQL Gateway (EPG) [docs] for its web server. Nothing to report there, it worked fine right out of the box.
Next step is to upgrade to APEX 3.0 which means I lose the cute APEX database administration interface, but I have to do this because the apps I want to migrate are currently on 3.0. Not to worry, there’s a good guide for administrating Oracle XE and APEX 3.0.1 here. After upgrading I disable the SYSTEM login for APEX, and use the ADMIN account like I’m accustomed to.
After a bit of tyre-kicking I’m off to bed.
[Next]
[Previous]
Ok, I’ve got all the hardware I need (took a few minutes with a vacuum cleaner to carefully suck out as much of the dust that was caked in there), and hooked it all up. The computer starts up ok, but it needs an OS – the hard disk was wiped clean of all government secrets, as expected.
I downloaded Oracle Enterprise Linux release 5 from OTN [link]. I choose the x86 32 bit version, Release 5 Media Pack. It comes as five ISO images (ignoring the four Source ISOs), which I burned onto five CDs (just happened to have some blanks lying around).
Pop the first CD into the tray and hope nothing’s broken. It works! It’s alive!
Oracle Enterprise Linux welcomes me into its world and I recklessly accept all the defaults. It’s successfully detected all the hardware, and after the last CD has been inserted the transformation from boring ex-government PC into a shiny clean Linux box is complete.
A bit of a brush up on linux commands (Guide to Linux File Command Mastery), and now it’s play time!
[Next]
[Previous]
My main computer, used by my wife as well, runs XP and I want to remove Oracle from it because it takes too long to boot up, and Oracle can suffer when I run CPU-intensive applications on it.
In spite of my asking very nicely, none of my friends, family, in-laws, or colleagues had any old computers lying around they didn’t need, so I’ve done a bit of shopping around. An ad in the local paper pointed me to McLernon’s Supply & Demand, an auction house which sells heaps of old office furniture and computer equipment. They had just stacks of secondhand computers, mostly from DOLA (Department of Land Administration) (who, coincidentally, I once worked for), and I picked up a good PC for $99. It had 512MB of RAM so I also got a second half-gig for $50.
This is the hardware manifest:
- 1 x Intel P4 2.0GHz, with 512MB RAM, 40GB HD, onboard video & network: $99.00
- 1 x 512MB RAM: $50.00
- Network cable: free (was in my box of computer junk, left over following an upgrade of my router)
- DSL-G604T 4-port+wireless ADSL Router: $86.00 (secondhand via eBay)
- Labour: free (me)
It’ll use my existing broadband to access the Internet. I’m on a $49.95/month plan from iiNet.
TOTAL COST: $235 upfront, plus the monthly broadband cost.
(not mentioned: a KVM switch, dirt cheap for $35, just for convenience while setting it up)
From here on in, there’ll be no further outlays; free software only!
[Next]
Seeing how Oracle XE and Linux is free, I want to see for just a minimum of outlay I could get a working database and web server running. I am also keen to give Linux a try; I’ve been a Windows user ever since my dad upgraded his computer from MS-DOS 3.3 to Windows 3.1, and while I’ve always worked for companies that used Unix I’ve never really had to learn much about it.
My goal is to get Linux up and running on the cheapest hardware I could find (free, if possible), and to run Oracle XE, the free version of the Oracle database, which includes Application Express. On the same machine I want to set up a web server to serve static web pages and streaming media.
My plan is as follows:
- Obtain a barebones machine to be the server. Must be free, or dirt cheap.
- Install Oracle Enterprise Linux on it.
- Install Oracle XE 10g R2.
- Upgrade APEX to version 3.0.
- Set up the router for external access.
- Migrate all Apex applications from the Win XP box.
In the next few posts I’ll describe how I went on all six points.
[Next]
