After upgrading APEX I found this query useful to review all the plugins I had installed across multiple workspaces and in multiple applications to find ones that needed to be upgraded.
select name
      ,plugin_type
      ,version_identifier
      ,workspace
      ,application_id
      ,application_name
from APEX_APPL_PLUGINS
where workspace not in ('INTERNAL','COM.ORACLE.CUST.REPOSITORY')
order by name, workspace, application_id;
Normally, in a report you can add a checkbox to select records like this:
select apex_item.checkbox2(1,x.id) as sel
      ,x.mycol
      ,...
from mytable x
And process the selected records using a process like this:
for i in 1..apex_application.g_f01.count loop
  l_id := apex_application.g_f01(i);
  -- ... process ...
end loop;
Since we have set the value of the checkbox to the record ID we can just get that ID from the resulting g_f01 array. What if we need multiple columns in our processing? There are a few approaches we could use:
Option 1. Re-query the table to get the corresponding data for the record ID
This is possible as long as the record ID is a unique identifier for the results in the report. A downside is that this involves running an extra query to get the corresponding data which might add a performance problem. An advantage is that the query can bring back as much data as we need – so if we need more than, say, 6 or 7 columns, this would be a reasonable approach.
Option 2. Concatenate the extra data into the checkbox value
For example:
select apex_item.checkbox2(1, x.col1 || ':' || x.col2) as sel
      ,x.mycol
      ,...
from mytable x
This requires parsing the value in the process, e.g.:
for i in 1..apex_application.g_f01.count loop
  l_buf := apex_application.g_f01(i);
  l_col1 := substr(l_buf, 1, instr(l_buf,':')-1);
  l_col2 := substr(l_buf, instr(l_buf,':')+1);
  -- ... process ...
end loop;
Option 3. Add extra hidden items to hold the data
select apex_item.checkbox2(1,rownum)
       || apex_item.hidden(2,rownum)
       || apex_item.hidden(3,col1)
       || apex_item.hidden(4,col2)
       as sel
      ,x.mycol
      ,...
from mytable x
Note: using “rownum” like this allows selecting the data from the row in the report, even if the underlying view for the report has no unique values that might be used.
Processing involves getting the selected rownums from the checkbox, then searching the hidden item (#2) for the corresponding rownum. This is because the g_f01 array (being based on a checkbox) will only contain elements for the selected records, whereas the g_f02, g_f03, etc. arrays will contain all elements from all records that were visible on the page.
for i in 1..apex_application.g_f01.count loop
  for j in 1..apex_application.g_f02.count loop
    -- compare the ROWNUMs
    if apex_application.g_f02(j) = apex_application.g_f01(i)
    then
      l_col1 := apex_application.g_f03(j);
      l_col2 := apex_application.g_f04(j);
      -- ... process ...
    end if;
  end loop;
end loop;
This approach helped when I had a report based on a “full outer join” view, which involved multiple record IDs which were not always present on each report row, and I had multiple processes that needed to process based on different record IDs and other data, which would have been too clumsy to concatenate and parse (as per option #2 above).
I was working on an application in an APEX instance that was not configured for email (and would not be), but a number of interactive reports were allowing users to use the “Subscription” or the “Download as Email” features. If they tried these features, those emails would just go into the APEX mail queue and never go anywhere, so I needed to turn these off.
I listed all the interactive reports that need fixing with this query:
select page_id
      ,region_name
      ,show_notify
      ,download_formats
from apex_application_page_ir
where application_id = <my app id>
and (show_notify = 'Yes' or instr(download_formats,'EMAIL') > 0);
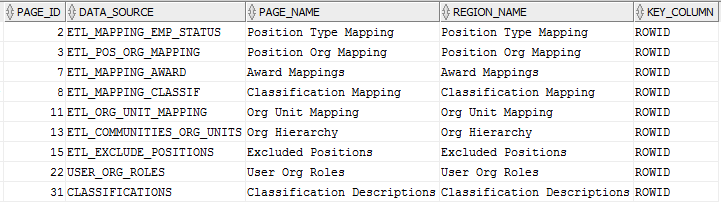
I needed to get a list of all the tabular forms in my application along with which table they were based on. This query did the trick:
select page_id
      ,attribute_02 as data_source
      ,page_name
      ,region_name
      ,attribute_03 as key_column
from   apex_application_page_proc
where  application_id = ...my app id...
and    process_type_code = 'MULTI_ROW_UPDATE'
order by 1, 2;
If you have an ordinary Oracle APEX form with the standard Automatic Row Fetch process, and the page has an optional item with a default value, APEX will set the default on new records automatically. However, if the user queries an existing record, Oracle APEX will also fill in a missing value with the default value. This might not be what is desired – if the user clears the value they would expect it will stay cleared.
If you only want the default to be applied for new records, change the attribute on the item so that the default is only applied to new records:
Set Default Value Type to PL/SQL Expression
Set Default value to something like: case when :P1_ID is null then 'xyzzy' end
I received a question today from a developer who wanted to write a single static SQL query that could handle multiple optional parameters – i.e. the user might choose to leave one or more of the parameters NULL, and they’d expect the query to ignore those parameters. This is a quite common requirement for generic reporting screens, and there are two different methods commonly used to solve it.
Their sample query, using bind variables (natch), never returned any rows if any of the bind variables were null:
SELECT * FROM emp
WHERE job = :P_JOB
AND dept = :P_DEPT
AND city = :P_CITY
This is expected, of course, because “x = null” always evaluates to “unknown”, and this causes the rows to be omitted.
Option 1: add “OR v NOT NULL”, e.g.
SELECT * FROM emp
WHERE (job = :P_JOB OR :P_JOB IS NULL)
AND (dept = :P_DEPT OR :P_DEPT IS NULL)
AND (city = :P_CITY OR :P_CITY IS NULL)
Option 2: use NVL, e.g.
SELECT * FROM emp
WHERE job = NVL(:P_JOB, job)
AND dept = NVL(:P_DEPT, dept)
AND city = NVL(:P_CITY, city)
If the columns in the table do not have NOT NULL constraints on them, Option #2 will fail to return rows that have NULL in the relevant column – regardless of whether the user parameter is null or not. This is because “job = job” will always be “unknown” if job is null. In this case, Option #1 must be used.
If the columns do have NOT NULL constraints on them, then both Option #1 and Option #2 will work just fine. However, given the choice I would use Option #2 in order to take advantage of the potential performance optimisation that Oracle 12 can do with these types of NVL queries. There is a 3rd option, which is identical to Option #2 except that it uses the COALESCE function instead of NVL – but I would avoid this option as it will not get the performance optimisation.
On the other hand, if any of the attributes is the result of a costly operation (e.g. a function call), I would always use Option #1 (“OR NULL”) instead, because the NVL does not use short-circuit evaluation to avoid multiple function calls.
If there is a mix of columns that have NOT NULL constraints and others that don’t, I don’t really see any problem with mixing the two methods, e.g. in the case where dept has a NOT NULL constraint but job and city don’t:
SELECT * FROM emp
WHERE (job = :P_JOB OR :P_JOB IS NULL)
AND dept = NVL(:P_DEPT, dept)
AND (city = :P_CITY OR :P_CITY IS NULL)
Here’s a question for you to think about. What if the business rule states that the report should omit records where a column is null (i.e. the column may have nulls but they don’t want those records to ever appear in the report)? You may as well use NVL, e.g. in the case where dept has a NOT NULL constraint, but job and city don’t, but the report should omit records where job is null:
SELECT * FROM emp
WHERE job = NVL(:P_JOB, job)
AND dept = NVL(:P_DEPT, dept)
AND (city = :P_CITY OR :P_CITY IS NULL)
You might argue that future developers might be confused by the above query; it’s not exactly clear whether the developer intended to omit the records with null jobs, or if they made a mistake. Code comments might help, but alternatively you might choose to make the rule explicit, e.g.:
SELECT * FROM emp
WHERE job = NVL(:P_JOB, job) AND job IS NOT NULL
AND dept = NVL(:P_DEPT, dept)
AND (city = :P_CITY OR :P_CITY IS NULL)
If you feel strongly about this one way or another, please leave your comments below 🙂
This topic is a reminder that when there are multiple possible solutions to a problem, the choice should not be taken arbitrarily; and we should avoid enshrining one choice in any standards document as the “one true way”. This is because the answer is often “it depends” – different options may be valid for different scenarios, and have advantages and disadvantages that need to be taken into account.
Every Interactive Report has an optional set of “Link” attributes that allow you to specify the location where the user should be redirected if they click a link next to a record in the report. You can choose “Link to Custom Target” and use the Link Builder to easily specify the target application, page, item values to pass, and other attributes.
What if the report combines different entities, and you need to direct the user to a different page depending on the type of entity? Or, if you need to direct the user to a different page with different attributes depending on the status of the record?
One method is to generate the URL in the report query using apex_page.get_url (APEX 5+) or apex_util.prepare_url (APEX 4 or earlier), or (God forbid) you could generate the url yourself using string concatenation.
A more declarative solution is to instead use APEX page redirects. This solution involves the following:
Add some hidden items to the page to store the parameters for each target page;
Add a Branch to the page for each target page; and
Add a Request to the link to signal the page that a redirect has been requested.
NOTE This method does not work as described if you want to navigate to a modal page.
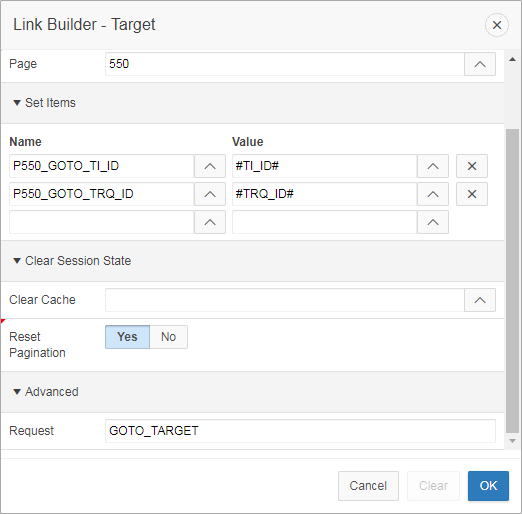
Here’s an example. My page 550 has an interactive report which combines TI records with TRQ records (both of which have a very similar structure). If the user clicks on a TI record they should be redirected to p510 with the corresponding TI_ID, and if they click on a TRQ record they should be redirected to p305 with the corresponding TRQ_ID.
Here’s the link attributes for this report:
Notice that the page now redirects back to itself with the request set to “GOTO_TARGET”, along with the IDs required. My report query has been constructed so that every record will only have a TI_ID or a TRQ_ID, never both at the same time; so the link will ensure that only one of the P550_GOTO_xxx_ID values will be set.
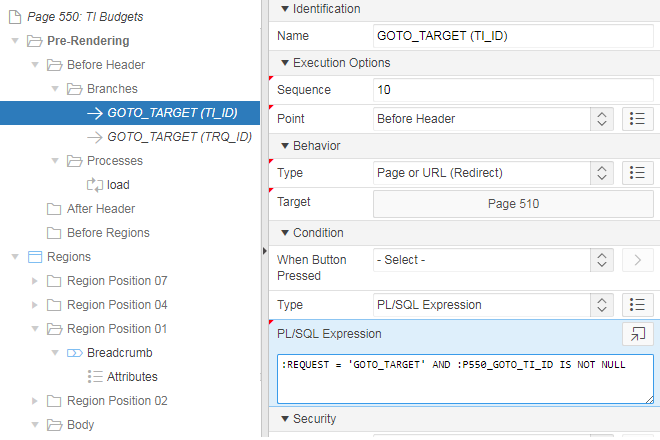
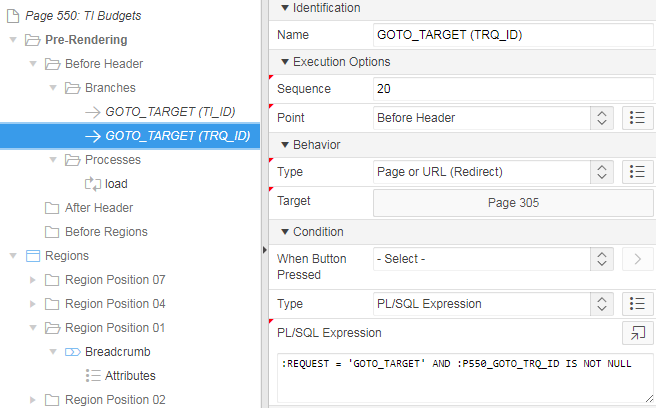
The page then just needs two Branches: one for each target. Conditions on each branch ensures they only get activated if the request has been set, and the branch is selected based on which “GOTO ID” item has been set:
For a normal navigation to this report (e.g. from another page), the request should be blank (or some other value) so none of the Branches should be triggered.
For a relatively simple scenario like this, I like the declarative approach. Each branch can take advantage of the full range of APEX features such as the link builder, security conditions, build options, etc.
Note: this method works just as well for Classic report links as well.
The thing to be mindful of is that the order of the branches, and the condition on each branch, must be carefully selected so that the correct branch is activated in each situation. I’ve shown a simple example which works because I have ensured that only one of the ID parameters is set at the same time. If a record has both IDs, the condition on the first branch “GOTO_TARGET (TI_ID)” will evaluate to True and it will be used, regardless of what GOTO_TRQ_ID was set to.
If there were numerous potential destination pages, with a large number of parameters to pass, I might choose the apex_page.get_url method instead. This is also what I’d usually do if the target was a modal page; alternatively, I’d use a “redirector” modal page as described in the comments below.
I have an editable tabular form using APEX’s old greyscale edit link icons:
The users complained that they currently have to click each link to drill down to the detail records to find and fix any errors; they wanted the screen to indicate which detail records were already fine and which ones needed attention.
Since screen real-estate is limited here, I wanted to indicate the problems by showing a red edit link instead of the default greyscale one; since this application is using an old theme I didn’t feel like converting it to use Font Awesome (not yet, at least) and neither did I want to create a whole new image and upload it. Instead, I tried a CSS trick to convert the greyscale image to a red shade.
What this does is if there is an error for a particular record, the class "btnerr" is added to the img tag. Rows with no error will simply have class="" which does nothing.
Now, to make the greyscale image show up as red, I need to add an SVG filter to the HTML Header in the page:
I made up the values for the R G B lines with some trial and error. The filter is applied to the buttons with the btnerr class with this CSS in the Inline CSS property of the page:
img.btnerr {filter:url(#redshader);}
The result is quite effective:
But, as I noted earlier, this solution does not work in IE, so that’s a big fail.
NOTE: if this application was using the Universal Theme I would simply apply a simple font color style to the icon since it would be using a font instead of an image icon.
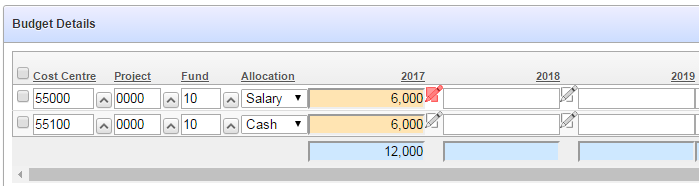
I have an Interactive Report that includes some editable columns, and the users wanted to include some “quick picks” on these columns to make it easy to copy data from a previous period. The user can choose to type in a new value, or click the “quick pick” to quickly data-enter the suggested value.
Normally, a simple page item can have a quick pick by setting the Show Quick Picks attribute on the item. This is not, however, available as an option when generating APEX items in a report.
To do this, I added code like the following to my report query: NOTE: don’t copy this, refer to ADDENDUM below
SELECT ...
      ,APEX_ITEM.textarea(5,x.ytd_comments
         ,p_rows => 1
         ,p_cols => 30
         ,p_item_id => 'f05_'||to_char(rownum,'fm00000'))
       || case when x.prev_ytd_comments is not null
          then '<a href="javascript:$(''#'
            || 'f05_' || to_char(rownum,'fm00000')
            || ''').val('
            || apex_escape.js_literal(x.prev_ytd_comments)
            || ').trigger(''change'')">'
            || apex_escape.html(x.prev_ytd_comments)
            || '</a>'
          end
       as edit_ytd_comments
FROM my_report_view x;
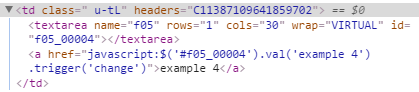
This results in the following HTML code being generated:
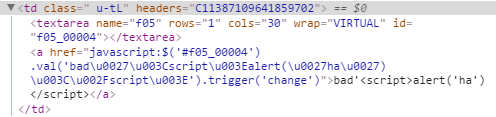
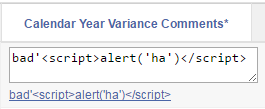
In the report definition, the EDIT_YTD_COMMENTS column has Escape Special Characters set to No. This runs a real risk of adding a XSS attack vector to your application, so be very careful to escape any user-entered data (such as prev_ytd_comments in the example above) before allowing it to be included. In this case, the user-entered data is rendered as the link text (so is escaped using APEX_ESCAPE.html) and also within some javascript (so is escaped using APEX_ESCAPE.js_literal).
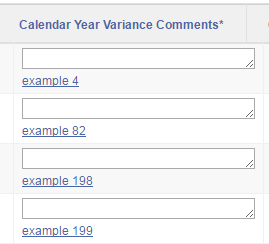
So, if the data includes any characters that conflict with html or javascript, it is neatly escaped:
And it is shown on screen as expected, and clicking the link copies the data correctly into the item:
This technique should, of course, work with most of the different item types you can generate with APEX_ITEM.
A problem with the above code causes this to fail in Internet Explorer (IE11, at least) – when clicking on the quickpick, the user is presented with a page blank except for “[object Object]”. After googling I found this question on StackOverflow and fixed the problem by moving the jQuery code to a function defined at the page level.
I added this to the page Function and Global Variable Declaration:
function qp (id,v) {
  $(id).val(v).trigger('change');
}
And modified the report query as follows:
SELECT ...
      ,APEX_ITEM.textarea(5,x.ytd_comments
         ,p_rows => 1
         ,p_cols => 30
         ,p_item_id => 'f05_'||to_char(rownum,'fm00000'))
       || case when x.prev_ytd_comments is not null
          then '<a href="javascript:qp(''#'
            || 'f05_' || to_char(rownum,'fm00000')
            || ''','
            || apex_escape.js_literal(x.prev_ytd_comments)
            || ')">'
            || apex_escape.html(x.prev_ytd_comments)
            || '</a>'
          end
       as edit_ytd_comments
FROM my_report_view x;
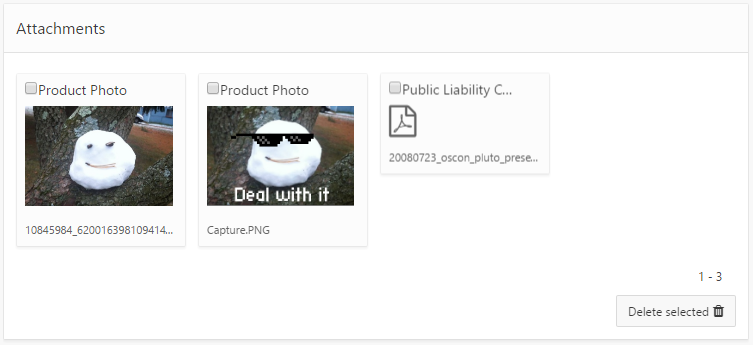
I wanted to use the “Cards” report template for a small report which lists file attachments. When the user clicks on one of the cards, the file should download and open in a new tab/window. Unfortunately, the Cards report template does not include a placeholder for extra attributes for the anchor tag, so it won’t let me add “target=_blank” like I would normally.
One solution is to edit the Cards template to add the extra placeholder; however, this means breaking the subscription from the universal theme.
As a workaround for this I’ve added a small bit of javascript to add the attribute after page load, and whenever the region is refreshed.
Set report static ID, e.g. “mycardsreport”
Add Dynamic Action:
Event = After Refresh
Selection Type = Region
Region = (the region)
Add True Action: Execute JavaScript Code
Code = $("#mycardsreport a.t-Card-wrap").attr("target","_blank");(replace the report static ID in the selector)
Fire On Page Load = Yes
Note: this code affects all cards in the chosen report.


 I wanted to use the “Cards” report template for a small report which lists file attachments. When the user clicks on one of the cards, the file should download and open in a new tab/window. Unfortunately, the Cards report template does not include a placeholder for extra attributes for the anchor tag, so it won’t let me add “target=_blank” like I would normally.