“We always click ‘Apply Changes’, then we click the button we actually wanted” – a user
Typically an Apex report with an “Open” or “Edit” icon will simply do an immediate navigation to the target page, passing the ID of the record to edit. When the user clicks this link, the page is not submitted and the user is instead redirected.
It’s easy to quickly build large and complex applications in Apex but it’s also very easy to build something that confuses and disorients your users. They only need one instance when something doesn’t work how they expected it to, and they will lose trust in your application.
For example: if most buttons save their changes, but one button doesn’t, they might not notice straight away, and then wonder what happened to their work. If you’re lucky, they will raise a defect notice and you can fix it. More likely (and worse), they’ll decide it’s their fault, and begrudgingly accept slow and unnecessary extra steps as part of the process.
You can improve this situation by taking care to ensure that everything works the way your users expect. For most buttons in an Apex page, this is easy and straightforward: just make sure the buttons submit the page. The only buttons that should do a redirect are those that a user should expect will NOT save the changes – e.g. a “Cancel” button.
For the example of an icon in a report region, it’s not so straightforward. The page might include some editable items (e.g. a page for editing a “header” record) – and if the user doesn’t Save their changes before clicking the report link their changes will be lost on navigation.
To solve this problem you can make the edit links first submit the page before navigating. The way I do this is as follows (in this example, the report query is on the “emp” table:
- Add a hidden item
P1_EDIT_ID to the page
- Set Value Protected to No
- Add something like this to the report query (without the newlines):
'javascript:apex.submit(
  {request:''SAVE_EDIT_ROW'',
   set:{''P1_EDIT_ID'':''' || emp.rec_id || '''}
  })' AS edit_link
- Set this new column to Hidden Column
- Modify the edit link Target:
- Type = URL
- URL =
#EDIT_LINK#
- Add a Branch at point “After Processing”
- Modify any existing Processing so that the request SAVE_EDIT_ROW will cause any changes on the page to be saved.
You can, of course, choose different item names and request names if needed (just update it in the code you entered earlier). For example, to make it work with the default Apex DML process you might need to use a request like “APPLY_CHANGES_EDIT_ROW”.
Now, when the user makes some changes to the form, then clicks one of the record Edit links, the page will first be submitted before navigating to the child row.
Adding buttons to Apex pages is easy. Making sure every last one of them does exactly what the user expects, nothing more, and nothing less, is the tricky part!
If you have an ordinary checkbox item based on a list of values, here is a function which will set all the values to checked or unchecked:
function checkboxSetAll (item,checked) {
 $("#"+item+" input[type=checkbox]").attr('checked',checked);
 $("#"+item).trigger("change");
}
For example:
checkboxSetAll("P1_ITEM", true); //select all
checkboxSetAll("P1_ITEM", false); //select none
It works this way because a checkbox item based on a LOV is generated as a set of checkbox input items within a fieldset.
Note: If it’s a checkbox column in a report, you can use this trick instead: Select All / Unselect All Checkbox in Interactive Report Header
A common APEX project is to take a customer’s existing spreadsheet-based solution and convert it more-or-less as is into APEX. I’ve got one going at the moment, a budgeting solution where users need to enter their budget requests. They currently enter their requests into an XLS template file which generates subtotals and totals for them.
To do this in APEX I’m going to use a tabular form, and to do the subtotals I’ll use jQuery in a way not too dissimilar to that I described earlier.
Here is a mockup of the screen so far:
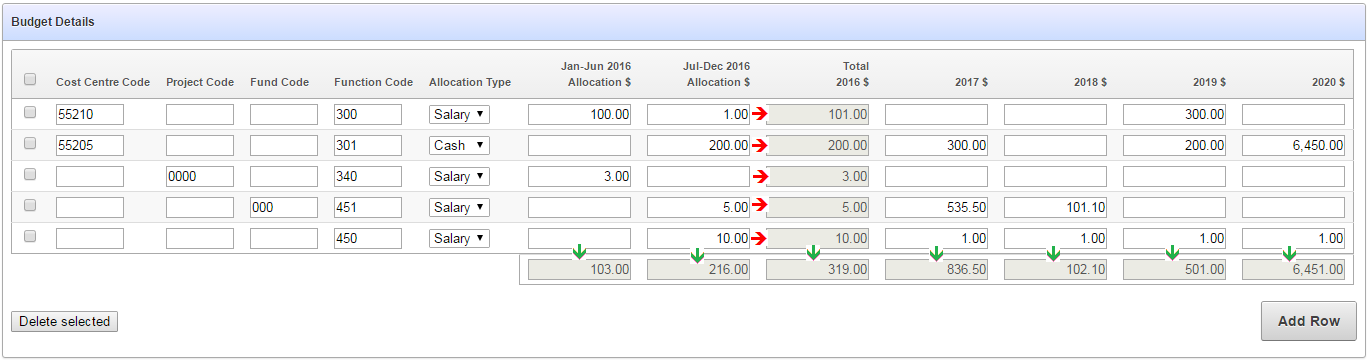
There are column totals that need to be added up and updated dynamically (indicated by the green arrows) as well as subtotals within each row (indicated by the red arrows).
I started by looking at the generated items, getting their ids (e.g. “f09_0001” etc) and writing the jQuery code to detect changes, add them up, and put the totals in the relevant items. I then started repeating this code for each column, and thought “hmmm”.
There were two problems with this approach that I could foresee:
- The generated ids in a tabular form can change if the structure of the query changes – e.g. what was f08 + f09 => f10 might change to f09 + f10 => f11
- I was aware of another form that I would need to build, with a similar structure except that there will be two sets of “Jan-Jun” + “Jul-Dec” columns, each with their own subtotal.
I wanted a more declarative solution, so that the heavy lifting will be done in one set of generic javascript functions, and I simply need to put attributes in the relevant columns to activate them. This is how I’ve approached this:
- Create the tabular form as usual (mine is based on an APEX Collection) and remove the standard DML processes, replaced with my own that calls
APEX_COLLECTION instead.
- Create a standard report that generates the total items by calling
APEX_ITEM.text, with p_attributes=>'data-total="x"' (with a different “x” for each column, e.g. year1).
- Set the Static ID on the tabular form region (e.g.
tabularform).
- Set Element Attributes on the Jan-Jun column to
data-cell="year1" data-col="year1_jan_jun", similarly for the Jul_Dec column.
- Set Element Attributes on all the Year columns in the tabular form to
data-col="yearx", where x is 1..5.
- Set Element Attributes on the total for the first year to
data-subtotal="year1".
The following is the query for the totals report region:
select APEX_ITEM.text(1, TO_CHAR(SUM(year1_jan_jun),'FM999G999G999G999G990D00'), p_size=>10, p_maxlength=>2000,
       p_attributes=>'disabled=true class="edit_money" data-total="year1_jan_jun"') as year1_jan_jun
      ,APEX_ITEM.text(2, TO_CHAR(SUM(year1_jul_dec),'FM999G999G999G999G990D00'), p_size=>10, p_maxlength=>2000,
       p_attributes=>'disabled=true class="edit_money" data-total="year1_jul_dec"') as year1_jul_dec
      ,APEX_ITEM.text(3, TO_CHAR(SUM(year1_total),'FM999G999G999G999G990D00'), p_size=>10, p_maxlength=>2000,
       p_attributes=>'disabled=true class="edit_money" data-total="year1"') as year1_total
      ,APEX_ITEM.text(4, TO_CHAR(SUM(year2_total),'FM999G999G999G999G990D00'), p_size=>10, p_maxlength=>2000,
       p_attributes=>'disabled=true class="edit_money" data-total="year2"') as year2_total
      ,APEX_ITEM.text(5, TO_CHAR(SUM(year3_total),'FM999G999G999G999G990D00'), p_size=>10, p_maxlength=>2000,
       p_attributes=>'disabled=true class="edit_money" data-total="year3"') as year3_total
      ,APEX_ITEM.text(6, TO_CHAR(SUM(year4_total),'FM999G999G999G999G990D00'), p_size=>10, p_maxlength=>2000,
       p_attributes=>'disabled=true class="edit_money" data-total="year4"') as year4_total
      ,APEX_ITEM.text(7, TO_CHAR(SUM(year5_total),'FM999G999G999G999G990D00'), p_size=>10, p_maxlength=>2000,
       p_attributes=>'disabled=true class="edit_money" data-total="year5"') as year5_total
from budget_collection_vw
So, to summarise: all the data-cell items get totalled to the data-subtotal item in the same row; and all the data-col items get totalled to the data-total item below the tabular form.
To do all the hard work, I’ve added the following code to my page’s Function and Global Variable Declaration:
function getSum (qry) {
  //get the sum over all items matching the given jQuery search criterion
  var t = 0;
  $(qry).each(function() {
    t += parseFloat($(this).val().replace(/,/g,''))||0;
  });
  return t;
}

function updateSubTotal (item) {
  // update a row-level subtotal
  // the items to add up are identified by data-cell="x"
  // the item to show the total is identified by data-subtotal="x"
  var cell = $(item).data("cell") //get the data-cell attribute
     ,rn = $(item).prop("id").split("_")[1]
     ,t = getSum("input[data-cell='"+cell+"'][id$='_"+rn+"']");

  // we need to temporarily enable then disable the subtotal
  // item in order for the change event to fire
  $("input[data-subtotal="+cell+"][id$='_"+rn+"']")
    .val(t.formatMoney())
    .prop("disabled",false)
    .trigger("change")
    .prop("disabled",true);
}

function updateTotal (item) {
  // update a column total
  var col = $(item).data("col") //get the data-col attribute
     ,t = getSum("input[data-col='"+col+"']");

  $("input[data-total="+col+"]")
    .val(t.formatMoney())
    .trigger("change");
}
In case you’re wondering, I’m re-using the formatMoney function here.
There’s a number of things happening here. On page load, we add a listener for changes to any input item that has a data-cell attribute; this calls updateSubTotal, which detects the row number for the triggering item, adds up all the values for any input item that has the same data-cell value; and puts the total in the input item with a matching data-subtotal attribute.
We also have a listener for changes to any item with a data-col class; when these are changed, updateTotal adds up any item with the same attribute, and puts the total in an item with attribute data-total.
The jQuery selector [id$='_"+rn+"'] makes sure that the row-level code only finds items ending with the given row number (i.e. '*_0001').
The benefit of this declarative approach is that it is much easier to re-use and adapt.
EDIT: fixed the change trigger so that I don’t need to call updateTotal from updateSubTotal.
Getting older, it’s getting harder to see and click those tiny checkboxes…
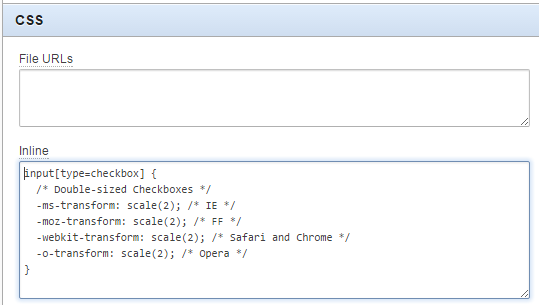
input[type=checkbox] {
/* Double-sized Checkboxes */
-ms-transform: scale(2); /* IE */
-moz-transform: scale(2); /* FF */
-webkit-transform: scale(2); /* Safari and Chrome */
-o-transform: scale(2); /* Opera */
}
CAN YOU SEE THEM NOW? Ah, good. That’s all right then.
Brought to you by dept-of-coding-by-copy-and-paste.
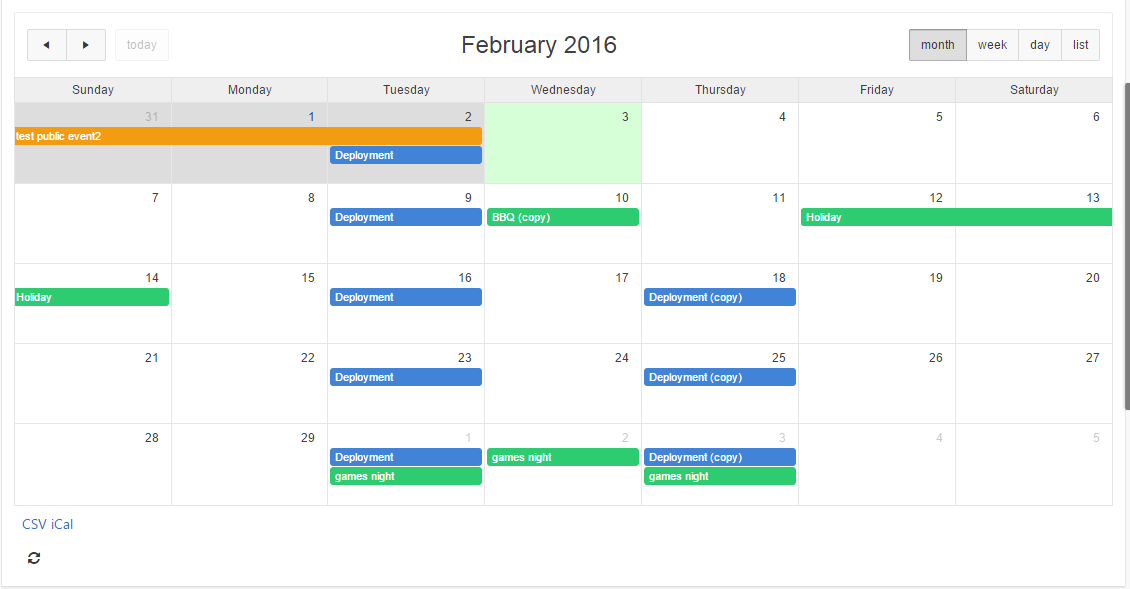
Sometimes it’s the simple little things that can add polish and make your Apex application shine. One simple little thing that you can do is add a Refresh button to improve the usability of your Apex 5 calendar. This makes it easy for the user to see recent changes on the database, e.g. if events had been added or changed since the page had last been loaded.
- Set the Static ID on the Calendar region (e.g. “eventscalendar“)
- Add an Icon button (Button Template = “Icon”) to the calendar region
- Set the button’s Static ID (e.g. “refreshbutton“)
- Set Icon CSS Classes to “fa-refresh“
- Set Action to “Defined by Dynamic Action”
- (optional) Set Template Option -> Style to “Remove UI Decoration”
- Add a Dynamic Action to the button, Event = “Click”
- Set Fire on Page Load to “No”
- Add a True Action “Execute Javascript Code” with the code below:
$("#eventscalendar_calendar").fullCalendar("refetchEvents");
This calls the refetchEvents method of the FullCalendar object. Replace the “eventscalendar” part of the id with whatever static ID you set on the Calendar region in step #1.
Now, to add a bit of pizzazz you can get the refresh button icon to spin while the calendar is being refreshed. To do this, change the dynamic action code to this instead:
$("#refreshbutton span.t-Icon").addClass("fa-spin");
window.setTimeout(function() {
  $("#eventscalendar_calendar").fullCalendar("refetchEvents");
  window.setTimeout(function() {
    $("#refreshbutton span.t-Icon").removeClass("fa-spin");
  }, 1000);
}, 50);
This code starts the refresh icon spinning before invoking refetchEvents, then stops the icon spinning after it has completed. Note that these are done via timeouts (otherwise the icon isn’t repainted until after the entire javascript function has completed). I added a wait of 1 second prior to stopping the spinning because most of the time the refresh is too quick to notice the spinning effect.
You can, if it makes sense in your case, also make the calendar automatically refresh itself periodically, using some simple javascript: add the following function to the page Function and Global Variable Declaration:
function refreshCalendar() {
  $("#refreshbutton span.t-Icon").addClass("fa-spin");
  window.setTimeout(function() {
    $("#eventscalendar_calendar").fullCalendar("refetchEvents");
    window.setTimeout(function() {
      $("#refreshbutton span.t-Icon").removeClass("fa-spin");
    }, 1000);
  }, 50);
}
Then add this to start the timer in the page attribute Execute when Page Loads:
var periodicrefresh = setInterval(function() {
                                    refreshCalendar();
                                  }, 30000);
In this example, I’ve set the timer to go off every 30 seconds. Not only does it refresh the calendar, but the user gets feedback on what’s going on because the refresh button icon is spinning. Be careful not to set the timeout too low, or else your database could get very busy!
The function I’ve declared can now also be reused by the button’s dynamic action, so I can replace the DA javascript with simply:
refreshCalendar();
One of the things that used to bug me about the Apex developer toolbar was that it sometimes obscured the content I was trying to test at the bottom of the page; you could turn it off but then next thing you want to access it you have to jump through the hoops to turn it back on again.
I just noticed it now has some new display options which solves this problem perfectly:
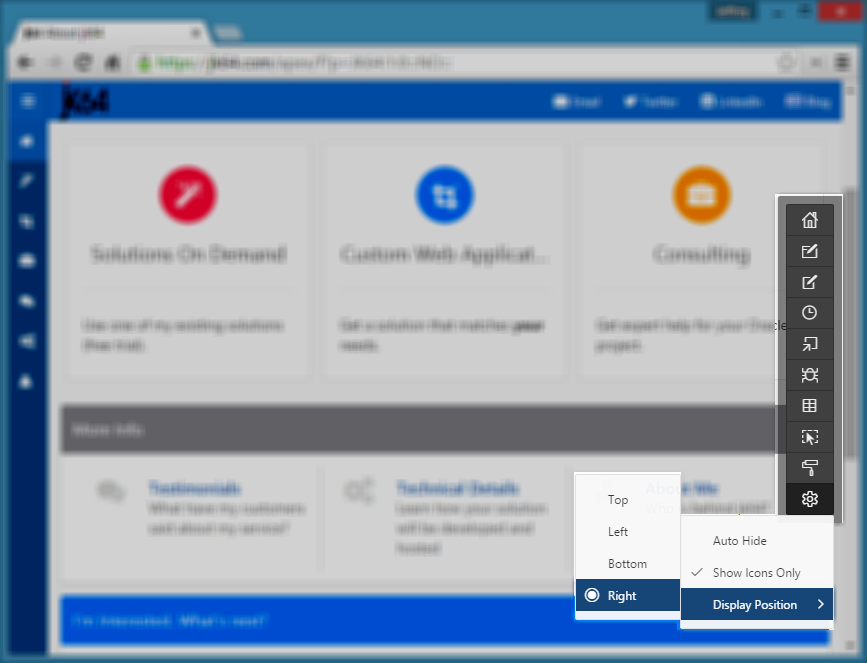
- Auto Hide – I turn this on so that it slides almost completely out of the way when I don’t want it (move your mouse over it to make it pop out again, click into your page to hide it)
- Show Icons Only – once you’re familiar with the options you can shrink the toolbar to show only the icons (hover over the icon to see the label)
- Display Position – put it on the Right-hand side of the window instead of the bottom
715175039885776956103287888080
I needed to generate a random string with an exact length consisting of numeric digits, that I could send in an SMS to a user as a temporary account “pin”. DBMS_RANDOM.string is unsuitable for this purpose as its supported modes all include alphabetic characters. So I used DBMS_RANDOM.value instead. I call TRUNC afterwards to lop off the decimal portion.
FUNCTION random_pin (digits IN NUMBER)
  RETURN NUMBER IS
BEGIN
  IF digits IS NULL OR digits < 1 OR digits > 39 THEN
    RAISE_APPLICATION_ERROR(-20000,'digits must be 1..39');
  END IF;

  IF digits = 1 THEN
    RETURN TRUNC( DBMS_RANDOM.value(0,10) );
  ELSE
    RETURN TRUNC( DBMS_RANDOM.value(
                    POWER(10, digits-1)
                   ,POWER(10, digits) ));
  END IF;
END random_pin;

random_pin(digits => 6);

482372
EDIT 8/1/2016: added special case for 1 digit
ADDENDUM
Because the requirements of my “pin” function was to return a value that would remain unchanged when represented as an integer, it cannot return a string of digits starting with any zeros, which is why the lowerbound for the random function is POWER(10,digits-1). This, unfortunately, makes it somewhat less than perfectly random because zeroes are less frequent – if you call this function 1000 times for a given length of digits, then counted the frequency of each digit from 0..9, you will notice that 0 has a small but significantly lower frequency than the digits 1 to 9.
To fix this, the following function returns a random string of digits, with equal chance of returning a string starting with one or more zeroes:
FUNCTION random_digits (digits IN NUMBER)
  RETURN VARCHAR2 IS
BEGIN
  IF digits IS NULL OR digits < 1 OR digits > 39 THEN
    RAISE_APPLICATION_ERROR(-20000,'digits must be 1..39');
  END IF;

  RETURN LPAD( TRUNC(
    DBMS_RANDOM.value(0, POWER(10, digits))
    ), digits, '0');
END random_digits;
The above functions may be tested and downloaded from Oracle Live SQL.
You have a Select List item on your page driven from a dynamic query, e.g. one that only shows valid values. One day, users notice that the list appears empty and raise a defect note.

You check the query behind the list and verify that indeed, the list should be empty because there are no valid values to show. It’s an optional item so the user is free to save the record if they wish.
There are a number of ways we could make this more user-friendly: depending on the specifics of the situation, we might just hide the item, or we might want to show an alternative item or a warning message. We can do any of these things quite easily using either a computation on page load (if the list doesn’t change while the page is open) or a dynamic action.
In the case of my client, they wanted the item to remain on screen, but to show an orange warning message to let them know that there are no gateways currently available; this is only a warning because there are subsequent processes that can handle the missing gateway (e.g. a higher-privileged user can assign a “hidden” gateway to the record if they deem it suitable).
To do this we create a display item (e.g. “P1_NO_GATEWAY_WARNING” which shows the warning message) and a dynamic action with the following attributes:
- Event = Page Load
- Condition = JavaScript expression
- Value =
listIsEmpty("P1_GATEWAY_ID")
- True Action = Set Value
- Set Type = Static Assignment
- Value = Warning: no gateways currently available
- Selection Type = Item(s)
- Item(s) = P1_NO_GATEWAY_WARNING
In the page’s Function and Global Variable Declaration, or (even better) in the application’s global javascript file, we add the following:
function listIsEmpty(itemName) {
  return $("#" + itemName + " option:enabled").filter(
    function(){return this.text;}
    ).length==0;
}
This was adapted from some solutions here. It looks for all <option>s under the item, filters the list for options which are not disabled and have a label, and returns true if the remaining set is empty. I added the this.text bit because the empty lists generated by Apex include a single empty option for the “NULL” value. This is because I have set the list item’s Null Display Value to blank (null).

Quite a long time ago I made a collection of MP3s available from our APEX website and made them playable within the browser using Google’s shockwave player, using code like this:
<embed type="application/x-shockwave-flash"
       flashvars="audioUrl=#FILE_URL#"
       src="/3523697345-audio-player.swf"
       width="400"
       height="27"
       quality="best">
</embed>
This relies on the user’s browser being able to run flash applications. It looked like this:

With HTML5, however, this is no longer required, so I’ve updated it to:
<audio controls preload>
  <source src="#FILE_URL#" type="audio/mpeg">
</audio>
Not only is it simpler and no longer requires flash, it looks much nicer as well:

Note: you may or may not want to include the preload tag, especially if you have more than one audio control on a page.
This is just a quick note for my future reference. I needed all items with the class “uppercase” to be converted to uppercase, and I thought it would work with just some CSS:
.uppercase { text-transform: uppercase; }
This makes the items appear uppercase, but when the page is posted it actually sends the values exactly as the user typed. They’d type in “lower“, it looks like “LOWER” on screen, but gets posted as “lower“.
In many cases I could just convert the value in my PL/SQL code, but in cases where I was using APEX tabular forms, I don’t know a simple way to intercept the values before the insert occurs.
To solve this I added this to the page’s Execute when Page Loads:
//the item looks uppercase but the internal value is still lowercase
$(document).on('change', '.uppercase', function() {
    var i = "#" + $(this).attr("id");
    $(i).val( $(i).val().toUpperCase() );
});
Or, even better, add this to the application’s global javascript file:
$(document).ready( function() {

    $(document).on('change', '.uppercase', function() {
        var i = "#" + $(this).attr("id");
        $(i).val( $(i).val().toUpperCase() );
    });

});
UPDATE: Interactive Grids
For interactive grids, you can still use this method. Put the class uppercase in the Advanced / CSS Classes attribute (Note: this is different to the Appearance / CSS Classes attribute!). I would also set the Column Filter / Text Case to Upper for good measure.
