An item in the Universal Theme using the Optional – Floating template looks like this:
An item using the Required – Floating template looks like this:
In addition, if the item is required we would most probably set the Value Required attribute to Yes. What if the item is sometimes required but not always? How do we create a Conditionally Required field?
Firstly, we would make sure there is a Validation on the field that checks that the value is provided if required. This way, regardless of what the form may or may not send to the database, it is validated appropriately.
Secondly, to indicate to the user that the item is required or optional, based on the value of another item, we can use a Dynamic Action that sets the required item property (this triggers the client-side validation) and adds or removes the is-required class from the item’s container (this shows the little red “required” indicator on the page).
For example, let’s say that whether item P1_COST_CENTRE is required or not is dependent on whether a hidden item, P1_COST_CENTRE_REQUIRED, has the value 'Y'.
Create a Dynamic Action
Event: Change
Selection Type: Item(s)
Item(s): P1_COST_CENTRE_REQUIRED
Client-side Condition Type: Item = Value
Item: P1_COST_CENTRE_REQUIRED
Value: Y
Create a True Action: Execute JavaScript Code
var item = $("#P1_COST_CENTRE");
item.prop("required",true);
item.closest(".t-Form-fieldContainer").addClass("is-required");
Create a False Action: Execute JavaScript Code
var item = $("#P1_COST_CENTRE");
item.prop("required",false);
item.closest(".t-Form-fieldContainer").removeClass("is-required");
The above code works for all item templates (“Optional”, “Optional – Above”, “Optional – Floating”, etc.) in the Universal Theme; I’ve tested this on APEX 18.2 and 19.1.
Note: this is custom code for the Universal Theme, so it may or may not work for other themes; and might stop working in a future revision of the theme.
UPDATE 29/7/2019: I’ve created some simple Dynamic Action plugins (for APEX 18.2 and later) to implement this, if you’re interested you can download them from here:
To use these plugins, select them as an Action to take on a Dynamic Action:
EDIT 29/7/2019: modified to use a better method to find the container div.
Older Themes
In other themes, the way that a required field is rendered is different. For example, in Theme 26 (Productivity Applications) the label for a required item is rendered in bold, along with a red asterisk; if the item is optional, no red asterisk is rendered. The way to make an item conditionally mandatory in this theme is:
Set the item to use the Required template (so that the red asterisk is rendered).
In the Dynamic Action JavaScript, execute the following if the item should be optional:
var itemLabel = $("label[for='P1_COST_CENTRE']");
itemLabel.removeClass("uRequired");
itemLabel.addClass("uOptional");
To make the item required again:
var itemLabel = $("label[for='P1_COST_CENTRE']");
itemLabel.removeClass("uOptional");
itemLabel.addClass("uRequired");
Over the past couple of weeks I’ve been working on an overhaul of my Google Maps region for Oracle Application Express. This free, open-source plugin allows you to integrate fully-featured Google Maps into your application, with a wide range of built-in declarative features including dynamic actions, as well as more advanced API routines for running custom JavaScript with the plugin.
Route map
Marker Clustering
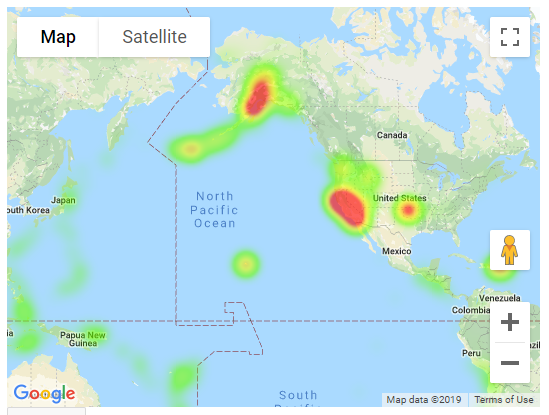
Geo Heatmap
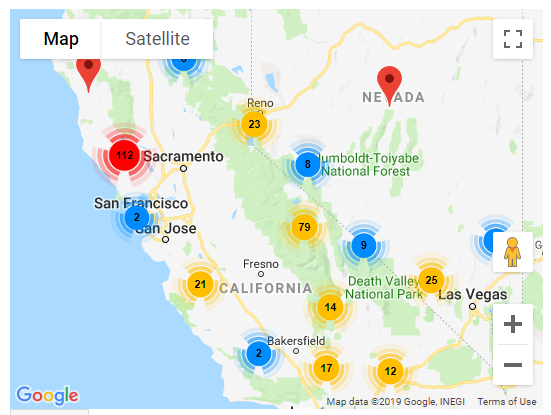
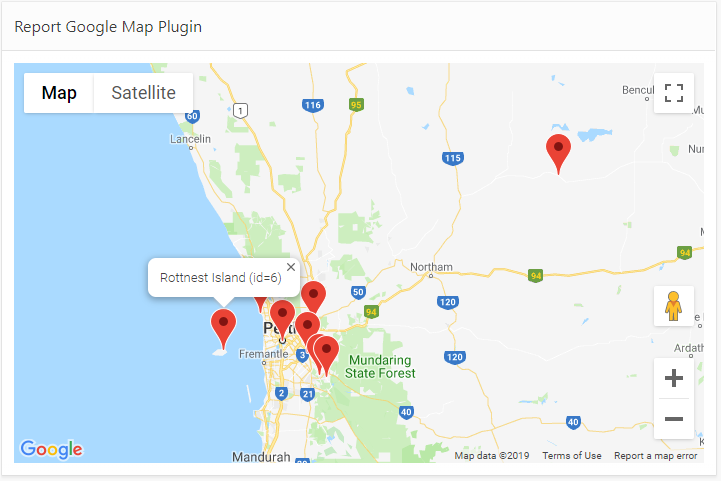
Report Map
The plugin has been updated to Oracle APEX 18.2 (as that is the version my current system is using). Unfortunately this means that people still on older versions will miss out, unless someone is willing to give me a few hours on their APEX 5.0 or 5.1 instance so I can backport the plugin.
EDIT: Release 1.0.1 includes some bugfixes and a backport for APEX 5.0, 5.1 and 18.1.
The plugin is easy to install and use. You provide a SQL Query that returns latitude, longitude, and information for the pins, and the plugin does all the work to show them on the map.
The plugin has been rewritten to use the JQuery UI Widgets interface, at the suggestion of Martin D’Souza. This makes for a cleaner integration on any APEX page, and reduces the JavaScript footprint of each instance on the page if you need two or more map regions at the same time. This represented a rather steep learning curve for me personally, but I learned a lot and I’m pleased with the result. Of course, I’m sure I’ve probably missed a few tricks that the average JavaScript coder would say was obvious.
The beta releases of the plugin (0.1 to 0.10) kept adding more and more plugin attributes until it hit the APEX limit of 25 region-level attributes. This was obviously not very scaleable for future enhancements, so in Release 1.0 I ran the scythe through all the attributes and consolidated, replaced, or removed more than half of them – while preserving almost every single feature. This means v1.0 is not backwards compatible with the beta versions; although many attributes are preserved, others (including the SQL Query itself, which is rather important) would be lost in the conversion if the plugin was merely replaced. For this reason I’ve changed the Internal ID of the plugin. This is so that customers who are currently using a beta version can safely install Release 1.0 alongside it, without affecting all the pages where they are using the plugin. They can then follow the instructions to gradually upgrade each page that uses the plugin.
All of the plugin attributes relating to integrating the plugin with page items have been removed. Instead, it is relatively straightforward to use Dynamic Actions to respond to events on the map, and an API of JavaScript functions can be called to change its behaviour. All of this is fully documented and sample code can be found in the wiki.
New features include, but are not limited to:
Marker Clustering
Geo Heatmap visualisation (this replaces the functionality previous provided in a separate plugin)
Draggable pins
Lazy Load (data is now loaded in a separate Ajax call after the page is loaded)
The plugin attributes that have been added, changed or removed are listed here.
If you haven’t used this plugin before, I encourage you to give it a go. It’s a lot of fun and the possibilities presented by the Google Maps JavaScript API are extensive. You do need a Google Maps API Key which requires a Google billing account, but it is worth the trouble. It is recommended to put a HTTP Referer restriction on your API Key so that people can’t just copy your public key and use it on their own sites. For more information refer to the Installation Instructions.
If you are already using a beta version of the plugin in your application, please review the Upgrading steps before starting. Don’t panic! It’s not quite as simple as just importing the plugin into your application, but it’s not overly complicated. If you were using any of the Page Item integration attributes, you will need to implement Dynamic Actions to achieve the same behaviour. If you had any JavaScript integrations with the plugin, you will need to update them to use the new JQuery UI Widget API calls. I am keen for everyone to update to Release 1.0 as soon as possible, so I will provide free support (via email) for anyone needing help with this.
I am very keen to hear from everyone who is using the plugin, and how it is being used – please let me know in the comments below.
If you notice a bug or have a great idea to enhance the plugin, commenting on this post is not the best place – instead, please raise an issue on GitHub.
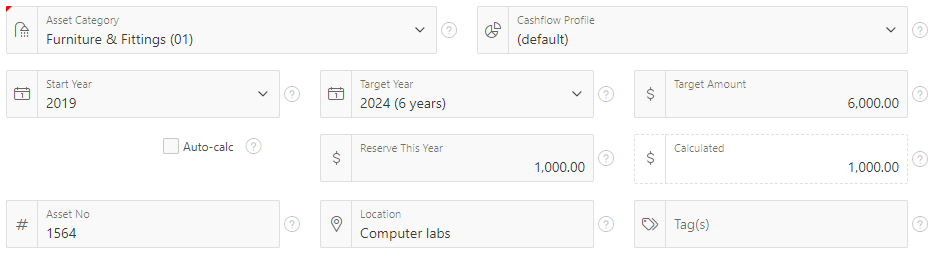
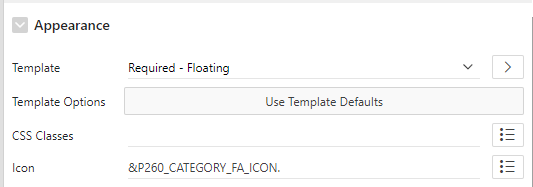
The floating item type has an optional “Icon” property that allows you to render an icon next to the item, which can help users quickly identify what the item is for. This is especially helpful when the form has a lot of items.
The icon attribute can be static, e.g. fa-hashtag, or it can be chosen based on the value of another item, e.g. &P1_FA_ICON..
If you want the icon to change dynamically as the user enters or modifies data, it’s a little bit more complicated. I have a list item based on a table of asset categories, and each asset category has an icon assigned to it. When the user selects an asset category from the list I want it to get the icon from the table and show it in the item straight away.
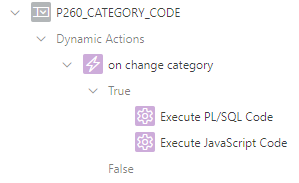
To do this, I use two Dynamic Actions: (1) a PL/SQL action which updates the hidden Pn_FA_ICON item, and (2) a Javascript action which manipulates the displayed icon next to the list item.
This is my item and its two dynamic actions.The Icon attribute causes the icon to be shown when the page is loaded.
The Execute PL/SQL Code action is a simple PL/SQL block which gets the icon from the reference table for the selected category code. Make sure the “Wait for Result” is “Yes”, and make sure the Items to Submit and Items to Return are set to P260_CATEGORY_CODE and P260_CATEGORY_FA_ICON, respectively.
select x.fa_icon
into   :P260_CATEGORY_FA_ICON
from   asset_categories x
where  x.code = :P260_CATEGORY_CODE;
On examining the source of the page, we see that the select item is immediately followed by a span which shows the icon:
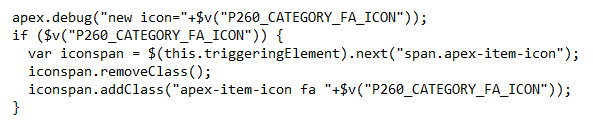
The Execute JavaScript Code action finds the item (in this case, the triggering element), then searches the DOM for the following span with the apex-item-icon class. Once found, it resets the classes on the span with a new set of classes, including the new icon.
It’s a little gimmicky but it’s an easy way to delight users, and it might help them to quickly identify data entry mistakes.
Warning: due to the way the javascript manipulates the DOM, this method is not guaranteed to work correctly in future releases of APEX., so it will need to be retested after upgrades.
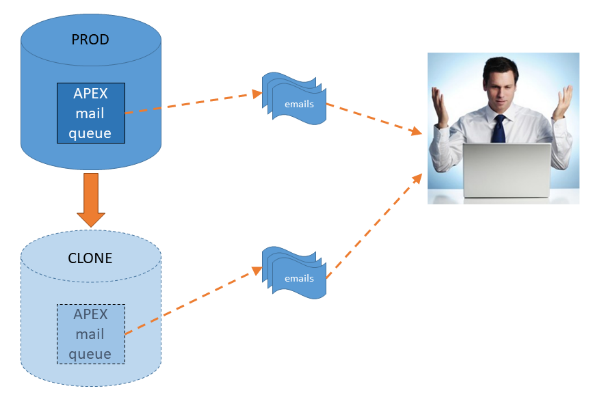
Refreshing any of our non-prod environments (e.g. dev, test, etc.) with a clone from production is a fairly regular process at my client. A recurring issue with this is emails: we’ve had occasion where users have received a second copy of an email immediately after the clone has completed. This was confusing because they thought the event that had triggered the email actually occurred twice.
As it turns out, the duplicate emails were caused by the fact that the emails happened to be waiting in the APEX mail queue in production at the time of the export. After the export, the APEX mail queue was processed normally in production and the users received their emails as expected; after the clone was completed, the database jobs were restarted in the cloned environment which duly processed the emails sitting in the cloned queue and the users effectively got the same emails a second time.
What’s worse, if the same export were to be used for multiple clones, the users might get the same emails again and again!
A good way to solve this sort of issue would be to isolate the non-prod environments behind a specially configured mail server with a whitelist of people who want (and expect) to get emails from the non-prod systems. We don’t have this luxury at this client, however.
Instead, we have a post_clone.sql script which is run by the DBAs immediately after creating the clone. They already stop all the jobs by setting job_queue_processes=0.
In case the mail queue happens to have any emails waiting to be sent, the post clone script now includes the following step:
begin
*** WARNING: DO NOT RUN THIS IN PRODUCTION! ***
  for r in (
    select workspace_id
          ,workspace
    from apex_workspaces
    ) loop
    apex_application_install.set_workspace_id (r.workspace_id);
    apex_util.set_security_group_id
      (p_security_group_id => apex_application_install.get_workspace_id);
    delete apex_mail_queue;
  end loop;
  commit;
end;
/
This script is run as SYS but it could also be run as SYSTEM or as APEX_nnnnnn, depending on your preference.
ADDENDUM: Overriding the From Email Address
Christian Neumüller commented that an additional technique that might be useful is to override the From (sender) email address to indicate which environment each email was sent from. To do this, run something like the following:
begin
  apex_instance_admin.set_parameter('EMAIL_FROM_OVERRIDE',
    'apex-' || sys_context('userenv','db_name') || '@mydomain');
end;
I’ve tested this in APEX 19.1 and it seems to work fine. Regardless of the p_from parameter that the code passes to apex_mail.send, the EMAIL_FROM_OVERRIDE email address is used instead. Note that this is currently undocumented, so this may stop working or change in a future release.
The updated Universal Theme has added new “Floating” item templates which look great, e.g.:
I had a list item which I wanted to leave optional; if the user leaves it null, I wanted it to show a “default” display value (derived at runtime). To implement this, I added a hidden item (P10_DEPTNO_DEFAULT) and on the list item set Null Display Value to &P10_DEPTNO_DEFAULT..
If the page is shown in read-only mode, however, the list item is rendered as a Display Item, and the Null Display Value attribute is ignored:
To solve this, I added a Dynamic Action which injects the default value into the HTML for display (without affecting the value of the underlying item):
Event: Page Load
Server-side Condition: <page is readonly> AND :P10_DEPTNO IS NULL
Action: Execute JavaScript Code
Fire on Initialization: No
Code:
This finds the span for the display-only item and injects the default display value for display:
Like most active sites our applications have a healthy pipeline of change requests and bug fixes, and we manage this pipeline by maintaining a steady pace of small releases.
Each release is built, tested and deployed within a 3-4 week timeframe. Probably once or twice a month, on a Thursday evening, one or more deployments will be run, and each deployment is fully scripted with as few steps as possible. My standard deployment script has evolved over time to handle a number of cases where failures have happened in the past; failed deployments are rare now.
One issue we encountered some time ago was when a deployment script happened to be run at the same time as a database scheduler job; the job started halfway during the deployment when some objects were in the process of being modified. This led to some temporary compilation failures that caused the job to fail. Ultimately the deployment was successful, and the next time the job ran it was able to recover; but we couldn’t be sure that another failure of this sort wouldn’t cause issues in future. So I added a step to each deployment to temporarily stop all the jobs and re-start them after the deployment completes, with a script like this:
prompt disable_all_jobs.sql

begin
  for r in (
    select job_name
    from   user_scheduler_jobs
    where  schedule_type = 'CALENDAR'
    and    enabled = 'TRUE'
    order by 1
  ) loop
    dbms_scheduler.disable
      (name  => r.job_name
      ,force => true);
  end loop;
end;
/
This script simply marks all the jobs as “disabled” so they don’t start during the deployment. A very similar script is run at the end of the deployment to re-enable all the scheduler jobs. This works fine, except for the odd occasion when a job just happens to start running, just before the script starts, and the job is still running concurrently with the deployment. The line force => true in the script means that my script allows those jobs to continue running.
To solve this problem, I’ve added the following:
prompt Waiting for any running jobs to finish...

whenever sqlerror exit sql.sqlcode;

declare
  max_wait_seconds constant number := 60;
  start_time       date := sysdate;
  job_running      varchar2(100);
begin
  loop

    begin
      select job_name
      into   job_running
      from   user_scheduler_jobs
      where  state = 'RUNNING'
      and    rownum = 1;
    exception
      when no_data_found then
        job_running := null;
    end;

    exit when job_running is null;

    if sysdate - start_time > max_wait_seconds/24/60/60 then

      raise_application_error(-20000,
           'WARNING: waited for '
        || max_wait_seconds
        || ' seconds but job is still running ('
        || job_running
        || ').');

    else
      dbms_lock.sleep(2);
    end if;

  end loop;
end;
/
When the DBA runs the above script, it pauses to allow any running jobs to finish. Our jobs almost always finish in less than 30 seconds, usually sooner. The loop checks for any running jobs; if there are no jobs running it exits straight away – otherwise, it waits for a few seconds then checks again. If a job is still running after a minute, the script fails (stopping the deployment) and the DBA can investigate further to see what’s going on; once the job has finished, they can re-start the deployment.
It’s well known that after processing a page one often needs to add a Branch so the user is taken to another page, e.g. to start the next step in a process. It’s less common to need a Branch that is evaluated before the page is shown. This is a “Before Header” Branch and I use it when the user might open a page but need to be redirected to a different one.
A good example is a page that is designed to direct the user to two or more different pages depending on what data they requested.
Another way that a branch like this can be useful is where a user might navigate to a page that should show a record, but if the record ID is not set, I might want the page to automatically redirect the user back to a report page instead.
Of course, you have to take some care with these sorts of branches; if the target page also has its own “Before Header” branch, that will also be evaluated; if the user ends up in a loop of branches the page will fail to load (with a “ERR_TOO_MANY_REDIRECTS” error).
This is the order in which various steps are done before APEX shows a page:
Authentication check
Verify session
“Before Header” Branches
Authorization check
Computations
“Before Header” Processes
Regions, etc.
One of the implications of the above order is that any computations or processes that set or change application state (e.g. an application item) are not run before it evaluates conditions or attributes for any “Before Header” Branches. This applies regardless of whether the computations or processes are defined on the page, or defined globally in Shared Components. This little detail tripped me up today, because I had a branch that I needed to run based on a condition that relied on state that should have been set by a “Before Header” process defined globally.
If you need to redirect a user to a different page on the basis of any application state that is set by a computation or process, you can use a PL/SQL Process instead that does the redirect. The PL/SQL code to use is something like:
Warning: redirect_url raises the exception ORA-20876: Stop APEX Engine, so it’s probably preferable to avoid combining this with other PL/SQL code that might need to be committed first.
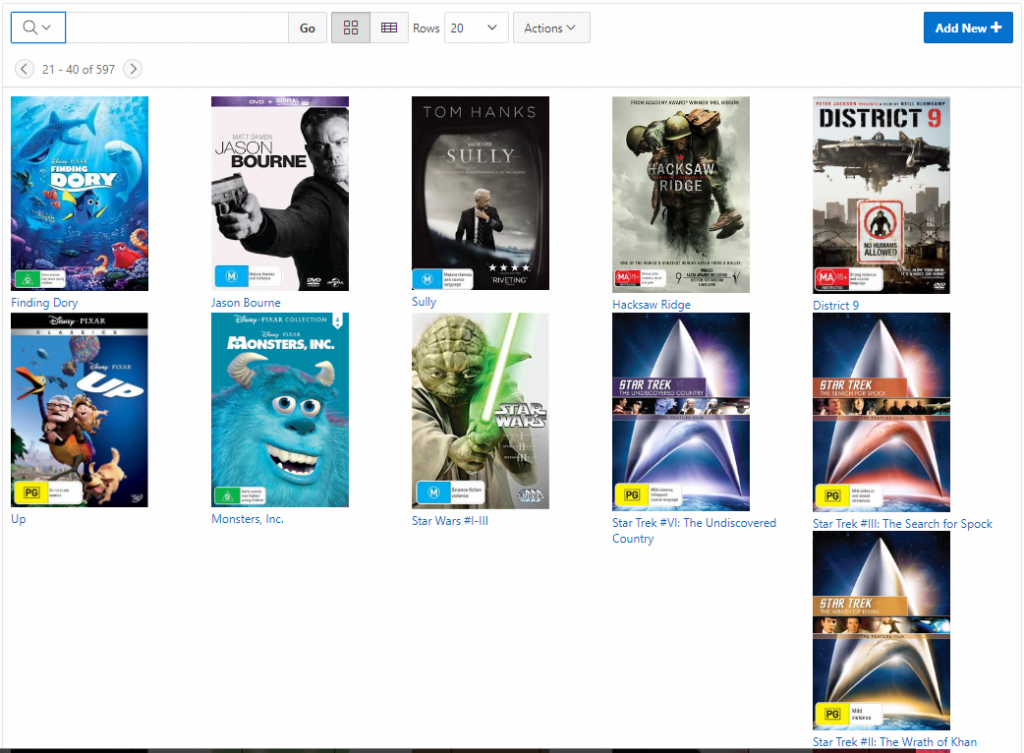
I had an interactive report an an old APEX application that I’ve kept maintained for quite a few years, which is able to show an Icon View that shows a thumbnail of the image for each item.
The problem was that the layout sometimes went wonky depending on the size of the image or the size of the label text. How the items were laid out depended on the width of the viewing window as well. I have set Columns Per Row to 5, and I’m using a Custom Icon View with the following Custom Link:
Each item shows an image, scaled down to width 140 pixels (my images come in all sorts of sizes), plus the title; either the title or the image may be clicked to open the details for it.
This is how it looked:
Depending on a number of variables (length of the label text, and the width of the viewing window) some rows would show their first item in the 5th column instead of over on the left; this would have a run-on effect to following rows. In addition, I wasn’t quite happy with the left-justified layout for each item.
To fix this I added some DIVs and some CSS. My Custom Link is now:
Some of the key bits here are that the container div has width and height attributes, and the image is constrained using max-width, max-height, width:auto and height:auto. Also, the work title is constrained to a 40 pixel high block, with overflow:hidden.
My report now looks like this:
The images are scaled down automatically to fit within a consistent size, and both the images and the labels are horizontally centered leading to a more pleasing layout. If an image is already small enough, it won’t be scaled up but will be shown full-size within the available area. Also, the label height is constrained (if an item label is too high the overflow will be hidden) which solves the layout problem I had before. If the image is not very tall, the label appears directly beneath it which is what I wanted.
The only remaining issue is that the icon view feature of the interactive report generates a table with rows of a fixed number of columns (5, in my case), which doesn’t wrap so nicely on a small screen when it can’t fit 5 in a row. I’ve set Columns Per Row to 1 now, and it seems to wrap perfectly; it shows up to a maximum of 6 items per row depending on the viewing window width.
POSTSCRIPT – Lazy Load
Thanks to Matt (see comment below) who pointed out that a report like this would benefit greatly from a Lazy Load feature to reduce the amount of data pulled to the client – for example, if the user requests 5,000 records per page and starts paging through the results, each page view could potentially download a large volume of data, especially if the images are quite large. I’ve implemented this now and it was quite straightforward:
Upload the file jquery.lazyload-any.js to Static Application Files
Add the following to the page attribute File URLs: #APP_IMAGES#jquery.lazyload-any.js
Add a Dynamic Action to the report region: Event = After Refresh Action = Execute JavaScript Code Code = $(".workicon").lazyload() Fire on Initialization = Yes
Modify the Icon View Custom Link code to put the bits to lazy load within a script tag of type “text/lazyload” (in my case, all the html contents within the “workicon” div), e.g.:
This was an important addition in my cases as some of the images were quite large; I don’t have to worry about load on my server because they are hosted on Amazon S3, but I do have to pay a little bit for the transfer of data.
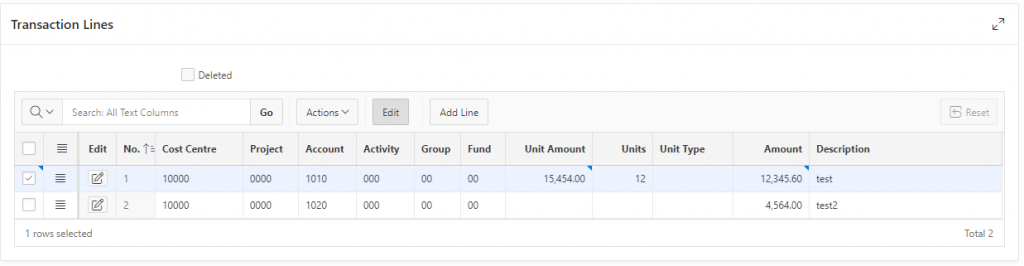
A lot of the applications I build allow users to enter large numbers of monetary amounts, and the way these numbers are presented can have an impact on how easy it is for them to read and check those numbers.
All such amounts are formatted for display using a system-wide standard format (in our case, the Australian standard fm999g999g999g990d00), with any amounts less than $0.01 rounded to the nearest cent. After an amount is entered or modified, the user expects to see the value formatted correctly straight away; so I use javascript to take their entered value, convert it to a number, format it and set its value back in the field. Also, if the user has copied in any non-numeric characters (e.g. a $ symbol), these are simply removed silently.
An interactive grid (this one was a work in progress) with some editable monetary amounts.
In the past I had a global javascript file which I’d load with each application with the following basic functions to auto-format any monetary amount fields as the user tabs out of them, whether they appear in an ordinary form or a tabular form:
Number.prototype.formatMoney = function(decPlaces, thouSep, decSep) {
/* this function taken from http://stackoverflow.com/questions/9318674/javascript-number-currency-formatting */
  var n = this,
  decPlaces = isNaN(decPlaces = Math.abs(decPlaces)) ? 2 : decPlaces,
  decSep = decSep == undefined ? "." : decSep,
  thouSep = thouSep == undefined ? "," : thouSep,
  sign = n < 0 ? "-" : "",
  i = parseInt(n = Math.abs(+n || 0).toFixed(decPlaces)) + "",
  j = (j = i.length) > 3 ? j % 3 : 0;
  return sign + (j ? i.substr(0, j) + thouSep : "") + i.substr(j).replace(/(\d{3})(?=\d)/g, "$1" + thouSep) + (decPlaces ? decSep + Math.abs(n - i).toFixed(decPlaces).slice(2) : "");
};

function parseNumeric(v) {
  //strip any non-numeric characters and return a non-null numeric value
  return parseFloat(v.replace(/[^\d.-]/g,''))||0;
}

$(document).ready(function() {
  //automatically format any item with the "edit_money" class
  $( document ).on('change', '.edit_money', function(){
    var i = "#"+$(this).attr("id"), v = $(i).val();
    if(v){ $(i).val( parseNumeric(v).formatMoney() ); }
  });
});
I would then simply add the class edit_money to any item in the application and it would automatically apply the formatting; for example, if the user types in 12345.6, it changes the value to 12,345.60.
TL;DR If you want to skip to the punchline, scroll down past the next few paragraphs where I take you down a merry rabbit-hole that, as it turns out, was completely unnecessary (but still somewhat educational).
Now we’re on APEX 19.1 and starting to use Interactive Grids (IG) for a lot of new screens, but applying the edit_money class to the columns in the grid doesn’t work, because the edit item that is generated on-the-fly by the grid doesn’t [edit: I was wrong here] conform to the structure expected by my document-on-change function callback.
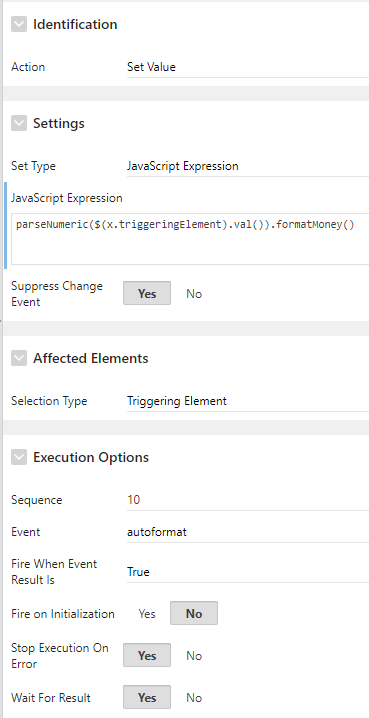
Instead, to solve this I decided to add a single dynamic action to the IG that sets the value to a JavaScript Expression which calls my parseNumeric and formatMoney functions.
Aside: when Google failed me It took me a little bit of searching and experimentation to work out what the JavaScript Expression should be; I didn’t expect it to be complex, and knew it should refer to the item without specifying any particular column name or ID, because this DA could be triggered from multiple columns in the same grid. But I just didn’t know how to refer to the “current item”, and the attribute help was not as helpful as I’d have liked. My google-fu was failing me as well (although I picked up a few neat tricks that I’d like to try in future); I tried searching “oracle apex interactive grid javascript expression” but most of the results were for complicated scenarios that didn’t apply to what I thought was this simple case. I even tried reading the Oracle documentation but just couldn’t find what I was looking for.
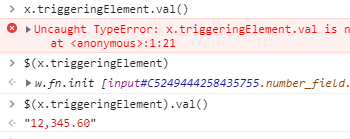
I guessed the JavaScript Expression would have access to a this object that should give me access to the item’s value. I used a little trick to copy this into a global variable and used the Chrome debug console to examine this to see how to get the value of the cell being edited. Firstly, in the page Function and Global Variable Declaration I added var x;. Secondly, in the JavaScript Expression on the dynamic action I entered x=this. Running the page, I entered a value into the cell in the grid, opened the Chrome console, then typed “x”. Chrome immediately showed the structure of “x”:
That “triggeringElement” looks like it might be what I’m after, so I continued typing:
After finishing typing “.val()” it gave an error “val is not a function”. I’d seen other code around the place that converts triggeringElement to a jQuery object, so I tried that instead:
This spat out the number I’d entered. So initially I used $(this.triggeringElement).val(). Later I did some more digging and realised I didn’t need jQuery here, I can use the value attribute directly – this.triggeringElement.value. I suspect this is one of those basic things that they teach you on day one of an “Intro to APEX Interactive Grids 101” class but I must have been sick that day 🙂
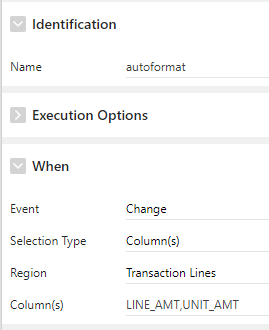
My final DA has the following attributes:
Event = Change
Selection Type = Column(s)
Region = [the interactive grid region]
Column(s) = [list of all the editable monetary columns]
It’s not quite as simple as adding the class to all the items, but at least it’s just one dynamic action that I need to add to each interactive grid.
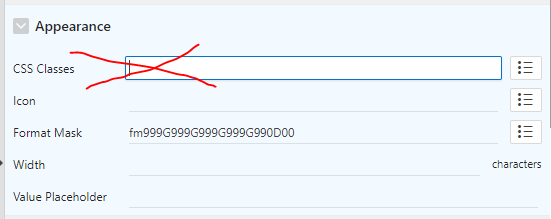
POSTSCRIPT As pointed out by John, I went down this rabbit hole for one simple and annoying reason: I forgot that there are not one, but two “CSS Classes” attributes on each item, and I’d put my “edit_money” class in the wrong attribute.
This may have the appearance of being the right one (it’s the first one listed). This is not the CSS Classes you’re looking for.This is the CSS Classes you’re looking for.
A common requirement is to format data for display in an Interactive Report, for example showing an icon, making part of the data a clickable link or a button, or showing it in different colours.
The problem with embedding formatting in the data for the report is that it is not only used for display in the web page; it is also used for the Download option, causing user confusion when HTML code is exposed in the generated CSV file.
If the logic for the formatting is not data-driven, the solution is to enter the HTML in the HTML Expression attribute on the report column definition. The HTML Expression is used only when displaying the data in the interactive report; the underlying column data is used for the Download. The underlying column data is also used to generate the filter list for the column (if Column Filter Type is “Default Based on Column Type”).
If the logic for the formatting is data-driven, a simple solution is to generate the HTML in an underlying column in the query. However, you don’t want this HTML appearing in the Download CSV, so what you can do is generate the HTML in an additional, hidden column in the report; then use the hidden column in the HTML Expression attribute. This works because the HTML Expression attribute is allowed to refer to any column in the query, even hidden ones.
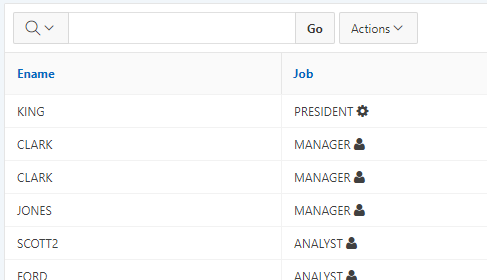
For example, here is a query with a generated column that determines an icon to be displayed within the “job” column:
select ename,
       job,
       job
       || ' <span class="fa '
       || case when mgr is null then 'fa-gear' else 'fa-user' end
       || '"></span>' as job_html
from emp
The following column attributes are set:
JOB: HTML Expression = #JOB_HTML#
JOB_HTML: Type = Hidden Column
When the report is run, we see the icons displayed:
When the report is downloaded as CSV, the Job column is plaintext as desired: