 So you’ve built an APEX application to solve a problem for one client, or one department, or just yourself – and you think it might be useful for others as well. How do you make that application available for other users, departments, or companies to reuse, while ensuring each sees only their own data and cannot mess around with others’ data?
Architecting a Multi-Tenant Application
To make your application multi-tenant you have a few options.
Option #1. Copy the application to another workspace/schema, another Pluggable Database (in Oracle 12c+) or another database server entirely.
Option #2. Modify your data model to allow completely independant sets of data to co-exist in the same physical tables (e.g. a security_group_id column that allows the database to discriminate data for each tenant).
The desirable properties of a multi-tenant system are as follows:
 a. Tenant isolation – no tenant sees data for another tenant; no tenant can affect the app’s behaviour for another tenant; protect against “noisy neighbours” (i.e. those which impact system capacity and performance).
“Hadlow’s first law of multi-tenancy: A multi-tenanted application should not look like a multi-tenanted application.”
b. Administration – ability to backup/recover all data for a single tenant; ability to give a degree of control to each tenant (self service).
c. Maintainability – simplicity of deploying enhancements and bug fixes for all tenants, or for one tenant at a time (e.g. rolling upgrades).
d. Scalability – ability to easily add more tenants, ability to add more capacity for more tenants.
Some of these properties are more easily and effectively achieved with option #1 (separate servers or schemas for each tenant), such as Isolation and Administration. Other properties are more easily and effectively achieved with option #2 (discriminator column) such as Maintainability and Scalability. This is a gross generalisation of course; there are many solutions to this design problem each with many pros and cons.
Some inspiration may be gained from examining how Oracle Application Express achieves this goal: multi-tenant has been baked into the product, via its concept of Workspaces. Each tenant can be given their own workspace in APEX and are able to build and deploy applications in isolation from other workspaces. Internally, APEX maintains a unique security_group_id for each workspace. This works very well – a single Oracle database instance can serve thousands or tens of thousands of workspaces.
It should be noted that a benefit of pursuing Option #2 is that it does not necessarily preclude using Option #1 as well, should the need arise later on – for example, to provide more capacity or better performance in the presence of more demanding tenants. For this reason, plus the fact that it’s much easier to maintain and enhance an application for all users at once if they’re colocated, I prefer Option #2.
Continue Reading →
There is officially now no good excuse for not running your own instance of Oracle 11g and getting into APEX 4 development, or just playing with SQL and PL/SQL.
Note: another easy-to-follow guide to this process was published back in April by Alex Gorbachev here: http://www.pythian.com/news/22045/how-to-get-started-with-amazon-ec2-oracle-11g-xe-example/, which may suit your needs – although it is based on an AMI with a beta release of 11gXE pre-installed. Some of the instructions below are virtually identical to his.
1. Gather your software.
You’ll need:
What, no OS, you ask? Nah – the easiest way to get started is to start with an AMI (Amazon Machine Image) that has linux installed.
Install PuTTY and your SCP/SFTP client on your computer, then:
2. Get your Amazon EC2 account.
Go to
http://aws.amazon.com/ and click “Sign Up Now”. You’ll need an EC2 account and you’ll need to give them some credit card details.
Navigate to the Amazon Elastic Compute Cloud (EC2) in the AWS Management Console.
3. Launch Instance.
Click the “Launch Instance” button. Go to “Community AMIs“. Change the “Viewing” filter to “64-bit“. In the search field type “oracle“. You should see a long list of AMIs to choose from. What you’re looking for is an EBS-backed AMI running Oracle Enterprise Linux 5. The actual name and AMI ID will vary from region to region, but in US-East you could use “493731438004/Oracle Linux 5.6 x86_64 – OVM”, AMI ID ami-42778a2b (you could enter this ID into the search field to go directly to it), or if you’re using the Singapore region you could use AMI ID ami-bc2f56ee.
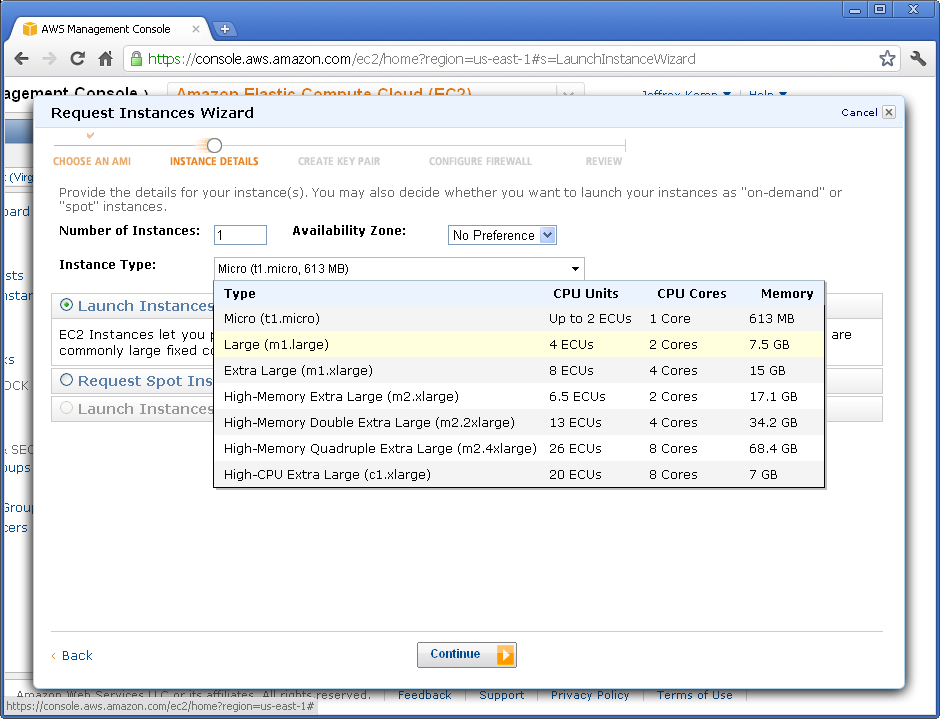
Next, you get to choose the size of the instance. The bigger the machine, the more grunt you get, but also slightly more expensive to run. You could choose Micro, but you might find it a bit slow at times. Of course, there’s nothing stopping you from trying one, and if you don’t like what it offers, just trade up!
On the “Advanced Instance Options” page, accept all the defaults and Continue.
On the next page, you can put a name on your instance if you like. This is just a label, and comes in handy when you run many instances.
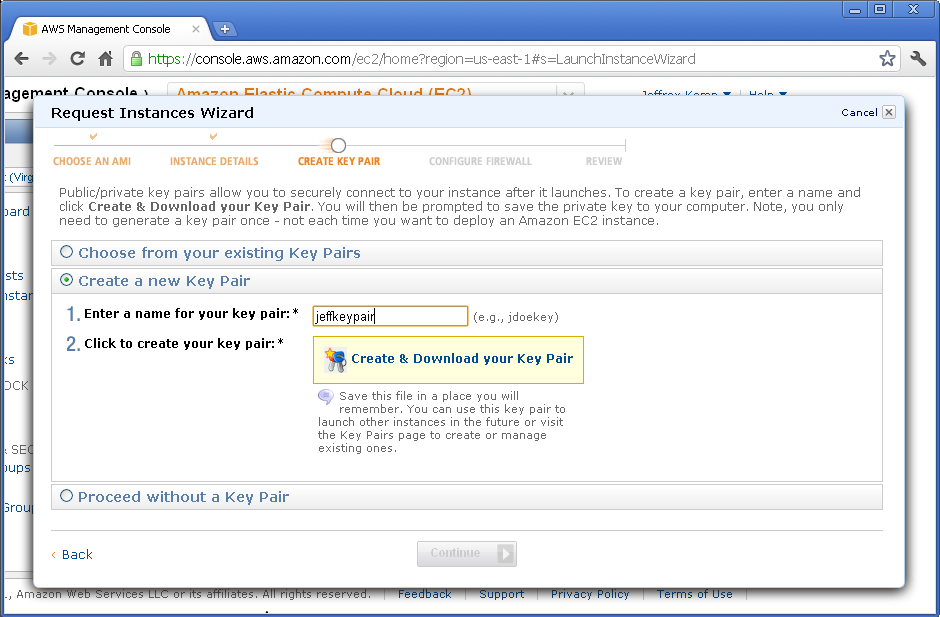
On the “Create Key Pair” page, you need to select a Key Pair. You can create one if you don’t already have one.
Enter a name for your key pair, then click “Create & Download your Key Pair“. Make sure you keep the file (it’ll be a .PEM file) in a safe place – if you lose it, you’ll lose access to your instance (in which case you’d just have to terminate it and start again).
The next page is the “Configure Firewall” step, where you select a Security Group. You could create a new one if you like – open up TCP ports 22, 8080 and 1521 so you can upload files, access the Apex web interface, and connect to the database (e.g. from SQL Developer).
On the final page, click “Launch”. After maybe a minute or two, your instance will have been started and running, ready for you to connect to it and do stuff on it:
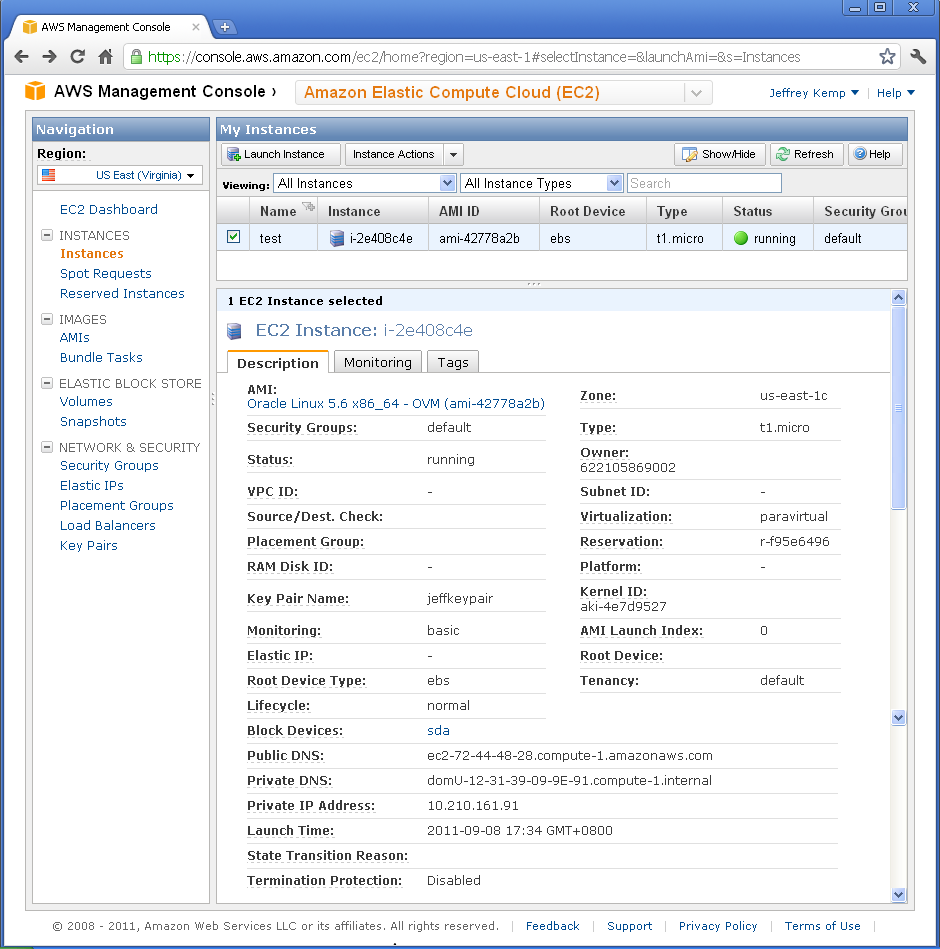
Here, you can find the following useful information:
Status: this will say “Pending”, “Running”, or some other status.
Public DNS: this is the URL you can use to connect to your instance: in my case, it is ec2-72-44-48-28.compute-1.amazonaws.com.
4. Set up your key pair.
Before you can connect to your instance with PuTTY or your SCP client, you’ll need a PPK file. You generate this from the PEM file you got before. In the folder where PuTTY is installed is a little tool called PUTTYGEN.EXE. Run this, select Conversions -> Import Key, select your PEM file, then click Save Private Key. It might warn you about a passphrase – if you want to protect the key in case someone manages to steal it then you could put one in, but personally I don’t. Save it somewhere safe as a PPK file.
5. Upload the Oracle installer to the instance.
Open WinSCP. Click New. Copy the Public DNS into Host (e.g. ec2-72-44-48-28.compute-1.amazonaws.com). Set User name to root. Leave the Password blank. Select your Private Key file (PPK). Save the settings then click Login. If you get a warning about the “server’s host key not in the cache”, just click “Yes” to continue.
If you get timeout errors, check that port 22 has been open (and your changes saved) on your AWS Security Group.
Upload the Oracle installer (oracle-xe-11.2.0-1.0.x86_64.rpm.zip).
6. Login to your instance.
Open PuTTY. Copy the Public DNS into Host Name, and select your Private Key file (PPK) (this option is tucked away under Connection/SSH/Auth). You can save the session if you want. When you Open the connection, it will prompt for the login. Login as root.
7. Install Oracle.
If you just want to know what to type, here is basically all you need (type the commands after the “#” – don’t type the “#” itself though):
# unzip /root/oracle-xe-11.2.0-1.0.x86_64.rpm.zip
# rpm -ivh /root/Disk1/oracle-xe-11.2.0-1.0.x86_64.rpm
# /etc/init.d/oracle-xe configure
This script will prompt you for the APEX port and the database port – just press Enter to accept the defaults (8080 and 1521, respectively). It will then ask for the password for SYS and SYSTEM. Finally, it will ask you if you want it to run on startup. Accept the default (yes).
8. Disable the firewall.
# chkconfig iptables off
# service iptables stop
This disables the internal firewall running in your linux instance.
9. Log into APEX.
Open your browser and point it at your instance. Take the Public DNS and add :8080/apex/apex_admin, e.g.:
http://ec2-72-44-48-28.compute-1.amazonaws.com:8080/apex/apex_admin
The login name is admin, and the password is (for now) the same password you entered for the SYS and SYSTEM accounts earlier.
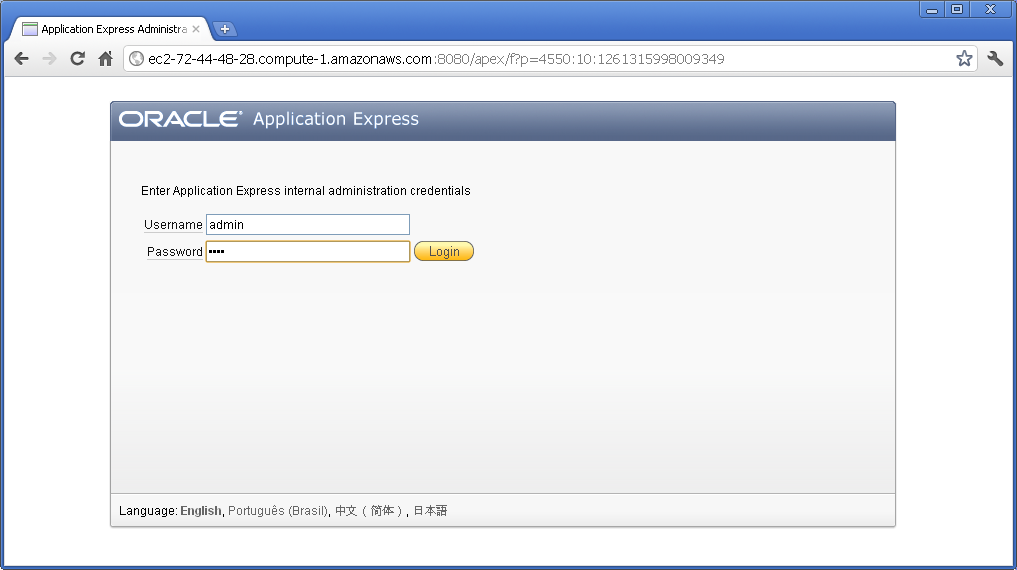
It will prompt you to change the password. It has to be a fairly secure – you’ll need at least a letter, number and symbol, and you can’t include the login name. After changing your password, you’ll need to log in again but using the new password.
You now have a fully-fledged Oracle Application Express environment, version 4.0.
10. Create a Workspace.
The last thing you need to do before you can start creating applications and stuff is to create a workspace. Click “Create Workspace” and answer the prompts to create the workspace along with its own schema and admin user account.

Log out of APEX Administration, and log into the newly created workspace – and you will now be able to start creating applications, tables, and what-have-you. You can also use APEX to write code (such as procedures and packages), but I suggest you use Oracle SQL Developer for this kind of thing because it’s a bit more powerful.
From now on, to get back into your APEX development environment, you can use this url:
http://ec2-72-44-48-28.compute-1.amazonaws.com:8080/apex
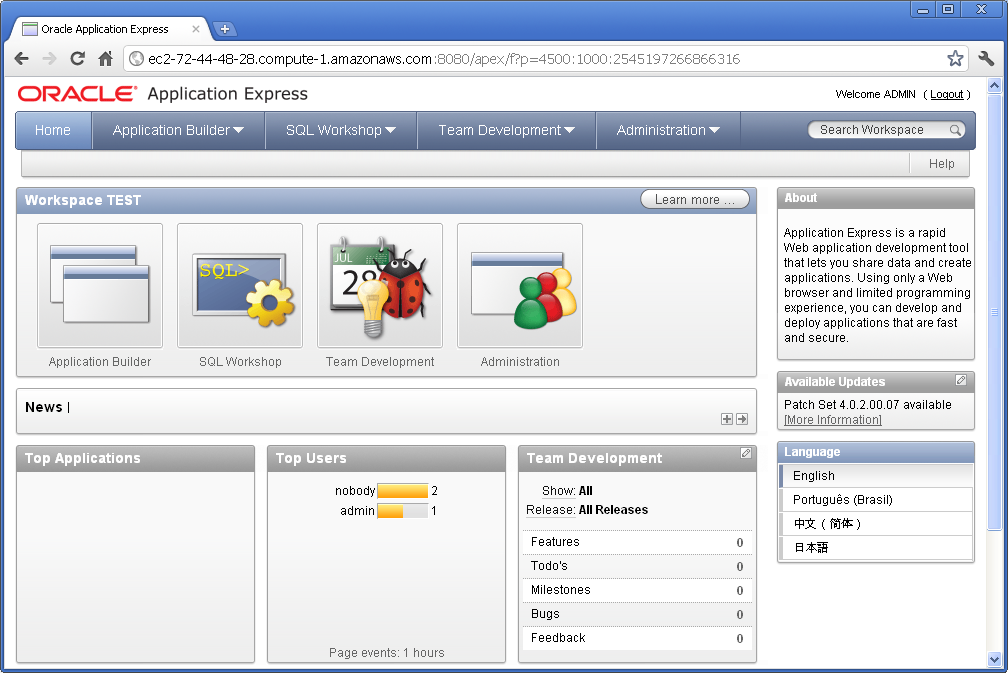
Have fun!
Oh, by the way: when you’ve had your fun, and you want to stop your instance (which at about 34c/h may cost around $60 per week if you leave it running 24×7), don’t forget to terminate it from AWS Management Console. Before you do, however, you can take a snapshot of it in its current state so you can restore from it later. (Before this, you might want to shut down the Oracle database within the instance first – although I’ve found it quite easy to recover an instance which was snapshotted while the database was up and running). To do that, right-click on the instance in AWS Management Console, and select “Create Image (EBS AMI)”. It may take some time for the image to be created. When the image creation is complete, you can then Terminate the instance. The AMI will take up a bit of storage that will cost a dollar or two per month; and you can now spin up as many copies of your machine whenever you want.
Update:
Lew posted an excellent introduction to PuTTY and SSH for AWS Newbies that I heartily recommend. It was posted in 2009 but still applies.
[Previous]
Ok kids, play time is over, it’s time to install Oracle, upgrade Apex and then turn out the lights for a good night’s sleep. After double-checking that they haven’t released 11g XE yet :(, I download Oracle XE 10gR2, as well as Apex 3.0 for good measure (no Apex 4.0 yet either…).
Download Oracle XE 10g Release 2 (10.2.0.1) for Linux x86. I chose the RPM version.
Download Oracle Application Express. I chose 3.0.1.
Did some reading, and learned a lot about configuring Linux, but in the end it was a frightfully simple matter to install the RPM using the RPM [Wikipedia:RPM] command (who would have guessed), it installed without a hitch and told me to run the configure command, which I did, and that went fine as well. So now I’ve got Oracle running.
Apex as installed along with Oracle XE works a bit differently to what I’m used to (I’m running 3.0 on Oracle 10GR2 Enterprise Edition on my WinXP box for experimental purposes), it serves as the administration GUI to the database (no Enterprise Manager, unfortunately) as well as the application development environment. The database (Oracle XE), being free, is limited to 4GB of user data, and will only use 1GB of RAM (which is fine, that’s all I’m giving it anyway). To help ensure I don’t go over 4GB I’ll keep my large media files on the file system instead of in the database, and I’ll design my applications with automated cleanup routines for tables that grow a lot. So far my applications on my experimental 10G database only use 1GB, and that’s including a whole lot of BLOBs, so I don’t think I’ll have a problem with this limit if I’m careful.
It uses the Embedded PL/SQL Gateway (EPG) [docs] for its web server. Nothing to report there, it worked fine right out of the box.
Next step is to upgrade to APEX 3.0 which means I lose the cute APEX database administration interface, but I have to do this because the apps I want to migrate are currently on 3.0. Not to worry, there’s a good guide for administrating Oracle XE and APEX 3.0.1 here. After upgrading I disable the SYSTEM login for APEX, and use the ADMIN account like I’m accustomed to.
After a bit of tyre-kicking I’m off to bed.
[Next]
Seeing how Oracle XE and Linux is free, I want to see for just a minimum of outlay I could get a working database and web server running. I am also keen to give Linux a try; I’ve been a Windows user ever since my dad upgraded his computer from MS-DOS 3.3 to Windows 3.1, and while I’ve always worked for companies that used Unix I’ve never really had to learn much about it.
My goal is to get Linux up and running on the cheapest hardware I could find (free, if possible), and to run Oracle XE, the free version of the Oracle database, which includes Application Express. On the same machine I want to set up a web server to serve static web pages and streaming media.
My plan is as follows:
- Obtain a barebones machine to be the server. Must be free, or dirt cheap.
- Install Oracle Enterprise Linux on it.
- Install Oracle XE 10g R2.
- Upgrade APEX to version 3.0.
- Set up the router for external access.
- Migrate all Apex applications from the Win XP box.
In the next few posts I’ll describe how I went on all six points.
[Next]
 So you’ve built an APEX application to solve a problem for one client, or one department, or just yourself – and you think it might be useful for others as well. How do you make that application available for other users, departments, or companies to reuse, while ensuring each sees only their own data and cannot mess around with others’ data?
 a. Tenant isolation – no tenant sees data for another tenant; no tenant can affect the app’s behaviour for another tenant; protect against “noisy neighbours” (i.e. those which impact system capacity and performance).


