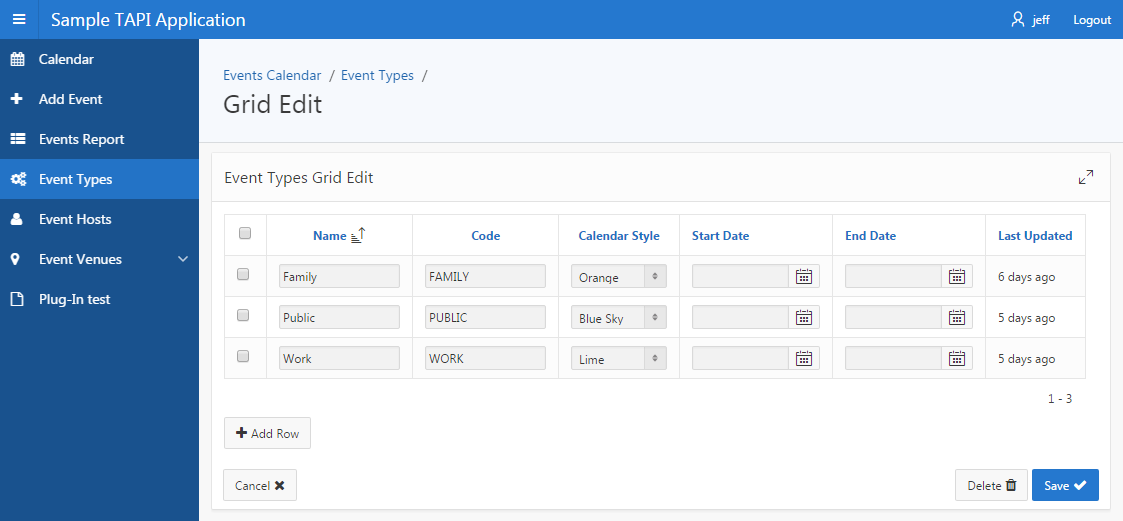
Ever since I started exploring the idea of using a TAPI approach with APEX, something I was never quite satisfied with was Tabular Forms.
They can be a bit finicky to work with, and if you’re not careful you can break them to the point where it’s easier to recreate them from scratch rather than try to fix them (although if you understand the underlying mechanics you can fix them [there was an article about this I read recently but I can’t find it now]).
I wanted to use the stock-standard APEX tabular form, rather than something like Martin D’Souza’s approach – although I have used that a number of times with good results.
In the last week or so while making numerous improvements to my TAPI generator, and creating the new APEX API generator, I tackled again the issue of tabular forms. I had a form that was still using the built-in APEX ApplyMRU and ApplyMRD processes (which, of course, bypass my TAPI). I found that if I deleted both of these processes, and replaced them with a single process that loops over the APEX_APPLICATION.g_f0x arrays, I lose a number of Tabular Form features such as detecting which records were changed.
Instead, what ended up working (while retaining all the benefits of a standard APEX tabular form) was to create a row-level process instead. Here’s some example code that I put in this APEX process that interfaces with my APEX API:
VENUES$APEX.apply_mr (rv =>
  VENUES$TAPI.rv
    (venue_id   => :VENUE_ID
    ,name       => :NAME
    ,version_id => :VERSION_ID
    ));
The process has Execution Scope set to For Created and Modified Rows. It first calls my TAPI.rv function to convert the individual columns from the row into an rvtype record, which it then passes to the APEX API apply_mr procedure. The downside to this approach is that each record is processed separately – no bulk updates; however, tabular forms are rarely used to insert or update significant volumes of data anyway so I doubt this would be of practical concern. The advantage of using the rv function is that it means I don’t need to repeat all the column parameters for all my API procedures, making maintenance easier.
The other change that I had to make was ensure that any Hidden columns referred to in my Apply process must be set to Hidden Column (saves state) – in this case, the VERSION_ID column.
Here’s the generated APEX API apply_mr procedure:
PROCEDURE apply_mr (rv IN VENUES$TAPI.rvtype) IS
  r VENUES$TAPI.rowtype;
BEGIN
  log_start('apply_mr');

  UTIL.check_authorization('Operator');

  IF APEX_APPLICATION.g_request = 'MULTI_ROW_DELETE' THEN

    IF v('APEX$ROW_SELECTOR') = 'X' THEN
      VENUES$TAPI.del (rv => rv);
    END IF;

  ELSE

    CASE v('APEX$ROW_STATUS')
    WHEN 'C' THEN

      r := VENUES$TAPI.ins (rv => rv);

    WHEN 'U' THEN

      r := VENUES$TAPI.upd (rv => rv);

    ELSE
      NULL;
    END CASE;

  END IF;

  log_end;
EXCEPTION
  WHEN UTIL.application_error THEN
    log_end('application_error');
    RAISE;
  WHEN OTHERS THEN
    UTIL.log_sqlerrm;
    RAISE;
END apply_mr;
The code uses APEX$ROW_STATUS to determine whether to insert or update each record. If the Delete button was pressed, it checks APEX$ROW_SELECTOR to check that the record had been selected for delete – although it could skip that check since APEX seems to call the procedure for only the selected records anyway. The debug logs show APEX skipping the records that weren’t selected.
Now, before we run off gleefully inserting and updating records we should really think about validating them and reporting any errors to the user in a nice way. The TAPI ins and upd functions do run the validation routine, but they don’t set up UTIL with the mappings so that the APEX errors are registered as we need them to. So, we add a per-record validation in the APEX page that runs this:
VENUES$APEX.val_row (rv =>
  VENUES$TAPI.rv
    (venue_id   => :VENUE_ID
    ,name       => :NAME
    ,version_id => :VERSION_ID
    )
  ,region_static_id => 'venues');
RETURN null;
As for the single-record page, this validation step is of type PL/SQL Function (returning Error Text). Its Execution Scope is the same as for the apply_mr process – For Created and Modified Rows.
Note that we need to set a static ID on the tabular form region (the generator assumes it is the table name in lowercase – e.g. venues – but this can be changed if desired).
The val_row procedure is as follows:
PROCEDURE val_row
  (rv               IN VENUES$TAPI.rvtype
  ,region_static_id IN VARCHAR2
  ) IS
  dummy            VARCHAR2(32767);
  column_alias_map UTIL.str_map;
BEGIN
  log_start('val_row');

  UTIL.pre_val_row
    (label_map        => VENUES$TAPI.label_map
    ,region_static_id => region_static_id
    ,column_alias_map => column_alias_map);

  dummy := VENUES$TAPI.val (rv => rv);

  UTIL.post_val;

  log_end;
EXCEPTION
  WHEN UTIL.application_error THEN
    log_end('application_error');
    RAISE;
  WHEN OTHERS THEN
    UTIL.log_sqlerrm;
    RAISE;
END val_row;
The pre_val_row procedure tells all the validation handlers how to register any error message with APEX_ERROR. In this case, column_alias_map is empty, which causes them to assume that each column name in the tabular form is named the same as the column name on the database. If this default mapping is not correct for a particular column, we can declare the mapping, e.g. column_alias_map('DB_COLUMN_NAME') := 'TABULAR_FORM_COLUMN_NAME';. This way, when the errors are registered with APEX_ERROR they will be shown correctly on the APEX page.
Things got a little complicated when I tried using this approach for a table that didn’t have any surrogate key, where my TAPI uses ROWID instead to uniquely identify a row for update. In this case, I had to change the generated query to include the ROWID, e.g.:
SELECT t.event_type
      ,t.name
      ,t.calendar_css
      ,t.start_date
      ,t.end_date
      ,t.last_updated_dt
      ,t.version_id
      ,t.ROWID AS p_rowid
FROM   event_types t
I found if I didn’t give a different alias for ROWID, the tabular form would not be rendered at runtime as it conflicted with APEX trying to get its own version of ROWID from the query. Note that the P_ROWID must also be set to Hidden Column (saves state). I found it strange that APEX would worry about it because when I removed* the ApplyMRU and ApplyMRD processes, it stopped emitting the ROWID in the frowid_000n hidden items. Anyway, giving it the alias meant that it all worked fine in the end.
* CORRECTION (7/11/2016): Don’t remove the ApplyMRU process, instead mark it with a Condition of “Never” – otherwise APEX will be unable to map errors to the right rows in the tabular form.
The Add Rows button works; also, the Save button correctly calls my TAPI only for inserted and updated records, and shows error messages correctly. I can use APEX’s builtin Tabular Form feature, integrated neatly with my TAPI instead of manipulating the table directly. Mission accomplished.
Source code/download: http://bitbucket.org/jk64/jk64-sample-apex-tapi
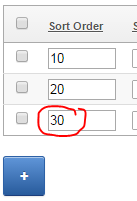
I have a simple tabular form with a numeric “sort order” column. I want the value of this column to be defaulted automatically, based on the maximum value of the rest of the records on the screen. Unfortunately the builtin Apex default type for columns in a tabular form can only be based on an Item, or a PL/SQL expression or function. I didn’t want to make a database call to get the maximum value because the user may have added multiple records which have not yet been saved to the database.
I tried basing the default on a hidden page item which I kept updated based on the values entered, but it seems the tabular form only gets the item’s value on page load and doesn’t re-examine the item’s value when you click the “Add” button. Instead, I had to turn to javascript and jQuery to get the job done.
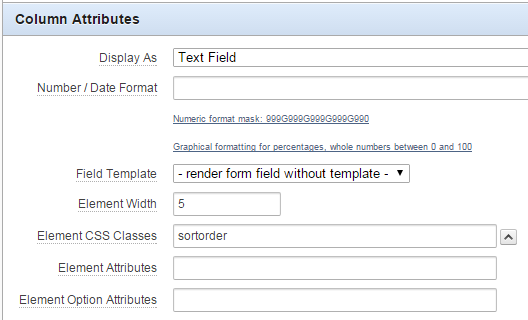
1. Add a class to the tabular form column by setting the Element CSS Classes column attribute (I’ve used “sortorder” as the class name).
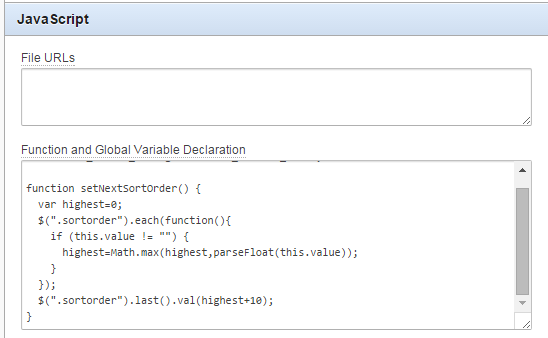
2. Add a javascript function to the page that searches for all the “sortorder” items, calculates the maximum value and adds 10, and assigns it to the last sortorder item on the page.
function setNextSortOrder() {
  var highest=0;
  $(".sortorder").each(function(){
    if (this.value != "") {
      highest=Math.max(highest,parseFloat(this.value));
    }
  });
  $(".sortorder").last().val(highest+10);
}
3. Modify the javascript for the “Add” button to call the setNextSortOrder function immediately after adding a row.
javascript:{apex.widget.tabular.addRow();setNextSortOrder();}
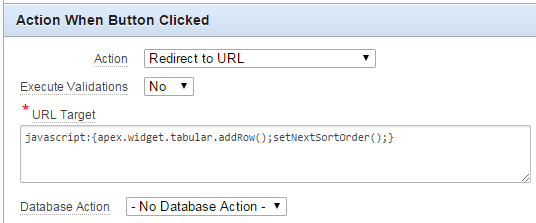
It’s a bit hackish and might not work correctly in some cases but it’ll do for now.
If you decide to use an editable tabular form to present a number of records for viewing and/or editing, but you have some users who are only allowed to view the data but not edit it, you’d think you could set the “Readonly” condition on the region; but this condition is only applied to any extra region items you add, not to the editable items within the report itself.

Here’s my tabular form, with the records still editable:
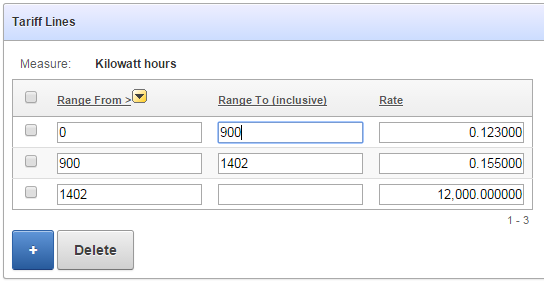
One way to get around this is to have two separate report regions on the page – one is the editable tabular report, the other is an ordinary standard report that doesn’t have any of the edit capabilities – and use conditions to hide one or the other depending on the user’s authorisation.
Another way is to use conditions and jQuery to make all the items in the tabular form readonly:
1. Put a condition on all the buttons (e.g. “Add Row”, “Delete”, “Save”, etc) so they are not shown if the user doesn’t have edit privilege
2. Put the same condition on the Multi-Row processes so that they will not run if the user doesn’t have edit privilege.
3. Set the static ID on the region so jquery can find it:

4. Add a Dynamic Action to make all the input items within that region disabled:
Event: Page Load
Authorization Scheme: {Not Editor} (this is just an example where I have an Authorization scheme called “Editor”; alternatively you could set a Condition instead)
True Action: Execute Javascript Code
$("#linesreport input, #linesreport select").prop("disabled",true)
Now, when the page loads, if the user doesn’t have edit privilege the items are rendered readonly, e.g.:
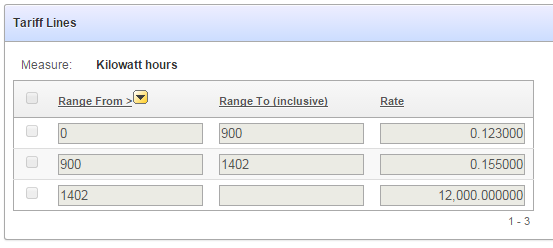
There are other variations on this theme, e.g. we could target the jQuery expression to just the text inputs while still allowing the user to use the checkboxes (e.g. if there was some action that we wanted to allow). Of course, if I wanted to hide the checkboxes completely, I’d just put the authorization on the [row selector] column in the tabular report definition.
I have a Tabular Report with an editable Amount item. When the page loads, the total amount should be shown below the report; and if the user updates any amount on any row, the total amount should be updated automatically.
Note: this method does not work if you have a tabular report that might have a very large number of records (as it relies on all records being rendered in the page at one time).
1. Make sure the report always shows all the records. To do this, set the Number of Rows and the Maximum Row Count to a large number (e.g. 1000).
2. Add an item to show the total, e.g. P1_TOTAL_AMOUNT. I use a Number field, and add “disabled=true” to the HTML Form Element Attributes so that the user won’t change it.
3. Examine the generated HTML to see what ID is given to the amount fields in the tabular report. In my case, the amount field is rendered with input items with name “f04” and id “f04_0001”, “f04_0002”, etc.
4. Add the following code to the page’s Function and Global Variable Declaration:
function UpdateTotal () {
  var t = 0;
  $("input[name='f04']").each(function() {
    t += parseFloat($(this).val().replace(/,/g,''))||0;
  });
  $s("P1_TOTAL_AMOUNT",t.formatMoney());
}
This strips out any commas from the amounts before parsing them as Floats and adding them to a running total; it finally formats the total using my formatMoney function and updates the total amount item.
5. Add the following to the page’s Execute when Page Loads:
$("input[name='f04']").change(function(){UpdateTotal();});
To prime the total amount field when the page is loaded, I have a Before Header process that calculates the total based on a simple query on the table.
Now, in my case I want to have two running totals: one for “Cash” lines and another for “Salary” lines. My tabular report renders a radio button on each record which the user can select “Cash” or “Salary”. So instead of just the one total amount field, I have two: P1_TOTAL_CASH and P1_TOTAL_SALARY. The radio buttons have hidden input items with the value, rendered with id “f05_nnnn” (where nnnn is the row number).
My UpdateTotal function therefore looks like this:
function UpdateTotals () {
  var sal = 0, cash = 0, amt, rownum, linetype;
  $("input[name='f04']").each(function() {
    amt = parseFloat($(this).val().replace(/,/g,''))||0;
    // determine if this is a Cash or Salary line
    rownum = $(this).prop("id").split("_")[1];
    linetype = $("input[id='f05_"+rownum+"']").val();
    if (linetype == "SALARY") {
      sal += amt;
    } else if (linetype == "CASH") {
      cash += amt;
    }
  });
  $s("P52_TOTAL_SALARY",sal.formatMoney());
  $s("P52_TOTAL_CASH",cash.formatMoney());
}
And my Execute when Page Loads has an additional call:
$("input[name='f05']").change(function(){UpdateTotals();});
Now, when the user changes the amounts or changes the line type, the totals are updated dynamically.
EDIT: simplified jquery selectors based on Tom’s feedback (see comments) and use the hidden field for the radio buttons instead of querying for “checked”
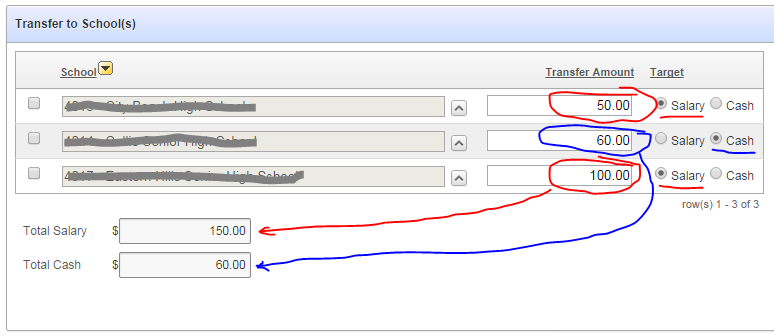
UPDATE: If the tabular form has an “Add Row” button, the above code won’t work on the newly added rows. In this case, the Execute when Page Load should be this instead:
$(document).on("change", "input[name='f05']", function(){UpdateTotals();});
I have a standard tabular report with checkboxes on each row, and a multi-record delete button called MULTI_ROW_DELETE.
If the user clicks the button before selecting any records (or if there are no records), they get an error message. Instead, I’d rather hide the button and only show it when they have selected one or more records.
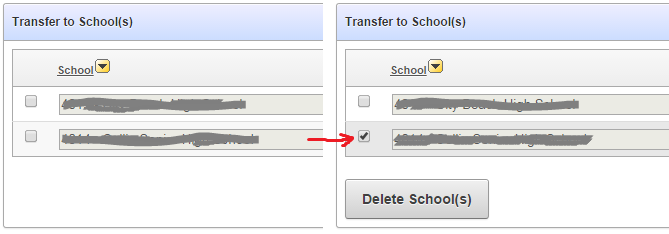
To do this:
1. Edit the MULTI_ROW_DELETE button to have a Static ID (e.g. “MULTI_ROW_DELETE”).
2. Add this function to the page’s Function and Global Variable Declaration:
function ShowHideMultiRowDelete () {
  if ($("input[id^='f01_']:checked").length==0) {
    $x_Hide("MULTI_ROW_DELETE");
  } else {
    $x_Show("MULTI_ROW_DELETE");
  }
}
This looks to see if there are any checkboxes selected, if none are found it hides the delete button, otherwise it shows it.
3. Add this code to the page’s Execute when Page Loads:
ShowHideMultiRowDelete();
$("input[id^='f01_']").change(function(){ShowHideMultiRowDelete();});
$x_Hide("check-all-rows");
This does the initial check on form load (i.e. it initially hides the button, since none of the checkboxes will be selected yet), and adds a listener to the checkboxes so that if any of them are changed, the function is re-run to show or hide the button as needed.
Unfortunately this doesn’t work with the “all rows” checkbox that was generated by the tabular report, so I’ve added a step to hide that checkbox (“check-all-rows”) until I can find a solution for that.
I want to visually enable/disable certain items in each row of a tabular form depending on the value of another item in that row. I’m using APEX 4.1.
My tabular form has a number of editable fields representing budgets. Each line might be an Annual budget (AMOUNT_TYPE = ‘YEAR’) with a single amount for the year, or a Monthly budget (AMOUNT_TYPE = ‘MONTH’) with separate amounts for each of the twelve months.
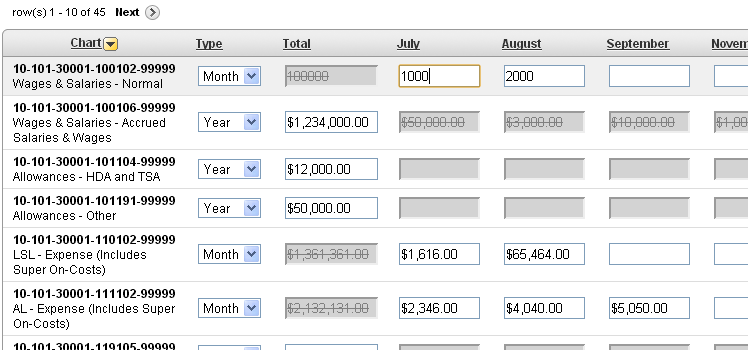
The first editable item (internal id f02) is AMOUNT_TYPE which is a Select List with an LOV. The second editable item (internal id f03) is the Annual Amount and should only be enabled if AMOUNT_TYPE = ‘YEAR’. The 3rd, 4th … 14th items (internal ids f04..f15) are the Monthly Amounts and should only be enabled if AMOUNT_TYPE = ‘MONTH’.
To do this:
1. Define a visual style to be applied to items that are disabled.
Add this to the Page’s “HTML Header” attribute:
<style>
.textinputdisabled {
  color:grey;
  background-color:lightgrey;
  text-decoration:line-through;
}
</style>
In this instance, I’ve set the background color to a light grey, the text color to darker grey, and I’ve added a strikethrough effect.
2. Set the class on the AMOUNT_TYPE item
Edit the Column Attributes on the AMOUNT_TYPE column, set Element Attributes to:
class="typeselect"
3. Define the Dynamic Action
Event = Change
Selection Type = jQuery Selector
jQuery Selector = .typeselect
Condition = – No Condition –
True Action = Execute JavaScript Code
Fire On Page Load = yes
Code =
row_id = $(this.triggeringElement ).attr('id').substr(4);
if( $(this.triggeringElement ).val() == 'MONTH')
{
  $( "#f03_" + row_id ).prop( 'readOnly', 'readonly');
  $( "#f03_" + row_id ).prop( 'class', 'textinputdisabled');
  for (var i=4;i<16;i++)
  {
    column_id = ("0" + i).slice(-2);
    $( "#f" + column_id + "_" + row_id ).prop( 'readOnly', false);
    $( "#f" + column_id + "_" + row_id ).prop( 'class', false);
  }
}
else
{
  $( "#f03_" + row_id ).prop( 'readOnly', false);
  $( "#f03_" + row_id ).prop( 'class', false);
  for (var i=4;i<16;i++)
  {
    column_id = ("0" + i).slice(-2);
    $( "#f" + column_id + "_" + row_id ).prop( 'readOnly', 'readonly');
    $( "#f" + column_id + "_" + row_id ).prop( 'class', 'textinputdisabled');
  }
}
The above code first determines the id for the row; $(this.triggeringElement).attr(‘id’) returns ‘f02_nnnn’ where nnnn is the row number left-padded with zeroes. For Oracle peeps, substr(4) is equivalent to SUBSTR(x,5).
If the value of the triggering item is MONTH, we want to disable the Annual amount item and re-enable (in case they were previously disabled) the Month amount items. And vice-versa.
To disable an item, we set the readOnly property (note the capital O: this is case sensitive!) to the value “readonly” (all lowercase); this makes it so that the user cannot modify the value in the field. Note that we don’t set the “disabled” property because that would stop the item being posted to the database, which will break the tabular form processing.
Side Note: at first, I was using the .attr and .removeAttr jquery functions to set/unset readOnly as per some notes I’d found on the web; this worked for Chrome, but it made all the items permanently read-only in IE7; after some googling I found this is a feature, not a bug; and that .prop is the correct function to use in this instance.
We also set the class to the CSS style we defined earlier.
Because I have 12 items in a row to modify, I use a Javascript loop. The expression to generate the column id (“0” + i).slice(-2) does the same job as the Oracle expression TO_CHAR(i, ‘fm00’).
Next, I want to enhance this page further, so that when the user is entering monthly amounts, the Total field automatically calculates the sum of all the months (while still saving the original annual amount, if any, on the database). I had to get outside help [stackoverflow] to get this working.
UPDATE (31/7/2015): to make this work if the tabular form has an “Add Row” button, you need to use a jquery “on” event handler instead of using the Dynamic Action, and refer to the item using just “this” instead of “this.triggeringElement”, e.g. put this into the forms Execute when Page Loads:
$(document).on("change", ".typeselect", function(){
 row_id = $(this).attr('id').substr(4);
 ... etc. ...
});


