I needed a table that could only ever have one row – if anyone tried to insert a second row they’d get an error.
CREATE UNIQUE INDEX only_one_row_allowed ON mytable (1);
Testing it:
 INSERT INTO mytable VALUES ('x');

ORA-00001: unique constraint (SCOTT.ONLY_ONE_ROW_ALLOWED) violated
Recently I had a bit of a saga with a public-facing website running on Oracle APEX (www.foothillschurch.org.au, if you’re curious) getting hammered by Googlebot. We went live with a new version of the site, but I’d forgotten to make sure that all the links set the Session ID to 0 (zero).
What is this session ID?
Every visit to an APEX application needs to have a session. Each unique session is recorded in the database, and keeps track of the state of all the variables for the various pages you visit. Normally, the session is identified by a Session ID which is embedded in the “p” parameter of the URL.
For example, if you visit the page:
http://www.foothillschurch.org.au/apex/f?p=102:1
You’ll notice that the “p” parameter only specifies the app ID (102) and the page ID (1). What apex does is responds with a 302 temporary redirect, that tells the client to redirect to a new URL containing a newly generated session ID, e.g.:
http://www.foothillschurch.org.au/apex/f?p=102:1:45164531548964:::::
Behind the scenes, it’s not just changing the URL – it’s also sending a cookie to the client to be used for subsequent calls. I’ll get back to this later.
Whenever you navigate around a normal apex site, the session ID gets copied into each link so that the user’s session is preserved. If you manually change or remove the session ID from the URL, apex will redirect you to a newly created session ID.
In case you’re wondering, there’s no significant security risk behind the exposed session ID – no-one can “hijack” your session, even if they copy your session ID directly. That’s because there’s a cookie behind the scenes with a secret value that must match up with the session ID, and only someone with sufficient access to the database server could get enough data to do that.
If you store the URL containing a session ID (e.g. in your bookmarks) and re-use it much later, your session will have expired – in which case APEX will create a new session, and 302 temporary redirect you to a new URL with the new session ID. Therefore, users can safely bookmark any page in apex.
But now we come, finally, to Googlebot, that little rascal. Now, we would like our public-facing site to be indexed by Google, so we need all the pages of the site that have relevant info to be crawlable.
The way Googlebot works, normally, is that it starts from a link to your page (e.g. on another website, or in a sitemap you submit to Google), e.g.
http://www.foothillschurch.org.au/apex/f?p=102:1
It checks that the URL is not forbidden by your robots.txt, and sends a request to your server for it. If the response is 200 OK and has a body, Googlebot indexes the page contents, extracts any links from it, and crawls them. Actually, it doesn’t crawl them straight away – it just adds them onto the end of a queue somewhere to be crawled later.
If the response is a 4xx (permanent error) or 5xx (temporary error), Googlebot seems to put the URL back on the queue for a few more goes before it gives up.
If the response is a 3xx redirect, and this is the kicker, Googlebot does not always perform the redirect straight away. It may take the new URL and just add it onto the end of the queue to be crawled later. It seems to me (based on what I’ve seen in my apache logs) that if the URL is different from the first, Googlebot will queue it up for later; but if the URL is identical, it will usually try it straight away.
You may see the problem here: Googlebot visits:
http://www.foothillschurch.org.au/apex/f?p=102:1
Our site creates a session, and responds with a 302 temporary redirect to:
http://www.foothillschurch.org.au/apex/f?p=102:1:48327482923832:::::
Googlebot dutifully notes this new URL and queues it up to crawl later. Meanwhile, our server is waiting patiently for it to get back, but it never does – so the session automatically expires. Much later, Googlebot visits:
http://www.foothillschurch.org.au/apex/f?p=102:1:48327482923832:::::
Our site sees the expired session, creates a new one, and responds with another 302 temporary redirect to:
http://www.foothillschurch.org.au/apex/f?p=102:1:9783829383342:::::
Googlebot dutifully notes this new URL and queues it up to crawl later, etc. etc. etc. Also, it’s not even as benign as that: each URL is not tried just once, but many many times (depending on what speed setting you’ve got the crawler on) – and every single time, our server responds with a brand-new, unique session ID. I hope you can now see why our little site crashed under the load – it quickly filled up the apache logs, it quickly filled up the debug logs in apex, and it quickly overflowed the poorly-configured archive log.
The way to solve this problem is to stop exposing these session IDs in the URL – and in Apex you can do that by setting the session ID to zero, e.g.:
http://www.foothillschurch.org.au/apex/f?p=CHURCH:1:0
Behind the scenes, Apex still creates a session, but whenever it generates a URL with #SESSION# it substitutes zero instead of the internal session ID. This method is great for people who wish to bookmark a page in an application that doesn’t require authentication. It also seems to work for the Googlebot crawler.
The above URL will still cause a 302 temporary redirect, however; apex will redirect it to:
http://www.foothillschurch.org.au/apex/f?p=CHURCH:1:0:::::
You might think that this final URL would stop the redirects, wouldn’t you? Well, it doesn’t. You can see what happens if you open this URL in Google Chrome in incognito mode. First, open an incognito window, then choose the Tools menu, Developer Tools. Select the Network tab. Then, paste the URL into the address bar and press Enter.
You will find that the first call to apex/f receives a 302 (temporary redirect). If you click this entry and choose Headers, you’d see something like this:
Request URL:http://www.foothillschurch.org.au/apex/f?p=CHURCH:1:0:::::
Request Method:GET
Status Code:302 Found
Request Headers:
Accept:text/html,application/xhtml+xml,application/xml;q=0.9,*/*;q=0.8
Accept-Charset:ISO-8859-1,utf-8;q=0.7,*;q=0.3
Accept-Encoding:gzip,deflate,sdch
Accept-Language:en-US,en;q=0.8
Connection:keep-alive
Host:www.foothillschurch.org.au
User-Agent:Mozilla/5.0 (Windows NT 6.1; WOW64) AppleWebKit/535.1 (KHTML, like Gecko) Chrome/14.0.835.187 Safari/535.1
Response Headers:
Cache-Control:max-age=0
Connection:Keep-Alive
Content-Length:0
Content-Type:text/html; charset=UTF-8
Date:Thu, 06 Oct 2011 22:54:10 GMT
Expires:Thu, 06 Oct 2011 22:54:10 GMT
Keep-Alive:timeout=10, max=100
Location:f?p=CHURCH:1:0:::::
Server:Oracle XML DB/Oracle Database
Set-Cookie:WWV_CUSTOM-F_5238514445419534_102=D6E147387BD4C9DA
WWV_PUBLIC_SESSION_102=2140144576372238
X-DB-Content-length:0
Notice that the request sent no cookies, and the response was a 302 including some cookies (WWV_CUSTOM-F_blablabla and WWV_PUBLIC_SESSION_102).
If you click on the next line (the second call to apex/f) and look at the Headers view, you’ll see this interaction instead:
Request URL:http://www.foothillschurch.org.au/apex/f?p=CHURCH:1:0:::::
Request Method:GET
Status Code:200 OK
Request Headers:
Accept:text/html,application/xhtml+xml,application/xml;q=0.9,*/*;q=0.8
Accept-Charset:ISO-8859-1,utf-8;q=0.7,*;q=0.3
Accept-Encoding:gzip,deflate,sdch
Accept-Language:en-US,en;q=0.8
Connection:keep-alive
Cookie:WWV_CUSTOM-F_5238514445419534_102=D6E147387BD4C9DA; WWV_PUBLIC_SESSION_102=2140144576372238
Host:www.foothillschurch.org.au
User-Agent:Mozilla/5.0 (Windows NT 6.1; WOW64) AppleWebKit/535.1 (KHTML, like Gecko) Chrome/14.0.835.187 Safari/535.1
Response Headers:
Cache-Control:max-age=0
Connection:Keep-Alive
Content-Type:text/html; charset=UTF-8
Date:Thu, 06 Oct 2011 22:54:10 GMT
Expires:Thu, 06 Oct 2011 22:54:10 GMT
Keep-Alive:timeout=10, max=99
Server:Oracle XML DB/Oracle Database
Transfer-Encoding:chunked
X-DB-Content-length:11291
This time, the request included the cookies, and the apex engine matched them against a valid and current session; so it responds with the desired 200 (OK) response and the body of the web page.
Gradually, as I was working all this out, I fixed individual problems one by one – turning off debug mode in the application, setting the crawler to a slower speed, and fixing the archive logging. I also added a rel=canonical link in the header of every page. However, the root cause was these URLs being tried by Googlebot, which were quickly escalating as time went by. I didn’t want to use robots.txt to stop it completely, although that might be a valid solution for some cases, because that would remove our Google listing.
I raised a question on the Google webmaster forum to see if there was some way to remove all these URLs from the Googlebot queue that had session IDs. The only way to remove URLs is to (a) add them to your robots.txt, and (b) submit individual URLs to be removed via Google webmaster tools.
In the end, with some help some contributors to the forum, I worked out how to set up Apache to stop these session IDs in their tracks, by doing a 301 (permanent redirect) to a URL with a 0 (zero) session ID. The magic words, added to my apache conf file, were:
RewriteCond %{QUERY_STRING} ^p=102:([a-z0-9]*):([0-9]*):(.*)$ [NC,OR]
RewriteCond %{QUERY_STRING} ^p=CHURCH:([a-z0-9]*):([1-9][0-9]*):(.*)$ [NC]
RewriteRule /apex/f /apex/f?p=CHURCH:%1:0:%3 [R=permanent,L]
What these do is look for any URL with a parameter p where the app ID is 102 or “CHURCH”, and redirects to a new URL that is identical except that it uses the app alias (CHURCH) and sets the session ID to 0.
Breaking it down:
RewriteCond introduces a condition for the following RewriteRule. It’s like an “IF” test.
%{QUERY_STRING} means we want to test the query string (i.e. the part of the URL following the ?).
^p=102:([a-z0-9]*):([0-9]*):(.*)$ this is the regular expression that is used to test for a match. In this case, it is looking for a query string that starts with “p=102:“, followed by a string of letters or digits (the page ID or alias), followed by “:“, followed by a string of digits (the session ID), followed by “:“, and ending with any string of characters. The parts in parentheses – i.e. ([a-z0-9]*) and ([0-9]*) and (.*) will be available for later reuse as substitution variables %1, %2 and %3.
^p=CHURCH:([a-z0-9]*):([1-9][0-9]*):(.*)$ is a similar regular expression, with a slightly different rule for the middle part (the session ID) – it only matches where the session ID is not zero – ([1-9][0-9]*) only matches a string of digits that starts with 1-9. This is because we don’t want our rewrite rule triggering if the app alias is already “CHURCH” and the session ID is already zero.
[NC] “not case sensitive” flag – so that “church” and “Church” will match as well.
[OR] “OR” flag – the condition should be “OR”-ed with the following condition. If either of the RewriteCond directives match, then we want to use the same RewriteRule.
RewriteRule directs the engine to modify the request URI.
/apex/f identifies the part of the request to be rewritten.
/apex/f?p=CHURCH:%1:0:%3 is the rewritten URL. %1 and %3 extract the page ID/alias, and the part of the query string following the session ID, respectively.
[R=permanent] “Redirect” flag – by default this would do a 302 (temporary) redirect, but we have specified “permanent” so that it will do a 301 permanent redirect.
[L] “Last” flag – no further rewrite rules (if any) should be applied.
It works! Everything is now back to sane levels, and I can now enjoy life.
UPDATE Oct 2020
Introduced in APEX 20.1 is the new Friendly URLs option which changes things a lot for this topic – Friendly URLs on a public page no longer require a session ID.
If the page is public and the URL has no session parameter, APEX immediately returns a 200 OK response with the page – which is perfect for Googlebot.
This is just in case you come across this. It appears to be an Oracle bug. I don’t know if it’s been fixed in a later release. I haven’t isolated a simple repeatable test case yet, so I don’t know if the scenario here includes all the relevant details or not.
Version: Oracle Database 11g Enterprise Edition Release 11.2.0.1.0 – 64bit Production
Scenario:
- MERGE into a table that has one or more virtual columns.
- The MERGE statement has a “LOG ERRORS” clause.
- The error log table is a standard one created using DBMS_ERRLOG.create_error_log.
Other factors that may or may not be involved are:
- the target table is in a different schema
- the merge statement queries another table with the same name in the current schema
- the merge statement includes WHEN MATCHED THEN UPDATE, DELETE WHERE, WHEN NOT MATCHED THEN INSERT cluases
- the merge statement has a WHERE clause on the WHEN NOT MATCHED clause
Result:
ORA-03113: end-of-file on communication channel and/or ORA-03114: not connected to ORACLE
This happens whether the MERGE is executed or just explain-plan’ed – so it shouldn’t be related to the actual data in either the source or destination tables.
Workaround:
After creating the log table, but before the merge, drop the columns from the error log that are virtual columns in the target table.
It starts out as a fairly simple, innocent business requirement. Create a report to list records meeting some criteria, one of which is:
“List only records where today’s date is more than 35 business days after the due date from the record.”
When you delve deeper you find that querying the table with “DUE_DATE + 35 < SYSDATE” is not going to cut it – “business days” do not include weekends. You might start with something similar to this. But even that’s not good enough, because business days should not include public holidays. How do you code that?
So, here’s my solution.
1. We need to know what days are public holidays for the region. In our case this application is only applicable for a single region, so we use a simple table:
CREATE TABLE holidays (holiday_date DATE PRIMARY KEY);
We create a simple form for users to enter new holidays every year, and give someone the job of making sure it’s up-to-date every year when the public holidays are announced.
2. Create a view that lists all non-business days – i.e. list all weekends and public holidays. To retain reasonable performance, we limit our solution to dates in the years 2000 to 2050.
CREATE VIEW non_business_days AS
SELECT TO_DATE('01012000','DDMMYYYY') + ROWNUM * 7
       AS day -- Saturdays 2000 to 2050
FROM DUAL CONNECT BY LEVEL <= 2661
UNION ALL
SELECT to_date('02012000','DDMMYYYY') + ROWNUM * 7
       AS day -- Sundays 2000 to 2050
FROM DUAL CONNECT BY LEVEL <= 2661
UNION ALL
SELECT holiday_date FROM holidays;
3. Now, when we need to take a date and add x business days to it, we query this table to find all the non-business-days that are applicable, e.g.:
SELECT day
      ,COUNT(*) OVER (ORDER BY day
                      ROWS BETWEEN UNBOUNDED PRECEDING
                      AND CURRENT ROW)
       AS count_so_far
      ,(day - p_date) AS base_days
FROM   NON_BUSINESS_DAYS
WHERE  day > p_date;
If you run this query and examine each row in order of day, if you take base_days and subtract count_so_far, when the result is less than x, then base_days – count_so_far is the number of extra days we need to add to the holiday’s date to give us the answer. You’ll find this logic in the function below.
In our final solution, we’ll also need to UNION in the date parameter as well, for the case where there are no holidays between the starting date and the number of business days requested.
Here’s our function to take any date (at least, any date between 2000 and 2050) and add x business days (positive or negative):
FUNCTION add_working_days (p_date IN DATE, p_working_days IN NUMBER)
RETURN DATE IS
  l_date DATE;
BEGIN

  IF p_date IS NULL OR p_working_days IS NULL THEN
    RETURN NULL;
  END IF;

  IF p_working_days != TRUNC(p_working_days) THEN
    RAISE_APPLICATION_ERROR(-20000,
      'add_working_days: cannot handle fractional p_working_days ('
      || p_working_days || ')');
  END IF;

  IF p_working_days > 0 THEN

    SELECT MAX(day + p_working_days - (base_days - count_so_far))
    INTO l_date
    FROM (SELECT day
                ,COUNT(*) OVER (ORDER BY day
                                ROWS BETWEEN UNBOUNDED PRECEDING
                                AND CURRENT ROW)
                 AS count_so_far
                ,(day - p_date) AS base_days
          FROM NON_BUSINESS_DAYS
          WHERE day > p_date
          UNION
          SELECT p_date, 0, 0 FROM DUAL
         )
    WHERE base_days - count_so_far < p_working_days;

  ELSIF p_working_days < 0 THEN

    SELECT MIN(day - (ABS(p_working_days) - (base_days - count_so_far)))
    INTO l_date
    FROM (SELECT day
                ,COUNT(*) OVER (ORDER BY day DESC
                                ROWS BETWEEN UNBOUNDED PRECEDING
                                AND CURRENT ROW)
                 AS count_so_far
                ,(p_date - day) AS base_days
          FROM NON_BUSINESS_DAYS
          WHERE day < p_date
          UNION
          SELECT p_date, 0, 0 FROM DUAL
         )
    WHERE base_days - count_so_far < ABS(p_working_days);

  ELSE

    l_date := p_date;

  END IF;

  RETURN l_date;
END add_working_days;
Test cases (these are some public holidays in Western Australia):
insert into holidays values (to_date('27/12/2010','DD/MM/YYYY');
insert into holidays values (to_date('28/12/2010','DD/MM/YYYY');
insert into holidays values (to_date('03/01/2011','DD/MM/YYYY');
insert into holidays values (to_date('26/01/2011','DD/MM/YYYY');
— Expected: 06/01/2011
select cls_util.add_working_days(to_date('13/12/2010','DD/MM/YYYY')
                                ,15) from dual;
— Expected: 31/01/2011
select cls_util.add_working_days(to_date('25/01/2011','DD/MM/YYYY')
                                ,3) from dual;
— Expected: 13/12/2010
select cls_util.add_working_days(to_date('06/01/2011','DD/MM/YYYY')
                                ,-15) from dual;
— Expected: 25/01/2011
select cls_util.add_working_days(to_date('31/01/2011','DD/MM/YYYY')
                                ,-3) from dual;
For a long time my disaster recovery procedure for my Amazon EC2-based web site was:
- Find an Oracle AMI that has 10g XE with APEX pre-installed, and start up an instance with it.
- Create a volume from a backup snapshot and attach it to the new instance.
- Log into the instance, shut down apache and oracle, then delete all the oracle data files, apache config files, and a few other bits and pieces.
- Create symbolic links for the deleted bits and pieces (including the oracle data files) that point to the attached volume.
- Start up oracle and apache and test.
- Switch the elastic IP over to the new instance.
This procedure has been tested and retested multiple times, and came in useful once when I almost lost the site (actually, it just went unresponsive due to some general problems at Amazon, but at the time I thought it’d had gone down).
Last week I logged in to the AWS Management Console to do a routine backup-and-restore test, but discovered a problem: it couldn’t find the Oracle 10g XE AMI. Searches on the image ID and various keywords, across all the Amazon regions, returned no results. Searches on “oracle” brought back a number of options but none of them close to what I required. I enquired with Amazon and they responded that the AMIs are supplied by Oracle and had been removed. I discovered this meant that not only could I not start up an instance using one of these images, I also couldn’t point to my running instance and “start up another like this” – because this requires access to the original AMI that was used to start it.
The machine image which I was trying to find is (at least, as of today 5 Jul 2011) still referred to here: http://aws.amazon.com/amis/Oracle/1720 “Oracle Database 10g Release 2 Express Edition – 32 Bit” so I raised a question on the oracle forum (http://forums.oracle.com/forums/thread.jspa?messageID=9707298�) and sent an email to Bill Hodak at Oracle who was named in the description of the AMI. He replied he would see if he could find out what had happened to it.
At this point I was hoping that my running instance wouldn’t go down, because I didn’t know if I’d be able to restore from backup. My backup consisted solely of snapshots of just the data – the rest of the OS was supposed to be provided by the AMI.
Meanwhile, asam replied to my oracle forum thread, suggesting I create my own AMI. A bit of googling yielded this result, which proved very helpful: http://webkist.wordpress.com/2010/03/16/creating-an-amazon-ec2-ebs-ami-from-a-running-instance/ “Creating an Amazon EC2 EBS AMI from a running instance”. I followed the instructions, slightly modified as follows:
- Use AWS Management Console to create a new volume
- Attach the volume to my running instance and mount it:
# mkdir /u03
# mount -t ext3 /dev/sdf /u03
- Move everything from the old volume so that it all sits under / again instead of via symbolic links
- Synchronize the filesystem to the new volume:
# rsync -a --delete --progress -x / /u03
- When rsync has completed, fix up the devices:
# MAKEDEV -d /u03/dev -x console
# MAKEDEV -d /u03/dev -x zero
# MAKEDEV -d /u03/dev -x null
- Unmount the volume:
# umount /u03
- Get the EC2 X.509 cert and private key from the “Security Credentials” area under “Account” in AWS Management Console.
- Download the Amazon EC2 API tools:
http://aws.amazon.com/developertools/351
- I needed java to run the API tools, so download the rpm:
jre-6u26-linux-i586.rpm – e.g. from http://www.oracle.com/technetwork/java/javase/downloads/jre-6u26-download-400751.html
- Upload the EC2 X.509 cert and private key, the Amazon EC2 API tools, and the java rpm to the instance. Unzip and install the API tools and the java rpm.
- Set up all the required environment variables (replace xxxwith the appropriate bits from the relevant file names):
# export EC2_CERT=/root/cert-xxx.pem
# export EC2_PRIVATE_KEY=/root/pk-xxx.pem
# export EC2_HOME=(path-to-ec2-stuff)
# export JAVA_HOME=(path-to-java-stuff)
# export PATH=$PATH:$EC2_HOME/bin
- Set up a symbolic link so that the EC2 tools can find java:
# ln -s (path-to-java-stuff) /usr/bin/java
- Back in the AWS Management Console, create a snapshot of the volume.
- In the instance, run this command (this is the only command you can’t do in the management console, which is what all that rigmarole about installing the API tools was all about):
# ec2-register --snapshot snap-xxx   --description "my ami description" --name "my ami name"
  --ramdisk ari-yyy --kernel aki-zzz   --region ap-southeast-1
You can get the snapshot, ramdisk and kernel identifiers from the AWS Management Console. (my instance was running in Singapore, so my region is ap-southeast-1)
- Back in AWS Management Console, I see my new AMI has been created. All I have to do now is select it, click Launch Instance, and a copy of my site is up and running.
I startup the database and see if it’s working. Unfortunately it isn’t – a bit more investigation revealed that the Oracle listener was not responding to requests. lsnrctl status reveals that it is still using the old internal IP address from the original instance – but this is a new instance with a different internal IP address.
To fix this, I edit listener.ora to correct the IP:
# cd /usr/lib/oracle/xe/app/oracle/product/10.2.0/server/network/admin
# chmod +w listener.ora
# vi listener.ora
The IP address is listed as the “Private IP Address” on the instance in AWS Management Console.
# lsnrctl start
After that, it’s all working – and very soon I will have a much simpler (and hopefully somewhat less reliant on the kindness of big corporations) disaster recovery process. I just need to work out the simplest way to restore the data from backup to the new instance. I’ll probably just create a new volume from a backup snapshot, attach it to the instance, and copy all the data across.
UPDATE: With an EBS-backed volume, I can now create a new AMI from the running instance whenever I want – it takes a complete snapshot of the instance, from which I can then create new instances. So my disaster recovery procedure is much simpler than it was before 🙂
 A particular table in our system is a M:M link table between Bonds and Payments, imaginatively named BOND_PAYMENTS; and to make the Java devs’ jobs easier it has a surrogate key, BOND_PAYMENT_ID. Its structure, therefore, is basically:
BOND_PAYMENTS
  (BOND_PAYMENT_ID,
   BOND_NUMBER,
   PAYMENT_ID)
This is a very simple design, quite common in relational database designs. There is a Primary key constraint on BOND_PAYMENT_ID, and we’ve also added a Unique constraint on (BOND_NUMBER, PAYMENT_ID) since it makes no sense to have more than one link between a Bond and a Payment.
The application allows a user to view all the Payments linked to a particular Bond; and it allows them to create new links, and delete existing links. Once they’ve made all their desired changes on the page, they hit “Save”, and Hibernate does its magic to run the required SQL on the database. Unfortunately, this was failing with ORA-00001: unique constraint violated.
Now, the way this page works is that it compares the old set of payments for the bond with the new target set, and Hibernate works out which records need to be deleted, which need to be inserted, and leaves the rest untouched. Unfortunately, in its infinite wisdom it does the INSERTs first, then it does the DELETEs. Apparently this order can’t be changed.
This is the cause of the unique constraint violation – if the user deletes a link to a payment, then changes their mind and re-inserts a link to the same payment, Hibernate quite happily tries to insert it then delete it. Since these inserts/deletes are running as separate SQL statements, Oracle validates the constraint immediately on the first insert.
We had only a few options:
- Make the constraint deferrable
- Remove the unique constraint
Option 2 was not very palatable, because the constraint provides excellent protection from nasty application bugs that might allow inconsistent data to be saved. We went with option 1.
ALTER TABLE bond_payments ADD
  CONSTRAINT bond_payment_uk UNIQUE (bond_number, payment_id)
  DEFERRABLE INITIALLY DEFERRED;
This solved it – and no changes required to the application. If a bug in the application were to cause it to try to insert a duplicate row, it will fail with ORA-02091 (transaction rolled back) and ORA-00001 (unique constraint violated) when the session COMMITs.
The only downside is that the index created to police this constraint is now a non-unique index, so may be somewhat less efficient for queries. We decided this is not as great a detriment for this particular case.
If you know of any other options that we should have considered, let me know 🙂
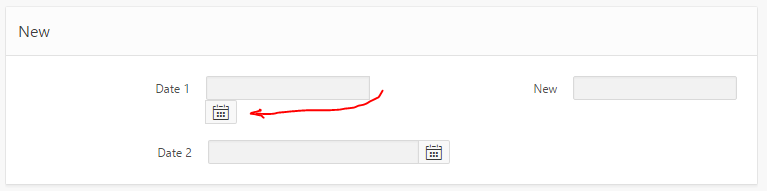
I was playing around with the layout of my APEX form, while at the same time upgrading the date items from the Classic date items to the new Date Picker items, and was rewarded with this:

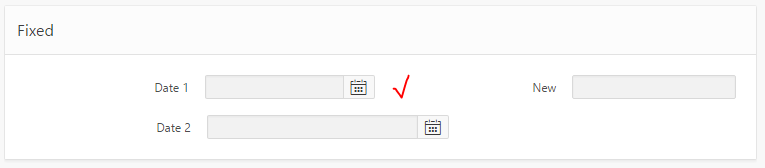
The simplest way to fix this is to edit the Item, specifically the HTML Table Cell Attributes – set to NOWRAP:

Viola, problem solved:

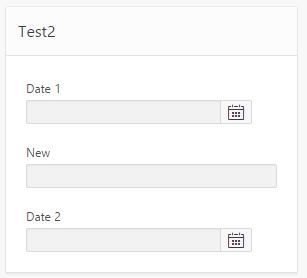
June 2016: Update for APEX 5 Universal Theme
I was alerted by Evandro Giachetto that the above solution does not work with the Universal Theme in APEX 5.
I had a go at trying to workaround it. I tried adding “white-space:nowrap” to various levels of divs around the item, which stopped it from wrapping the icon, but it kept hiding the icon behind the label div for the next item.
So through the magic of twitter we got a CSS solution proposed by Markus Hohloch:
.t-Form-inputContainer { white-space: nowrap; }
.ui-datepicker-trigger { right: 25px; }
This takes care of the wrapping, and fixes the problem with the icon being hidden. The only downside is that when the screen is very slim, this css causes a gap to be shown on the right-hand side of the icon; this is not too big a deal but I suspect with the right media query syntax that could be fixed as well.
My client has decided to design and build a completely new replacement system for an aging system running on Oracle Forms 6i on Oracle 8. The new system will have a web frontend, backed by Hibernate (don’t get me started) on top of an Oracle 11gR1 database. Crucially, due to changes to business practices and legislation, the new system has been designed “from scratch”, including a new data model.
My task is to write the ETL scripts which will take the data from the legacy database (an Oracle 8i schema), transform it to meet the requirements of the new model, and load it. If you’re looking at building scripts to transform data from one system to another, the method I used might be helpful for you too.
Making it more complicated is their desire that the data move be executed in two stages – (1) before the switch-over, transform and load all “historical” data; (2) at go-live, transform and load all “current” data, as well as any modifications to “historical” data.
Since the fundamental business being supported by this system hasn’t changed very much, the old and new data models have a lot in common – the differences between them are not very complex. In addition, the data volume is not that great (coming from someone who’s worked with terabyte-scale schemas) – the biggest table only had 2 million rows. For these reasons, the purchase of any specialised ETL tools was not considered. Instead, they asked me to write the ETL as scripts that can just be run on the database.
These scripts must be re-runnable: they should be able to be run without modification to pick up any changes in the legacy data, and automatically work out how to merge the changes into the new schema.
The first step for me was to analyse both data models, and work out a mapping for the data between them. The team for the project had a very good idea of what the tables in the new model meant (since they had designed it), but there was no-one available to me to explain how the old data model worked. It was down to me to learn how the legacy data model worked – by exploring it at the database level, examining the source for the forms and reports, and in some cases by talking to the users.
The outcome of this analysis was two spreadsheets: one was a list of every table and column in the legacy database, and the other was a list of every table and column in the new database. For each table in the legacy database, I recorded which table (or tables) the data would be migrated to in the new schema, or an explanation if the data could be safely disregarded. For each table in the new schema, I recorded which table (or tables) in the legacy database would feed into it. In the end, eleven of the tables in the new schema would be loaded.
Then, for each table in the legacy and new schemas, I worked through each column, identifying what it meant, and how it would be mapped from the old to the new. In some cases, the mapping was very 1:1 – perhaps some column names were different, or code values different, but relatively simple. In other cases, the mapping would require a more complex transformation, prehaps based on multiple tables. For example, both systems had a table named “ADDRESS” which stored street or postal addresses; in the old system, this table was a child table to the “PARTY” table; so PARTY was 1:M to ADDRESS. In the new model, however, there was a master “ADDRESS” table which was intended to store any particular address once and only once; the relationship of PARTY to ADDRESS is M:M. De-duplication of addresses hasn’t come up yet but it’s going to be fun when it does 🙂
Thankfully, in no cases was the mapping so complicated that I couldn’t envisage how it could be done using relatively simple SQL.
Once the spreadsheets were filled, I was finally able to start coding!
In order to meet the requirements, my scripts must:
- INSERT rows in the new tables based on any data in the source that hasn’t already been created in the destination
- UPDATE rows in the new tables based on any data in the source that has already been inserted in the destination
- DELETE rows in the new tables where the source data has been deleted
Now, instead of writing a whole lot of INSERT, UPDATE and DELETE statements, I thought “surely MERGE would be both faster and better” – and in fact, that has turned out to be the case. By writing all the transformations as MERGE statements, I’ve satisfied all the criteria, while also making my code very easily modified, updated, fixed and rerun. If I discover a bug or a change in requirements, I simply change the way the column is transformed in the MERGE statement, and re-run the statement. It then takes care of working out whether to insert, update or delete each row.
My next step was to design the architecture for my custom ETL solution. I went to the dba with the following design, which was approved and created for me:
- create two new schemas on the new 11g database: LEGACY and MIGRATE
- take a snapshot of all data in the legacy database, and load it as tables in the LEGACY schema
- grant read-only on all tables in LEGACY to MIGRATE
- grant CRUD on all tables in the target schema to MIGRATE.

All my scripts will run as the MIGRATE user. They will read the data from the LEGACY schema (without modifying) and load it into intermediary tables in the MIGRATE schema. Each intermediary table takes the structure of a target table, but adds additional columns based on the legacy data. This means that I can always map from legacy data to new data, and vice versa.
For example, in the legacy database we have a table:
LEGACY.BMS_PARTIES(
 par_id             NUMBER        PRIMARY KEY,
 par_domain         VARCHAR2(10)  NOT NULL,
 par_first_name     VARCHAR2(100) ,
 par_last_name      VARCHAR2(100),
 par_dob            DATE,
 par_business_name  VARCHAR2(250),
 created_by         VARCHAR2(30)  NOT NULL,
 creation_date      DATE          NOT NULL,
 last_updated_by    VARCHAR2(30),
 last_update_date   DATE)
In the new model, we have a new table that represents the same kind of information:
NEW.TBMS_PARTY(
 party_id           NUMBER(9)     PRIMARY KEY,
 party_type_code    VARCHAR2(10)  NOT NULL,
 first_name         VARCHAR2(50),
 surname            VARCHAR2(100),
 date_of_birth      DATE,
 business_name      VARCHAR2(300),
 db_created_by      VARCHAR2(50)  NOT NULL,
 db_created_on      DATE          DEFAULT SYSDATE NOT NULL,
 db_modified_by     VARCHAR2(50),
 db_modified_on     DATE,
 version_id         NUMBER(12)    DEFAULT 1 NOT NULL)
This was the simplest transformation you could possibly think of – the mapping from one to the other is 1:1, and the columns almost mean the same thing.
The solution scripts start by creating an intermediary table:
MIGRATE.TBMS_PARTY(
 old_par_id         NUMBER        PRIMARY KEY,
 party_id           NUMBER(9)     NOT NULL,
 party_type_code    VARCHAR2(10)  NOT NULL,
 first_name         VARCHAR2(50),
 surname            VARCHAR2(100),
 date_of_birth      DATE,
 business_name      VARCHAR2(300),
 db_created_by      VARCHAR2(50),
 db_created_on      DATE,
 db_modified_by     VARCHAR2(50),
 db_modified_on     DATE,
 deleted            CHAR(1))
You’ll notice that the intermediary table has the same columns of the new table (except for VERSION_ID, which will just be 1), along with the minimum necessary to link each row back to the source data – the primary key from the source table, PAR_ID.
You might also notice that there is no unique constraint on PARTY_ID – this is because we needed to do some merging and de-duplication on the party info. I won’t go into that here, but the outcome is that for a single PARTY_ID might be mapped from more than one OLD_PAR_ID.
The second step is the E and T parts of “ETL”: I query the legacy table, transform the data right there in the query, and insert it into the intermediary table. However, since I want to be able to re-run this script as often as I want, I wrote this as a MERGE statement:
MERGE INTO MIGRATE.TBMS_PARTY dest
USING (
  SELECT par_id            AS old_par_id,
         par_id            AS party_id,
         CASE par_domain
           WHEN 'P' THEN 'PE' /*Person*/
           WHEN 'O' THEN 'BU' /*Business*/
         END               AS party_type_code,
         par_first_name    AS first_name,
         par_last_name     AS surname,
         par_dob           AS date_of_birth,
         par_business_name AS business_name,
         created_by        AS db_created_by,
         creation_date     AS db_created_on,
         last_updated_by   AS db_modified_by,
         last_update_date  AS db_modified_on
  FROM   LEGACY.BMS_PARTIES s
  WHERE NOT EXISTS (
    SELECT null
    FROM   MIGRATE.TBMS_PARTY d
    WHERE  d.old_par_id = s.par_id
    AND    (d.db_modified_on = s.last_update_date
            OR (d.db_modified_on IS NULL
               AND s.last_update_date IS NULL))
    )
  ) src
ON (src.OLD_PAR_ID = dest.OLD_PAR_ID)
WHEN MATCHED THEN UPDATE SET
  party_id        = src.party_id        ,
  party_type_code = src.party_type_code ,
  first_name      = src.first_name      ,
  surname         = src.surname         ,
  date_of_birth   = src.date_of_birth   ,
  business_name   = src.business_name   ,
  db_created_by   = src.db_created_by   ,
  db_created_on   = src.db_created_on   ,
  db_modified_by  = src.db_modified_by  ,
  db_modified_on  = src.db_modified_on
WHEN NOT MATCHED THEN INSERT VALUES  (
  src.old_par_id      ,
  src.party_id        ,
  src.party_type_code ,
  src.first_name      ,
  src.surname         ,
  src.date_of_birth   ,
  src.business_name   ,
  src.db_created_by   ,
  src.db_created_on   ,
  src.db_modified_by  ,
  src.db_modified_on  ,
  NULL                );
You’ll notice that all the transformation logic happens right there in a single SELECT statement. This is an important part of how this system works – every transformation is defined in one place and one place only. If I need to change the logic for any column, all I have to do is update it in one place, and re-run the MERGE.
This is a simple example; for some of the tables, the SELECT statement is quite complex.
(Warning: you’ll note that I’ve omitted the column list from the INSERT clause; this can be dangerous if you’re not in complete control of the column order like I am for this particular table)
There is a follow-up UPDATE statement that for a couple of thousand records, changes the PARTY_ID to a different value; in effect, this performs the de-duplication.
Next, we look for any rows that have been deleted:
UPDATE MIGRATE.TBMS_PARTY dest
SET    deleted = 'Y'
WHERE  deleted IS NULL
AND    NOT EXISTS   (
  SELECT null
  FROM   LEGACY.BMS_PARTIES src
  WHERE  src.par_id = dest.old_par_id);
The idea is that the data in the MIGRATE table is *exactly* what we will insert, unmodified, into the target schema. In a year’s time, we could go back to this MIGRATE schema and see what we actually inserted when the system went live. In addition, we’ll be able to go back to the LEGACY schema and see exactly how the data looked in the old system; and we’ll be able to use tables like MIGRATE.TBMS_PARTY to map back-and-forth between the old and new systems.
The final stage of the process is the “L” of “ETL”. This, again, uses a MERGE statement:
MERGE INTO NEW.TBMS_PARTY dest
USING (
  SELECT *
  FROM   MIGRATE.TBMS_PARTY s
  WHERE  s.party_id = s.old_par_id /*i.e. not a duplicate*/
  AND    (s.deleted IS NOT NULL
          OR NOT EXISTS (
            SELECT null
            FROM   NEW.TBMS_PARTY d
            WHERE  d.party_id = s.party_id
            AND    (d.db_modified_on = s.db_modified_on
                    OR (d.db_modified_on IS NULL
                        AND s.db_modified_on IS NULL))
           ) )
  ) src
ON (src.party_id = dest.party_id)
WHEN MATCHED THEN UPDATE SET
  party_type_code = src.party_type_code ,
  first_name      = src.first_name      ,
  surname         = src.surname         ,
  date_of_birth   = src.date_of_birth   ,
  business_name   = src.business_name   ,
  db_created_by   = src.db_created_by   ,
  db_created_on   = src.db_created_on   ,
  db_modified_by  = src.db_modified_by  ,
  db_modified_on  = src.db_modified_on
DELETE WHERE (src.deleted IS NOT NULL)
WHEN NOT MATCHED THEN INSERT  (
  party_id        ,
  party_type_code ,
  first_name      ,
  surname         ,
  date_of_birth   ,
  business_name   ,
  db_created_by   ,
  db_created_on   ,
  db_modified_by  ,
  db_modified_on  )
VALUES  (
  src.party_type_code ,
  src.first_name      ,
  src.surname         ,
  src.date_of_birth   ,
  src.business_name   ,
  src.db_created_by   ,
  src.db_created_on   ,
  src.db_modified_by  ,
  src.db_modified_on  )
LOG ERRORS
INTO MIGRATE.ERR$_TBMS_PARTY
REJECT LIMIT UNLIMITED;
A few things to note here:
- The SELECT clause brings back each row from the intermediary table that has not been merged to a new record (by the way, those records are needed because they are used when transforming PAR_ID values in child tables) or that has not been modified since it was previously loaded.
- The MERGE inserts any new rows, updates all columns for modified rows, and deletes rows that have been marked for deletion.
- NO transformation of data happens here.
- If any data fails any validation, the MERGE logs the error and continues, using a table created using this:
BEGIN
DBMS_ERRLOG.create_error_log('NEW.TBMS_PARTY',
  err_log_table_name  => 'ERR$_TBMS_PARTY',
  err_log_table_owner => 'MIGRATE');
END;
I can then query this error table to see if there were any problems, e.g.:
SELECT ORA_ERR_OPTYP$, ORA_ERR_MESG$, COUNT(*)
FROM MIGRATE.ERR$_TBMS_PARTY
GROUP BY ORA_ERR_OPTYP$, ORA_ERR_MESG$;
A common issue is a failed check constraint, e.g. where the old system failed to validate something correctly. We’d then go back and either change the transformation to work around the problem, or send the data back to the business and ask them to fix it in the source.
Each stage of this ETL solution can be restarted and re-run. In fact, that’s what we will be doing; a few weeks prior to go-live, we’ll get a preliminary extract of the old system into the LEGACY schema, and run all my scripts. Then, at go-live, when the old system is taken down, we’ll wipe the LEGACY schema and refresh it from Prod. We will then re-run the scripts to take changes through.
All the scripts for each table had the same structure: one script to create the intermediary table; one script to do the merge into the intermediary table; and one script to merge into the final destination. With the exception of the SELECT statement in the first merge script, which differed greatly for each table, these scripts were very similar, so I started by generating them all. For this I used queries on the data dictionary to generate all the SELECT lists and x = y lists, and after a bit of work I had a complete set of ETL scripts which just needed me to go in and make up the SELECT statement for the transformation.
For this case, a relatively simple data migration problem, this method seems to have worked well. It, or a variation on it, might very well work for you too.
I’m building a very simple set of Oracle Forms for a customer who has very simple requirements. The form will allow one set of users to enter “payments”, which eventually get turned into requests for cheques to be sent out from the organisation. Each payment must go through an approval process – another set of users will open another form which will list all the payments that have been entered, select some or all of them and mark them as “Approved”.
To implement this design, I have one form which allows the users to enter the payment details; this form allows users to both insert new payments and update existing ones. Once a payment has been marked as “Approved”, they can only view but not edit them.
I’ve created a second form for the approvers, which lists all the payments that have not yet been approved, and gives them a simple checkbox. They tick any or all of the payments that they wish to approve, and click the “Approve” button. The button just sends an array of payment IDs to a database procedure which does a bulk update on the payments, setting their status as appropriate. Simple, right?
The one complication here is that this is a multi-user system, and it is quite likely that a users might try to update a payment at the same time as the approver is trying to mark them as approved. My first test of the forms indicated that this would cause a record locking issue:
In session #1, I open the payments form, query an existing payment, and start editing one of the fields. Oracle Forms automatically locks the record for update.
In session #2, I open the approvals form, tick the same payment, and click the “Approve” button. The form complains that it cannot reserve the record for update and the error logged is “FRM-40735 WHEN-BUTTON-PRESSED trigger raised unhandled exception ORA-04068.”
To solve this, I go to the checkbox item in the approvals form and add this code to the when-checkbox-changed trigger (the checkbox item is called PAYMENTS.SELECTED):
IF :PAYMENTS.SELECTED = 'Y' THEN
  LOCK_RECORD;
  IF NOT FORM_SUCCESS THEN
    :PAYMENTS.SELECTED := 'N';
    RAISE FORM_TRIGGER_FAILURE;
  END IF;
END IF;
Now, when the user tries to tick a payment that is currently locked, the LOCK_RECORD causes the form to attempt to lock the record. The “unable to reserve record for update” error still appears, after which the trigger un-ticks the record automatically.
If the approve gets to a payment first and ticks it, the record will now be locked until the form commits the status change; this ensures that other users cannot modify the record until the approver either approves the payment or cancels out of the form.
This is just a story about a really weird bit of code. It was the type of code you look at and say, “that’s obviously wrong” and delete straight away.
One of the requirements was to rebuild an Oracle form, a data-entry form for receipts (cash, cheque, credit card, etc). Some of the cashiers use these cheque readers to read the numbers off the MICR band, and with the first release of the new form they reported a defect – “the cheque readers don’t work”.
I didn’t have access to a cheque reader when I was developing the form, but assumed that it would be a normal cheque reader – they put the cheque in, it reads it, it sends a series of digits to the computer. The form should work no different than if the operator keyed in the numbers manually (which they have to do, anyway, if the cheque reader doesn’t work for a particular cheque).
So to investigate the defect I requisitioned a cheque reader, along with some test cheques; after some difficulty (turns out these things don’t work alongside my USB keyboard, I had to get a PS2 keyboard), it was working.
It didn’t take long to discover that the cheque reader was sending the cheque number and BSB in the wrong order, as far as the form is concerned; thus why the validation was failing.
I opened up the old form again, and had a good hard look at the fields. Turns out, what I missed originally is that there is a custom KEY-NEXT-ITEM trigger on the bank code field (which is where the operator puts the focus before using the cheque reader). It looks something like this:
DECLARE
  v_data VARCHAR2(50) := REPLACE(REPLACE(:rct.bak_code
                         ,' ','')
                         ,CHR(9),'');
BEGIN
  IF LENGTH(v_data) > 4 THEN
    IF LENGTH(v_data) < 14 THEN
       NULL;
    ELSE
      :rct.cheque_no := SUBSTR(v_data,1,6);
      :rct.bak_code := SUBSTR(v_data,7,3);
      :rct.branch := SUBSTR(v_data,10,3);
      go_field('RCT.CHEQUE_TYPE');
    END IF;
  ELSE
    go_field('RCT.BRANCH');
  END IF;
END;
It turns out that:
(a) the REPLACE(REPLACE( code to remove spaces and tab characters (CHR(9)) is redundant, since the cheque reader never sends spaces, and when it sends a TAB, Oracle Forms doesn’t put a CHR(9) into the field anyway; instead it fires the KEY-NEXT-ITEM trigger
(b) if the length of the data is between 5 and 13, the KEY-NEXT-ITEM trigger does nothing; which means the focus stays in the bak_code field
It’s (b) that is the reason this worked. The trigger fires three times when the cheque reader is used; the third time the trigger fires, it’s got enough digits lumped together in the bak_code field, which it then splits apart, and moves the relevant bits to the cheque_no and branch fields.
A normal, sane person, building this form, would have designed the form to accept the cheque number, bank code and branch in the same order that they are read from the cheque reader; that way, no special code is required – the cheque reader just tabs through the fields, filling them in as it goes.
Oh well – it’s too late to do a screen redesign now, so I’ve had to pretty much replicate the same behaviour in the new form; except that my new code is a little bit smarter – it can also read money orders, which I’ve been told will make the cashiers very happy.
