An application I maintain needed a checklist feature added. I wanted to show a “Yes / No” switch for a list of checklist items. Initially, when the record is created, the checklist is populated with the questions along with a NULL for the response.
I generated the switches in an ordinary Classic report using code like this:
select r.name as risk_category
      ,apex_item.switch
         (p_idx        => 10
         ,p_value      => i.response
         ,p_on_value   => 'Yes'
         ,p_on_label   => 'Yes'
         ,p_off_value  => 'No'
         ,p_off_label  => 'No'
         ,p_item_id    => 'RESPONSE_' || rownum
         ,p_item_label => i.risk_category_code || '-' || i.rci_fk
         ,p_attributes => 'data-risk="' || i.risk_category_code || '"'
         )
       ||apex_item.hidden(p_idx => 11, p_value => i.rci_fk)
       as response
      ,i.question_text
from supplier_risk_checklist_items i
join risk_categories r on r.code = i.risk_category_code
where i.sri_fk = :P10_ID
order by r.sort_order nulls last, i.sort_order nulls last, i.rci_fk
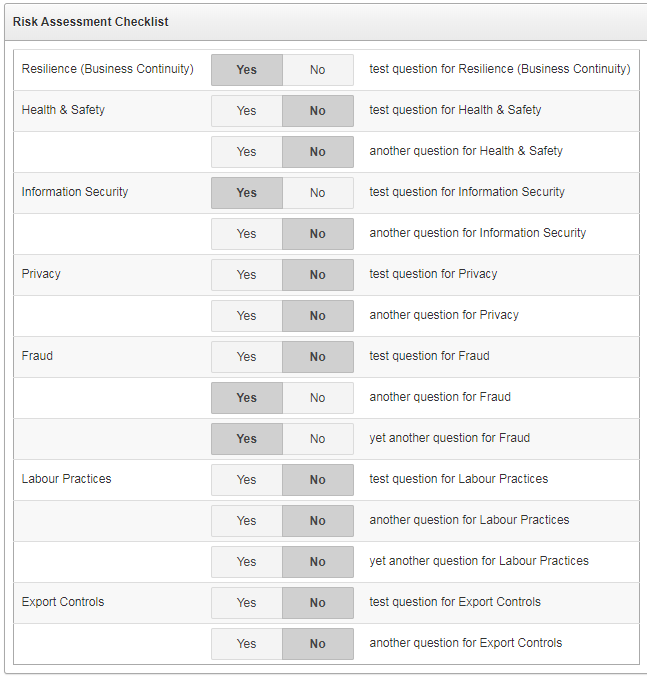
I’ve used p_idx values of 10 and 11 in order to avoid conflicting with another tabular report on this particular page. The “response” column in the report has CSS Classes set to responseSwitch (this becomes useful later when we want to write javascript targeting just these items and nothing else on the page) and its Escape special characters attribute is set to No. The report when run looks like this:
Some of the responses are “Yes”, some “No”, and some are NULL (unanswered).
The problem is that all the NULL responses are indistinguishable from the “No” responses. If the user clicks “Yes” or “No”, the response is saved correctly – but the user cannot tell which ones haven’t explicitly been answered yet.
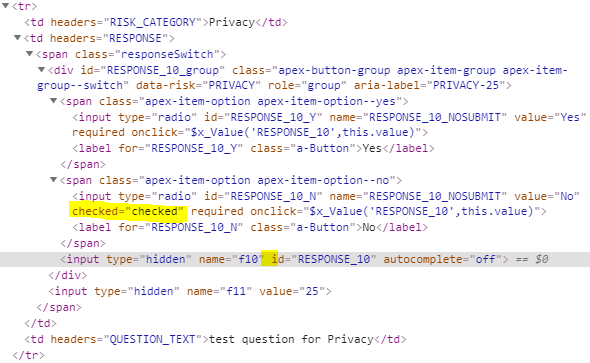
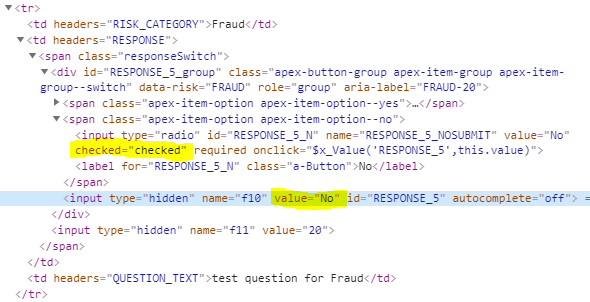
To find a solution for this issue I started by examining the HTML being generated for each question. I noticed that the input option for the “No” value was marked as “checked”, while the hidden input item had no “value” on it. These were the ones that needed fixing.
Example 1. Notice that the displayed radio button RESPONSE_10_N is “checked”, but the associated hidden input RESPONSE_10 has no value attribute.Example 2. In this example, the displayed radio button RESPONSE_5_N is “checked”, but that’s ok because the hidden input RESPONSE_5 has the value “No” – so we don’t want to change this one.
In the page’s Execute When Page Loads, I search for all instances of responseSwitch where the hidden input item does not have a value attribute; in each case, I find the associated input item that shows “No” and unset the “checked” property:
// workaround for generated switch items showing "No" when value is null
// search for the hidden input items without a value (i.e. null on the database)
$(".responseSwitch input[name='f10']:not([value])").each(function(i){
    var id = $(this).attr("id");
    // these will have "checked" on the "No" option; remove it
    $(".responseSwitch input#"+id+"_N").prop("checked",null);
});
This makes it clear to the user which checklist items have been answered so far, and which ones haven’t.
Note: the user is given no way to unset an answer once it has been saved; if this were a problem I would change this to use an ordinary Select list item instead of a Switch item.
Sometimes my customers need to be able to get a direct link to a record in their APEX application which they can share with others (e.g. to publish it on a website, or send by email to a colleague).
They don’t want people to be able to easily “guess” the link (so it needs to have some degree of randomness and complexity), but it’s not so sensitive that if someone somehow gets the link by mistake it won’t be cause for alarm. They would like to be able to invalidate the link at any time, so if they send the link and then decide they don’t want people viewing the record anymore, they can mark it as “expired”.
Task 1. Generate the link
We have a table to which we want to create links for each record. It already has a surrogate key called id based on a simple sequence, so on its own this is not suitable for our link (we don’t want users just adding 1 to the id and iterating through all values to look up other records). Add a column to the table with a unique constraint:
Update existing rows (if any) and make the column not null:
update mytable
set link_code = id || '-' || dbms_random.string('x',10)
where link_code is null;

alter mytable modify link_code not null;
Set its value using the following expression (e.g. this could be done in a page process, in your table API, or a table trigger):
create trigger bi_mytable before insert on mytable for each row
begin
  :new.link_code := :new.id || '-' || dbms_random.string('x',10);
end;
Note that the random string is more than likely to be unique for each record; but we prepend the unique ID as well which guarantees it to be unique. In addition, if a user sends us a link saying “this didn’t work”, we can visually parse it to see what the record ID was they were trying to access. This is needed because our design allows users to overwrite link_code (e.g. to expire the link).
Task 2. Build an APEX link page
Create a page (in my example, this will be page 100) to be the link resolver. It won’t have any complex regions or show any information, but will merely redirect the user to the page with the actual data (page 10, in my example).
Set it up as follows:
Alias: GO
Page Access Protection: Unrestricted
Region with title “Record not found”
Hidden item: P100_REF
Session State Protection: Unrestricted
Note: if the target page that shows the record is Public (i.e. the people getting the link cannot login to the application), this link resolver page will also need to be public – i.e. set Authentication to Page Is Public. On the other hand, if the target record is only available to authenticated users, the link resolver page should be restricted to authenticated users as well.
Add a PL/SQL Process that runs Before Header, with the following code:
declare
  l_id number;
begin

  select x.id into l_id
  from mytable x
  where x.link_code = :P100_REF;

  -- requires APEX 5.1 or later
  apex_util.redirect_url(
    apex_page.get_url
      (p_page        => 10
      ,p_clear_cache => 10
      ,p_items       => 'P10_ID'
      ,p_values      => l_id));

/*
  -- use this on APEX 5.0 or earlier
  apex_util.redirect_url(
    apex_util.prepare_url(
      p_url => 'f?p='
            || :APP_ID
            || ':10:'
            || :APP_SESSION
            || ':::10:P10_ID:'
            || l_id));
*/

exception
  when no_data_found then
    null;
end;
If the page gets a valid value for P100_REF, it will find the ID for the corresponding record and redirect the user to the page showing that record. If the link is invalid or expired, the page will not redirect but will show a “record not found” message.
Task 3. Show the link
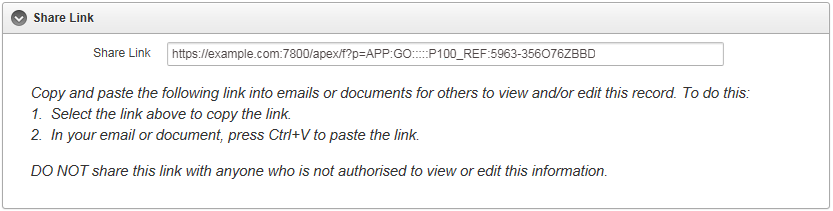
We show the generated link on a page with an ordinary Text item.
Create an item on the page with the following properties:
Name: P10_LINK
Custom Attributes (or HTML Form Element Attributes): readonly
Session State Protection: Unrestricted
We need to generate the link using the page’s domain name, which (at least in some cases) we don’t know ahead of time. To do this, we need to get the page’s URL including host, port and path.
Create a dynamic action on page load. Set its condition so it only fires if P10_LINK_CODE is not null (if it doesn’t already exist, create P10_LINK_CODE as a hidden item based on the database column LINK_CODE).
The dynamic action needs two True Actions – firstly, Execute Javascript:
This dynamic action constructs the link using the current window’s URL including path (which includes the trailing “/apex/f” or “/ords/f“) and query string (“?p=...“).
When the user clicks the item, we want it to automatically select the entire link and copy it to their clipboard. To show this has happened, we show the word “Copied” on the screen.
Create a Dynamic Action on the item – Event: Click
Users who are looking at the record get a “Share Link” in a convenient item that they can copy-and-paste into emails or web pages. If you need to expire a link, simple update the record with a new link_code and the old links will no longer work.
I wanted to use the “Cards” report template for a small report which lists file attachments. When the user clicks on one of the cards, the file should download and open in a new tab/window. Unfortunately, the Cards report template does not include a placeholder for extra attributes for the anchor tag, so it won’t let me add “target=_blank” like I would normally.
One solution is to edit the Cards template to add the extra placeholder; however, this means breaking the subscription from the universal theme.
As a workaround for this I’ve added a small bit of javascript to add the attribute after page load, and whenever the region is refreshed.
Set report static ID, e.g. “mycardsreport”
Add Dynamic Action:
Event = After Refresh
Selection Type = Region
Region = (the region)
Add True Action: Execute JavaScript Code
Code = $("#mycardsreport a.t-Card-wrap").attr("target","_blank");(replace the report static ID in the selector)
Fire On Page Load = Yes
Note: this code affects all cards in the chosen report.
A common APEX project is to take a customer’s existing spreadsheet-based solution and convert it more-or-less as is into APEX. I’ve got one going at the moment, a budgeting solution where users need to enter their budget requests. They currently enter their requests into an XLS template file which generates subtotals and totals for them.
To do this in APEX I’m going to use a tabular form, and to do the subtotals I’ll use jQuery in a way not too dissimilar to that I described earlier.
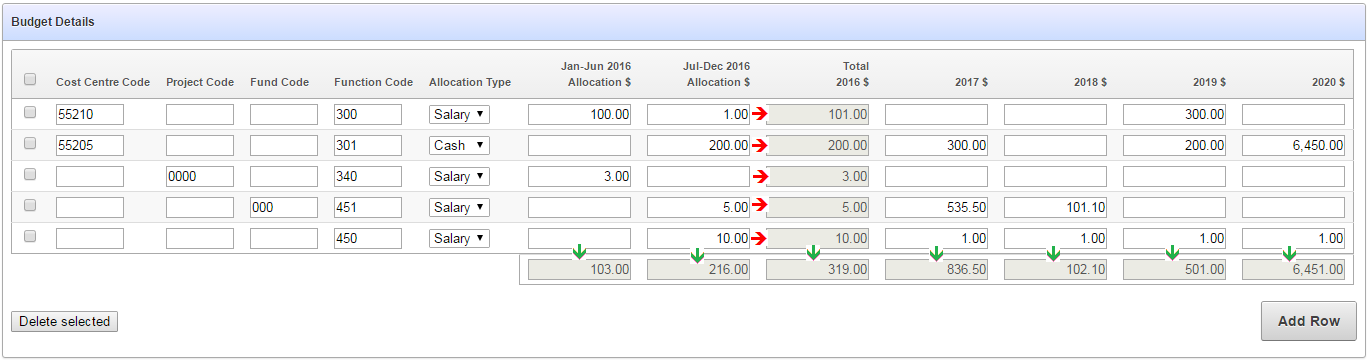
Here is a mockup of the screen so far:
There are column totals that need to be added up and updated dynamically (indicated by the green arrows) as well as subtotals within each row (indicated by the red arrows).
I started by looking at the generated items, getting their ids (e.g. “f09_0001” etc) and writing the jQuery code to detect changes, add them up, and put the totals in the relevant items. I then started repeating this code for each column, and thought “hmmm”.
There were two problems with this approach that I could foresee:
The generated ids in a tabular form can change if the structure of the query changes – e.g. what was f08 + f09 => f10 might change to f09 + f10 => f11
I was aware of another form that I would need to build, with a similar structure except that there will be two sets of “Jan-Jun” + “Jul-Dec” columns, each with their own subtotal.
I wanted a more declarative solution, so that the heavy lifting will be done in one set of generic javascript functions, and I simply need to put attributes in the relevant columns to activate them. This is how I’ve approached this:
Create the tabular form as usual (mine is based on an APEX Collection) and remove the standard DML processes, replaced with my own that calls APEX_COLLECTION instead.
Create a standard report that generates the total items by calling APEX_ITEM.text, with p_attributes=>'data-total="x"' (with a different “x” for each column, e.g. year1).
Set the Static ID on the tabular form region (e.g. tabularform).
Set Element Attributes on the Jan-Jun column to data-cell="year1" data-col="year1_jan_jun", similarly for the Jul_Dec column.
Set Element Attributes on all the Year columns in the tabular form to data-col="yearx", where x is 1..5.
Set Element Attributes on the total for the first year to data-subtotal="year1".
The following is the query for the totals report region:
select APEX_ITEM.text(1, TO_CHAR(SUM(year1_jan_jun),'FM999G999G999G999G990D00'), p_size=>10, p_maxlength=>2000,
       p_attributes=>'disabled=true class="edit_money" data-total="year1_jan_jun"') as year1_jan_jun
      ,APEX_ITEM.text(2, TO_CHAR(SUM(year1_jul_dec),'FM999G999G999G999G990D00'), p_size=>10, p_maxlength=>2000,
       p_attributes=>'disabled=true class="edit_money" data-total="year1_jul_dec"') as year1_jul_dec
      ,APEX_ITEM.text(3, TO_CHAR(SUM(year1_total),'FM999G999G999G999G990D00'), p_size=>10, p_maxlength=>2000,
       p_attributes=>'disabled=true class="edit_money" data-total="year1"') as year1_total
      ,APEX_ITEM.text(4, TO_CHAR(SUM(year2_total),'FM999G999G999G999G990D00'), p_size=>10, p_maxlength=>2000,
       p_attributes=>'disabled=true class="edit_money" data-total="year2"') as year2_total
      ,APEX_ITEM.text(5, TO_CHAR(SUM(year3_total),'FM999G999G999G999G990D00'), p_size=>10, p_maxlength=>2000,
       p_attributes=>'disabled=true class="edit_money" data-total="year3"') as year3_total
      ,APEX_ITEM.text(6, TO_CHAR(SUM(year4_total),'FM999G999G999G999G990D00'), p_size=>10, p_maxlength=>2000,
       p_attributes=>'disabled=true class="edit_money" data-total="year4"') as year4_total
      ,APEX_ITEM.text(7, TO_CHAR(SUM(year5_total),'FM999G999G999G999G990D00'), p_size=>10, p_maxlength=>2000,
       p_attributes=>'disabled=true class="edit_money" data-total="year5"') as year5_total
from budget_collection_vw
So, to summarise: all the data-cell items get totalled to the data-subtotal item in the same row; and all the data-col items get totalled to the data-total item below the tabular form.
To do all the hard work, I’ve added the following code to my page’s Function and Global Variable Declaration:
function getSum (qry) {
  //get the sum over all items matching the given jQuery search criterion
  var t = 0;
  $(qry).each(function() {
    t += parseFloat($(this).val().replace(/,/g,''))||0;
  });
  return t;
}

function updateSubTotal (item) {
  // update a row-level subtotal
  // the items to add up are identified by data-cell="x"
  // the item to show the total is identified by data-subtotal="x"
  var cell = $(item).data("cell") //get the data-cell attribute
     ,rn = $(item).prop("id").split("_")[1]
     ,t = getSum("input[data-cell='"+cell+"'][id$='_"+rn+"']");

  // we need to temporarily enable then disable the subtotal
  // item in order for the change event to fire
  $("input[data-subtotal="+cell+"][id$='_"+rn+"']")
    .val(t.formatMoney())
    .prop("disabled",false)
    .trigger("change")
    .prop("disabled",true);
}

function updateTotal (item) {
  // update a column total
  var col = $(item).data("col") //get the data-col attribute
     ,t = getSum("input[data-col='"+col+"']");

  $("input[data-total="+col+"]")
    .val(t.formatMoney())
    .trigger("change");
}
In case you’re wondering, I’m re-using the formatMoney function here.
There’s a number of things happening here. On page load, we add a listener for changes to any input item that has a data-cell attribute; this calls updateSubTotal, which detects the row number for the triggering item, adds up all the values for any input item that has the same data-cell value; and puts the total in the input item with a matching data-subtotal attribute.
We also have a listener for changes to any item with a data-col class; when these are changed, updateTotal adds up any item with the same attribute, and puts the total in an item with attribute data-total.
The jQuery selector [id$='_"+rn+"'] makes sure that the row-level code only finds items ending with the given row number (i.e. '*_0001').
The benefit of this declarative approach is that it is much easier to re-use and adapt.
EDIT: fixed the change trigger so that I don’t need to call updateTotal from updateSubTotal.
This is just a quick note for my future reference. I needed all items with the class “uppercase” to be converted to uppercase, and I thought it would work with just some CSS:
.uppercase { text-transform: uppercase; }
This makes the items appear uppercase, but when the page is posted it actually sends the values exactly as the user typed. They’d type in “lower“, it looks like “LOWER” on screen, but gets posted as “lower“.
In many cases I could just convert the value in my PL/SQL code, but in cases where I was using APEX tabular forms, I don’t know a simple way to intercept the values before the insert occurs.
To solve this I added this to the page’s Execute when Page Loads:
//the item looks uppercase but the internal value is still lowercase
$(document).on('change', '.uppercase', function() {
    var i = "#" + $(this).attr("id");
    $(i).val( $(i).val().toUpperCase() );
});
Or, even better, add this to the application’s global javascript file:
$(document).ready( function() {

    $(document).on('change', '.uppercase', function() {
        var i = "#" + $(this).attr("id");
        $(i).val( $(i).val().toUpperCase() );
    });

});
UPDATE: Interactive Grids
For interactive grids, you can still use this method. Put the class uppercase in the Advanced / CSS Classes attribute (Note: this is different to the Appearance / CSS Classes attribute!). I would also set the Column Filter / Text Case to Upper for good measure.
I have a simple tabular form with a numeric “sort order” column. I want the value of this column to be defaulted automatically, based on the maximum value of the rest of the records on the screen. Unfortunately the builtin Apex default type for columns in a tabular form can only be based on an Item, or a PL/SQL expression or function. I didn’t want to make a database call to get the maximum value because the user may have added multiple records which have not yet been saved to the database.
I tried basing the default on a hidden page item which I kept updated based on the values entered, but it seems the tabular form only gets the item’s value on page load and doesn’t re-examine the item’s value when you click the “Add” button. Instead, I had to turn to javascript and jQuery to get the job done.
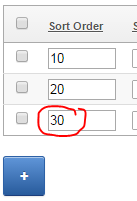
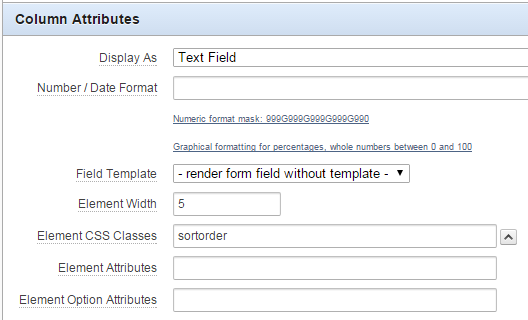
1. Add a class to the tabular form column by setting the Element CSS Classes column attribute (I’ve used “sortorder” as the class name).
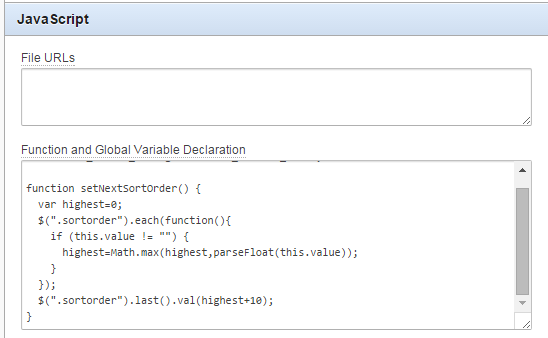
2. Add a javascript function to the page that searches for all the “sortorder” items, calculates the maximum value and adds 10, and assigns it to the last sortorder item on the page.
function setNextSortOrder() {
  var highest=0;
  $(".sortorder").each(function(){
    if (this.value != "") {
      highest=Math.max(highest,parseFloat(this.value));
    }
  });
  $(".sortorder").last().val(highest+10);
}
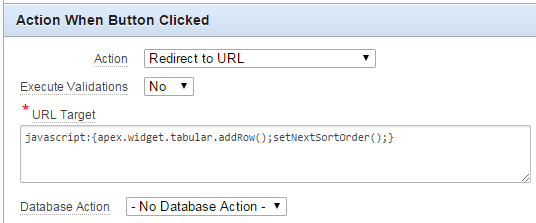
3. Modify the javascript for the “Add” button to call the setNextSortOrder function immediately after adding a row.
The APEX application I’m working on has a search filter on a report page that looks like this:
The list of values is based on a user-defined “ref codes” table, which includes an option “Show By Default”. This option is currently set on the “Closed” and “Deleted” status and means that transactions with that status will not normally be listed in the report, unless the user explicitly selects either of those statuses, e.g.:
If no checkboxes are selected, the report shows all transactions by default, except for Closed or Deleted transactions.
To indicate this behaviour, I added an asterisk (*) next to the label on those checkboxes. I also wanted some hover text so that a user who has forgotten what the asterisk means can get an idea, e.g.:
<td>
<input type="checkbox" id="P23_FTS_STATUS_7" name="p_v05" value="CLOSED">
<label for="P23_FTS_STATUS_7" title="* not shown by default">Closed*</label>
</td>
However, the default apex Checkbox item doesn’t support putting extra attributes on the generated html labels – so I need to add the hover text by running some javascript after the page is loaded. jQuery to the rescue!
To add the hover text I simply add this to the Execute when Page Loads page attribute:
$("label[for*='P23_FTS_STATUS']:contains('*')")
  .attr("title","* not shown by default")
This searches for all label nodes where the “for” attribute contains my item name (“P23_FTS_STATUS”), where the text contains a “*”. It then adds the “title” attribute with my desired value.
APEX’s Blue Responsive Theme 25 is a great theme for building a user-friendly website, and unlike many other themes which make the item labels clickable to get help, it renders little question-mark icons to the right of each item that has a help message defined.
One issue with this design, however, is that a keyboard-savvy user (such as myself) hates to switch between keyboard and mouse – so they Tab between each field as they fill in a form. With this theme, however, those little question-mark icons are in the tab order, so the user has to Tab twice between each field. If they’re not looking at the page they might forget; and if one item doesn’t happen to have a Help icon, they have to remember to only Tab once. All of this adds up to a poor user experience.
To fix this, we simply tell the browser to move the Help icons out of the tab order – and yet again, jQuery comes to the rescue as we can simply pick out all the elements with the class itemHelpButton and set their tabindex to “-1”:
$(".itemHelpButton").attr('tabindex',-1);
Put this code in the page attribute Execute when Page Loads – when the page loads, this will set the tabindex on all the help icons on the page, so now the user can tab through the page without interruption.
Don’t you hate those nagging issues where you attempt a few fixes in vain, waste hours of your life, and then suddenly the issue just resolves itself? What’s worse than an issue that won’t go away is one that just resolves itself and you don’t know why. You don’t know if it is just hiding, waiting to reappear at some inconvenient time later (e.g. when the app goes live in Production).
I’d used the simple popup modal using the builtin jQuery dialog widget as described here: Oracle APEX 4.2 – Creating a modal window [link no longer valid – http://rowantraining.blogspot.com.au/2013/08/oracle-apex-42-creating-modal-window.html] – Helen’s example works but doesn’t include submitting the page. Side note: I found it only worked if I put it in one of the page body regions, not in the After Header region.
The purpose of my popup is to accept additional input from the user, then submit the page. If I removed the page submit, the popup worked fine. On submit, it raises this error for the first item on the page:
“Session state protection violation: This may be caused by manual alteration of protected page item P1_ID. …”
If I turn off session state protection on the item, the same error is then raised on the next item on the page. Plus, I require session state protection to be enabled so disabling it is not an acceptable solution.
I didn’t want to import another plugin to the application because I wanted to keep it dead simple. The default jQuery dialog should just work, dammit! (I don’t mind importing plugins if the plain vanilla features provided by APEX are just not sufficient for the need; but the basic jQuery dialog is perfectly fine.)
In the end on a hunch I tried doing the submit after a timeout, i.e. instead of:
function popupSubmit() {
  $("#myPopup").dialog('close');
  doSubmit('SAVE');
}
This workaround seemed to have done the trick, but I wasn’t happy – it just felt “hacky”.
I tried adding a similar popup to another page that was far simpler and it didn’t experience the problem. So submitting from a popup dialog should work.
I reverted the code to remove the timout and tried disabling all the Dynamic Actions on the original page, and the problem disappeared. So I figured the problem was caused by some interaction with a Dynamic Action. I gradually re-enabled the DAs one by one, retesting the page between each one. Finally I re-enabled the last Dynamic Action – and the problem still didn’t reoccur. So the problem has resolved itself, but apparently not because of any particular thing I’ve fixed, and I can no longer reproduce the problem. Aarrgh.
UPDATE 4/9/2015:
After a number of unrelated changes to the page, I started getting this error again, consistently. As the comments (see below) suggested, this is due to the jQuery dialog.close() method moving its contents outside of the <form> tag, which meant that the items submitted to APEX differed from those in the original page, causing APEX to raise the error.
I could find no way of avoiding the error, so instead I’ve fixed it by a little hack: instead of opening the dialog based on the original region that was generated by APEX, I use jQuery to create a copy of the region, and open and close that copy. That way, the original region stays unmodified (forever hidden) and the page submit works. It’s a bit fiddly but it seems to work so far.
(in this example, P1_REAL_NOTE is the database item; P1_POPUP_NOTE is a non-database textarea that’s rendered in the popup region)
function showPopup() {
  //copy the current note text into the popup window
  $s("P1_POPUP_NOTE",$v("P1_REAL_NOTE"));

  //make a temporary copy of the region
  //(because dialog.close moves it leading to
  //APEX.SESSION_STATE.ITEM_VALUE_PROTECTION)
  var x = $("#myPopup").clone();
  x.attr("id","myPopupCopy");
  x.insertAfter($("#myPopup"));
  //change the ID of the copied popup note item
  $("#myPopupCopy textarea#P1_POPUP_NOTE")
    .attr("id","P1_POPUP_NOTE_COPY");

  //popup the dialog
  $("#myPopupCopy").dialog(
    {modal:true
    ,autoOpen:true
    ,title:'Please enter your Notes'
    ,width:'500px'
    }
  );
}
function popupSubmit() {
  //copy the note text back into the real form item
  $s("P1_REAL_NOTE",$v('P1_POPUP_NOTE_COPY'));

  //close the popup (this moves the contents out of the
  //form tag which is what was leading to the apex error)
  $("#myPopupCopy").dialog('close');

  apex.submit({request:'SAVE_REVIEW',showWait:true});
}


 Sometimes my customers need to be able to get a direct link to a record in their APEX application which they can share with others (e.g. to publish it on a website, or send by email to a colleague).
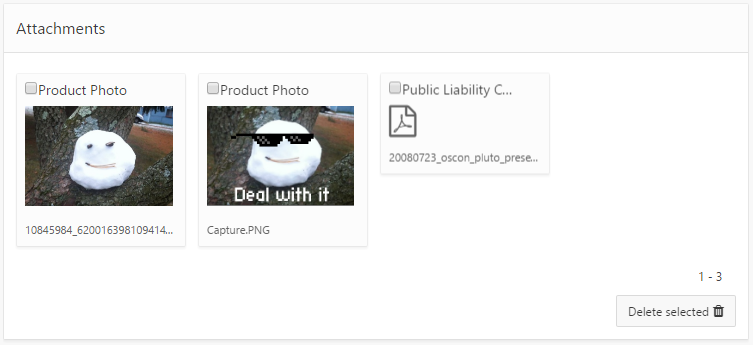 I wanted to use the “Cards” report template for a small report which lists file attachments. When the user clicks on one of the cards, the file should download and open in a new tab/window. Unfortunately, the Cards report template does not include a placeholder for extra attributes for the anchor tag, so it won’t let me add “target=_blank” like I would normally.