If you create an APEX form based on a table, APEX automatically creates processes of type Automatic Row Fetch and Automatic Row Processing (DML) as well as one item for each column in the table, each bound to the database column via its Source Type. This design is excellent as it’s fully declarative and is very quick and easy to build a data entry page for all your tables.
The downside to this approach is that if you want to use a Table API (TAPI) to encapsulate all DML activity on your tables, you need to write a whole lot of code to replace the processes that Apex created for you. In order to mitigate this as much as possible, I’ve augmented my code generator with an “APEX API” generator. This generates a second package for each table which can be called from APEX, which in turn calls the TAPI to run the actual DML. In addition, the validations that are performed by the TAPI are translated back into APEX Errors so that they are rendered in much the same way as built-in APEX validations.
Probably the best way to explain this is to show an example. Here’s my EMPS table (same as from my last article):
CREATE TABLE emps
(emp_id NUMBER NOT NULL
,name VARCHAR2(100 CHAR) NOT NULL
,emp_type VARCHAR2(20 CHAR) DEFAULT 'SALARIED' NOT NULL
,start_date DATE NOT NULL
,end_date DATE
,dummy_ts TIMESTAMP(6)
,dummy_tsz TIMESTAMP(6) WITH TIME ZONE
,life_history CLOB
,CONSTRAINT emps_pk PRIMARY KEY ( emp_id )
,CONSTRAINT emps_name_uk UNIQUE ( name )
,CONSTRAINT emp_type_ck
CHECK ( emp_type IN ('SALARIED','CONTRACTOR')
);
CREATE SEQUENCE emp_id_seq;
By the way, my table creation script calls DEPLOY.create_table to do this, which automatically adds my standard audit columns to the table – CREATED_BY, CREATED_DT, LAST_UPDATED_BY, LAST_UPDATED_DT, and VERSION_ID. My script also calls GENERATE.journal for the table which creates a journal table (EMPS$JN) and a trigger (EMPS$TRG) to log all DML activity against the table.
I then call GENERATE.tapi which creates the Table API (EMPS$TAPI) which has routines for validating, inserting, updating and deleting rows (or arrays of rows using bulk binds) of the EMPS table.
Finally, I call GENERATE.apexapi which creates the APEX API (EMPS$APEX) which looks like this:
Package Spec: EMPS$APEX
create or replace PACKAGE EMPS$APEX AS
/**************************************************
Apex API for emps
10-FEB-2016 - Generated by SAMPLE
**************************************************/
-- page load process
PROCEDURE load;
-- single-record page validation
PROCEDURE val;
-- page submit process
PROCEDURE process;
END EMPS$APEX;
Notice that these routines require no parameters; the API gets all the data it needs directly from APEX.
Package Body: EMPS$APEX
create or replace PACKAGE BODY EMPS$APEX AS
/*******************************************************************************
Table API for emps
10-FEB-2016 - Generated by SAMPLE
*******************************************************************************/
PROCEDURE apex_set (r IN EMPS$TAPI.rowtype) IS
p VARCHAR2(10) := 'P' || UTIL.apex_page_id || '_';
BEGIN
log_start('apex_set');
sv(p||'EMP_ID', r.emp_id);
sv(p||'NAME', r.name);
sv(p||'EMP_TYPE', r.emp_type);
sd(p||'START_DATE', r.start_date);
sd(p||'END_DATE', r.end_date);
st(p||'BLA_TSZ', r.bla_tsz);
st(p||'DUMMY_TS', r.dummy_ts);
sv(p||'CREATED_BY', r.created_by);
sd(p||'CREATED_DT', r.created_dt);
sv(p||'LAST_UPDATED_BY', r.last_updated_by);
sd(p||'LAST_UPDATED_DT', r.last_updated_dt);
sv(p||'VERSION_ID', r.version_id);
log_end;
EXCEPTION
WHEN UTIL.application_error THEN
log_end('application_error');
RAISE;
WHEN OTHERS THEN
UTIL.log_sqlerrm;
RAISE;
END apex_set;
FUNCTION apex_get RETURN EMPS$TAPI.rvtype IS
p VARCHAR2(10) := 'P' || UTIL.apex_page_id || '_';
rv EMPS$TAPI.rvtype;
BEGIN
log_start('apex_get');
rv.emp_id := nv(p||'EMP_ID');
rv.name := v(p||'NAME');
rv.emp_type := v(p||'EMP_TYPE');
rv.start_date := v(p||'START_DATE');
rv.end_date := v(p||'END_DATE');
rv.bla_tsz := v(p||'BLA_TSZ');
rv.dummy_ts := v(p||'DUMMY_TS');
rv.version_id := nv(p||'VERSION_ID');
log_end;
RETURN rv;
EXCEPTION
WHEN UTIL.application_error THEN
log_end('application_error');
RAISE;
WHEN OTHERS THEN
UTIL.log_sqlerrm;
RAISE;
END apex_get;
FUNCTION apex_get_pk RETURN EMPS$TAPI.rvtype IS
p VARCHAR2(10) := 'P' || UTIL.apex_page_id || '_';
rv EMPS$TAPI.rvtype;
BEGIN
log_start('apex_get_pk');
IF APEX_APPLICATION.g_request = 'COPY' THEN
rv.emp_id := v(p||'COPY_EMP_ID');
ELSE
rv.emp_id := nv(p||'EMP_ID');
rv.version_id := nv(p||'VERSION_ID');
END IF;
log_end;
RETURN rv;
EXCEPTION
WHEN UTIL.application_error THEN
log_end('application_error');
RAISE;
WHEN OTHERS THEN
UTIL.log_sqlerrm;
RAISE;
END apex_get_pk;
/*******************************************************************************
PUBLIC INTERFACE
*******************************************************************************/
PROCEDURE load IS
p VARCHAR2(10) := 'P' || UTIL.apex_page_id || '_';
rv EMPS$TAPI.rvtype;
r EMPS$TAPI.rowtype;
BEGIN
log_start('load');
UTIL.check_authorization('Reporting');
rv := apex_get_pk;
r := EMPS$TAPI.get (emp_id => rv.emp_id);
IF APEX_APPLICATION.g_request = 'COPY' THEN
r := EMPS$TAPI.copy(r);
END IF;
apex_set (r => r);
log_end;
EXCEPTION
WHEN UTIL.application_error THEN
log_end('application_error');
RAISE;
WHEN OTHERS THEN
UTIL.log_sqlerrm;
RAISE;
END load;
PROCEDURE val IS
p VARCHAR2(10) := 'P' || UTIL.apex_page_id || '_';
rv EMPS$TAPI.rvtype;
dummy VARCHAR2(32767);
item_name_map UTIL.str_map;
BEGIN
log_start('val');
IF APEX_APPLICATION.g_request = 'CREATE'
OR APEX_APPLICATION.g_request LIKE 'SAVE%' THEN
rv := apex_get;
UTIL.pre_val
(label_map => EMPS$TAPI.label_map
,item_name_map => item_name_map);
dummy := EMPS$TAPI.val (rv => rv);
UTIL.post_val;
END IF;
log_end;
EXCEPTION
WHEN UTIL.application_error THEN
log_end('application_error');
RAISE;
WHEN OTHERS THEN
UTIL.log_sqlerrm;
RAISE;
END val;
PROCEDURE process IS
p VARCHAR2(10) := 'P' || UTIL.apex_page_id || '_';
rv EMPS$TAPI.rvtype;
r EMPS$TAPI.rowtype;
BEGIN
log_start('process');
UTIL.check_authorization('Operator');
CASE
WHEN APEX_APPLICATION.g_request = 'CREATE' THEN
rv := apex_get;
r := EMPS$TAPI.ins (rv => rv);
apex_set (r => r);
UTIL.success('Emp created.');
WHEN APEX_APPLICATION.g_request LIKE 'SAVE%' THEN
rv := apex_get;
r := EMPS$TAPI.upd (rv => rv);
apex_set (r => r);
UTIL.success('Emp updated.'
|| CASE WHEN APEX_APPLICATION.g_request = 'SAVE_COPY'
THEN ' Ready to create new emp.'
END);
WHEN APEX_APPLICATION.g_request = 'DELETE' THEN
rv := apex_get_pk;
EMPS$TAPI.del (rv => rv);
UTIL.clear_page_cache;
UTIL.success('Emp deleted.');
END CASE;
log_end;
EXCEPTION
WHEN UTIL.application_error THEN
log_end('application_error');
RAISE;
WHEN OTHERS THEN
UTIL.log_sqlerrm;
RAISE;
END process;
END EMPS$APEX;
Now, given the above package, we can create an APEX page that allows users to view, create, update, copy and delete a record from the EMPS table, using all the features provided by our TAPI.
- Create Page, select Form, select Form on a Table or view, select the table EMPS.
- Accept the defaults, or change them to taste, and click Next, Next.
- On the Primary Key wizard step, change type to Select Primary Key Column(s) and it should pick up the EMP_ID column automatically. Click Next.*
- For Source Type, leave the default (Existing trigger).** Click Next, Next, Next.
- For Branching, enter page numbers as required. Click Next, then Create.
* the APEX API and Table API generator also handles tables with no surrogate key by using ROWID instead; in this case, you would leave the default option selected (Managed by Database (ROWID)) here.
** note however that our TAPI will handle the sequence generation, not a trigger.
The page should look something like this:
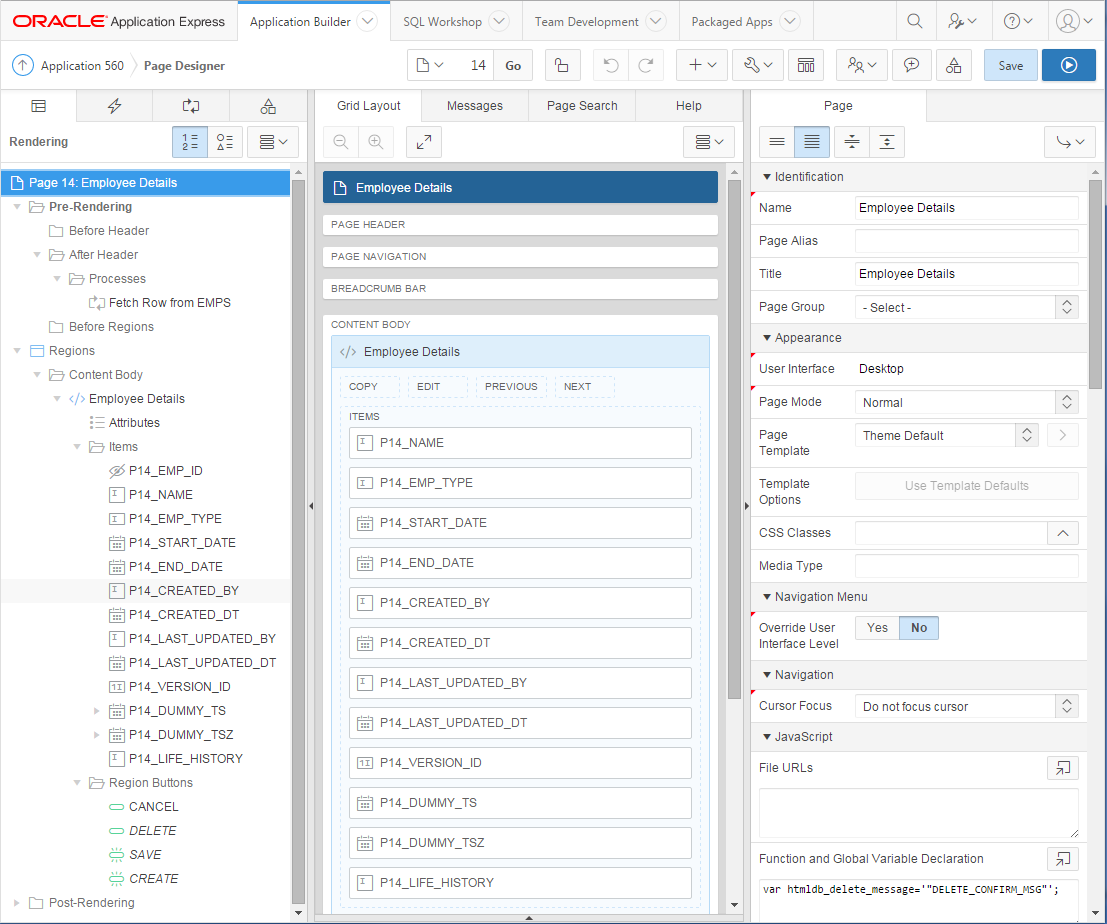
Notice that it has created a Fetch Row from EMPS process for when the page is loaded, as well as the Process Row of EMPS and reset page processes for when the page is submitted. It has also created a few validations.
Notice also that all the items are named consistently with the column names; this is important as my APEX API package generator relies on this one-to-one mapping. You can, of course, add additional non-database items to the page – they won’t be affected by the generator unless the table is altered with columns that match.
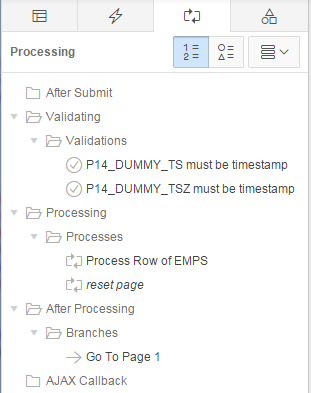
Now, this page will work fine, except that it bypasses our TAPI. To change the page so that it uses our TAPI instead, edit the page as follows:
- Delete all the Fetch Row from EMPS, Process Row of EMPS and reset page processes.
- Delete all the validations.
- For all the page items, set Source Type to Null. In Apex 5 this is easy – just Ctrl+Click each item, then make the change to all of them in one step!
- Make the audit column items (CREATED_BY, CREATED_DT, LAST_UPDATED_BY, LAST_UPDATED_DT) Display Only.
- Make the VERSION_ID item Hidden.
- Under Pre-Rendering, add an After Header process that calls
EMPS$APEX.load;.
- In the Page Processing tab, under Validating, add a validation with Type = PL/SQL Function (returning Error Text).
- Set the PL/SQL Function Body Returning Error Text to
EMPS$APEX.val; RETURN null;.
- Set Error Message to “bla” (this is a mandatory field but is never used – I think this is a small bug in Apex 5).
- Under Processing, add a process that calls
EMPS$APEX.process;.
- Set Error Message to
#SQLERRM_TEXT#.
Run the page – you should find that it works just as well as before, with all the TAPI goodness working behind the scenes. Even the validations work, and they will point at the right items on the page.
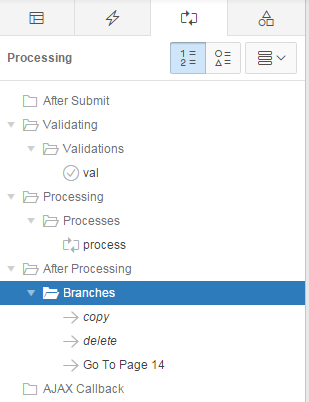
But that’s not all! You can easily add a useful “Copy” function that your users will thank you for because (depending on the use case) it can reduce the amount of typing they have to do.
- Add a button to the region, named SAVE_COPY (this name is important) with the label Copy. Tip: if you want an icon set the Icon CSS Classes to fa-copy.
- Add a hidden item named after the PK item prefixed with “COPY_”, e.g.
P14_COPY_EMP_ID.
- Under After Processing, add a Branch that goes to this same page (e.g. 14, in this example).
- On the branch, set Request (under Advanced) to COPY and assign
&P14_EMP_ID. to the item P14_COPY_EMP_ID.
- Set When Button Pressed to SAVE_COPY.
- Change the order of the branches so that the Copy branch is evaluated before the other branches (see below)
Now, when they click Copy, the page will first save any changes they had made to the record, then go back to the same page with a copy of all the details from the original record. The user can then edit the new record and Create it if they so desire, or Cancel.
An advantage of this design is that, if you want to add a validation that applies whether someone is updating the table from APEX or from some other UI or interface, you can add it in one place – the TAPI (specifically, you would add it to the TAPI template). If you add a column, just add an item to the APEX page and regenerate the TAPI and Apex API. It’s a nice DRY-compliant solution.
Addendum: you may be wondering why we need a P14_COPY_EMP_ID item, instead of simply reusing the P14_EMP_ID item that’s already there. The reason for this is that after saving a copied record, in some cases we may want to copy some or all the child records from the original record to the copy, or do some other operation that needs both the old and the new ID.
Source code/download: https://github.com/jeffreykemp/jk64-sample-apex-xapi
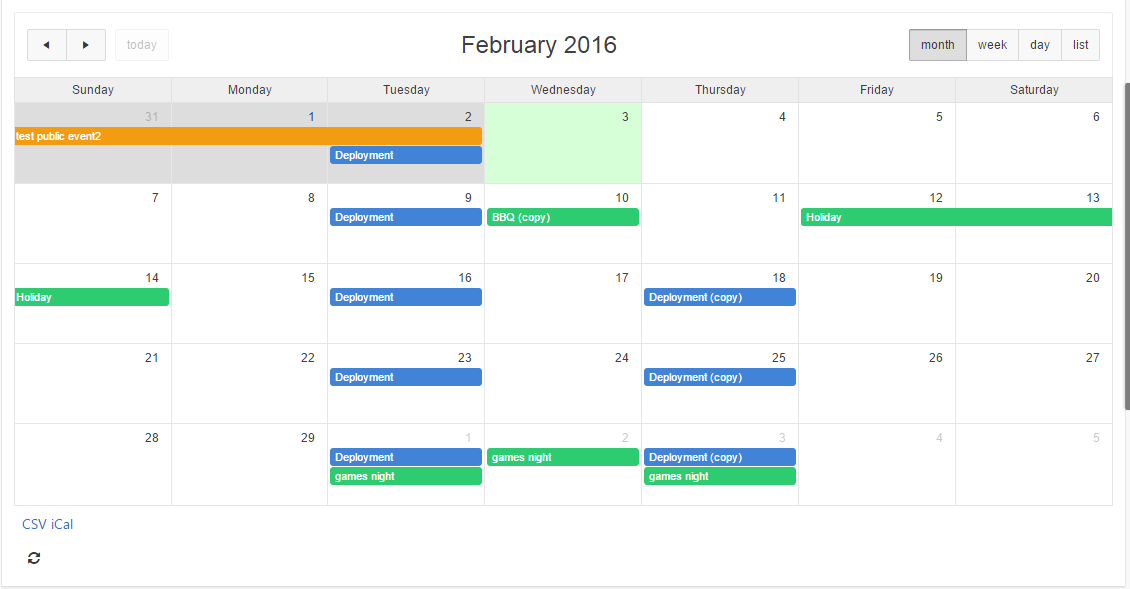
Sometimes it’s the simple little things that can add polish and make your Apex application shine. One simple little thing that you can do is add a Refresh button to improve the usability of your Apex 5 calendar. This makes it easy for the user to see recent changes on the database, e.g. if events had been added or changed since the page had last been loaded.
- Set the Static ID on the Calendar region (e.g. “eventscalendar“)
- Add an Icon button (Button Template = “Icon”) to the calendar region
- Set the button’s Static ID (e.g. “refreshbutton“)
- Set Icon CSS Classes to “fa-refresh“
- Set Action to “Defined by Dynamic Action”
- (optional) Set Template Option -> Style to “Remove UI Decoration”
- Add a Dynamic Action to the button, Event = “Click”
- Set Fire on Page Load to “No”
- Add a True Action “Execute Javascript Code” with the code below:
$("#eventscalendar_calendar").fullCalendar("refetchEvents");
This calls the refetchEvents method of the FullCalendar object. Replace the “eventscalendar” part of the id with whatever static ID you set on the Calendar region in step #1.
Now, to add a bit of pizzazz you can get the refresh button icon to spin while the calendar is being refreshed. To do this, change the dynamic action code to this instead:
$("#refreshbutton span.t-Icon").addClass("fa-spin");
window.setTimeout(function() {
  $("#eventscalendar_calendar").fullCalendar("refetchEvents");
  window.setTimeout(function() {
    $("#refreshbutton span.t-Icon").removeClass("fa-spin");
  }, 1000);
}, 50);
This code starts the refresh icon spinning before invoking refetchEvents, then stops the icon spinning after it has completed. Note that these are done via timeouts (otherwise the icon isn’t repainted until after the entire javascript function has completed). I added a wait of 1 second prior to stopping the spinning because most of the time the refresh is too quick to notice the spinning effect.
You can, if it makes sense in your case, also make the calendar automatically refresh itself periodically, using some simple javascript: add the following function to the page Function and Global Variable Declaration:
function refreshCalendar() {
  $("#refreshbutton span.t-Icon").addClass("fa-spin");
  window.setTimeout(function() {
    $("#eventscalendar_calendar").fullCalendar("refetchEvents");
    window.setTimeout(function() {
      $("#refreshbutton span.t-Icon").removeClass("fa-spin");
    }, 1000);
  }, 50);
}
Then add this to start the timer in the page attribute Execute when Page Loads:
var periodicrefresh = setInterval(function() {
                                    refreshCalendar();
                                  }, 30000);
In this example, I’ve set the timer to go off every 30 seconds. Not only does it refresh the calendar, but the user gets feedback on what’s going on because the refresh button icon is spinning. Be careful not to set the timeout too low, or else your database could get very busy!
The function I’ve declared can now also be reused by the button’s dynamic action, so I can replace the DA javascript with simply:
refreshCalendar();
One of the things that used to bug me about the Apex developer toolbar was that it sometimes obscured the content I was trying to test at the bottom of the page; you could turn it off but then next thing you want to access it you have to jump through the hoops to turn it back on again.
I just noticed it now has some new display options which solves this problem perfectly:
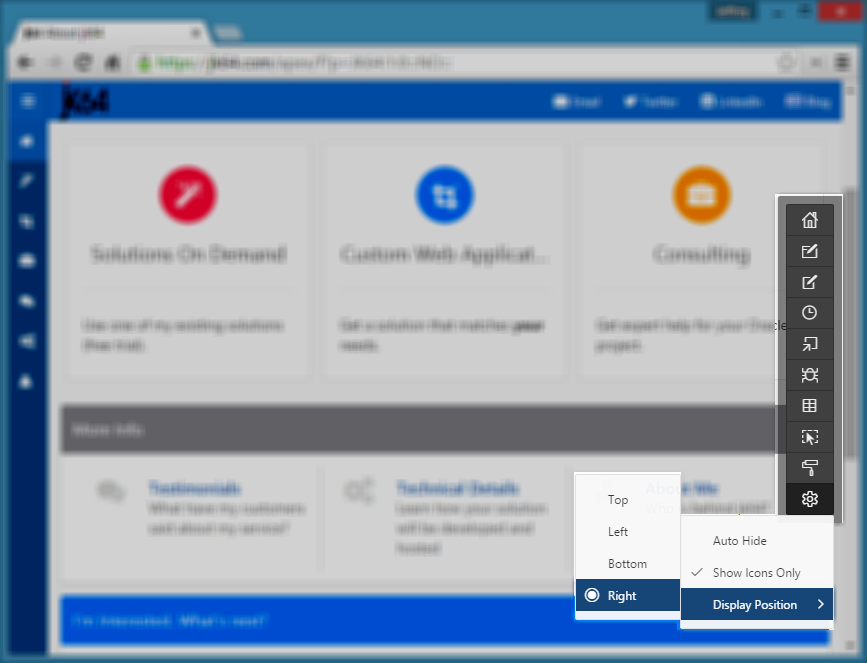
- Auto Hide – I turn this on so that it slides almost completely out of the way when I don’t want it (move your mouse over it to make it pop out again, click into your page to hide it)
- Show Icons Only – once you’re familiar with the options you can shrink the toolbar to show only the icons (hover over the icon to see the label)
- Display Position – put it on the Right-hand side of the window instead of the bottom
 Just a quick note that (as mentioned by Christian Neumueller earlier) APEX 5 now populates an Application Context
 APEX$SESSION with the session’s User, Session ID and Workspace ID:
SYS_CONTEXT('APEX$SESSION','APP_USER')
SYS_CONTEXT('APEX$SESSION','APP_SESSION')
SYS_CONTEXT('APEX$SESSION','WORKSPACE_ID')
Using the above should be faster in your queries than calling v() to get these values. Note that the alias 'SESSION' won’t work like it does with v().
The context is managed by the database package APEX_050000.WWV_FLOW_SESSION_CONTEXT which is an undocumented API used internally by APEX to synchronize the context with the associated APEX attibutes. Incidentally, the comments in the package indicate it was authored by Chris himself.
Personally I was hoping that a bit more of the session state would be replicated in the context, e.g. application ID, page ID, request, debug mode, application items and page items.
Sidebar: to see all contexts that are visible to your session, query ALL_CONTEXT. To see all context values set in your session, query SESSION_CONTEXT. Of course, don’t query these in your application code to get individual values – that’s what the SYS_CONTEXT function is for.
You have a Select List item on your page driven from a dynamic query, e.g. one that only shows valid values. One day, users notice that the list appears empty and raise a defect note.

You check the query behind the list and verify that indeed, the list should be empty because there are no valid values to show. It’s an optional item so the user is free to save the record if they wish.
There are a number of ways we could make this more user-friendly: depending on the specifics of the situation, we might just hide the item, or we might want to show an alternative item or a warning message. We can do any of these things quite easily using either a computation on page load (if the list doesn’t change while the page is open) or a dynamic action.
In the case of my client, they wanted the item to remain on screen, but to show an orange warning message to let them know that there are no gateways currently available; this is only a warning because there are subsequent processes that can handle the missing gateway (e.g. a higher-privileged user can assign a “hidden” gateway to the record if they deem it suitable).
To do this we create a display item (e.g. “P1_NO_GATEWAY_WARNING” which shows the warning message) and a dynamic action with the following attributes:
- Event = Page Load
- Condition = JavaScript expression
- Value =
listIsEmpty("P1_GATEWAY_ID")
- True Action = Set Value
- Set Type = Static Assignment
- Value = Warning: no gateways currently available
- Selection Type = Item(s)
- Item(s) = P1_NO_GATEWAY_WARNING
In the page’s Function and Global Variable Declaration, or (even better) in the application’s global javascript file, we add the following:
function listIsEmpty(itemName) {
  return $("#" + itemName + " option:enabled").filter(
    function(){return this.text;}
    ).length==0;
}
This was adapted from some solutions here. It looks for all <option>s under the item, filters the list for options which are not disabled and have a label, and returns true if the remaining set is empty. I added the this.text bit because the empty lists generated by Apex include a single empty option for the “NULL” value. This is because I have set the list item’s Null Display Value to blank (null).

Quite a long time ago I made a collection of MP3s available from our APEX website and made them playable within the browser using Google’s shockwave player, using code like this:
<embed type="application/x-shockwave-flash"
       flashvars="audioUrl=#FILE_URL#"
       src="/3523697345-audio-player.swf"
       width="400"
       height="27"
       quality="best">
</embed>
This relies on the user’s browser being able to run flash applications. It looked like this:

With HTML5, however, this is no longer required, so I’ve updated it to:
<audio controls preload>
  <source src="#FILE_URL#" type="audio/mpeg">
</audio>
Not only is it simpler and no longer requires flash, it looks much nicer as well:

Note: you may or may not want to include the preload tag, especially if you have more than one audio control on a page.
This is just a quick note for my future reference. I needed all items with the class “uppercase” to be converted to uppercase, and I thought it would work with just some CSS:
.uppercase { text-transform: uppercase; }
This makes the items appear uppercase, but when the page is posted it actually sends the values exactly as the user typed. They’d type in “lower“, it looks like “LOWER” on screen, but gets posted as “lower“.
In many cases I could just convert the value in my PL/SQL code, but in cases where I was using APEX tabular forms, I don’t know a simple way to intercept the values before the insert occurs.
To solve this I added this to the page’s Execute when Page Loads:
//the item looks uppercase but the internal value is still lowercase
$(document).on('change', '.uppercase', function() {
    var i = "#" + $(this).attr("id");
    $(i).val( $(i).val().toUpperCase() );
});
Or, even better, add this to the application’s global javascript file:
$(document).ready( function() {

    $(document).on('change', '.uppercase', function() {
        var i = "#" + $(this).attr("id");
        $(i).val( $(i).val().toUpperCase() );
    });

});
UPDATE: Interactive Grids
For interactive grids, you can still use this method. Put the class uppercase in the Advanced / CSS Classes attribute (Note: this is different to the Appearance / CSS Classes attribute!). I would also set the Column Filter / Text Case to Upper for good measure.
Most places I’ve worked at allow employees to use any of the major browsers to do their work, but mandate an “SOE” that only supports IE, presumably because that generates the most amount of work for us developers. I’d conservatively estimate that 99% of the rendering bugs I’ve had to deal with are only reproducible in IE. (cue one of the thousands of IE joke images… nah, just do a Google Image search, there’s plenty!)
Anyway, we had a number of these rendering issues in Apex on IE8, IE9 and IE10, mainly in edge cases involving some custom CSS or plugins. In some cases I was never able to reproduce the issue until we noticed that the user had inadvertently switched “IE Compatility Mode” on:

We told them to make sure the icon was grey, like this:

– and most of the issues went away.
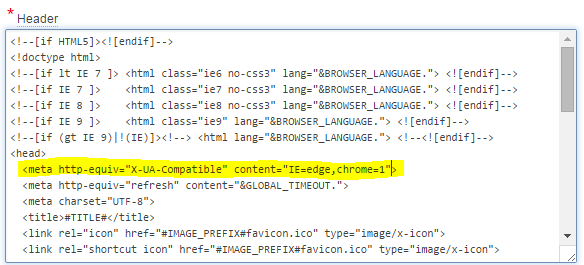
Since there’s nothing in our Apex application that requires compatibility mode, we would rather the option not be available at all. To this end, we simply add this code to all the Page templates in the application:
<meta http-equiv="X-UA-Compatible" content="IE=edge,chrome=1">
This is added just after the <head> tag, like this:
Now, the compatibility button doesn’t appear at all – one less choice for users and less bug reports to deal with:

For more information, see this stackoverflow question and read all the answers. Note that it may be better to add this as a header in the response generated by your web server. In our case it was simpler to just add it into the html.

I’ve added this script to our toolbelt for future upgrades. We have a friendly “System is under maintenance, sorry for any convenience” web page that we want to show to users while we run upgrades, and we want it to be shown even if we’re just doing some database schema changes.
So I took the script from here and adapted it slightly, here’s our version:
declare PRAGMA AUTONOMOUS_TRANSACTION;
  v_workspace CONSTANT VARCHAR2(100) := 'MYSCHEMA';
  v_workspace_id NUMBER;
begin
  select workspace_id into v_workspace_id
  from apex_workspaces where workspace = v_workspace;
  apex_application_install.set_workspace_id (v_workspace_id);
  apex_util.set_security_group_id
    (p_security_group_id => apex_application_install.get_workspace_id);
  wwv_flow_api.set_flow_status
    (p_flow_id             => 100
    ,p_flow_status         => 'UNAVAILABLE_URL'
    ,p_flow_status_message => 'http://www.example.com/system_unavailable.html'
    );
  commit;
end;
/
It uses an autonomous transaction because we want the system to be unavailable immediately for all users while the deployment is running.
Warning: WWV_FLOW_API is an undocumented package so this is not supported.
The opposite script to make the application available again is:
declare PRAGMA AUTONOMOUS_TRANSACTION;
  v_workspace CONSTANT VARCHAR2(100) := 'MYSCHEMA';
  v_workspace_id NUMBER;
begin
  select workspace_id into v_workspace_id
  from apex_workspaces where workspace = v_workspace;
  apex_application_install.set_workspace_id (v_workspace_id);
  apex_util.set_security_group_id
    (p_security_group_id => apex_application_install.get_workspace_id);
  wwv_flow_api.set_flow_status
    (p_flow_id             => 100
    ,p_flow_status         => 'AVAILABLE'
    );
  commit;
end;
/
However, if we run the f100.sql script to deploy a new version of the application, we don’t need to run the “set available” script since the redeployment of the application (which would have been exported in an “available” state already) will effectively make it available straight away.
UPDATE FOR APEX 5.1 and later
The APEX API has been updated with a documented and supported call – APEX_UTIL.set_application_status to do this which should be used in APEX 5.1 or later.
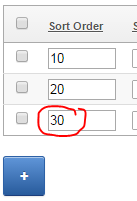
I have a simple tabular form with a numeric “sort order” column. I want the value of this column to be defaulted automatically, based on the maximum value of the rest of the records on the screen. Unfortunately the builtin Apex default type for columns in a tabular form can only be based on an Item, or a PL/SQL expression or function. I didn’t want to make a database call to get the maximum value because the user may have added multiple records which have not yet been saved to the database.
I tried basing the default on a hidden page item which I kept updated based on the values entered, but it seems the tabular form only gets the item’s value on page load and doesn’t re-examine the item’s value when you click the “Add” button. Instead, I had to turn to javascript and jQuery to get the job done.
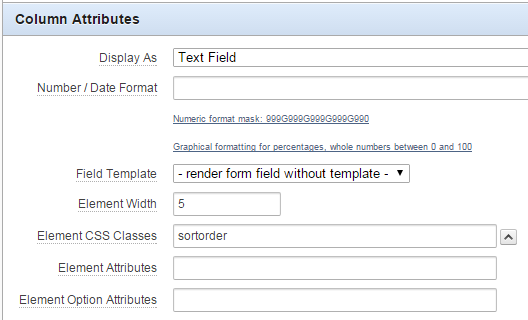
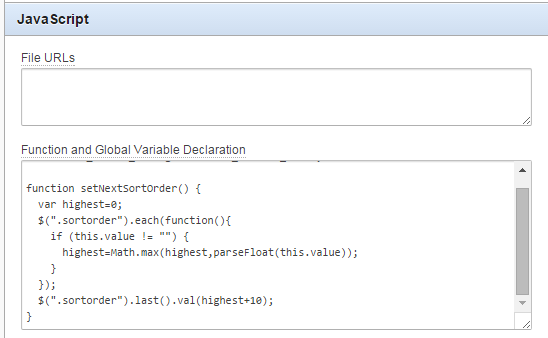
1. Add a class to the tabular form column by setting the Element CSS Classes column attribute (I’ve used “sortorder” as the class name).
2. Add a javascript function to the page that searches for all the “sortorder” items, calculates the maximum value and adds 10, and assigns it to the last sortorder item on the page.
function setNextSortOrder() {
  var highest=0;
  $(".sortorder").each(function(){
    if (this.value != "") {
      highest=Math.max(highest,parseFloat(this.value));
    }
  });
  $(".sortorder").last().val(highest+10);
}
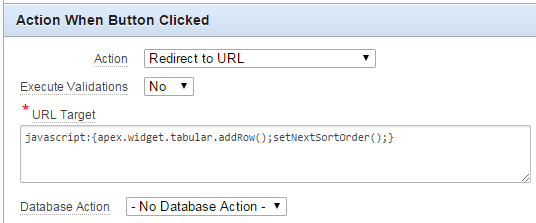
3. Modify the javascript for the “Add” button to call the setNextSortOrder function immediately after adding a row.
javascript:{apex.widget.tabular.addRow();setNextSortOrder();}
It’s a bit hackish and might not work correctly in some cases but it’ll do for now.
