“We always click ‘Apply Changes’, then we click the button we actually wanted” – a user
Typically an Apex report with an “Open” or “Edit” icon will simply do an immediate navigation to the target page, passing the ID of the record to edit. When the user clicks this link, the page is not submitted and the user is instead redirected.
It’s easy to quickly build large and complex applications in Apex but it’s also very easy to build something that confuses and disorients your users. They only need one instance when something doesn’t work how they expected it to, and they will lose trust in your application.
For example: if most buttons save their changes, but one button doesn’t, they might not notice straight away, and then wonder what happened to their work. If you’re lucky, they will raise a defect notice and you can fix it. More likely (and worse), they’ll decide it’s their fault, and begrudgingly accept slow and unnecessary extra steps as part of the process.
You can improve this situation by taking care to ensure that everything works the way your users expect. For most buttons in an Apex page, this is easy and straightforward: just make sure the buttons submit the page. The only buttons that should do a redirect are those that a user should expect will NOT save the changes – e.g. a “Cancel” button.
For the example of an icon in a report region, it’s not so straightforward. The page might include some editable items (e.g. a page for editing a “header” record) – and if the user doesn’t Save their changes before clicking the report link their changes will be lost on navigation.
To solve this problem you can make the edit links first submit the page before navigating. The way I do this is as follows (in this example, the report query is on the “emp” table:
Add a hidden item P1_EDIT_ID to the page
Set Value Protected to No
Add something like this to the report query (without the newlines):
'javascript:apex.submit(
  {request:''SAVE_EDIT_ROW'',
   set:{''P1_EDIT_ID'':''' || emp.rec_id || '''}
  })' AS edit_link
Set this new column to Hidden Column
Modify the edit link Target:
Type = URL
URL = #EDIT_LINK#
Add a Branch at point “After Processing”
Set the Target to the page to navigate to
Set the item for the record ID to &P1_EDIT_ID.
Set the Condition to the following PL/SQL Expression:
:REQUEST='SAVE_EDIT_ROW' AND :P1_EDIT_ID IS NOT NULL
Make sure the branch is evaluated before any other branches (at least, any others that might respond to this request)
Modify any existing Processing so that the request SAVE_EDIT_ROW will cause any changes on the page to be saved.
You can, of course, choose different item names and request names if needed (just update it in the code you entered earlier). For example, to make it work with the default Apex DML process you might need to use a request like “APPLY_CHANGES_EDIT_ROW”.
Now, when the user makes some changes to the form, then clicks one of the record Edit links, the page will first be submitted before navigating to the child row.
Adding buttons to Apex pages is easy. Making sure every last one of them does exactly what the user expects, nothing more, and nothing less, is the tricky part!
Updated 10/10/2017 now that APEX 5.1 has been out for a while.
Updated 22/8/2020 with some corrections.
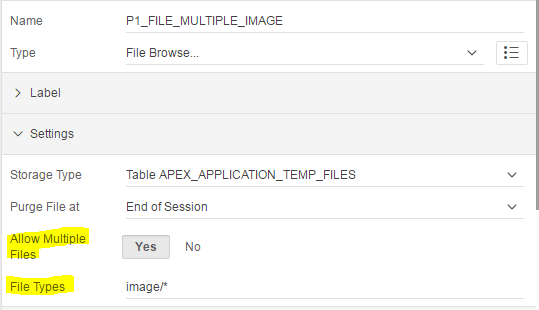
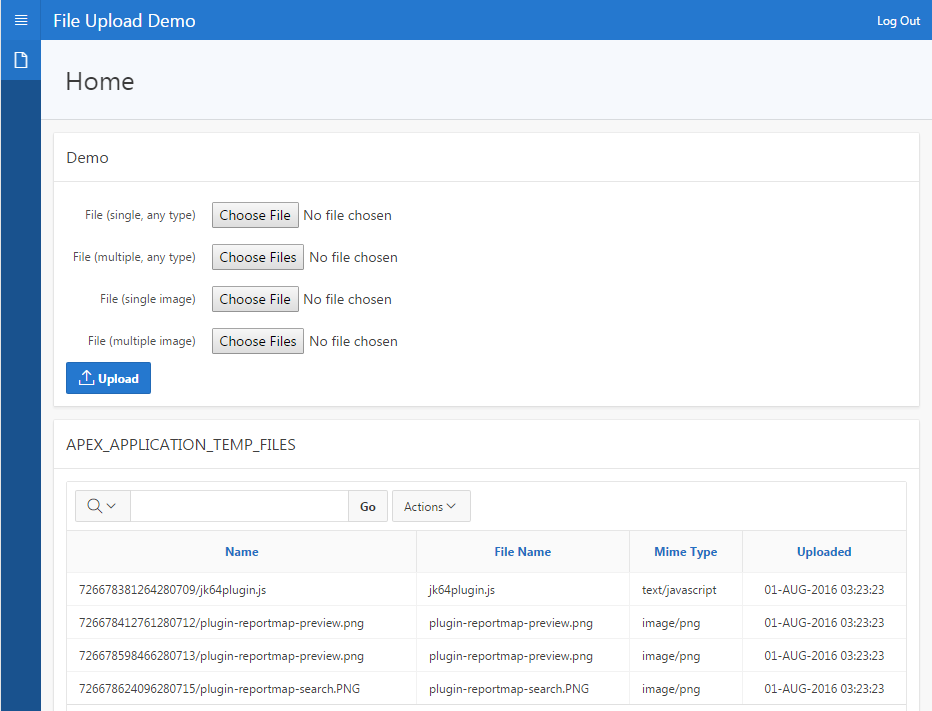
The standard File Upload item type is getting a nice little upgrade in Apex 5.1. By simply changing attributes on the item, you can allow users to select multiple files (from a single directory) at the same time.
In addition, you can now restrict the type of file they may choose, according to the MIME type of the file, e.g. image/jpg. This file type restriction can use a wildcard, e.g. image/*, and can have multiple patterns separated by commas, e.g. image/png,application/pdf.
NOTE (22/8/2020): this doesn’t stop a user from choosing files of other types (they can change the file type selector) and doesn’t validate the file types.
Normally, to access the file that was uploaded you would query APEX_APPLICATION_TEMP_FILES with a predicate like name = :P1_FILE_ITEM. If multiple files are allowed, however, the item will be set to a colon-delimited list of names, so the suggested code to get the files is:
declare
  arr apex_global.vc_arr2;
begin
  arr := apex_util.string_to_table(:P1_MULTIPLE_FILES);
  for i in 1..arr.count loop
    select t.whatever
    into   your_variable
    from   apex_application_temp_files t
    where  t.name = arr(i);
  end loop;
end;
If you want to support drag-and-drop, image copy&paste, load large files asynchronously, restrict the actual file type or maximum file size that may be uploaded, you will probably want to consider a plugin instead, like Daniel Hochleitner’s DropZone.
DISCLAIMER: this article is based on Early Adopter 1.
I’ve finally got back to looking at my reference TAPI APEX application. I’ve greatly simplified it (e.g. removed the dependency on Logger, much as I wanted to keep it) and included one dependency (CSV_UTIL_PKG) to make it much simpler to install and try. The notice about compilation errors still applies: it is provided for information/entertainment purposes only and is not intended to be a fully working system. The online demo for APEX 5.0 has been updated accordingly.
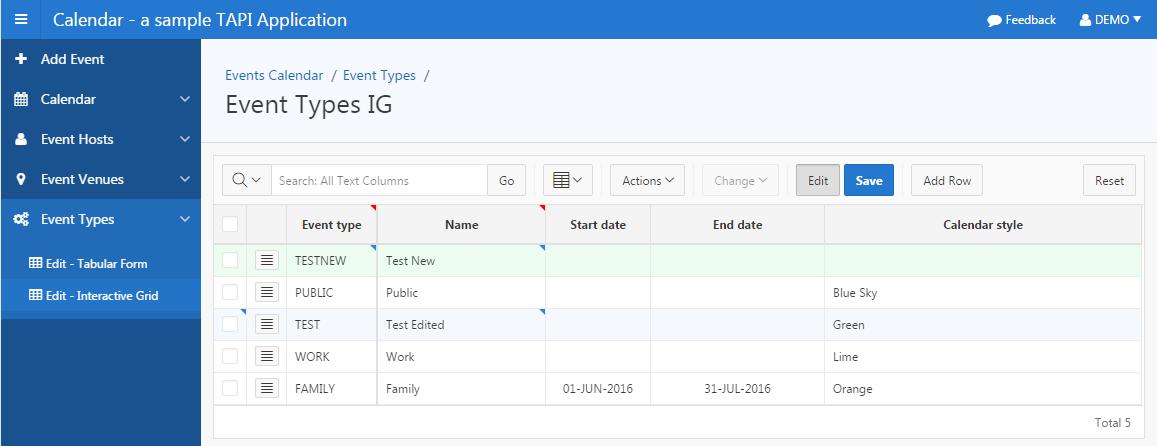
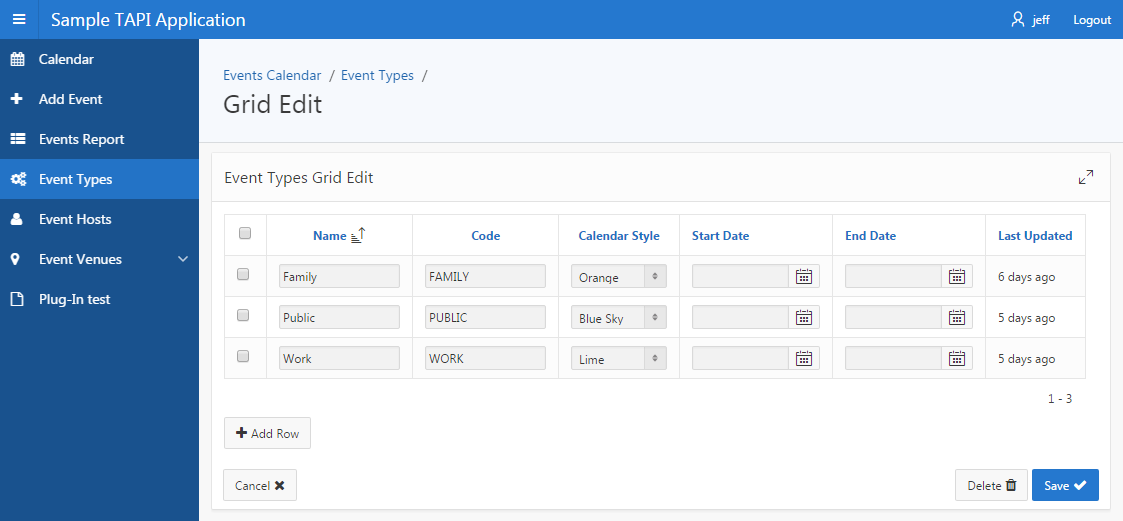
I next turned my attention to APEX 5.1 Early Adopter, in which the most exciting feature is the all-new Interactive Grid which may replace IRs and tabular forms. I have installed my reference TAPI APEX application, everything still works fine without changes.
I wanted my sample application to include both the old Tabular Forms as well as the new Interactive Grid, so I started by making copies of some of my old “Grid Edit” (tabular form) pages. You will find these under the “Venues” and “Event Types” menus in the sample application. I then converted the tabular form regions to Interactive Grids, and after some fiddling have found that I need to make a small change to my APEX API to suit them. The code I wrote for the tabular forms doesn’t work for IGs; in fact, the new code is simpler, e.g.:
PROCEDURE apply_ig (rv IN VENUES$TAPI.rvtype) IS
  r VENUES$TAPI.rowtype;
BEGIN
  CASE v('APEX$ROW_STATUS')
  WHEN 'I' THEN
    r := VENUES$TAPI.ins (rv => rv);
    sv('VENUE_ID', r.venue_id);
  WHEN 'U' THEN
    r := VENUES$TAPI.upd (rv => rv);
  WHEN 'D' THEN
    VENUES$TAPI.del (rv => rv);
  END CASE;
END apply_ig;
You may notice a few things here:
(1) APEX$ROW_STATUS for inserted rows is ‘I’ instead of ‘C’; also, it is set to ‘D’ (unlike under tabular forms, where it isn’t set for deleted rows).
(2) After inserting a new record, the session state for the Primary Key column(s) must be set if the insert might have set them – including if the “Primary Key” in the region is ROWID. Otherwise, Apex 5.1 raises No Data Found when it tries to retrieve the new row.
(3) I did not have to make any changes to my TAPI at all 🙂
Here’s the example from my Event Types table, which doesn’t have a surrogate key, so we use ROWID instead:
PROCEDURE apply_ig (rv IN EVENT_TYPES$TAPI.rvtype) IS
  r EVENT_TYPES$TAPI.rowtype;
BEGIN
  CASE v('APEX$ROW_STATUS')
  WHEN 'I' THEN
    r := EVENT_TYPES$TAPI.ins (rv => rv);
    sv('ROWID', r.p_rowid);
  WHEN 'U' THEN
    r := EVENT_TYPES$TAPI.upd (rv => rv);
  WHEN 'D' THEN
    EVENT_TYPES$TAPI.del (rv => rv);
  END CASE;
END apply_ig;
Converting Tabular Form to Interactive Grid
The steps needed to convert a Tabular Form based on my APEX API / TAPI system are relatively straightforward, and only needed a small change to my APEX API.
Select the Tabular Form region
Change Type from “Tabular Form [Legacy]” to “Interactive Grid”
Delete any Region Buttons that were associated with the Tabular form, such as CANCEL, MULTI_ROW_DELETE, SUBMIT, ADD
Set the Page attribute Advanced > Reload on Submit = “Only for Success”
Under region Attributes, set Edit > Enabled to “Yes”
Set Edit > Lost Update Type = “Row Version Column”
Set Edit > Row Version Column = “VERSION_ID”
Set Edit > Add Row If Empty = “No”
If your query already included ROWID, you will need to remove this (as the IG includes the ROWID automatically).
If the table has a Surrogate Key, set the following attributes on the surrogate key column:
Identification > Type = “Hidden”
Source > Primary Key = “Yes”
Also, if the table has a Surrogate Key, delete the generated ROWID column. Otherwise, leave it (it will be treated as the Primary Key by both the Interactive Grid as well as the TAPI).
Set any columns Type = “Hidden” where appropriate (e.g. for Surrogate Key columns and VERSION_ID).
Under Validating, create a Validation:
Editable Region = (your interactive grid region)
Type = “PL/SQL Function (returning Error Text)”
PL/SQL = (copy the suggested code from the generated Apex API package) e.g.
Under Processing, edit the automatically generated “Save Interactive Grid Data” process:
Target Type = PL/SQL Code
PL/SQL = (copy the suggested code from the generated Apex API package) e.g.
I like how the new Interactive Grid provides all the extra knobs and dials needed to interface cleanly with an existing TAPI implementation. For example, you can control whether it will attempt to Lock each Row for editing – and even allows you to supply Custom PL/SQL to implement the locking. Note that the lock is still only taken when the page is submitted (unlike Oracle Forms, which locks the record as soon as the user starts editing it) – which is why we need to prevent lost updates:
Preventing Lost Updates
The Interactive Grid allows the developer to choose the type of Lost Update protection (Row Values or Row Version Column). The help text for this attribute should be required reading for any database developer. In my case, I might choose to turn this off (by setting Prevent Lost Updates = “No” in the Save Interactive Grid Data process) since my TAPI already does this; in my testing, however, it didn’t hurt to include it.
Other little bits and pieces
I found it interesting that the converted Interactive Grid includes some extra columns automatically: APEX$ROW_SELECTOR (Type = Row Selector), APEX$ROW_ACTION (Type = Actions Menu), and ROWID. These give greater control over what gets included, and you can delete these if they are not required.
Another little gem is the new Column attribute Heading > Alternative Label: “Enter the alternative label to use in dialogs and in the Single Row View. Use an alternative label when the heading contains extra formatting, such as HTML tags, which do not display properly.”.
Demo
If you’d like to play with a working version of the reference application, it’s here (at least, until the EA is refreshed) (login as demo / demo):
I’ve been running my APEX sites on Amazon EC2 for many years now, and I’ve gone through a number of infrastructure upgrades and price changes over time. I have some alerts set up, e.g. if a server starts getting very busy or if my estimated charges go over a threshold. Today I got an alert saying my estimated monthly bill will be over $100 which is unusual.
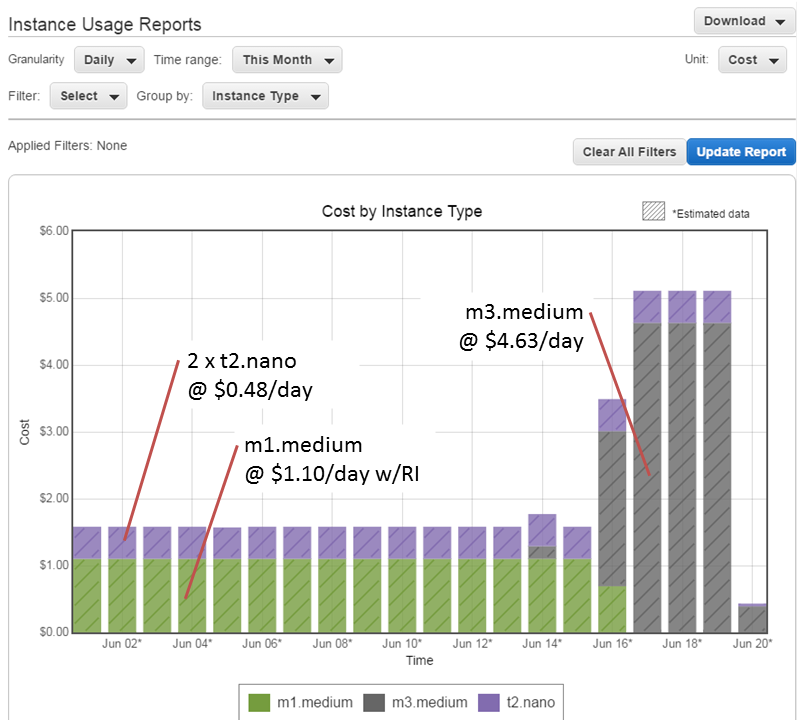
One of the most useful reports in AWS is the Instance Usage Reports (found under Dashboard > Reports > EC2 Instance Usage Report). I tell it to report Cost, grouped by Instance Type, which gives me the following:
As you can see, my daily cost was about $1.58 per day, and this shot up on the 16th (note: these rates are for the Sydney region). I was running Oracle on an m1.medium SUSE Linux instance until June 16, when I upgraded it to an m3.medium instance. I have a Reserved Instance (RI) for m1.medium, but not for m3.medium, which is why the cost has shot up. That RI will expire soon; I will purchase an m3.medium RI which will bring the cost of that instance back down to about $1 per day. Until I do that, I will be charged the “On Demand” rate of $4.63 per day.
I’m also running two t2.nano Amazon Linux instances as my frontend Apache servers. Even though they are the smallest available instance type (nano), they barely register over 1% CPU most of the time. I’ve moved all the DNS entries across to one of those nano instances now, so I will soon decommission one which will save me a few extra dollars per month.
As an APEX developer, outsourcing the hardware-related worries to AWS has been the best decision I’ve made. I’ve only suffered a couple of significant outages to date, and in both instances all my servers were still running without issue when connectivity was restored. I can spin up new instances whenever I want, e.g. to test upgrades (you might notice from the graph that I did a test upgrade on an m3.medium instance on June 14).
In case you’re wondering, the total time I needed to take down my Apex instance, take a snapshot, spin up the new instance, and swap the IP address across to it, was about 30 minutes. And that included about 10 minutes lost because I accidentally picked an incorrect option at one point. Not only that, but my upgrade also included changing from magnetic disk to SSD, which seems a bit faster. Overall I’m pretty happy with all that.
If your APEX application import log shows something like this:
...PAGE 73: Transaction Lines Report
declare
*
ERROR at line 1:
ORA-00001: unique constraint (APEX_040200.WWV_FLOW_WORKSHEET_RPTS_UK)
violated
ORA-06512: at "APEX_040200.WWV_FLOW_API", line 16271
ORA-06512: at line 6
(this is on an Apex 4.2.4 instance)
This is due to a Saved Report on an Interactive Report that was included in the export, which conflicts with a different Saved Report in the target instance. The log will, conveniently, tell you which page the IR is on.
The solution for this problem is simple – either:
(a) Export the application with Export Public Interactive Reports and Export Private Interactive Reports set to No;
OR
(b) Delete the Saved Report(s) from the instance you’re exporting from.
You can find all Saved Reports in an instance by running a query like this:
select workspace
      ,application_id
      ,application_name
      ,page_id
      ,application_user
      ,report_name
      ,report_alias
      ,status
from APEX_APPLICATION_PAGE_IR_RPT
where application_user not in ('APXWS_DEFAULT'
                              ,'APXWS_ALTERNATIVE');
You can delete Saved Reports from the Application Builder by going to the page with the Interactive Report, right-click on the IR and choose Edit Saved Reports, then select the report(s) and click Delete Checked.
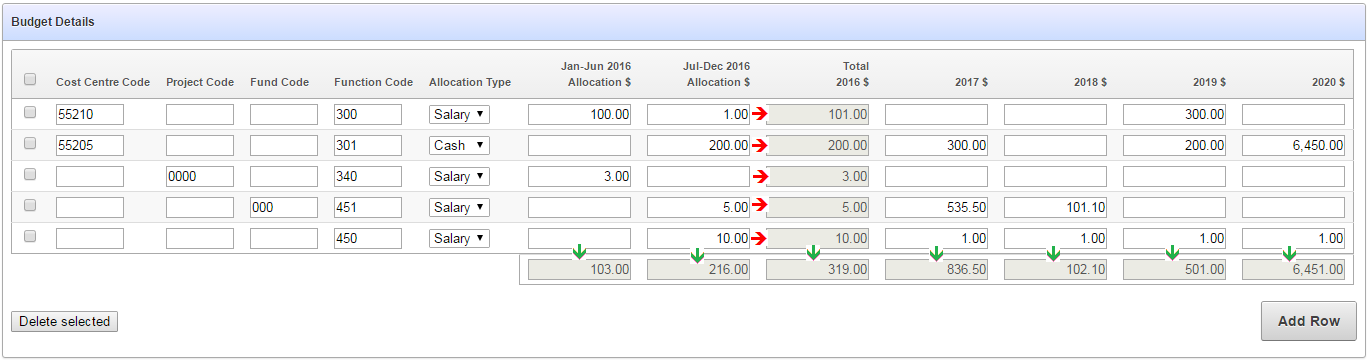
A common APEX project is to take a customer’s existing spreadsheet-based solution and convert it more-or-less as is into APEX. I’ve got one going at the moment, a budgeting solution where users need to enter their budget requests. They currently enter their requests into an XLS template file which generates subtotals and totals for them.
To do this in APEX I’m going to use a tabular form, and to do the subtotals I’ll use jQuery in a way not too dissimilar to that I described earlier.
Here is a mockup of the screen so far:
There are column totals that need to be added up and updated dynamically (indicated by the green arrows) as well as subtotals within each row (indicated by the red arrows).
I started by looking at the generated items, getting their ids (e.g. “f09_0001” etc) and writing the jQuery code to detect changes, add them up, and put the totals in the relevant items. I then started repeating this code for each column, and thought “hmmm”.
There were two problems with this approach that I could foresee:
The generated ids in a tabular form can change if the structure of the query changes – e.g. what was f08 + f09 => f10 might change to f09 + f10 => f11
I was aware of another form that I would need to build, with a similar structure except that there will be two sets of “Jan-Jun” + “Jul-Dec” columns, each with their own subtotal.
I wanted a more declarative solution, so that the heavy lifting will be done in one set of generic javascript functions, and I simply need to put attributes in the relevant columns to activate them. This is how I’ve approached this:
Create the tabular form as usual (mine is based on an APEX Collection) and remove the standard DML processes, replaced with my own that calls APEX_COLLECTION instead.
Create a standard report that generates the total items by calling APEX_ITEM.text, with p_attributes=>'data-total="x"' (with a different “x” for each column, e.g. year1).
Set the Static ID on the tabular form region (e.g. tabularform).
Set Element Attributes on the Jan-Jun column to data-cell="year1" data-col="year1_jan_jun", similarly for the Jul_Dec column.
Set Element Attributes on all the Year columns in the tabular form to data-col="yearx", where x is 1..5.
Set Element Attributes on the total for the first year to data-subtotal="year1".
The following is the query for the totals report region:
select APEX_ITEM.text(1, TO_CHAR(SUM(year1_jan_jun),'FM999G999G999G999G990D00'), p_size=>10, p_maxlength=>2000,
       p_attributes=>'disabled=true class="edit_money" data-total="year1_jan_jun"') as year1_jan_jun
      ,APEX_ITEM.text(2, TO_CHAR(SUM(year1_jul_dec),'FM999G999G999G999G990D00'), p_size=>10, p_maxlength=>2000,
       p_attributes=>'disabled=true class="edit_money" data-total="year1_jul_dec"') as year1_jul_dec
      ,APEX_ITEM.text(3, TO_CHAR(SUM(year1_total),'FM999G999G999G999G990D00'), p_size=>10, p_maxlength=>2000,
       p_attributes=>'disabled=true class="edit_money" data-total="year1"') as year1_total
      ,APEX_ITEM.text(4, TO_CHAR(SUM(year2_total),'FM999G999G999G999G990D00'), p_size=>10, p_maxlength=>2000,
       p_attributes=>'disabled=true class="edit_money" data-total="year2"') as year2_total
      ,APEX_ITEM.text(5, TO_CHAR(SUM(year3_total),'FM999G999G999G999G990D00'), p_size=>10, p_maxlength=>2000,
       p_attributes=>'disabled=true class="edit_money" data-total="year3"') as year3_total
      ,APEX_ITEM.text(6, TO_CHAR(SUM(year4_total),'FM999G999G999G999G990D00'), p_size=>10, p_maxlength=>2000,
       p_attributes=>'disabled=true class="edit_money" data-total="year4"') as year4_total
      ,APEX_ITEM.text(7, TO_CHAR(SUM(year5_total),'FM999G999G999G999G990D00'), p_size=>10, p_maxlength=>2000,
       p_attributes=>'disabled=true class="edit_money" data-total="year5"') as year5_total
from budget_collection_vw
So, to summarise: all the data-cell items get totalled to the data-subtotal item in the same row; and all the data-col items get totalled to the data-total item below the tabular form.
To do all the hard work, I’ve added the following code to my page’s Function and Global Variable Declaration:
function getSum (qry) {
  //get the sum over all items matching the given jQuery search criterion
  var t = 0;
  $(qry).each(function() {
    t += parseFloat($(this).val().replace(/,/g,''))||0;
  });
  return t;
}

function updateSubTotal (item) {
  // update a row-level subtotal
  // the items to add up are identified by data-cell="x"
  // the item to show the total is identified by data-subtotal="x"
  var cell = $(item).data("cell") //get the data-cell attribute
     ,rn = $(item).prop("id").split("_")[1]
     ,t = getSum("input[data-cell='"+cell+"'][id$='_"+rn+"']");

  // we need to temporarily enable then disable the subtotal
  // item in order for the change event to fire
  $("input[data-subtotal="+cell+"][id$='_"+rn+"']")
    .val(t.formatMoney())
    .prop("disabled",false)
    .trigger("change")
    .prop("disabled",true);
}

function updateTotal (item) {
  // update a column total
  var col = $(item).data("col") //get the data-col attribute
     ,t = getSum("input[data-col='"+col+"']");

  $("input[data-total="+col+"]")
    .val(t.formatMoney())
    .trigger("change");
}
In case you’re wondering, I’m re-using the formatMoney function here.
There’s a number of things happening here. On page load, we add a listener for changes to any input item that has a data-cell attribute; this calls updateSubTotal, which detects the row number for the triggering item, adds up all the values for any input item that has the same data-cell value; and puts the total in the input item with a matching data-subtotal attribute.
We also have a listener for changes to any item with a data-col class; when these are changed, updateTotal adds up any item with the same attribute, and puts the total in an item with attribute data-total.
The jQuery selector [id$='_"+rn+"'] makes sure that the row-level code only finds items ending with the given row number (i.e. '*_0001').
The benefit of this declarative approach is that it is much easier to re-use and adapt.
EDIT: fixed the change trigger so that I don’t need to call updateTotal from updateSubTotal.
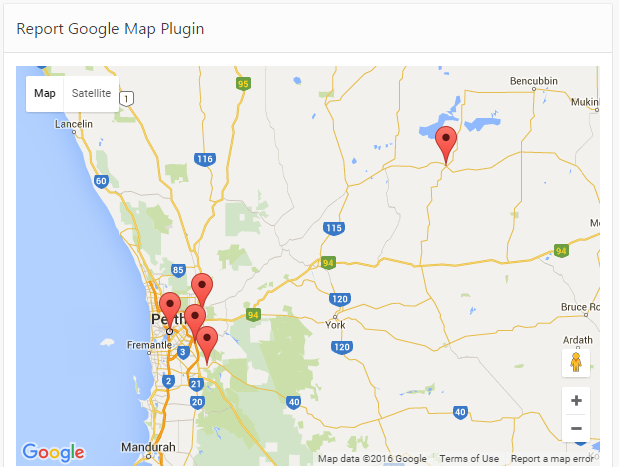
I’ve published two three APEX Region Plugins on apex.world that allow you to incorporate a simple Google Map region into your application. They’re easy to use, and you don’t need to apply for a Google API key or anything like that (although you can plug your key in if you have one, which enables a few additional features).
1. Simple Map
This allows you to add a small map to a page to allow the user to select any arbitrary point. If you synchronize it with an item on your page, it will put the Latitude, Longitude into that item. If the item has a value on page load, or is changed, the pin on the map is automatically updated.
This allows you to add a map to a page, and based on a SQL query you supply, it will render a number of pins on the map. Each pin has an ID, a name (used when the user hovers over a pin), and an info text (which can be almost any HTML, rendered in a popup window when the user clicks a pin).
If the user clicks a pin, the ID can be set in a page item.
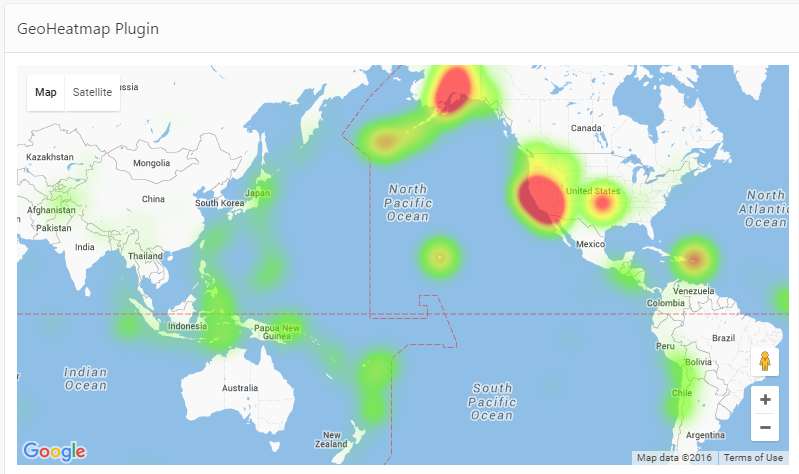
EDIT: the GeoHeatMap plugin was deprecated in 2019; its features have been incorporated into the ReportMap plugin.
Visualise a large set of data points on the map using the Google Maps “Heatmap” visualisation. All you need to do is supply a SQL Query that returns the data points to show, and the visualisation library does the rest.
Your SQL Query must be in the following format:
select lat, lng, weight from mydata;
You can set the Map Style (e.g. to the light blue/greyscale style you see above) easily on this plugin; just copy-and-paste the style codes from a site like snazzymaps.com.
Ever since I started exploring the idea of using a TAPI approach with APEX, something I was never quite satisfied with was Tabular Forms.
They can be a bit finicky to work with, and if you’re not careful you can break them to the point where it’s easier to recreate them from scratch rather than try to fix them (although if you understand the underlying mechanics you can fix them [there was an article about this I read recently but I can’t find it now]).
I wanted to use the stock-standard APEX tabular form, rather than something like Martin D’Souza’s approach – although I have used that a number of times with good results.
In the last week or so while making numerous improvements to my TAPI generator, and creating the new APEX API generator, I tackled again the issue of tabular forms. I had a form that was still using the built-in APEX ApplyMRU and ApplyMRD processes (which, of course, bypass my TAPI). I found that if I deleted both of these processes, and replaced them with a single process that loops over the APEX_APPLICATION.g_f0x arrays, I lose a number of Tabular Form features such as detecting which records were changed.
Instead, what ended up working (while retaining all the benefits of a standard APEX tabular form) was to create a row-level process instead. Here’s some example code that I put in this APEX process that interfaces with my APEX API:
The process has Execution Scope set to For Created and Modified Rows. It first calls my TAPI.rv function to convert the individual columns from the row into an rvtype record, which it then passes to the APEX API apply_mr procedure. The downside to this approach is that each record is processed separately – no bulk updates; however, tabular forms are rarely used to insert or update significant volumes of data anyway so I doubt this would be of practical concern. The advantage of using the rv function is that it means I don’t need to repeat all the column parameters for all my API procedures, making maintenance easier.
The other change that I had to make was ensure that any Hidden columns referred to in my Apply process must be set to Hidden Column (saves state) – in this case, the VERSION_ID column.
Here’s the generated APEX API apply_mr procedure:
PROCEDURE apply_mr (rv IN VENUES$TAPI.rvtype) IS
  r VENUES$TAPI.rowtype;
BEGIN
  log_start('apply_mr');

  UTIL.check_authorization('Operator');

  IF APEX_APPLICATION.g_request = 'MULTI_ROW_DELETE' THEN

    IF v('APEX$ROW_SELECTOR') = 'X' THEN
      VENUES$TAPI.del (rv => rv);
    END IF;

  ELSE

    CASE v('APEX$ROW_STATUS')
    WHEN 'C' THEN

      r := VENUES$TAPI.ins (rv => rv);

    WHEN 'U' THEN

      r := VENUES$TAPI.upd (rv => rv);

    ELSE
      NULL;
    END CASE;

  END IF;

  log_end;
EXCEPTION
  WHEN UTIL.application_error THEN
    log_end('application_error');
    RAISE;
  WHEN OTHERS THEN
    UTIL.log_sqlerrm;
    RAISE;
END apply_mr;
The code uses APEX$ROW_STATUS to determine whether to insert or update each record. If the Delete button was pressed, it checks APEX$ROW_SELECTOR to check that the record had been selected for delete – although it could skip that check since APEX seems to call the procedure for only the selected records anyway. The debug logs show APEX skipping the records that weren’t selected.
Now, before we run off gleefully inserting and updating records we should really think about validating them and reporting any errors to the user in a nice way. The TAPI ins and upd functions do run the validation routine, but they don’t set up UTIL with the mappings so that the APEX errors are registered as we need them to. So, we add a per-record validation in the APEX page that runs this:
As for the single-record page, this validation step is of type PL/SQL Function (returning Error Text). Its Execution Scope is the same as for the apply_mr process – For Created and Modified Rows.
Note that we need to set a static ID on the tabular form region (the generator assumes it is the table name in lowercase – e.g. venues – but this can be changed if desired).
The val_row procedure is as follows:
PROCEDURE val_row
  (rv               IN VENUES$TAPI.rvtype
  ,region_static_id IN VARCHAR2
  ) IS
  dummy            VARCHAR2(32767);
  column_alias_map UTIL.str_map;
BEGIN
  log_start('val_row');

  UTIL.pre_val_row
    (label_map        => VENUES$TAPI.label_map
    ,region_static_id => region_static_id
    ,column_alias_map => column_alias_map);

  dummy := VENUES$TAPI.val (rv => rv);

  UTIL.post_val;

  log_end;
EXCEPTION
  WHEN UTIL.application_error THEN
    log_end('application_error');
    RAISE;
  WHEN OTHERS THEN
    UTIL.log_sqlerrm;
    RAISE;
END val_row;
The pre_val_row procedure tells all the validation handlers how to register any error message with APEX_ERROR. In this case, column_alias_map is empty, which causes them to assume that each column name in the tabular form is named the same as the column name on the database. If this default mapping is not correct for a particular column, we can declare the mapping, e.g. column_alias_map('DB_COLUMN_NAME') := 'TABULAR_FORM_COLUMN_NAME';. This way, when the errors are registered with APEX_ERROR they will be shown correctly on the APEX page.
Things got a little complicated when I tried using this approach for a table that didn’t have any surrogate key, where my TAPI uses ROWID instead to uniquely identify a row for update. In this case, I had to change the generated query to include the ROWID, e.g.:
SELECT t.event_type
      ,t.name
      ,t.calendar_css
      ,t.start_date
      ,t.end_date
      ,t.last_updated_dt
      ,t.version_id
      ,t.ROWID AS p_rowid
FROM   event_types t
I found if I didn’t give a different alias for ROWID, the tabular form would not be rendered at runtime as it conflicted with APEX trying to get its own version of ROWID from the query. Note that the P_ROWID must also be set to Hidden Column (saves state). I found it strange that APEX would worry about it because when I removed* the ApplyMRU and ApplyMRD processes, it stopped emitting the ROWID in the frowid_000n hidden items. Anyway, giving it the alias meant that it all worked fine in the end.
* CORRECTION (7/11/2016): Don’t remove the ApplyMRU process, instead mark it with a Condition of “Never” – otherwise APEX will be unable to map errors to the right rows in the tabular form.
The Add Rows button works; also, the Save button correctly calls my TAPI only for inserted and updated records, and shows error messages correctly. I can use APEX’s builtin Tabular Form feature, integrated neatly with my TAPI instead of manipulating the table directly. Mission accomplished.