Tom Kyte offers some astute observations regarding EAV data models in general.
Interesting to see the justification for entity-attribute-value data models from their use in the design of Oracle Application Express. I’d say I’d have to agree – the site I’m at currently is chocas with name/value pairs, which works fine when querying individual bits of data for the UI, but works miserably for reporting and batch jobs.
Every day it seems, Googlebot scans my site. You wouldn’t think that would affect the performance of the site, or if at all, would make it worse, right?
A few days ago I used APEX’s Page View Analysis, Weighted Page Performance (under Home > Administration > Monitor Activity) to see which pages I should focus on to improve performance. The top page was my home page, which was taking 0.9 seconds to load on average. There were other pages that were taking longer to load, but the home page was the most common entry point so it had a higher “weighting”.
So I loaded up the page while logged in as a developer and clicked the “Debug” button at the bottom of the page. It showed that all the regions on the page were rendering in about 0.01 seconds each (sometimes a bit more), except for one region – a region that pulled a small bit of XML from another website (“Verse of the Day” via BibleGateway.com) and displayed it – it was consistently taking 0.5 – 0.8 seconds to load.
The “Verse of the Day”, obviously, only changes once a day, but for some reason, in spite of the Cache settings on the region, it was still going back to the source every page view (side question: have you noticed that in Debug mode, it seems no regions are found in the cache? – perhaps this is by design?).
Oh well – I was thinking that I’d like to store the text that is being shown in that region anyway, so I created a simple table to store the text, then rewrote the PL/SQL to get the text from the table instead; and if not found, only then does it go to BibleGateway.com to get the VotD.
After the first pageview loads the verse into the cache, subsequent pageviews are taking less than 0.1 seconds total, so that’s solved – except for the very first visitor to the site of the day, who will have to wait a whole 0.9 seconds.
However, as I discovered this morning, looking at the logs, it appears Googlebot is the one who is suffering – sometime after midnight most nights it scans the site, seeds the cache for me, then everyone who visits that day gets the benefit of the cache 🙂 🙂 🙂
Problem: when Google indexes my APEX web site, it considers the following URLs to be different pages:
http://www.site.com/apex/f?p=100:1:1234567890::::
http://www.site.com/apex/f?p=100:1:0::::
http://www.site.com/apex/f?p=MYAPP:1:46346346346::::
http://www.site.com/apex/f?p=MYAPP:1:34634634636::::
http://www.site.com/apex/f?p=MYAPP:HOME:46346346346::::
http://www.site.com/apex/f?p=MYAPP:HOME:0::::
Notice how my application with ID 100 has an alias of MYAPP, and page 1 has an alias of HOME; also, more duplicates happen due to the session ID; all these URLs point to pretty much the same content, but Google indexes them all as separate pages.
Google provides two features that help webmasters solve the duplicate page problem.
Solution #1: Parameter Handling – not very useful (for us)
This solution involves telling Google which parameters to ignore when indexing URLs. This doesn’t help us with APEX, because apex only uses one parameter – “p”; if we were to tell Google to ignore the “p” parameter it would consider ALL pages in our site to be identical, which is not correct.
Solution #2: Specify Your Canonical – very useful!
Example:
<head>

<link rel="canonical" href="http://www.example.com/product.php?item=swedish-fish" />

</head>
This works nicely for us – for any page that we want we can tell Google what URL should be the “canonical” or “official” URL for that page. We can use this in our APEX applications in a number of ways. Each has advantages and disadvantages and YMMV, and it depends on how many different kinds of pages you have and whether you want the same canonical form for all pages, or if you want it customised for individual pages.
A. Custom canonical URL for each page.
This option will probably be the most generally useful, since some pages (e.g. multi-row paged results) won’t work so well with a canonical URL, so you’ll want to specify a canonical URL for just some key pages on your site.
To do this, go to the Page editor and edit the Page Attributes, edit the HTML Header and add the following:
<link rel="canonical" href="/apex/f?p=&APP_ID.:&APP_PAGE_ID.:0"/>
- You can add the full URL instead of a relative one if you want, but note if you do that it must be on the same domain (e.g. if your site is www.mysite.com, you can’t have a canonical URL pointing to myothersite.com). Anyway, Google don’t mind if you use relative URLs here, so that’s what I do.
- You don’t have to use the
&APP_xxx. substitution variables if you don’t want to – e.g. you could specify another application or page entirely if that makes sense for your app.
- If your application has an alias, you could use that as the canonical URL:
<link rel="canonical" href="/apex/f?p=&APP_ALIAS.:&APP_PAGE_ID.:0"/>
B. Global canonical URL for all pages in an application.
This option works well if you want all the pages to have the same form of canonical URL. Because we’ll use the &APP_PAGE_ID. substitution variable, it will still correctly give the correct URL for each page in the application.
To do this, go to the Shared Components, and open Themes. Open the theme in use by your application, then find the Page themes. Next to each Page Theme is a number that indicates how many pages use that Page Theme; those are the only ones you need to edit (although there’s nothing stopping you from editing all of them if you wish).
Click the Page Theme name to edit it. In the Header definition, add the canonical link – it must be inserted after the <head> tag, and prior to the </head> tag. For example:
<html lang="&BROWSER_LANGUAGE." xmlns:htmldb="http://htmldb.oracle.com">

<head>

<title>#TITLE#</title>

<link rel="stylesheet" href="#IMAGE_PREFIX#themes/theme_16/theme_V3.css" type="text/css" />

<!--[if IE]><link rel="stylesheet" href="#IMAGE_PREFIX#themes/theme_16/ie.css" type="text/css" /><![endif]-->

<link rel="canonical" href="/apex/f?p=&APP_ALIAS.:&APP_PAGE_ID.:0"/>

#HEAD#

</head>

<body #ONLOAD#>#FORM_OPEN#
Now, it’s important to test your changes thoroughly because many syntax errors you enter will not manifest in any obvious problems when browsing the site. Open your pages and View Source – check that the header section of the HTML includes the correct <link rel="canonical" ...> tag, and ensure that the URL resolves to the same page by copying it out and pasting it into your brower’s address bar.
Once that’s done that’s it! When Google next indexes your site it should honour your canonical URLs and remove duplicate pages from its indexes.

I wanted to allow users to select one or more colours from a list, and to control the order of the colours, so I’ve used a Shuttle item.
I wanted to have different background colours for each value in the list, so I started here for help. I’m not very strong with javascript (yet) but with a bit of looking around and playing I ended up with what I wanted.
I created an item on the page with the following attributes:
Display As: Shuttle
List of values definition: STATIC2:Yellow;#FFFF00, Green;#00FF00, Turquoise;#00FFFF, Pink;#FF90FF, Blue;#9090FF, Purple;#FF00FF, Red;#FF9090
Post Element Text:
<script type="text/javascript">

(function() {

for (i=0;i<$x("#CURRENT_ITEM_NAME#_2").length;i++) {

$x("#CURRENT_ITEM_NAME#_2")[i].style.backgroundColor

= $x("#CURRENT_ITEM_NAME#_2")[i].value;

}

for (i=0;i<$x("#CURRENT_ITEM_NAME#").length;i++) {

$x("#CURRENT_ITEM_NAME#")[i].style.backgroundColor

= $x("#CURRENT_ITEM_NAME#")[i].value;

}

})();

</script>
Notes:
- the value of each item in the list is a HTML colour code. This colour code is used to set the background colour of the item in the list.
- the shuttle item actually involves two select lists in the generated page. If the item name is P1_SHUTTLE, the generated items will be P1_SHUTTLE_2 (the left-hand list) and P1_SHUTTLE (the right-hand list). These are referenced in the javascript via #CURRENT_ITEM_NAME# and #CURRENT_ITEM_NAME#_2.
- the $x returns the select list dom object, which supports the “length” attribute – this returns the count of items in the list
- the select list index starts at 0 and goes up to length-1
A small problem is when the “reset” button is clicked the colours disappear. They reappear if the page is refreshed, however.
Something to file under “pointless fun”…
Allow your users to feel like they’re part of a community by letting them know who else is using the app at the same time.
- Open APEX Application Builder, and open the page you want to add this to.
- Click the Create Region icon.
- Choose Report, then SQL Report.
- Enter a title, e.g. “Who’s Online Now”. Click Next.
- Copy the following for the SQL Query (sorry about the poor formatting):
SELECT apex_user || ' (' || minutes_ago
       || DECODE(minutes_ago,1,' min ago)',' mins ago)')
FROM (
  SELECT DISTINCT
         apex_user,
         FIRST_VALUE(TRUNC(seconds_ago/60))
         OVER (PARTITION BY apex_user ORDER BY seconds_ago)
         AS minutes_ago
  FROM apex_workspace_activity_log
  WHERE application_id = :APP_ID
  AND seconds_ago < 3600
  AND apex_user NOT IN (:APP_USER, 'nobody')
  ORDER BY 2);
- Click Next. Click Create Region.
You can customise the region as much as you like. For example, I use:
- Template (under Region Definition) = “Sidebar Region”
- Report Template (under Report Attributes) = “template: 16. One Column Unordered List”
- Pagination Scheme = “- No Pagination Selected -“
- Headings Type = “None”
The query is based on the APEX view apex_workspace_activity_log which is supplied with the product. It looks at all session activity within the last hour by users other than the current user, and returns a list showing their most recent activity.
The only slight problem is that it doesn’t detect when someone logs out – they’ll stay in the report for up to an hour.
I had this problem with an APEX application I’m building, and finally found the cause this morning, so I thought I’d share it.
This particular application has some pages which are only available to authenticated users, and some pages which are visible to everyone. One nice thing about APEX is that it automatically redirects users to the Login screen if they try to navigate to a protected page.
After authentication, the user doesn’t have to login again – they can now see all pages of the application that I want them to see. This used to work fine.
Recently I noticed that sometimes I’d Login with my username and password, click on a Tab, and it would ask me to Login again. In these instances, it’d only ask me to Login just the second time – after that, it would be fine. I wrote it off as a random glitch on my home-grown server. It seemed to be random, and after a while I noticed it was happening once every day. I looked all through my application, trying to find any links that didn’t pass the &SESSION. through, but I couldn’t find any such problems. I looked at some other applications on the same server – no problems there, it was just this one application.
Just this morning I went in, and happened to notice something not quite right. Normally, when I go into an application, the URL looks something like this:
http://www.xyz.com/apex/f?p=100:1:318727495645403::NO
The site should generate the long numeric Session ID automatically. However, I noticed my URL looked like this:
http://www.xyz.com/apex/f?p=100:1:0::NO
The Session ID was zero. This is a relatively new feature of APEX which I use for my fully-public applications (i.e. ones which require no authentication), where no Session ID is required – it means users can bookmark individual pages without having a long Session ID embedded in the URL.
The cause? When I updated my index page of APEX applications, I copied another entry without thinking, and so included the “0” for the Session ID. So when I first logged in, it gave me a new session, but somewhere internally APEX still had my Session ID = 0, requiring me to Login again. After this, the internal reference to my session was updated. I don’t know if this is expected behaviour or a bug in APEX.
The fix? Remove the 0 from the initial link (e.g. now it looks like “http://www.xyz.com/apex/f?p=100:1”) – zero session IDs are only appropriate for applications that require no login at all anyway.
This is a followup on my earlier series on setting up APEX on Linux. In it I described how I used Apache web server in front of APEX, instead of accessing APEX directly via OWA (this was so that I could use the same port to serve ordinary web pages and files via HTTP).
A consequence of that set up is that all my APEX pages are a little slow to load up because none of the images are being cached on the client. To solve this I added the following lines to my httpd.conf:
<LocationMatch /i>
   ExpiresActive on
   ExpiresDefault "access plus 1 month"
</LocationMatch>

<LocationMatch /apex>
   ExpiresActive on
   ExpiresDefault "access"
   ExpiresByType image/gif "access plus 1 month"
   ExpiresByType image/jpeg "access plus 1 month"
   ExpiresByType image/bmp "access plus 1 month"
</LocationMatch>
My location “/i” points to the images used by APEX. Since there are only images in there I’ve told it to expire everything (ExpiresDefault) after a month.
The location “/apex” is for the actual APEX pages, including APEX application images which are not in /i/. I’ve set the default to “access” (in other words, don’t cache them), but added exceptions for the various image types in use to cache for a month.
[Previous]
I’ve got my Linux server running now, and I can access it from anywhere on the Internet. I can even do application development remotely in Apex, which is fun to show off.
Now, I have a number of small APEX applications (mainly personal use) which are running on my Windows PC, and I want to transfer them all to Linux. The steps I take are as follows:
- Backup
- Export the applications
- Export the data
- Export the workspaces
- Set up tablespaces
- Import the workspaces
- Import the data
- Import the applications
- Test
- Backup
Instead of trying to just copy everything across in one big bang, I wanted to selectively move certain applications and data across, with a few changes along the way. For example, one application was storing a lot of images in BLOBs in a table, but in the new database these are going to be stored on the filesystem to save space in the database. So I’ll only export the data for the other tables, not including the BLOBs (if needed I could export the data to files on the filesystem, but as it happens I have already been keeping copies of all these images on the filesystem anyway, so it’ll be a simple matter to transfer them across). Another change is that one workspace uses a schema name which I’d like to change in the new database.
In detail:
1. Backup
The docs always say “take a backup” before you do anything. On this occasion I decide to actually do this for once. So I do a complete export of the database on the Linux PC.
While that’s running, I switch over to the Windows box and:
2. Export the applications
I’ve only got half a dozen applications I want to transfer across, so it’s not too big a deal to log into each workspace, select an application, click Export/Import, choose Export, and click Export Application.
3. Export the data
I’ve only got a small amount of data and with one exception I just want to get exports of all objects for the various schemas used by the workspaces, so I use the exp utility, one at a time for each schema. The one exception is the schema with the BLOBs – in that case, I choose the mode that allows me to select individual objects to export. Not too hard, as long as I don’t have to do it every day!
The docs all say to use the new Data Pump feature. So “do as I say, not as I do”…
4. Export the workspaces
This is a very useful feature of Apex – it takes care of creating workspaces, schemas and users along with their privileges. To do this, I log into the APEX Administration function (e.g. via the INTERNAL workspace), select Manage Workspaces, and click Export Workspace. Select each workspace in turn and click Export Workspace. Choose UNIX for the file format and click Save File.
Ok, I’ve got all the files I need. I put them on a transfer disk (I’ve got a share on the Windows PC) and switch back to Linux. The backup I started earlier has finished, so now I can start importing it all.
5. Set up tablespaces
I decided to set up my tablespaces manually, so I can specify the file sizes and everything to my exact requirements. E.G.:
CREATE TABLESPACE FLOW_1DATAFILE '/usr/lib/oracle/xe/oradata/XE/FLOW_1.dbf'SIZE 5M NEXT 1M MAXSIZE 100M;
6. Import the workspaces
What could be simpler? APEX Admin, Manage Workspaces, Import Workspace, pick the workspace export file created in step 4, and click Install. I choose the option to create new schemas. In one case I change the schema name (mentioned above).
7. Import the data
Simple matter of running the imp command in a Linux command window. I got quite a few compilation errors due to dependencies between schemas (including some schemas that I’d decided not to import), but once they’re resolved it’s all good.
8. Import the applications
Log into each workspace and click Application Builder, Import. Choose the application exported in step 2 above. Click Next and I’m done!
9. Test
I use all my test cases that I’ve prepared thoroughly beforehand (not!)… ha. Well, in fact I just opened each application and checked a few pages here and there. A few bits and bobs not working but soon sorted out.
10. Backup
I take another backup to lock down everything in a known working state, and it’s all done!
I’m sure there’s two dozen other ways I could have done all this, some of which perhaps easier, more efficient or just more exciting. Certainly I wouldn’t advocate all these steps for a large installation. It’ll depend on your requirements. Another approach would have been to do a complete export of Oracle and import the whole thing.
Please add any comments to any of the posts in this series about your experiences in these areas, as others have done already. We can all learn from each other, and that’s what I love about blogging. Thanks!
Thanks for reading – I hope you’ve enjoyed this little series on “Dirt Cheap Oracle”. I hope I’ve demonstrated that it is possible, and relatively easy, to obtain and set up a cheap Linux box, and add to your APEX/Oracle experience skills in web server configuration and home networking, all for free.
I can see this kind of setup being really useful for small non-profit organisations like community groups, charities, and religious organisations. Get out there and give it a go!
[Previous]
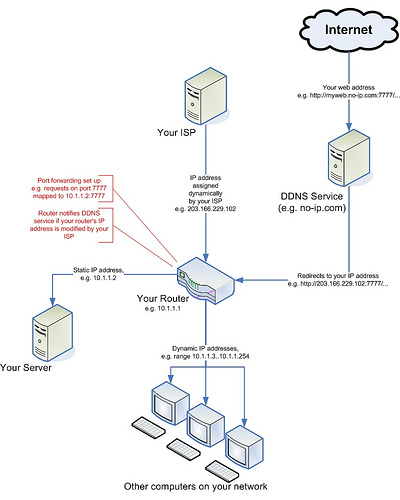
The link here is to a diagram that illustrates what I talked about in recent posts, how to set up a Dynamic DNS service and how the various IP addresses and ports relate to your router and devices connected to it.
[Next]
[Previous]
I want people to get to both my Apache web server (port 8000) as well as Apex (port 8080) via the default HTTP port (80) through the router, but you can’t map one port to two ports – otherwise, how is the router to know which port to pass requests on to? There’s a good reason why I’ve chosen the web server to get all the traffic, and that’s because I have an idea how to get Apache to pass traffic to APEX, but not how the other way around could be done (EPG pass traffic to Apache).
This was a bit of a conundrum, and I was forced to do some spelunking in the documentation for Apache web server configuration. Reading these docs is highly recommended, it’s a lot of fun although at first it’s hard to know where to start. I’d recommend starting with the sections on Configuration Files and Configuration Sections, with a bit of browsing through the various commands, and then maybe the URL Rewriting Guide.
It wasn’t pretty; in the end it came down to one of two options:
(a) Redirect
(b) Rewrite
I can’t use redirection because whenever someone goes to my web page, redirection means Apache will send back a message saying “wrong address, please try this new address” which would include port 8080, which for at least one friend of mine would be blocked.
So I tried URL rewriting, adding the following lines into my /etc/httpd/conf/httpd.conf:
<Location /apex>
    RewriteEngine On
    RewriteRule (.*) http://%{SERVER_NAME}:8080%{REQUEST_URI} [last]
    Order deny,allow
    Deny from none
    Allow from all
</Location>
(BTW if you’re wondering, the third line starting with “RewriteRule” is one long line, “{REQUEST_URI}…” should appear directly after “…8080%” without any line break)
This means: for any URL requesting /apex or anything under that folder, rewrite the request to go to the same server and address, but on port 8080.
This would have worked, except that according to the documentation, if the rewrite engine changes the host or port of the url, it will actually do a Redirect! So rewriting is no better than redirection for this case.
In the end, I found a third option:
(c) ProxyPass
I added the following lines into httpd.conf:
ProxyRequests Off
ProxyPass /apex http://localhost:8080/apex
ProxyPassReverse / http://localhost:8080
ProxyReceiveBufferSize 49152
(the above assumes that localhost is mapped in my hosts file)
This solved the problem for me. What the lines above mean is, any request for /apex or anything underneath it is internally passed on to http://localhost:8080/apex which will act like a proxy server for the request. This operation is transparent to the client, which doesn’t know that anything’s changed. I believe ProxyPassReverse is also needed so that requests going back from port 8080 is routed in the reverse direction; not entirely sure how that works but at least it works.
Now, that works, but when I access APEX pages via port 8000 (80 from the outside), I get all the text but no images. That’s because APEX was serving images via /i/ on port 8080 (via EPG), but now we have this proxy thing only passing requests for /apex/* to it, and Apache web server can’t find /i/.
At first I tried adding another ProxyPass line for /i to port 8080, and this did work; however, all the pages loaded very slowly, all the images were visibly taking time to load each time a page was refreshed, so no images were being cached. I figured this lack of caching was because Apache can’t tell that an image hasn’t been changed since the last time it was requested.
This performance problem was solved by getting all the Apex images and putting them on another folder on the Linux box (e.g. /usr/lib/oracle/apex/images) and adding the following line to httpd.conf:
Alias /i/ "/usr/lib/oracle/apex/images/"
This means that all the APEX images are now served by Apache web server instead of by Apex. It also means that application images I’ve loaded have to be copied out to the file system, but in my case there weren’t many and it didn’t take long.
It’s all very simple, isn’t it? Not. But at least it works, and reasonably well. My friends and family are suitably impressed, although they have no inkling of the trouble I went to to get it all working. Ah, the thankless life of an Oracle programmer – but it’s all worth it in the end when I can do full-on development remotely, wherever in the world I happen to be (e.g. down the road at a friend’s place).
Next problem: world peace. Or, migrating my existing APEX applications from the XP box to Linux. Depending on how much time I have.
[Next]
