My current project uses Oracle RLS (Row Level Security) to ensure each user can only see the data they’re allowed to see. This has made a potentially very complex application very simple. My APEX pages can query any table, no WHERE clauses needed (except for user-entered filters), and I can be confident they won’t be able to inadvertently see rows they’re not supposed to see if I forget to add the right predicate on every page that queries each table.
Now, remember that APEX is a stateless environment as far as database sessions are concerned: when a page is requested, it might be generated by any session running on the database; it might re-use a session that had just finished rendering a page for someone else entirely. Therefore, it is imperative that all my database code assumes nothing about the state of package variables, for example. Instead, we use Oracle Application Contexts to hold session-specific information. For example, a context might hold the current user’s identifier, or a flag that indicates they have been granted a particular privilege. As an added advantage, when we use contexts, we can easily pass data into views.
How do we guarantee that the context has been set correctly for the current user’s session? We could follow the guidelines in the APEX help (quoted below) to set the context at the start of every page call, then clear them at the end of the page call. If we were to do this, these are the steps we’d take (these are taken from APEX 4.1.1 but should be comparable in other releases):
- Create the context:
CREATE OR REPLACE CONTEXT MY_CONTEXT USING MY_PACKAGE;
- Create a database package with a procedure to Set the context variable(s), e.g.:
PROCEDURE set_session IS
BEGIN
  DBMS_SESSION.set_context
    (namespace => 'MY_CONTEXT'
    ,attribute => 'is_admin'
    ,value     => 'Y');
END new_session;
- Edit Application Properties; under Security, in the Database Session section, set Initialization PL/SQL Code to call MY_PACKAGE.set_session.
It is interesting that the APEX help page for Initialization PL/SQL Code has this to say:
“Use this attribute to enter a PL/SQL block that sets a context for the database session associated with the current “show page” or “accept page” request. The block you enter here is executed at a very early point during the page request, immediately after the APP_USER value is established. The value of APP_USER (using :APP_USER or v(‘APP_USER’)) may be used within the block. Values of other items in session state may be referenced as well, but any such items must have been established in session state before the initiation of the current page request. Consider the following example:
dbms_session.set_context(‘CTX_USER_QRY’,’USERPRIV’,my_package.my_function(:APP_USER));
It sets the value of USERPRIV in the context named CTX_USER_QRY to the value returned by the function my_function in package my_package. The function is passed the current value of APP_USER as an input argument. Presumably, the named context would be used in a VPD policy ( created within the application’s parsing schema) to effect the generation of predicates appropriate to the authenticated user.
Virtual Private Database, also know as Fine-Grained Access Control or FGAC, is an Oracle database feature that provides an application programming interface (API) that enables developers to assign security policies to database tables and views. Using PL/SQL, developers can create security policies with stored procedures and bind the procedures to a table or view by means of a call to an RDBMS package. Such policies are based on the content of application data stored within the database, or based on context variables provided by Oracle database. In this way, VPD permits access security mechanisms to be removed from applications, and to be situated closer to particular schemas.
…”
This works fine. Before every page is rendered, APEX calls our package to set the context variables. All our procedures, views, etc. as well as our RLS package can use these context variables as required.
Is there a simpler way? Yes.
Just this morning I attended an “Odds and Ends” session presented by Connor McDonald at the AUSOUG Monthly meeting in Perth. He briefly mentioned a cool feature of Oracle contexts – the fact that they can be made globally accessible. I had seen this in the documentation but didn’t know what the words meant or how it might be useful.
What Connor’s talk alerted me to was that what a Globally Accessible context does could be very useful for our APEX application: it allows a context to be simultaneously available from any session on the database, to any user who logs in and sets the correct Client Identifier. We can use this to avoid having to call any code from Initialization PL/SQL Code, which would be run before every page request, which may have a performance impact; instead, the context variables will follow the user around, no matter which database session services their page request.
To do this, you simply:
- Create our context to be globally accessible:
CREATE OR REPLACE CONTEXT MY_CONTEXT USING MY_PACKAGE
  ACCESSED GLOBALLY;
- Alter our database package to set the context variables, this time sending the client_id parameter, e.g.:
PROCEDURE set_session IS
v_real_client_id VARCHAR2(200);
BEGIN
  v_real_client_id := REPLACE(
    SYS_CONTEXT('USERENV','CLIENT_IDENTIFIER')
               ,'nobody'
               ,v('APP_USER'));
  DBMS_SESSION.set_context
    (namespace => 'MY_CONTEXT'
    ,attribute => 'is_admin'
    ,value     => 'Y'
    ,client_id => v_real_client_id);
END set_session;
- In APEX, remove the Initialization PL/SQL Code – we don’t need it anymore.
- In the Authentication scheme, set Post-Authentication Procedure Name to MY_PACKAGE.set_session.
Now, our context is only set once – just after login. Excellent.
“Now,” you’ll no doubt want to ask me, “where did you actually set the Client Identifier? And what’s the deal with the REPLACE?”
We don’t have to worry about setting Client Identifier – APEX already sets it for us automatically for each page request. If you log into an ordinary APEX application, and examine the Client Identifier, you’ll get something like this:
SCOTT:15135454564654
Where “SCOTT” is the login username, and “15135454564654” is the APEX session ID. We can bind our context to this combination of values simply by passing the Client Identifier to the client_id parameter of DBMS_SESSION.set_context. In fact, most of the time this sort of code will work fine:
DBMS_SESSION.set_context
 (namespace => 'MY_CONTEXT'
 ,attribute => 'my_attribute'
 ,value     => 'xyz'
 ,client_id => SYS_CONTEXT('USERENV','CLIENT_IDENTIFIER'));
Unfortunately, however, if we look at CLIENT_IDENTIFIER from the post-login procedure (i.e. immediately after the user has successfully logged in), we instead find it is something like this:
nobody:15135454564654
So the session ID is correct, but the username hasn’t been set yet. Looking at the APEX debug logs it’s apparent that the client identifier gets set with the username very soon after the post-login procedure is run – which is a tad inconvenient. However, APP_USER is set to SCOTT prior to the post-login procedure; therefore, my set_session procedure simply replaces “nobody” with v(‘APP_USER’), so that the client_id will agree with the client identifier that will be used from that point on.
That works great – my views, packages and RLS predicates can use SYS_CONTEXT to get context variables with negligible performance impact (remembering that context variables are always strings, so don’t forget to convert your datatypes if necessary).
As an added bonus, as a developer or DBA we can log into the database and diagnose an active session by pretending to be it. For example, Joe sends us an email with a screenshot of an APEX page showing “No Data Found”. When you log into your tool of choice and run the same query, you can see plenty of data. You want your session to pretend to be Joe. To do this, you would get Joe’s username and the session ID from the URL on the APEX page (it’s the 3rd parameter after the f?p= bit in the URL), and run this:
DBMS_SESSION.set_identifier('JOE:18765421554654');
What this does is tell Oracle that your session is Joe’s session. Your session will automatically see the same context variables that Joe’s session currently sees. You run the query again, and you can see that it returns no rows – ah, maybe there’s something wrong with the RLS predicate your application is generating. You now have a testbed under which you can test any change you might want to make in order to resolve the issue (or at least, to be able to tell Joe why he’s not allowed to see any data).
I want a checkbox in an Interactive Report (IR), and I want the users to be able to quickly Select All or Unselect All of them (but only for rows that were rendered on the page). I don’t want two big clunky buttons to do this, I just want a single checkbox in the header like I see on cool peoples’ web sites.

To do this:
1. In the Region Definition for the IR, add the checkbox to the query, e.g.:
SELECT ...,
       apex_item.checkbox(1, record_id) selected
FROM   ...
Also, set the region Static ID to some value, e.g. myreport This will be referred to by the dynamic action.
2. In the Report Attributes for the IR, modify the attributes of column “SELECTED”:
Heading =
<input type="checkbox" id="selectunselectall">
Escape Special Characters = No
Enable Users To = (uncheck all options, including Hide, Sort, etc.)
3. In the page definition, add a Dynamic Action:
Event = Change
Selection Type = jQuery Selector
jQuery Selector = #selectunselectall
Event Scope = Dynamic
Static Container (jQuery Selector) = #myreport
True Action = Execute JavaScript Code
Fire On Page Load = (uncheck)
Code =
if ($('#myreport #selectunselectall' ).is(':checked') ) {
  $('#myreport input[type=checkbox][name=f01]').prop('checked',true);
} else {
  $('#myreport input[type=checkbox][name=f01]').prop('checked',false);
}
The only issue with this is if the user clicks “Action” and “Select Columns”, the checkbox item shows the html code (”
UPDATE 18/5/2017: updated for multiple IRs on same page (APEX 5+)
UPDATE 23/5/2017: updated to recommended prop instead of attr
I want to visually enable/disable certain items in each row of a tabular form depending on the value of another item in that row. I’m using APEX 4.1.
My tabular form has a number of editable fields representing budgets. Each line might be an Annual budget (AMOUNT_TYPE = ‘YEAR’) with a single amount for the year, or a Monthly budget (AMOUNT_TYPE = ‘MONTH’) with separate amounts for each of the twelve months.

The first editable item (internal id f02) is AMOUNT_TYPE which is a Select List with an LOV. The second editable item (internal id f03) is the Annual Amount and should only be enabled if AMOUNT_TYPE = ‘YEAR’. The 3rd, 4th … 14th items (internal ids f04..f15) are the Monthly Amounts and should only be enabled if AMOUNT_TYPE = ‘MONTH’.
To do this:
1. Define a visual style to be applied to items that are disabled.
Add this to the Page’s “HTML Header” attribute:
<style>
.textinputdisabled {
  color:grey;
  background-color:lightgrey;
  text-decoration:line-through;
}
</style>
In this instance, I’ve set the background color to a light grey, the text color to darker grey, and I’ve added a strikethrough effect.
2. Set the class on the AMOUNT_TYPE item
Edit the Column Attributes on the AMOUNT_TYPE column, set Element Attributes to:
class="typeselect"
3. Define the Dynamic Action
Event = Change
Selection Type = jQuery Selector
jQuery Selector = .typeselect
Condition = – No Condition –
True Action = Execute JavaScript Code
Fire On Page Load = yes
Code =
row_id = $(this.triggeringElement ).attr('id').substr(4);
if( $(this.triggeringElement ).val() == 'MONTH')
{
  $( "#f03_" + row_id ).prop( 'readOnly', 'readonly');
  $( "#f03_" + row_id ).prop( 'class', 'textinputdisabled');
  for (var i=4;i<16;i++)
  {
    column_id = ("0" + i).slice(-2);
    $( "#f" + column_id + "_" + row_id ).prop( 'readOnly', false);
    $( "#f" + column_id + "_" + row_id ).prop( 'class', false);
  }
}
else
{
  $( "#f03_" + row_id ).prop( 'readOnly', false);
  $( "#f03_" + row_id ).prop( 'class', false);
  for (var i=4;i<16;i++)
  {
    column_id = ("0" + i).slice(-2);
    $( "#f" + column_id + "_" + row_id ).prop( 'readOnly', 'readonly');
    $( "#f" + column_id + "_" + row_id ).prop( 'class', 'textinputdisabled');
  }
}
The above code first determines the id for the row; $(this.triggeringElement).attr(‘id’) returns ‘f02_nnnn’ where nnnn is the row number left-padded with zeroes. For Oracle peeps, substr(4) is equivalent to SUBSTR(x,5).
If the value of the triggering item is MONTH, we want to disable the Annual amount item and re-enable (in case they were previously disabled) the Month amount items. And vice-versa.
To disable an item, we set the readOnly property (note the capital O: this is case sensitive!) to the value “readonly” (all lowercase); this makes it so that the user cannot modify the value in the field. Note that we don’t set the “disabled” property because that would stop the item being posted to the database, which will break the tabular form processing.
Side Note: at first, I was using the .attr and .removeAttr jquery functions to set/unset readOnly as per some notes I’d found on the web; this worked for Chrome, but it made all the items permanently read-only in IE7; after some googling I found this is a feature, not a bug; and that .prop is the correct function to use in this instance.
We also set the class to the CSS style we defined earlier.
Because I have 12 items in a row to modify, I use a Javascript loop. The expression to generate the column id (“0” + i).slice(-2) does the same job as the Oracle expression TO_CHAR(i, ‘fm00’).
Next, I want to enhance this page further, so that when the user is entering monthly amounts, the Total field automatically calculates the sum of all the months (while still saving the original annual amount, if any, on the database). I had to get outside help [stackoverflow] to get this working.
UPDATE (31/7/2015): to make this work if the tabular form has an “Add Row” button, you need to use a jquery “on” event handler instead of using the Dynamic Action, and refer to the item using just “this” instead of “this.triggeringElement”, e.g. put this into the forms Execute when Page Loads:
$(document).on("change", ".typeselect", function(){
 row_id = $(this).attr('id').substr(4);
 ... etc. ...
});
Recently I had a bit of a saga with a public-facing website running on Oracle APEX (www.foothillschurch.org.au, if you’re curious) getting hammered by Googlebot. We went live with a new version of the site, but I’d forgotten to make sure that all the links set the Session ID to 0 (zero).
What is this session ID?
Every visit to an APEX application needs to have a session. Each unique session is recorded in the database, and keeps track of the state of all the variables for the various pages you visit. Normally, the session is identified by a Session ID which is embedded in the “p” parameter of the URL.
For example, if you visit the page:
http://www.foothillschurch.org.au/apex/f?p=102:1
You’ll notice that the “p” parameter only specifies the app ID (102) and the page ID (1). What apex does is responds with a 302 temporary redirect, that tells the client to redirect to a new URL containing a newly generated session ID, e.g.:
http://www.foothillschurch.org.au/apex/f?p=102:1:45164531548964:::::
Behind the scenes, it’s not just changing the URL – it’s also sending a cookie to the client to be used for subsequent calls. I’ll get back to this later.
Whenever you navigate around a normal apex site, the session ID gets copied into each link so that the user’s session is preserved. If you manually change or remove the session ID from the URL, apex will redirect you to a newly created session ID.
In case you’re wondering, there’s no significant security risk behind the exposed session ID – no-one can “hijack” your session, even if they copy your session ID directly. That’s because there’s a cookie behind the scenes with a secret value that must match up with the session ID, and only someone with sufficient access to the database server could get enough data to do that.
If you store the URL containing a session ID (e.g. in your bookmarks) and re-use it much later, your session will have expired – in which case APEX will create a new session, and 302 temporary redirect you to a new URL with the new session ID. Therefore, users can safely bookmark any page in apex.
But now we come, finally, to Googlebot, that little rascal. Now, we would like our public-facing site to be indexed by Google, so we need all the pages of the site that have relevant info to be crawlable.
The way Googlebot works, normally, is that it starts from a link to your page (e.g. on another website, or in a sitemap you submit to Google), e.g.
http://www.foothillschurch.org.au/apex/f?p=102:1
It checks that the URL is not forbidden by your robots.txt, and sends a request to your server for it. If the response is 200 OK and has a body, Googlebot indexes the page contents, extracts any links from it, and crawls them. Actually, it doesn’t crawl them straight away – it just adds them onto the end of a queue somewhere to be crawled later.
If the response is a 4xx (permanent error) or 5xx (temporary error), Googlebot seems to put the URL back on the queue for a few more goes before it gives up.
If the response is a 3xx redirect, and this is the kicker, Googlebot does not always perform the redirect straight away. It may take the new URL and just add it onto the end of the queue to be crawled later. It seems to me (based on what I’ve seen in my apache logs) that if the URL is different from the first, Googlebot will queue it up for later; but if the URL is identical, it will usually try it straight away.
You may see the problem here: Googlebot visits:
http://www.foothillschurch.org.au/apex/f?p=102:1
Our site creates a session, and responds with a 302 temporary redirect to:
http://www.foothillschurch.org.au/apex/f?p=102:1:48327482923832:::::
Googlebot dutifully notes this new URL and queues it up to crawl later. Meanwhile, our server is waiting patiently for it to get back, but it never does – so the session automatically expires. Much later, Googlebot visits:
http://www.foothillschurch.org.au/apex/f?p=102:1:48327482923832:::::
Our site sees the expired session, creates a new one, and responds with another 302 temporary redirect to:
http://www.foothillschurch.org.au/apex/f?p=102:1:9783829383342:::::
Googlebot dutifully notes this new URL and queues it up to crawl later, etc. etc. etc. Also, it’s not even as benign as that: each URL is not tried just once, but many many times (depending on what speed setting you’ve got the crawler on) – and every single time, our server responds with a brand-new, unique session ID. I hope you can now see why our little site crashed under the load – it quickly filled up the apache logs, it quickly filled up the debug logs in apex, and it quickly overflowed the poorly-configured archive log.
The way to solve this problem is to stop exposing these session IDs in the URL – and in Apex you can do that by setting the session ID to zero, e.g.:
http://www.foothillschurch.org.au/apex/f?p=CHURCH:1:0
Behind the scenes, Apex still creates a session, but whenever it generates a URL with #SESSION# it substitutes zero instead of the internal session ID. This method is great for people who wish to bookmark a page in an application that doesn’t require authentication. It also seems to work for the Googlebot crawler.
The above URL will still cause a 302 temporary redirect, however; apex will redirect it to:
http://www.foothillschurch.org.au/apex/f?p=CHURCH:1:0:::::
You might think that this final URL would stop the redirects, wouldn’t you? Well, it doesn’t. You can see what happens if you open this URL in Google Chrome in incognito mode. First, open an incognito window, then choose the Tools menu, Developer Tools. Select the Network tab. Then, paste the URL into the address bar and press Enter.
You will find that the first call to apex/f receives a 302 (temporary redirect). If you click this entry and choose Headers, you’d see something like this:
Request URL:http://www.foothillschurch.org.au/apex/f?p=CHURCH:1:0:::::
Request Method:GET
Status Code:302 Found
Request Headers:
Accept:text/html,application/xhtml+xml,application/xml;q=0.9,*/*;q=0.8
Accept-Charset:ISO-8859-1,utf-8;q=0.7,*;q=0.3
Accept-Encoding:gzip,deflate,sdch
Accept-Language:en-US,en;q=0.8
Connection:keep-alive
Host:www.foothillschurch.org.au
User-Agent:Mozilla/5.0 (Windows NT 6.1; WOW64) AppleWebKit/535.1 (KHTML, like Gecko) Chrome/14.0.835.187 Safari/535.1
Response Headers:
Cache-Control:max-age=0
Connection:Keep-Alive
Content-Length:0
Content-Type:text/html; charset=UTF-8
Date:Thu, 06 Oct 2011 22:54:10 GMT
Expires:Thu, 06 Oct 2011 22:54:10 GMT
Keep-Alive:timeout=10, max=100
Location:f?p=CHURCH:1:0:::::
Server:Oracle XML DB/Oracle Database
Set-Cookie:WWV_CUSTOM-F_5238514445419534_102=D6E147387BD4C9DA
WWV_PUBLIC_SESSION_102=2140144576372238
X-DB-Content-length:0
Notice that the request sent no cookies, and the response was a 302 including some cookies (WWV_CUSTOM-F_blablabla and WWV_PUBLIC_SESSION_102).
If you click on the next line (the second call to apex/f) and look at the Headers view, you’ll see this interaction instead:
Request URL:http://www.foothillschurch.org.au/apex/f?p=CHURCH:1:0:::::
Request Method:GET
Status Code:200 OK
Request Headers:
Accept:text/html,application/xhtml+xml,application/xml;q=0.9,*/*;q=0.8
Accept-Charset:ISO-8859-1,utf-8;q=0.7,*;q=0.3
Accept-Encoding:gzip,deflate,sdch
Accept-Language:en-US,en;q=0.8
Connection:keep-alive
Cookie:WWV_CUSTOM-F_5238514445419534_102=D6E147387BD4C9DA; WWV_PUBLIC_SESSION_102=2140144576372238
Host:www.foothillschurch.org.au
User-Agent:Mozilla/5.0 (Windows NT 6.1; WOW64) AppleWebKit/535.1 (KHTML, like Gecko) Chrome/14.0.835.187 Safari/535.1
Response Headers:
Cache-Control:max-age=0
Connection:Keep-Alive
Content-Type:text/html; charset=UTF-8
Date:Thu, 06 Oct 2011 22:54:10 GMT
Expires:Thu, 06 Oct 2011 22:54:10 GMT
Keep-Alive:timeout=10, max=99
Server:Oracle XML DB/Oracle Database
Transfer-Encoding:chunked
X-DB-Content-length:11291
This time, the request included the cookies, and the apex engine matched them against a valid and current session; so it responds with the desired 200 (OK) response and the body of the web page.
Gradually, as I was working all this out, I fixed individual problems one by one – turning off debug mode in the application, setting the crawler to a slower speed, and fixing the archive logging. I also added a rel=canonical link in the header of every page. However, the root cause was these URLs being tried by Googlebot, which were quickly escalating as time went by. I didn’t want to use robots.txt to stop it completely, although that might be a valid solution for some cases, because that would remove our Google listing.
I raised a question on the Google webmaster forum to see if there was some way to remove all these URLs from the Googlebot queue that had session IDs. The only way to remove URLs is to (a) add them to your robots.txt, and (b) submit individual URLs to be removed via Google webmaster tools.
In the end, with some help some contributors to the forum, I worked out how to set up Apache to stop these session IDs in their tracks, by doing a 301 (permanent redirect) to a URL with a 0 (zero) session ID. The magic words, added to my apache conf file, were:
RewriteCond %{QUERY_STRING} ^p=102:([a-z0-9]*):([0-9]*):(.*)$ [NC,OR]
RewriteCond %{QUERY_STRING} ^p=CHURCH:([a-z0-9]*):([1-9][0-9]*):(.*)$ [NC]
RewriteRule /apex/f /apex/f?p=CHURCH:%1:0:%3 [R=permanent,L]
What these do is look for any URL with a parameter p where the app ID is 102 or “CHURCH”, and redirects to a new URL that is identical except that it uses the app alias (CHURCH) and sets the session ID to 0.
Breaking it down:
RewriteCond introduces a condition for the following RewriteRule. It’s like an “IF” test.
%{QUERY_STRING} means we want to test the query string (i.e. the part of the URL following the ?).
^p=102:([a-z0-9]*):([0-9]*):(.*)$ this is the regular expression that is used to test for a match. In this case, it is looking for a query string that starts with “p=102:“, followed by a string of letters or digits (the page ID or alias), followed by “:“, followed by a string of digits (the session ID), followed by “:“, and ending with any string of characters. The parts in parentheses – i.e. ([a-z0-9]*) and ([0-9]*) and (.*) will be available for later reuse as substitution variables %1, %2 and %3.
^p=CHURCH:([a-z0-9]*):([1-9][0-9]*):(.*)$ is a similar regular expression, with a slightly different rule for the middle part (the session ID) – it only matches where the session ID is not zero – ([1-9][0-9]*) only matches a string of digits that starts with 1-9. This is because we don’t want our rewrite rule triggering if the app alias is already “CHURCH” and the session ID is already zero.
[NC] “not case sensitive” flag – so that “church” and “Church” will match as well.
[OR] “OR” flag – the condition should be “OR”-ed with the following condition. If either of the RewriteCond directives match, then we want to use the same RewriteRule.
RewriteRule directs the engine to modify the request URI.
/apex/f identifies the part of the request to be rewritten.
/apex/f?p=CHURCH:%1:0:%3 is the rewritten URL. %1 and %3 extract the page ID/alias, and the part of the query string following the session ID, respectively.
[R=permanent] “Redirect” flag – by default this would do a 302 (temporary) redirect, but we have specified “permanent” so that it will do a 301 permanent redirect.
[L] “Last” flag – no further rewrite rules (if any) should be applied.
It works! Everything is now back to sane levels, and I can now enjoy life.
UPDATE Oct 2020
Introduced in APEX 20.1 is the new Friendly URLs option which changes things a lot for this topic – Friendly URLs on a public page no longer require a session ID.
If the page is public and the URL has no session parameter, APEX immediately returns a 200 OK response with the page – which is perfect for Googlebot.
There is officially now no good excuse for not running your own instance of Oracle 11g and getting into APEX 4 development, or just playing with SQL and PL/SQL.
Note: another easy-to-follow guide to this process was published back in April by Alex Gorbachev here: http://www.pythian.com/news/22045/how-to-get-started-with-amazon-ec2-oracle-11g-xe-example/, which may suit your needs – although it is based on an AMI with a beta release of 11gXE pre-installed. Some of the instructions below are virtually identical to his.
1. Gather your software.
You’ll need:
What, no OS, you ask? Nah – the easiest way to get started is to start with an AMI (Amazon Machine Image) that has linux installed.
Install PuTTY and your SCP/SFTP client on your computer, then:
2. Get your Amazon EC2 account.
Go to
http://aws.amazon.com/ and click “Sign Up Now”. You’ll need an EC2 account and you’ll need to give them some credit card details.
Navigate to the Amazon Elastic Compute Cloud (EC2) in the AWS Management Console.
3. Launch Instance.
Click the “Launch Instance” button. Go to “Community AMIs“. Change the “Viewing” filter to “64-bit“. In the search field type “oracle“. You should see a long list of AMIs to choose from. What you’re looking for is an EBS-backed AMI running Oracle Enterprise Linux 5. The actual name and AMI ID will vary from region to region, but in US-East you could use “493731438004/Oracle Linux 5.6 x86_64 – OVM”, AMI ID ami-42778a2b (you could enter this ID into the search field to go directly to it), or if you’re using the Singapore region you could use AMI ID ami-bc2f56ee.
Next, you get to choose the size of the instance. The bigger the machine, the more grunt you get, but also slightly more expensive to run. You could choose Micro, but you might find it a bit slow at times. Of course, there’s nothing stopping you from trying one, and if you don’t like what it offers, just trade up!
On the “Advanced Instance Options” page, accept all the defaults and Continue.
On the next page, you can put a name on your instance if you like. This is just a label, and comes in handy when you run many instances.
On the “Create Key Pair” page, you need to select a Key Pair. You can create one if you don’t already have one.
Enter a name for your key pair, then click “Create & Download your Key Pair“. Make sure you keep the file (it’ll be a .PEM file) in a safe place – if you lose it, you’ll lose access to your instance (in which case you’d just have to terminate it and start again).
The next page is the “Configure Firewall” step, where you select a Security Group. You could create a new one if you like – open up TCP ports 22, 8080 and 1521 so you can upload files, access the Apex web interface, and connect to the database (e.g. from SQL Developer).
On the final page, click “Launch”. After maybe a minute or two, your instance will have been started and running, ready for you to connect to it and do stuff on it:

Here, you can find the following useful information:
Status: this will say “Pending”, “Running”, or some other status.
Public DNS: this is the URL you can use to connect to your instance: in my case, it is ec2-72-44-48-28.compute-1.amazonaws.com.
4. Set up your key pair.
Before you can connect to your instance with PuTTY or your SCP client, you’ll need a PPK file. You generate this from the PEM file you got before. In the folder where PuTTY is installed is a little tool called PUTTYGEN.EXE. Run this, select Conversions -> Import Key, select your PEM file, then click Save Private Key. It might warn you about a passphrase – if you want to protect the key in case someone manages to steal it then you could put one in, but personally I don’t. Save it somewhere safe as a PPK file.
5. Upload the Oracle installer to the instance.
Open WinSCP. Click New. Copy the Public DNS into Host (e.g. ec2-72-44-48-28.compute-1.amazonaws.com). Set User name to root. Leave the Password blank. Select your Private Key file (PPK). Save the settings then click Login. If you get a warning about the “server’s host key not in the cache”, just click “Yes” to continue.
If you get timeout errors, check that port 22 has been open (and your changes saved) on your AWS Security Group.
Upload the Oracle installer (oracle-xe-11.2.0-1.0.x86_64.rpm.zip).
6. Login to your instance.
Open PuTTY. Copy the Public DNS into Host Name, and select your Private Key file (PPK) (this option is tucked away under Connection/SSH/Auth). You can save the session if you want. When you Open the connection, it will prompt for the login. Login as root.
7. Install Oracle.
If you just want to know what to type, here is basically all you need (type the commands after the “#” – don’t type the “#” itself though):
# unzip /root/oracle-xe-11.2.0-1.0.x86_64.rpm.zip
# rpm -ivh /root/Disk1/oracle-xe-11.2.0-1.0.x86_64.rpm
# /etc/init.d/oracle-xe configure
This script will prompt you for the APEX port and the database port – just press Enter to accept the defaults (8080 and 1521, respectively). It will then ask for the password for SYS and SYSTEM. Finally, it will ask you if you want it to run on startup. Accept the default (yes).
8. Disable the firewall.
# chkconfig iptables off
# service iptables stop
This disables the internal firewall running in your linux instance.
9. Log into APEX.
Open your browser and point it at your instance. Take the Public DNS and add :8080/apex/apex_admin, e.g.:
http://ec2-72-44-48-28.compute-1.amazonaws.com:8080/apex/apex_admin
The login name is admin, and the password is (for now) the same password you entered for the SYS and SYSTEM accounts earlier.

It will prompt you to change the password. It has to be a fairly secure – you’ll need at least a letter, number and symbol, and you can’t include the login name. After changing your password, you’ll need to log in again but using the new password.
You now have a fully-fledged Oracle Application Express environment, version 4.0.
10. Create a Workspace.
The last thing you need to do before you can start creating applications and stuff is to create a workspace. Click “Create Workspace” and answer the prompts to create the workspace along with its own schema and admin user account.

Log out of APEX Administration, and log into the newly created workspace – and you will now be able to start creating applications, tables, and what-have-you. You can also use APEX to write code (such as procedures and packages), but I suggest you use Oracle SQL Developer for this kind of thing because it’s a bit more powerful.
From now on, to get back into your APEX development environment, you can use this url:
http://ec2-72-44-48-28.compute-1.amazonaws.com:8080/apex

Have fun!
Oh, by the way: when you’ve had your fun, and you want to stop your instance (which at about 34c/h may cost around $60 per week if you leave it running 24×7), don’t forget to terminate it from AWS Management Console. Before you do, however, you can take a snapshot of it in its current state so you can restore from it later. (Before this, you might want to shut down the Oracle database within the instance first – although I’ve found it quite easy to recover an instance which was snapshotted while the database was up and running). To do that, right-click on the instance in AWS Management Console, and select “Create Image (EBS AMI)”. It may take some time for the image to be created. When the image creation is complete, you can then Terminate the instance. The AMI will take up a bit of storage that will cost a dollar or two per month; and you can now spin up as many copies of your machine whenever you want.
Update:
Lew posted an excellent introduction to PuTTY and SSH for AWS Newbies that I heartily recommend. It was posted in 2009 but still applies.
For a long time my disaster recovery procedure for my Amazon EC2-based web site was:
- Find an Oracle AMI that has 10g XE with APEX pre-installed, and start up an instance with it.
- Create a volume from a backup snapshot and attach it to the new instance.
- Log into the instance, shut down apache and oracle, then delete all the oracle data files, apache config files, and a few other bits and pieces.
- Create symbolic links for the deleted bits and pieces (including the oracle data files) that point to the attached volume.
- Start up oracle and apache and test.
- Switch the elastic IP over to the new instance.
This procedure has been tested and retested multiple times, and came in useful once when I almost lost the site (actually, it just went unresponsive due to some general problems at Amazon, but at the time I thought it’d had gone down).
Last week I logged in to the AWS Management Console to do a routine backup-and-restore test, but discovered a problem: it couldn’t find the Oracle 10g XE AMI. Searches on the image ID and various keywords, across all the Amazon regions, returned no results. Searches on “oracle” brought back a number of options but none of them close to what I required. I enquired with Amazon and they responded that the AMIs are supplied by Oracle and had been removed. I discovered this meant that not only could I not start up an instance using one of these images, I also couldn’t point to my running instance and “start up another like this” – because this requires access to the original AMI that was used to start it.
The machine image which I was trying to find is (at least, as of today 5 Jul 2011) still referred to here: http://aws.amazon.com/amis/Oracle/1720 “Oracle Database 10g Release 2 Express Edition – 32 Bit” so I raised a question on the oracle forum (http://forums.oracle.com/forums/thread.jspa?messageID=9707298�) and sent an email to Bill Hodak at Oracle who was named in the description of the AMI. He replied he would see if he could find out what had happened to it.
At this point I was hoping that my running instance wouldn’t go down, because I didn’t know if I’d be able to restore from backup. My backup consisted solely of snapshots of just the data – the rest of the OS was supposed to be provided by the AMI.
Meanwhile, asam replied to my oracle forum thread, suggesting I create my own AMI. A bit of googling yielded this result, which proved very helpful: http://webkist.wordpress.com/2010/03/16/creating-an-amazon-ec2-ebs-ami-from-a-running-instance/ “Creating an Amazon EC2 EBS AMI from a running instance”. I followed the instructions, slightly modified as follows:
- Use AWS Management Console to create a new volume
- Attach the volume to my running instance and mount it:
# mkdir /u03
# mount -t ext3 /dev/sdf /u03
- Move everything from the old volume so that it all sits under / again instead of via symbolic links
- Synchronize the filesystem to the new volume:
# rsync -a --delete --progress -x / /u03
- When rsync has completed, fix up the devices:
# MAKEDEV -d /u03/dev -x console
# MAKEDEV -d /u03/dev -x zero
# MAKEDEV -d /u03/dev -x null
- Unmount the volume:
# umount /u03
- Get the EC2 X.509 cert and private key from the “Security Credentials” area under “Account” in AWS Management Console.
- Download the Amazon EC2 API tools:
http://aws.amazon.com/developertools/351
- I needed java to run the API tools, so download the rpm:
jre-6u26-linux-i586.rpm – e.g. from http://www.oracle.com/technetwork/java/javase/downloads/jre-6u26-download-400751.html
- Upload the EC2 X.509 cert and private key, the Amazon EC2 API tools, and the java rpm to the instance. Unzip and install the API tools and the java rpm.
- Set up all the required environment variables (replace xxxwith the appropriate bits from the relevant file names):
# export EC2_CERT=/root/cert-xxx.pem
# export EC2_PRIVATE_KEY=/root/pk-xxx.pem
# export EC2_HOME=(path-to-ec2-stuff)
# export JAVA_HOME=(path-to-java-stuff)
# export PATH=$PATH:$EC2_HOME/bin
- Set up a symbolic link so that the EC2 tools can find java:
# ln -s (path-to-java-stuff) /usr/bin/java
- Back in the AWS Management Console, create a snapshot of the volume.
- In the instance, run this command (this is the only command you can’t do in the management console, which is what all that rigmarole about installing the API tools was all about):
# ec2-register --snapshot snap-xxx   --description "my ami description" --name "my ami name"
  --ramdisk ari-yyy --kernel aki-zzz   --region ap-southeast-1
You can get the snapshot, ramdisk and kernel identifiers from the AWS Management Console. (my instance was running in Singapore, so my region is ap-southeast-1)
- Back in AWS Management Console, I see my new AMI has been created. All I have to do now is select it, click Launch Instance, and a copy of my site is up and running.
I startup the database and see if it’s working. Unfortunately it isn’t – a bit more investigation revealed that the Oracle listener was not responding to requests. lsnrctl status reveals that it is still using the old internal IP address from the original instance – but this is a new instance with a different internal IP address.
To fix this, I edit listener.ora to correct the IP:
# cd /usr/lib/oracle/xe/app/oracle/product/10.2.0/server/network/admin
# chmod +w listener.ora
# vi listener.ora
The IP address is listed as the “Private IP Address” on the instance in AWS Management Console.
# lsnrctl start
After that, it’s all working – and very soon I will have a much simpler (and hopefully somewhat less reliant on the kindness of big corporations) disaster recovery process. I just need to work out the simplest way to restore the data from backup to the new instance. I’ll probably just create a new volume from a backup snapshot, attach it to the instance, and copy all the data across.
UPDATE: With an EBS-backed volume, I can now create a new AMI from the running instance whenever I want – it takes a complete snapshot of the instance, from which I can then create new instances. So my disaster recovery procedure is much simpler than it was before 🙂
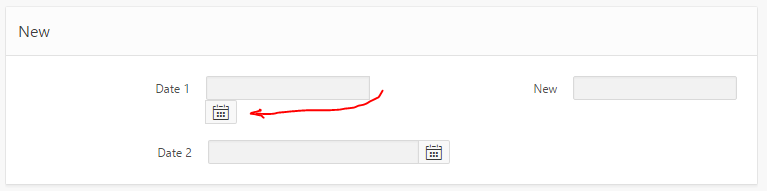
I was playing around with the layout of my APEX form, while at the same time upgrading the date items from the Classic date items to the new Date Picker items, and was rewarded with this:

The simplest way to fix this is to edit the Item, specifically the HTML Table Cell Attributes – set to NOWRAP:

Viola, problem solved:

June 2016: Update for APEX 5 Universal Theme
I was alerted by Evandro Giachetto that the above solution does not work with the Universal Theme in APEX 5.
I had a go at trying to workaround it. I tried adding “white-space:nowrap” to various levels of divs around the item, which stopped it from wrapping the icon, but it kept hiding the icon behind the label div for the next item.
So through the magic of twitter we got a CSS solution proposed by Markus Hohloch:
.t-Form-inputContainer { white-space: nowrap; }
.ui-datepicker-trigger { right: 25px; }
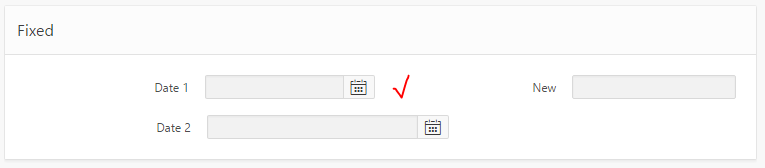
This takes care of the wrapping, and fixes the problem with the icon being hidden. The only downside is that when the screen is very slim, this css causes a gap to be shown on the right-hand side of the icon; this is not too big a deal but I suspect with the right media query syntax that could be fixed as well.
 Whereas APEX 3.2.1 (and earlier, I think) required one of:
- Microsoft Internet Explorer 6.0 or later version
- Firefox 1.0 or later
APEX 4.0 requires:
- Microsoft Internet Explorer 7.0 or later version
- Mozilla Firefox 3.5 or later version
- Google Chrome 4.0 or later version
- Apple Safari 4.0 or later version
While they’ve dropped support for IE 6, it does mention that you can still develop applications that will work perfectly well on the older version. Also, it’s good to see Oracle officially supporting more browsers, including Chrome. I’ve been using Chrome to develop APEX applications for quite a while now, and the only problem I’ve encountered is that the procedure editor wouldn’t work. I’ve tried it in APEX 4.0 using EPG and it seems to work fine – so that’s good. I doubt APEX will ever really replace SQL Developer but it’s already useful for many development and maintenance tasks.
I like the “Vertical Images List” in APEX, which allows me to create a navigation bar of icons to give users quick access to various pages in my site. It’s easy to customise each item – you can select any image, add attributes for the image if necessary, and each item in the list has a URL which can point to another page in the application, or to an arbitrary URL.
My problem, however, was that some of the URLs in my list took the user to another site, or opened a PDF, and these would open in the same window. I wanted these particular items to open a new window, but the navigation item properties don’t allow this.
To solve this, I modified the Vertical Images List template, and used one of the User Defined Attributes to add “target=_blank” to the items that I wanted. While I was in there, I made a few tweaks to customise the template further to my liking.
A. Modify the Vertical Images List template.
- Go to Shared Components and open the Templates (under User Interface).
- Scroll down to Vertical Images List (in the Lists category) and open it for editing.
- Modify the Template Definition (WARNING: the code for different Apex templates may differ slightly; you’ll have to use a bit of nouse to customise it to your requirements) – you can add bits like #A01#, #A02#, etc – in my case I’ve used the following convention:
#A01# = extra text to appear below the icon & link;
#A02# = tooltip text for the hyperlink;
#A03# = extra attributes for the link (HTML <A> tag).
I’ve done this in both the “List Template Current” and “List Template Noncurrent” sections.

For example, for “List Template Noncurrent, I’ve modified the template code as follows:
<tr><td><a href=”#LINK#” TITLE=”#A02#” #A03#>
<img src=”#IMAGE_PREFIX##IMAGE#” #IMAGE_ATTR# />#TEXT#</a>
<BR>#A01#</td></tr>
B. Set User Defined Attributes.
- Open the Navigation List for editing (Shared Components -> Navigation -> Lists).
- Open the list item for editing that you wish to customise (or create a new one).
- In User Defined Attributes, attribute 1, add any text you wish to show beneath the link (but not highlighted as part of the ink)
- For attribute 2, add the title you wish to show up as a tooltip.
- For attribute 3, add the html attribute “target=_blank” if you wish this navigation entry to open a new window when invoked.


This is how it looks in a sample application:

If the user clicks on “Address Book”, the “target=_blank” attribute instructs the browser to open in a new window (or tab, in some cases).
My web site accepts applications for a sports team, and the last step is the applicant needs to print out a form to be signed. To make things as simple as possible, I want this form to send itself to their printer as soon as they open it. Now, I’m not a javascript expert; but instead of googling for the code, I stole it by doing a View Source on Google Mail’s print feature.
To get any APEX page to print when it is opened, all you need to do is add two bits to the page definition:
HTML Header
function Print(){document.body.offsetHeight;window.print()}
Page HTML Body Attribute
onload="Print()"
Isn’t javascript easy? I’m not sure what the “document.body.offsetHeight” is all about but I suspect it’s something to do with waiting for the whole page to load and render before the print starts.


