User-editable Application Setting
A nice addition to APEX release 18.1 is the Application Settings feature. This allows the developer to define one or more configuration values that are relevant to a particular application. In a recent project this feature came in useful.
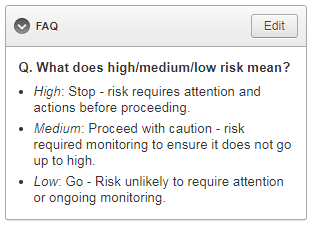
I had built a simple questionnaire/calculator application for a client and they wanted a small “FAQ” box on the left-hand side of the page:
I could have built this as an ordinary HTML region, but the Admin users needed to be able to modify the content later, so the content needed to be stored somewhere. I didn’t feel the users’ requirement was mature enough to design another table to store the boilerplate (not yet, at least), so I thought I’d give the Application Settings feature a go.
An Application Setting is a single value that can be set in Component Settings, and retrieved and modified at runtime via the supplied PL/SQL API (APEX_APP_SETTINGS). The feature is most useful for “configuration”-type data relevant to the application’s user interface. In the past I would have created a special table to store this sort of thing – and in some cases I think I still would – but in some cases using Application Settings may result in a simpler design for your applications.
I went to Shared Components, Application Settings and created a new Setting called “FAQ_BOILERPLATE“. Each Application Setting can have the following attributes configured:
- Name – although this can be almost anything, I suggest using a naming standard similar to how you name tables and columns, to reduce ambiguity if you need to refer to the setting in your PL/SQL.
- Value – at first, you would set this to the initial value; if it is changed, it is updated here. Note that the setting can only have one value at any time, and the value is global for all sessions. The value is limited to 4,000 bytes.
- Value Required – if needed you can make the setting mandatory. In my case, I left this set to “No”.
- Valid Values – if needed you can specify a comma-delimited list of valid values that APEX will validate against. In my case, I left this blank.
- On Upgrade Keep Value – if you deploy the application from Dev to Prod, set this to Yes so that if a user has changed the setting your deployment won’t clobber their changes. On the other hand, set this to No if you want the value reset to the default when the application is deployed. In my case, I set this to Yes.
- Build Option – if needed you can associate the setting with a particular build option. If the build option is disabled, an exception will be raised at runtime if the application setting is accessed.
On the page where I wanted to show the content, I added the following:
- A Static Content region titled “FAQ”.
- A hidden item in the region named “
P10_FAQ_BOILERPLATE“. - A Before Header PL/SQL process.
The Text content for the static content region is:
<div class="boilerplate">
&P10_FAQ_BOILERPLATE!RAW.
</div>
Note that the raw value from the application setting is trusted as it may include some embedded HTML; you would need to ensure that only “safe” HTML is stored in the setting.
The Before Header PL/SQL process has this code:
:P10_FAQ_BOILERPLATE := apex_app_setting.get_value('FAQ_BOILERPLATE');
Side note: a simpler, alternative design (that I started with initially) was just a PL/SQL region titled “FAQ”, with the following code:
htp.p(apex_app_setting.get_value('FAQ_BOILERPLATE'));
I later rejected this design because I wanted to hide the region if the FAQ_BOILERPLATE setting was blank.
I put a Server-side Condition on the FAQ region when “Item is NOT NULL” referring to the “P10_FAQ_BOILERPLATE” item.
Editing an Application Setting
The Edit button is assigned the Authorization Scheme “Admin” so that admin users can edit the FAQ. It redirects to another very simple page with the following components:
- A Rich Text Editor item P50_FAQ_BOILERPLATE, along with Cancel and Save buttons.
- An After Header PL/SQL process “get value” (code below).
- An On Processing PL/SQL process “save value” when the Save button is clicked (code below).
After Header PL/SQL process “get value”:
:P50_FAQ_BOILERPLATE := apex_app_setting.get_value('FAQ_BOILERPLATE');
On Processing PL/SQL process “save value”:
apex_app_setting.set_value('FAQ_BOILERPLATE',:P50_FAQ_BOILERPLATE);
The more APEX-savvy of you may have noticed that this design means that if an Admin user clears out the setting (setting it to NULL), since it has the Server-side Condition on it, the FAQ region will disappear from the page (by design). This also includes the Edit button which would no longer be accessible. In the event this happens, I added another button labelled “Edit FAQ” to the Admin page so they can set it again later if they want.
This was a very simple feature that took less than an hour to build, and was suitable for the purpose. Later, if they find it becomes a bit unwieldy (e.g. if they add many more questions and answers, and need to standardise the layout and formatting) I might replace it with a more complex design – but for now this will do just fine.
Related