I have been working with some code that uses JSON, sometimes fairly large documents of the stuff, and it’s often necessary to send this to the debug log (e.g. DBMS_OUTPUT) for debugging; however, the builtin functions that convert a JSON object to a string (or clob) return the JSON document in one big long line, like this:
To show this formatted, I added the following function using JSON_SERIALIZE with the “PRETTY” option, to my utility package:
function format_json (p_clob in clob) return clob is
    l_blob blob;
    l_clob clob;

    function clob_to_blob(p_clob clob) return blob is
        l_blob blob;
        o1 integer := 1;
        o2 integer := 1;
        c integer := 0;
        w integer := 0;
    begin
        sys.dbms_lob.createtemporary(l_blob, true);
        sys.dbms_lob.converttoblob(l_blob, p_clob, length(p_clob), o1, o2, 0, c, w);
        return l_blob;
    end clob_to_blob;

begin
    l_blob := clob_to_blob(p_clob);
    select JSON_SERIALIZE(l_blob returning clob PRETTY) into l_clob from dual;
    return l_clob;
end format_json;
Note that my function takes a CLOB, not a JSON object, because sometimes I receive the data already as a CLOB and I don’t want to require conversion to JSON before passing it to my formatting function.
If you break out into a sweat reading the title, it probably means that like me, you have had too little exposure to working with timestamps in Oracle.
Until recently I never really had much to do with time zones because I lived in the (now even moreso, due to covid) insular state of Western Australia. In WA most places pretend that there is no such thing as time zones – so our exposure to Oracle data types is limited to simple DATEs and TIMESTAMPs, with nary a time zone in sight. We just set the server time zone to AUSTRALIA/Perth and forget it.
Now I’ve helped build a system that needs to concurrently serve the needs of customers in any time zone – whether in the US, in Africa, or here in Australia. We therefore set the server time zone to UTC and use data types that support time zones, namely:
TIMESTAMP WITH TIME ZONE – for dates and times that need to include the relevant time zone; and
TIMESTAMP WITH LOCAL TIME ZONE – for dates and times of system events (e.g. record audit data) that we want to always be shown as of the session time zone (i.e. UTC), and we don’t care what time zone they were originally created in.
A colleague came to me with the following issue: a business rule needed to check an appointment date/time with the current date; if the appointment was for the prior day, an error message should be shown saying that they were too late for their appointment. A test case was failing and they couldn’t see why.
Here is the code (somewhat obfuscated):
if appointment_time < trunc(current_time) then
    :p1_msg := 'This appointment was for the previous day and has expired.';
end if;
We had used TRUNC here because we want to check if the appointment time was prior to midnight of the current date, from the perspective of the relevant time zone. The values of appointment_time and current_time seemed to indicate it shouldn’t fail:
appointment_time = 05-MAR-2021 07.00.00.000000 AM AUSTRALIA/Perth
current_time     = 05-MAR-2021 06.45.00.000000 AM AUSTRALIA/Perth
We can see that the appointment time and current time are in the same time zone, and the same day – so the tester expected no error message would be shown. (Note that the “current time” here is computed using localtimestamp at the time zone of the record being compared)
After checking that our assumptions were correct (yes, both appointment_time and current_time are TIMESTAMP WITH TIME ZONEs; and yes, they had the values shown above) we ran a query on the database to start testing our assumptions about the logic being run here.
select
    to_timestamp_tz('05-MAR-2021 07.00.00.000000 AM AUSTRALIA/Perth') as appt_time,
    to_timestamp_tz('05-MAR-2021 06.45.00.000000 AM AUSTRALIA/Perth') as current_time
from dual

APPT_TIME    = '05-MAR-2021 07.00.00.000000000 AM AUSTRALIA/PERTH'
CURRENT_TIME = '05-MAR-2021 06.45.00.000000000 AM AUSTRALIA/PERTH'
So far so good. What does an ordinary comparison show for these values?
with q as (
    select
        to_timestamp_tz('05-MAR-2021 07.00.00.000000 AM AUSTRALIA/Perth') as appt_time,
        to_timestamp_tz('05-MAR-2021 06.45.00.000000 AM AUSTRALIA/Perth') as current_time
    from dual)
select
    q.appt_time,
    q.current_time,
    case when q.appt_time < q.current_time then 'FAIL' else 'SUCCESS' end test
from q;

APPT_TIME    = '05-MAR-2021 07.00.00.000000000 AM AUSTRALIA/PERTH'
CURRENT_TIME = '05-MAR-2021 06.45.00.000000000 AM AUSTRALIA/PERTH'
TEST         = 'SUCCESS'
That’s what we expected; the appointment time is not before the current time, so the test is successful. Now, let’s test the expression actually used in our failing code, where the TRUNC has been added:
with q as (
    select
        to_timestamp_tz('05-MAR-2021 07.00.00.000000 AM AUSTRALIA/Perth') as appt_time,
        to_timestamp_tz('05-MAR-2021 06.45.00.000000 AM AUSTRALIA/Perth') as current_time
    from dual)
select
    q.appt_time,
    q.current_time,
    trunc(q.current_time),
    case when q.appt_time < trunc(q.current_time) then 'FAIL' else 'SUCCESS' end test
from q;

APPT_TIME           = '05-MAR-2021 07.00.00.000000000 AM AUSTRALIA/PERTH'
CURRENT_TIME        = '05-MAR-2021 06.45.00.000000000 AM AUSTRALIA/PERTH'
TRUNC(CURRENT_TIME) = '03/05/2021'
TEST                = 'FAIL'
Good: we have reproduced the problem. Now we can try to work out why it is failing. My initial suspicion was that an implicit conversion was causing the issue – perhaps the appointment date was being converted to a DATE prior to the comparison, and was somehow being converted to the UTC time zone, which was the database time zone?
with q as (
    select
        to_timestamp_tz('05-MAR-2021 07.00.00.000000 AM AUSTRALIA/Perth') as appt_time,
        to_timestamp_tz('05-MAR-2021 06.45.00.000000 AM AUSTRALIA/Perth') as current_time
    from dual)
select
    q.appt_time,
    q.current_time,
    cast(q.appt_time as date),
    cast(q.current_time as date)
from q;

APPT_TIME                  = '05-MAR-2021 07.00.00.000000000 AM AUSTRALIA/PERTH'
CURRENT_TIME               = '05-MAR-2021 06.45.00.000000000 AM AUSTRALIA/PERTH'
CAST(APPT_TIME AS DATE)    = '03/05/2021 07:00:00 AM'
CAST(CURRENT_TIME AS DATE) = '03/05/2021 06:45:00 AM'
Nope. When cast to a DATE, both timestamps still fall on the same date. Then I thought, maybe when a DATE is compared with a TIMESTAMP, Oracle first converts the DATE to a TIMESTAMP?
with q as (
    select
        to_timestamp_tz('05-MAR-2021 07.00.00.000000 AM AUSTRALIA/Perth') as appt_time,
        to_timestamp_tz('05-MAR-2021 06.45.00.000000 AM AUSTRALIA/Perth') as current_time
    from dual)
select
    q.appt_time,
    q.current_time,
    cast(trunc(q.current_time) as timestamp with time zone),
    case when q.appt_time < trunc(q.current_time) then 'FAIL' else 'SUCCESS' end test
from q;

APPT_TIME                              = '05-MAR-2021 07.00.00.000000000 AM AUSTRALIA/PERTH'
CURRENT_TIME                           = '05-MAR-2021 06.45.00.000000000 AM AUSTRALIA/PERTH'
CAST(TRUNC(CURRENT_TIME) AS TIMESTAMP) = '05-MAR-2021 12.00.00.000000 AM +00:00'
TEST                                   = 'FAIL'
Ah! Now we can see the cause of our problem. After TRUNCating a timestamp, we have converted it to a DATE (with no timezone information); since Oracle needs to implicitly convert this back to a TIMESTAMP WITH TIME ZONE, it simply slaps the UTC time zone on it. Now, when it is compared with the appointment time, it fails the test because the time is 12am (midnight) versus 7am.
Our original requirement was only to compare the dates involved, not the time of day; if the appointment was on the previous day (in the time zone relevant to the record), the error message should appear. We therefore need to ensure that Oracle performs no implicit conversion, by first converting the appointment time to a DATE:
with q as (
    select
        to_timestamp_tz('05-MAR-2021 07.00.00.000000 AM AUSTRALIA/Perth') as appt_time,
        to_timestamp_tz('05-MAR-2021 06.45.00.000000 AM AUSTRALIA/Perth') as current_time
    from dual)
select
    q.appt_time,
    q.current_time,
    case when cast(q.appt_time as date) < trunc(q.current_time) then 'FAIL' else 'SUCCESS' end test
from q;

APPT_TIME                              = '05-MAR-2021 07.00.00.000000000 AM AUSTRALIA/PERTH'
CURRENT_TIME                           = '05-MAR-2021 06.45.00.000000000 AM AUSTRALIA/PERTH'
TEST                                   = 'SUCCESS'
Our logic therefore should be:
if cast(appointment_time as date) < trunc(current_time) then
    :p1_msg := 'This appointment was for the previous day and has expired.';
end if;
It should be noted that if the tester had done this just an hour later in the day, they would not have noticed this problem – because Perth is +08:00, and the timestamps for the test data were prior to 8am in the morning.
Lesson #1: in any system that deals with timestamps and time zones it’s quite easy for subtle bugs to survive quite a bit of testing.
Lesson #2: when writing any comparison code involving timestamps and time zones, make sure that the data types are identical – and if they aren’t, add code to explicitly convert them first.
In building a code generator I found the need to write a number of helper methods for doing basic modifications of arrays that are indexed by integer – such as appending one array onto another, inserting, and shifting. These arrays represent an ordered sequence of strings (e.g. lines of source code).
I think these would be a useful addition to the language if they were made native – e.g. (new commands in UPPERCASE):
declare
    type str_array_type is table of varchar2(32767)
        index by binary_integer;
    l_lines str_array_type;
    l_new str_array_type;
    l_idx binary_integer;
begin
    .. (some code to fill the arrays here) ..

    -- get a subset of lines
    l_new := l_lines.SLICE(50, 59);

    -- extend l_lines with l_new at the end:
    l_lines.APPEND(l_new);

    -- shift l_lines forwards and insert l_new
    -- at the beginning:
    l_lines.PREPEND(l_new);

    -- insert l_new into l_lines at the given index;
    -- shift any existing lines at that location
    -- forward:
    l_lines.INSERT(l_new, at_idx => 21);

    -- remove the given range of indices from
    -- l_lines, replace with whatever is in l_new:
    l_lines.UPDATE(l_new,
        from_idx => 120,
        to_idx   => 149);

    -- apply the given substitution on each line
    l_lines.REPLACE_ALL(
        old_val => 'foo',
        new_val => 'bar');

    -- shift the given range of lines by the given
    -- offset (raise exception if existing data
    -- would get overwritten):
    l_lines.SHIFT(
        from_idx => 20,
        to_idx   => 29,
        offset   => 1000);

    -- shift and renumber all indices in the array
    -- with the given starting index and increment:
    l_lines.RENUMBER(start_idx => 10, increment => 10);

    -- make the array contiguous (i.e. remove gaps):
    l_lines.RENUMBER;

    -- loop over every line in the array that contains
    -- the given string:
    l_idx := l_lines.FIND_NEXT(contains => 'hello');
    loop
        exit when l_idx is null;
        .. do something with l_lines(l_idx) ..
        l_idx := l_lines.FIND_NEXT(contains => 'hello',
            from_idx => l_idx);
    end loop;
end;
I’ve illustrated these with a little sample package that may be viewed here:
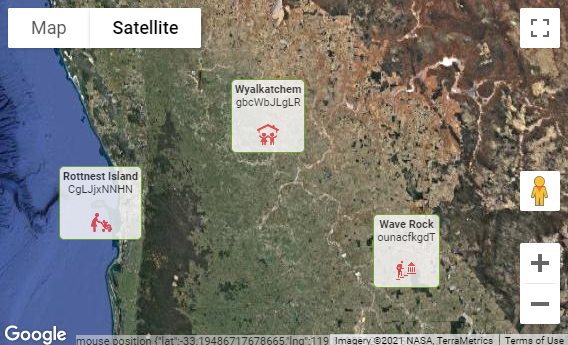
The plugin now supports Overlays, which allows you to add almost any arbitrary HTML or image content to particular points on the map. For example, instead of showing the default red pin, you might want to show a pretty Information card at a location. The cards are clickable as well, and you can use a dynamic action to make your app respond however you wish.
You can even show an image as a map overlay, which will be scaled automatically as the user zooms and pans the map.
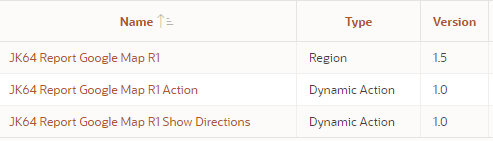
In the previous release I added a companion Dynamic Action “Action” plugin that allows you to declaratively perform actions on the map. This release fixes a few bugs in that plugin, and also adds a new, second companion Dynamic Action plugin: Show Directions. This plugin allows you to invoke the Directions API on the map between one location and a destination without needing to write JavaScript. The locations may be specified with static values (lat,lng coordinates or addresses), from items on your page, JavaScript expressions, or jQuery selectors. The travel mode (e.g. driving, bicycling, etc.) can also be specified the same way.
The Australian Oracle User Group is hosting a series of webinars this year and on 17 February I’ll be speaking about how to add an interactive Google Map to your APEX application. If you’re using APEX and want to see how easy it can be to integrate Google Map capabilities into your application, this is for you.
My session is at 9am in Perth time (1am UTC) – which is:
One of the nice things about PL/SQL is that it implements short circuit evaluation, a performance enhancement which takes advantage of the fact that an expression using logical AND or OR does not necessarily to evaluate both operands to determine the overall result.
For an expression using AND, if the first operand is not TRUE, the overall expression cannot be TRUE; for one using OR, if the first operand is TRUE, the overall expression must be TRUE. In the case of AND, what if the first operand is Unknown? It seems to depend on how the expression is used.
In my examples below, I have an expression that looks up an array. When an array is accessed with a key that is null, it will raise an exception. If short circuit evaluation is applied, the array is never accessed so the exception is not raised.
In the first example below, the PL/SQL engine never evaluates the second expression since the first expression ('abc' = p_param) is not TRUE:
declare
    p_param varchar2(10);
    l_result boolean := false;
    l_arr apex_t_varchar2;
begin
    if 'abc' = p_param and l_arr(p_param) = 'bla' then
        l_result := true;
    end if;
end;
This does not apply if the expression is being assigned to a variable. In the second example below, the exception ORA-06502: PL/SQL: numeric or value error: NULL index table key value is raised:
declare
    p_param varchar2(10);
    l_result boolean;
    l_arr apex_t_varchar2;
begin
    l_result := 'abc' = p_param and l_arr(p_param) = 'bla';
end;
If the first expression were to result in FALSE, it runs without error. If the first expression is Unknown (NULL), the second operand must be evaluated to determine whether to assign FALSE or NULL to the result.
A workaround is to use an IF statement to make the evaluation order explicit:
declare
    p_param varchar2(10);
    l_result boolean := false;
    l_arr apex_t_varchar2;
begin
    if 'abc' = p_param then
        l_result := l_arr(p_param) = 'bla';
    end if;
end;
Thanks to Connor for clearing up my understanding for this one.
8/10/2020 updated with better example code – instead of comparing to a literal null (which is never right), we compare to a variable which may or may not be null at runtime.
Need to run DBMS_MVIEW.explain_mview in APEX SQL Workshop, but don’t have the MV_CAPABILITIES_TABLE? You’ll get this error:
ORA-30377: table ORDS_PUBLIC_USER.MV_CAPABILITIES_TABLE not found
You don’t need to create this table. You could create this table by running admin/utlxmv.sql (if you have it). Instead, you can get the output in an array and do whatever you want with its contents, e.g.:
declare
    a sys.ExplainMVArrayType;
begin
    dbms_mview.explain_mview('MY_MV',a);
    dbms_output.put_line('Explain MV '
        || a(1).mvowner || '.' || a(1).mvname);
    for i in 1..a.count loop
        dbms_output.put_line(
            rpad(a(i).capability_name, 30)
            || ' [' || case a(i).possible
                       when 'T' then 'TRUE'
                       when 'F' then 'FALSE'
                       else a(i).possible
                       end || ']'
            || case when a(i).related_num != 0 then
                   ' ' || a(i).related_text
                   || ' (' || a(i).related_num || ')'
               end
            || case when a(i).msgno != 0 then
                   ' ' || a(i).msgtxt
                   || ' (' || a(i).msgno || ')'
               end
        );
    end loop;
end;
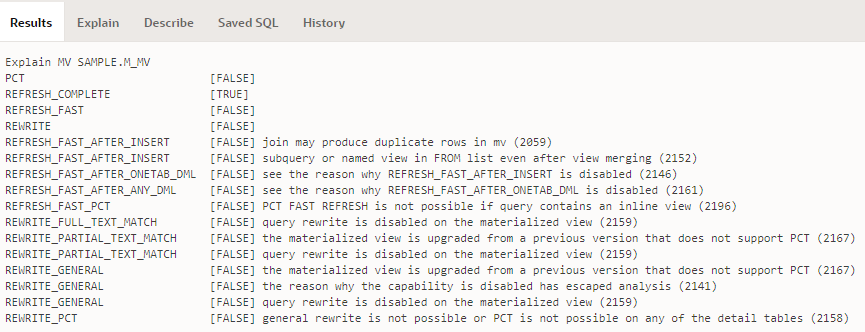
The result will be something like this:
Now, the challenge is merely how to resolve some of those “FALSEs” …
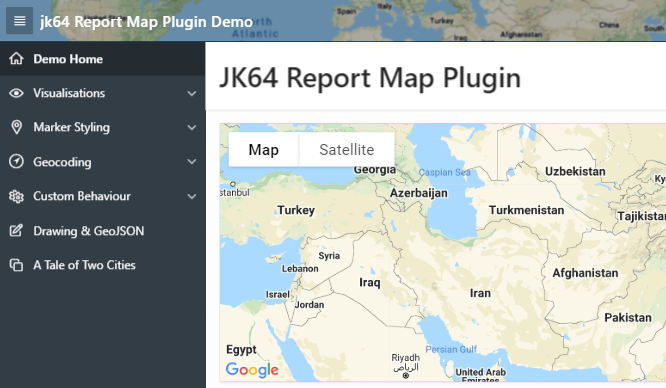
The Dynamic Action plugin, called JK64 Report Google Map R1 Action, allows you to implement any of a range of custom behaviours on your map region. If installed, you can make the map respond to user behaviour or other events without needing to resort to writing your own custom JavaScript.
You can add a dynamic action to modify a variety of options and attributes of the map, execute searches, pan and zoom, load features via geoJson, and more – and these can be based on the value of items on your page, or via JavaScript expressions that you specify.
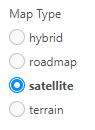
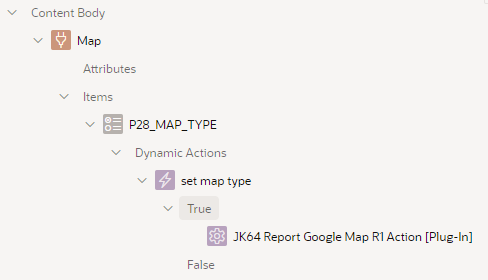
This is implemented as a radio item with a dynamic action on the Change event:
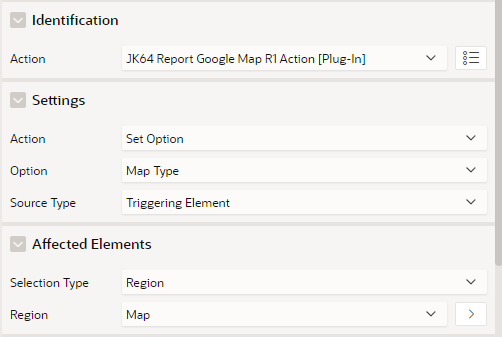
The dynamic action has the following attributes:
Note that in this case, it sets an Option – Map Type, based on the triggering element (the P28_MAP_TYPE item). The Affected Elements is required, and must refer to the map region that we want to change.
Notice anything missing? That’s right – No Code needed!
The plugin makes it easy to customise which of the default Google Map controls (buttons, etc.) are shown to the user:
Full Screen control
Map Type control
Rotate control
Scale control
Street View Pegman control
Zoom control
Other options that can be set include:
Clickable Icons
Disable default UI
Gesture Handling
Heading
Keyboard shortcuts
Map Type
Maximum Zoom level
Minimum Zoom level
Restrict search to Country
Styles
Tilt
Zoom level
In addition, the plugin allows you to restrict the map to a set of bounds, via the Restrict to Bounds or Restrict to Bounds Strict Mode actions.
Another enhancement included in this release is explicit support for the Table / View data source. This is simple to use, although not quite as flexible as the SQL Query option. Your table or view must include columns with the correct column names expected by the selected Visualisation – for example, if your Visualisation is Pins, the table or view must have columns named lat, lng, name and id. Click the Help tab on Table Name for more details, or review the WIKI (https://github.com/jeffreykemp/jk64-plugin-reportmap/wiki/SQL-Query-Examples).
NOTE: the plugin supports APEX 18.2 and later. It is no longer planned to include backports for older versions of APEX.
A big thanks to many APEX developers around the world who have installed and used the map plugin over the years. Your suggestions, questions and bug reports have contributed a great deal to improving the plugin.
Sometimes we can too quickly say “No” when we should take a moment to think about whether we can actually say “Yes”. This was one of those times for me.
We had just gone live with a fairly big system move + upgrade – a suite of APEX applications shifted from one database instance running APEX 5 to another instance running version 19.1. The migration went smoothly. After the new instance was released to the business to do some final shakedown testing, they noticed one problem:
“All our saved reports are gone.”
Oops. We had built the new instance by simply importing each application from source control; since these scripts don’t include the Saved Report formats that users had customised in many of the Interactive Reports in prod, they didn’t get migrated to the new database.
When they asked if we can transfer the saved reports across, I initially replied, “Sorry, we can’t” – thinking that redoing the migration from scratch with a full export from the old database, followed by re-doing all the app changes, was going to take too much time and effort.
A minute later, I sent another email. “Hold that thought – there is a way.” I’d forgotten that my script for exporting the applications uses an APEX API with some parameters that until now I’d rarely used, but which would solve our problem. My script included this:
I call this the “Yes” script. Using this “Yes” script, we performed the following steps:
Log into the schema on the old database (we hadn’t shut it down yet, thankfully – we’d just locked the schemas and set all the applications to “Unavailable”)
Run the “Yes” script. Rename the resulting export files, e.g. f100_ir.sql, f110_ir.sql, etc.
Log into the new database.
Run the IR scripts (f100_ir.sql, etc.). This reverted all the applications to their old versions, but they included all the user’s saved reports.
Re-import the new versions of the applications from source control. This upgraded all the applications, leaving the user’s saved reports intact.
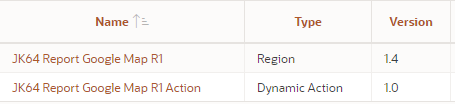
Version 1.2 of the ReportMap Google Map plugin has been released today. While the rest of you have been idling away under Covid-19 restrictions, I’ve been happy as a clam working on some exciting enhancements to the plugin.
Included in this release are the following new features:
New visualisation: Spidifier
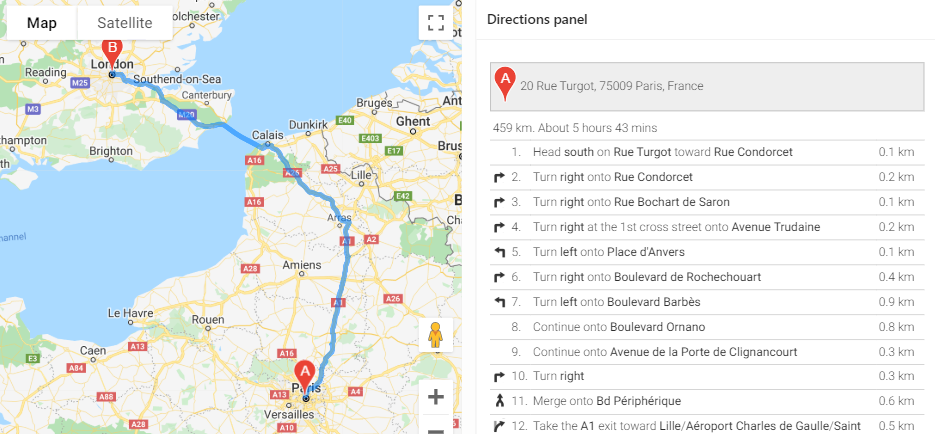
Show turn-by-turn Directions
Customise each Marker with your own JavaScript function
Load large data sets in batches
Show spinner while data is loading
Localisation options
A bug when the new Friendly URLs feature of Oracle APEX 20.1 is used with the Clustering visualisation has also been fixed in this release.
The full list of enhancements and bugfixes, with links to the issues register, may be viewed here.
If you use the Directions or Route Map options, you can now show the turn-by-turn directions on your page, anywhere you want.
The documentation has been updated. The plugin now has four new plugin attributes, as well as a number of other attributes that can be set via JavaScript (the officially supported ones are documented on the plugin attributes page). Three new plugin events have also been added to support the new features.
Spiderfier
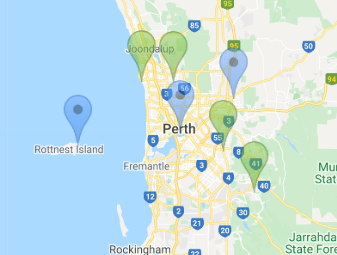
If you have a map that needs to show a lot of pins, especially ones that are close together, the plugin previously had the option of Clustering them at high zoom levels. The user could click on a cluster to zoom in enough to show the individual pins. One weakness of this approach is that if one or more pins are almost (or exactly) overlapping, the cluster never “unclusters” – the user cannot zoom in far enough to get the pins to show individually.
This release provides another Visualisation option, Spiderfier. This uses the OverlappingMarkerSpiderfier to control how pins react when clicked. When the user clicks a pin that is close or overlapping with other pins, it shifts the pins in that area into a ring, or a spiral (depending on how many pins are there) with lines pointing back to their original location. It also colours them blue to indicate they’ve been “spiderfied”. The user can then hover and click each marker separately.
If the user zooms in, the Spiderfier automatically returns all the pins to their original location.
I think the defaults I’ve set work reasonably well. If needed, you can customise the Spiderfier by setting its options via the JavaScript Initialisation Code (refer to “spiderfier options” here for details). You can also provide your own formatting function to change how the markers look when they are “spiderfied”.
Marker Icons
The WIKI has been augmented with a handy guide to Map Icons. The plugin has long supported the ability to specify custom images for the marker icons. This release gives a whole lot more control over the markers to the developer:
If all the icons in the query are being loaded from the same location, you can now set the iconBasePath option once and just have a relative icon file name in the query. When there is a lot of data to show in the map, this can significantly reduce the volume of data loaded to the client, which can lead to a significant performance improvement.
The developer can now supply a custom JavaScript function (via the markerFormatFn option) to format each marker using whatever logic they need.
For example, if the marker icon needs to be different according to some data value, you can send the data via one of the flex fields, and then write your custom function to set the marker icon depending on the value of the flex field.
You could also modify other characteristics of the marker, such as the title (hover text), info text (popup window), icon anchor point, opacity, and even position (although usually I’d expect your query would provide the correct lat/lng coordinates).
If you have a large number of custom icons you wish to use, along with a large data set of pins to render on the map, you could even compile the icons into a single sprite map to reduce network overhead. This means the image file is loaded once to the client, and then the map “cuts out” bits of the sprite map to render the marker icons. This can be done by setting just a few attributes of the marker’s Icon object. I haven’t tried it myself yet, but this tool looks like it would be useful for this purpose.
Loading Large Datasets
This release adds the Show Spinner and the Rows Per Batch attributes. These attributes are independent of each other, and they help to improve the quality of the experience for your end users when you are rendering a large number of pins on the map.
By default, new maps will have Show Spinner set on. For any existing maps, after upgrading you can turn this option on by setting it in the plugin attributes. This option causes the map to show the default APEX spinner while the data is loaded. The spinner is then removed when the last marker has been rendered. The effect is to give the user an indication that the map is “working”, and gives them immediate feedback when the data has finished loading and they may now interact with the map.
If the spinner seems to stay forever, it may indicate an issue with connectivity to the server (or perhaps that the server is under severe load or has stopped responding to requests).
When the APEX page has been rendered on the client, the Google Map is shown but the data is not immediately loaded; instead, a separate AJAX request is sent to the server to run your query and download all the data to render the pins on the map. By default, this is all done in one single AJAX call, which is the fastest way to get from start to finish; the downside is that the user will not see any pins on the map until all the data has been downloaded. You can change this behaviour by setting Rows Per Batch to some number (e.g. 1000). With this attribute set, the plugin will send a series of AJAX calls to the database (one at a time) and get a batch of records at a time. After loading a batch, the plugin will render the pins on the map (and if necessary, it will pan / zoom the map to show them all) and then send another AJAX request to get the next batch. When it has finished receiving all the batches, it adds any finishing touches needed (e.g. for a visualisation) and returns control to the user.
The advantage of this approach is that the user can see the pins being shown gradually, and they will know that “something is working”. This may help to give them a nicer user experience.
The downside of this approach is that it may cause a bigger load on the server (because each AJAX request requires running a new query, with an offset) and will usually take longer from start to finish. Generally, if your data comprises only a few hundred records at most, you will probably want to leave the Rows Per Batch setting blank.
The Future
There are still a few little enhancements on my “todo” list, but I’m keen to hear how you are using (or perhaps planning to use) this plugin, and if there are any new features or improvements that you need or want. If so, please raise them on the GitHub Issues page.
Quite a few people have raised questions or ideas in the past and sometimes I’ve incorporated them straight away, and other times it’s taken a little longer but I get there eventually. If you’re keen to contribute, feel free to have a poke around in the code and perhaps even do a pull request on the GitHub source to suggest a change. It would be great to collaborate with you because everyone has something unique to offer.
Long-term, I’m watching with interest the future direction of Oracle APEX. I remember at one point they were talking about incorporating some sort of new map region into the product, although the mention of this seems to have been dropped from the Statement of Direction (or maybe my memory is misleading me). I guess time will tell.